Graigar MD-5090
MD-5090 Gold Detector User Manual
Model: MD-5090 | Brand: Graigar
1. Introduction
The Graigar MD-5090 metal detector is designed for individuals seeking an effective entry-level device for metal detection. This versatile and user-friendly detector allows you to search for various metal objects, including coins, relics, jewelry, gold, and silver, in diverse environments.
Its primary application is detecting metal objects buried underground, making it suitable for security checks, treasure hunting, and material inspection.

Figure 1.1: Graigar MD-5090 Gold Detector and accessories.
This image displays the main MD-5090 metal detector unit, along with a small hand shovel and a small hand rake, which are typically included accessories.
2. Safety Information
- Always read and understand this manual before operating the detector.
- Do not operate the detector near live electrical lines or buried utility cables. Always check local regulations and obtain permission before searching.
- Use only the specified battery type (2 x 9V 6F22 batteries). Ensure correct polarity when inserting batteries.
- Remove batteries if the detector will not be used for an extended period to prevent leakage.
- Keep the control box dry. While the search coil is waterproof, the control box is not.
- Avoid exposing the detector to extreme temperatures.
- Dispose of batteries and electronic components responsibly according to local regulations.
3. Package Contents
Upon opening the package, verify that all components are present and in good condition:
- MD-5090 Metal Detector Unit (Control Box, Stem, Search Coil)
- Arm Rest
- Small Shovel
- Small Rake
- User Manual
4. Product Overview
4.1 Control Box Features

Figure 4.1: Control Box Layout and Functions.
This image illustrates the control panel of the MD-5090, highlighting key features such as the View Meter, SENS (Sensitivity), DISC (Discrimination), VOLUME, LOW BAT indicator, EAR (Earphone Jack), and POWER OFF switch.
- View Meter and Pointer: The meter pointer swings to the right when metal is detected, indicating the presence of a target.
- SENS (Sensitivity): This knob controls the detector's sensitivity to metal objects and also functions as the power switch.
- DISC (Discrimination Control): Used to discriminate between different types of metals, allowing you to ignore unwanted metals.
- VOLUME: Adjusts the audio level for both the internal speaker and connected headphones.
- LOW BAT: An indicator light that illuminates when the batteries are low and need replacement.
- EAR (Earphone Jack): A 3.5mm jack for connecting headphones (not supplied). When headphones are plugged in, the internal speaker is automatically disconnected.
- POWER OFF: Turns the detector off.
4.2 Main Components

Figure 4.2: Main Components of the MD-5090.
This diagram labels the primary parts of the metal detector, including the Search Coil, Lock Nut, Knob, Up Rod, Battery Holder, Display Screen, and Arm Rest.
- Handle: Ergonomically designed for comfortable and anti-slip grip.
- Battery Bay: Located within the control box, designed to hold two 9V batteries.
- Waterproof Search Coil: The 6.5-inch search coil is waterproof, allowing for detection in shallow water.
- Adjustable Stem: The length of the detector's stem can be adjusted to suit different user heights and preferences.
- Arm Rest: Provides support and comfort during extended use.
5. Setup
5.1 Assembly
- Attach the search coil to the lower stem using the provided knob and lock nut.
- Connect the lower stem to the middle stem, and then connect the middle stem to the upper stem (which includes the control box and arm rest). Secure all connections.
- Wrap the search coil cable around the stem, ensuring it is snug but not overly tight, and plug the connector into the corresponding jack on the control box.

Figure 5.1: Fully Assembled MD-5090 Metal Detector.
This image shows the metal detector fully assembled, ready for use, illustrating the connection points of the stem and search coil.
5.2 Battery Installation
- Locate the battery compartment on the control box.
- Open the battery compartment cover.
- Insert two 9V (6F22) batteries, ensuring correct polarity (+ and -).
- Close the battery compartment cover securely.
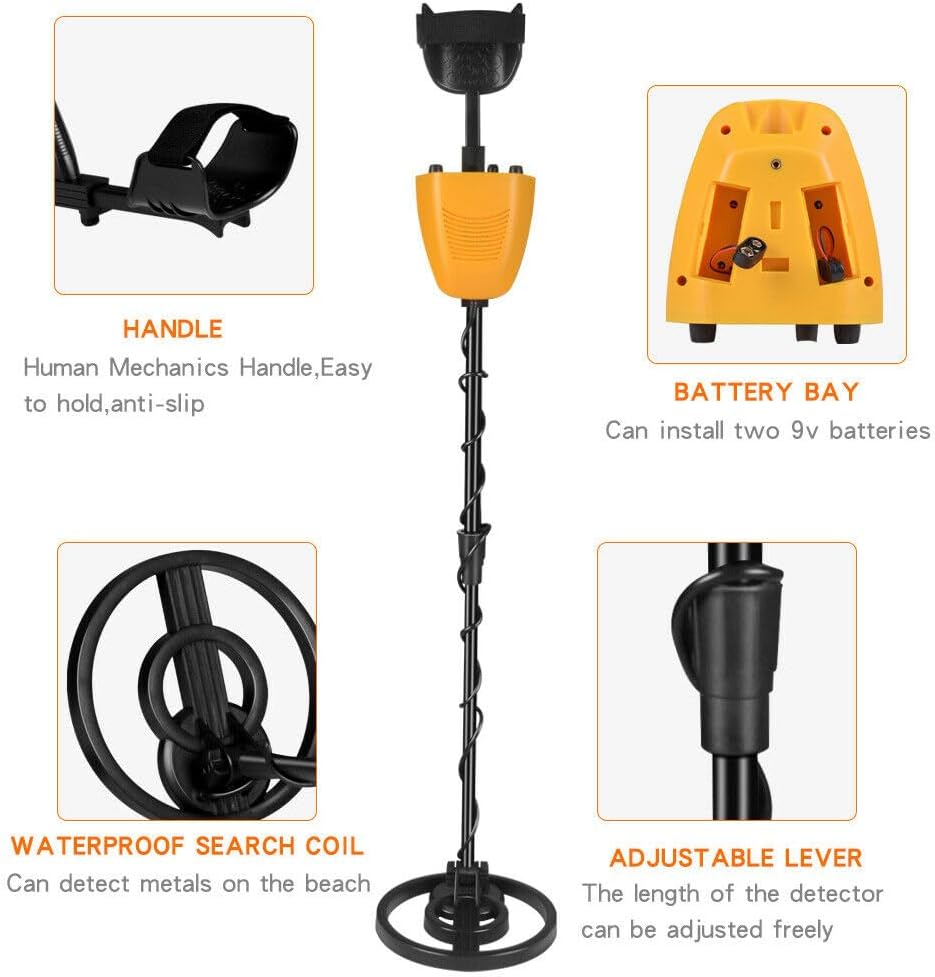
Figure 5.2: Battery Bay Location.
This image highlights the battery bay within the control unit, along with the ergonomic handle, waterproof search coil, and adjustable lever.
5.3 Adjusting Detector Length
The detector's stem is adjustable to accommodate users of different heights, from children to adults. Loosen the locking collar on the stem, extend or retract the stem to the desired length, and then tighten the locking collar to secure it.

Figure 5.3: Adjustable Stem for Various Users.
This image demonstrates the adjustable stem feature, showing both an adult and a child comfortably using the MD-5090 metal detector on a beach, highlighting its adaptability for different user heights.
6. Operating Instructions
6.1 Powering On/Off
To power on the detector, rotate the SENS knob clockwise until you hear a click. To power off, rotate the SENS knob counter-clockwise until it clicks off.
6.2 Operation Modes
The MD-5090 offers two primary operation modes:
- All Metal Mode: In this mode, the detector will respond to all types of metal objects. This is ideal for general searching when you want to find any metal.
- DISC (Discrimination) Mode: This mode allows you to discriminate between ferrous (iron) and non-ferrous metals. By adjusting the DISC knob, you can filter out unwanted junk metals and focus on more valuable targets.
6.3 Adjusting Sensitivity (SENS)
The SENS knob controls the detector's sensitivity. Higher sensitivity settings allow the detector to find smaller or deeper objects, but may also increase false signals from ground mineralization or electrical interference. Start with a medium sensitivity and adjust as needed for your search environment.
6.4 Adjusting Volume
Rotate the VOLUME knob to increase or decrease the audio output from the internal speaker or connected headphones.
6.5 Using the View Meter and Audio Indication
When a metal object is detected, the meter pointer will swing to the right, and an audible tone will be emitted. The strength of the signal (how far the pointer swings and the loudness of the tone) can indicate the size and proximity of the target.
The detector provides a single tone audio indication. Ferrous and non-ferrous metals can be distinguished using the DISC mode and observing the meter's response.
6.6 Using Headphones
For better target identification and to conserve battery life, plug 3.5mm headphones into the EAR jack. This will automatically mute the internal speaker.
6.7 Sweeping Technique
Hold the detector with the search coil parallel to the ground, about 1-2 inches above the surface. Sweep the coil slowly from side to side in overlapping arcs. Maintain a consistent height and speed for optimal detection.
Video 6.1: MD-5090 Gold Detector in Operation.
This video demonstrates the Graigar MD-5090 metal detector in use, showcasing its assembly, control adjustments, and sweeping motion for detecting metal objects. It provides a visual guide to the detector's functionality and user interaction.
7. Maintenance and Care
- Cleaning: After each use, wipe down the search coil and stem with a damp cloth. Avoid using abrasive cleaners or solvents. Keep the control box clean and dry.
- Storage: Store the detector in a cool, dry place when not in use. If storing for an extended period, remove the batteries.
- Battery Care: Replace batteries when the LOW BAT indicator illuminates. Always use fresh batteries of the specified type.
- Coil Protection: While the search coil is waterproof, avoid submerging the control box. Do not drag the search coil directly on rough surfaces to prevent wear.
8. Troubleshooting
| Problem | Possible Cause | Solution |
|---|---|---|
| No power/No response | Batteries are dead or incorrectly installed. | Check battery polarity; replace with fresh 9V batteries. |
| Constant false signals/Chattering | High sensitivity setting; electrical interference; ground mineralization. | Reduce SENS setting; move away from power lines/electronics; lift coil slightly. |
| Detector not finding metal | Low sensitivity; incorrect mode; coil not parallel to ground. | Increase SENS; ensure "All Metal" mode is selected or DISC is set appropriately; maintain proper sweeping technique. |
| Weak or inconsistent signal | Low batteries; loose coil cable connection. | Replace batteries; ensure coil cable is securely plugged in. |
9. Specifications
| Feature | Detail |
|---|---|
| Model | MD-5090 |
| Brand | Graigar |
| Power Supply | 2 x 9V (6F22) batteries |
| Sensitivity | >15cm (for a US quarter) |
| Operation Modes | All Metal, Discrimination (DISC) |
| Search Coil Diameter | 6.5 inches (Waterproof) |
| Audio Output | One Tone |
| Detected Indication | Mechanical Mode (View Meter); Sound Mode |
| Battery Condition Indicator | Yes (LOW BAT light) |
| Distinction | Ferrous and non-ferrous |
| Material | Plastic, Metal |
| Color | Black & Yellow |
| Item Weight | 3.3 Pounds |
| Product Dimensions | 9.8"L x 3.74"W x 16.9"H (packed) |
| Extended Length | Up to 5 Feet |
| Adjustable Length | Yes |
| International Protection Rating | IP65 (Search Coil) |
| Operating Frequency | 5.8 kHz |
| UPC | 707457448262 |

Figure 9.1: MD-5090 Dimensions.
This image provides visual measurements for the MD-5090 metal detector, showing its extended length (1130mm/44.49in), collapsed length (830mm/32.68in), and search coil diameter (200mm/7.87in).
10. Warranty Information
The Graigar MD-5090 Metal Detector comes with a 1-year warranty from the date of purchase. This warranty covers manufacturing defects and malfunctions under normal use. Please retain your proof of purchase for warranty claims. The warranty does not cover damage caused by misuse, accidents, unauthorized modifications, or failure to follow the instructions in this manual.
11. Customer Support
For technical assistance, troubleshooting beyond this manual, or warranty inquiries, please contact Graigar customer support. Refer to the contact information provided with your product packaging or visit the official Graigar website for the most up-to-date support details.
Brand: Graigar
Related Documents - MD-5090
 |
SUNPOW Foldable Metal Detector User Manual This document provides instructions and specifications for the SUNPOW Foldable Metal Detector for Adults, a professional, waterproof, and adjustable metal detector with an LCD display, 11-inch search coil, and 5 modes. |
 |
MD-4090 Metal Detector User Manual: Features, Operation, and Maintenance Comprehensive user manual for the TIANXUN MD-4090 metal detector. Learn about its features, assembly, operation, testing, target indications, and maintenance for finding coins, relics, jewelry, gold, and silver. |
 |
MIYAY MD-820 Metal Detector User Manual Comprehensive user manual for the MIYAY MD-820 metal detector, covering assembly, operation, features, and maintenance. Learn how to find coins, relics, jewelry, gold, and silver with this versatile device. |
 |
SUNPOW OT-MD03 Metal Detector User Manual for Adults & Kids Comprehensive user manual for the SUNPOW OT-MD03 Metal Detector. Learn how to use this high-accuracy device, featuring an LCD display, pinpoint function, DISC mode, and a waterproof search coil, for metal detecting adventures. |
 |
VEVOR TS181A Metal Detector User Manual Comprehensive user manual for the VEVOR TS181A Metal Detector, covering features, technical specifications, display understanding, and assembly instructions for effective metal detection. |
 |
MD-3028 LCD Display Underground Metal Detector - Features & Specifications Detailed overview of the MD-3028 LCD Display Underground Metal Detector, including its features, specifications, and package details for accurate metal detection in various applications. |
Ask a question about this manual
Ask about setup, troubleshooting, compatibility, parts, safety, or missing instructions. Manuals+ will review the question and use this page’s manual context to help answer it.