Introduction
This manual provides detailed instructions for the installation, operation, maintenance, and troubleshooting of your SOZT Commercial Ice Maker Machine, Model SLM36T. Please read this manual thoroughly before operating the appliance to ensure safe and efficient use. Retain this manual for future reference.

Image: Overview of the SOZT Commercial Ice Maker Machine SLM36T, showing its main components and accessories.
Important Safety Instructions
To reduce the risk of fire, electric shock, or injury when using your ice maker, follow these basic precautions:
- Read all instructions before use.
- Connect to potable water supply only.
- Ensure the power outlet is properly grounded.
- Do not immerse the power cord, plug, or any part of the appliance in water or other liquids.
- Unplug the appliance before cleaning, servicing, or when not in use.
- Do not operate any appliance with a damaged cord or plug, or after the appliance malfunctions or has been damaged in any manner.
- Keep children away from the ice maker.
- Do not use outdoors.
- Do not block ventilation openings.
- Use only manufacturer-recommended attachments.
- Do not store explosive substances such as aerosol cans with a flammable propellant in this appliance.
Product Features
- High Ice Production: Produces up to 100 lbs of ice per 24 hours, with 36 clear ice cubes per cycle in 6 to 15 minutes.
- Integrated Storage Bin: Features a 20 lbs capacity ice storage bin.
- Dual Water Inlet Modes: Supports both gallon bottled water and direct faucet water connections for continuous operation.
- Adjustable Ice Thickness: Customize ice cube thickness to suit various needs (thin, medium, thick).
- Advanced LCD Control Panel: User-friendly interface with functions for 24-hour reservation, automatic self-cleaning, malfunction alerts, built-in blue light, and defrosting.
- Durable Construction: Heavy-duty stainless steel exterior with integral thickened foam insulation and a food-grade PP liner for hygiene.
- Space-Efficient Design: Compact dimensions (13.5"D x 13.2"W x 26.4"H) suitable for undercounter or freestanding placement.

Image: Illustration of the ice maker's high production capacity and speed.

Image: Detailed view of design elements including the flip door, water intake, ventilation, and adjustable feet.
Setup and Installation
1. Unpacking and Placement
- Remove all packaging materials. Inspect the unit for any damage.
- Place the ice maker on a flat, stable surface. Ensure adequate ventilation around the unit.
- Allow the unit to stand upright for at least 24 hours before plugging it in to allow compressor fluids to settle.

Image: Examples of undercounter and freestanding installation options for the ice maker.
2. Water Connection
The ice maker supports two water inlet methods: bottled water or direct faucet connection.
- Bottled Water Mode: Place a standard gallon water bottle (not included) onto the top water dispenser. The machine will automatically draw water as needed.
- Faucet Water Mode: Connect the provided water inlet hose to a potable water supply faucet and to the designated inlet port on the back of the ice maker. Ensure all connections are secure to prevent leaks. A water filter is included for this mode.

Image: Visual guide for connecting the ice maker using either bottled water or a direct faucet line.
3. Drain Connection
Connect the provided drain hose to the drain outlet on the back of the ice maker. Route the drain hose to a suitable floor drain or a collection bucket. Ensure the drain hose has a continuous downward slope to allow for proper drainage.
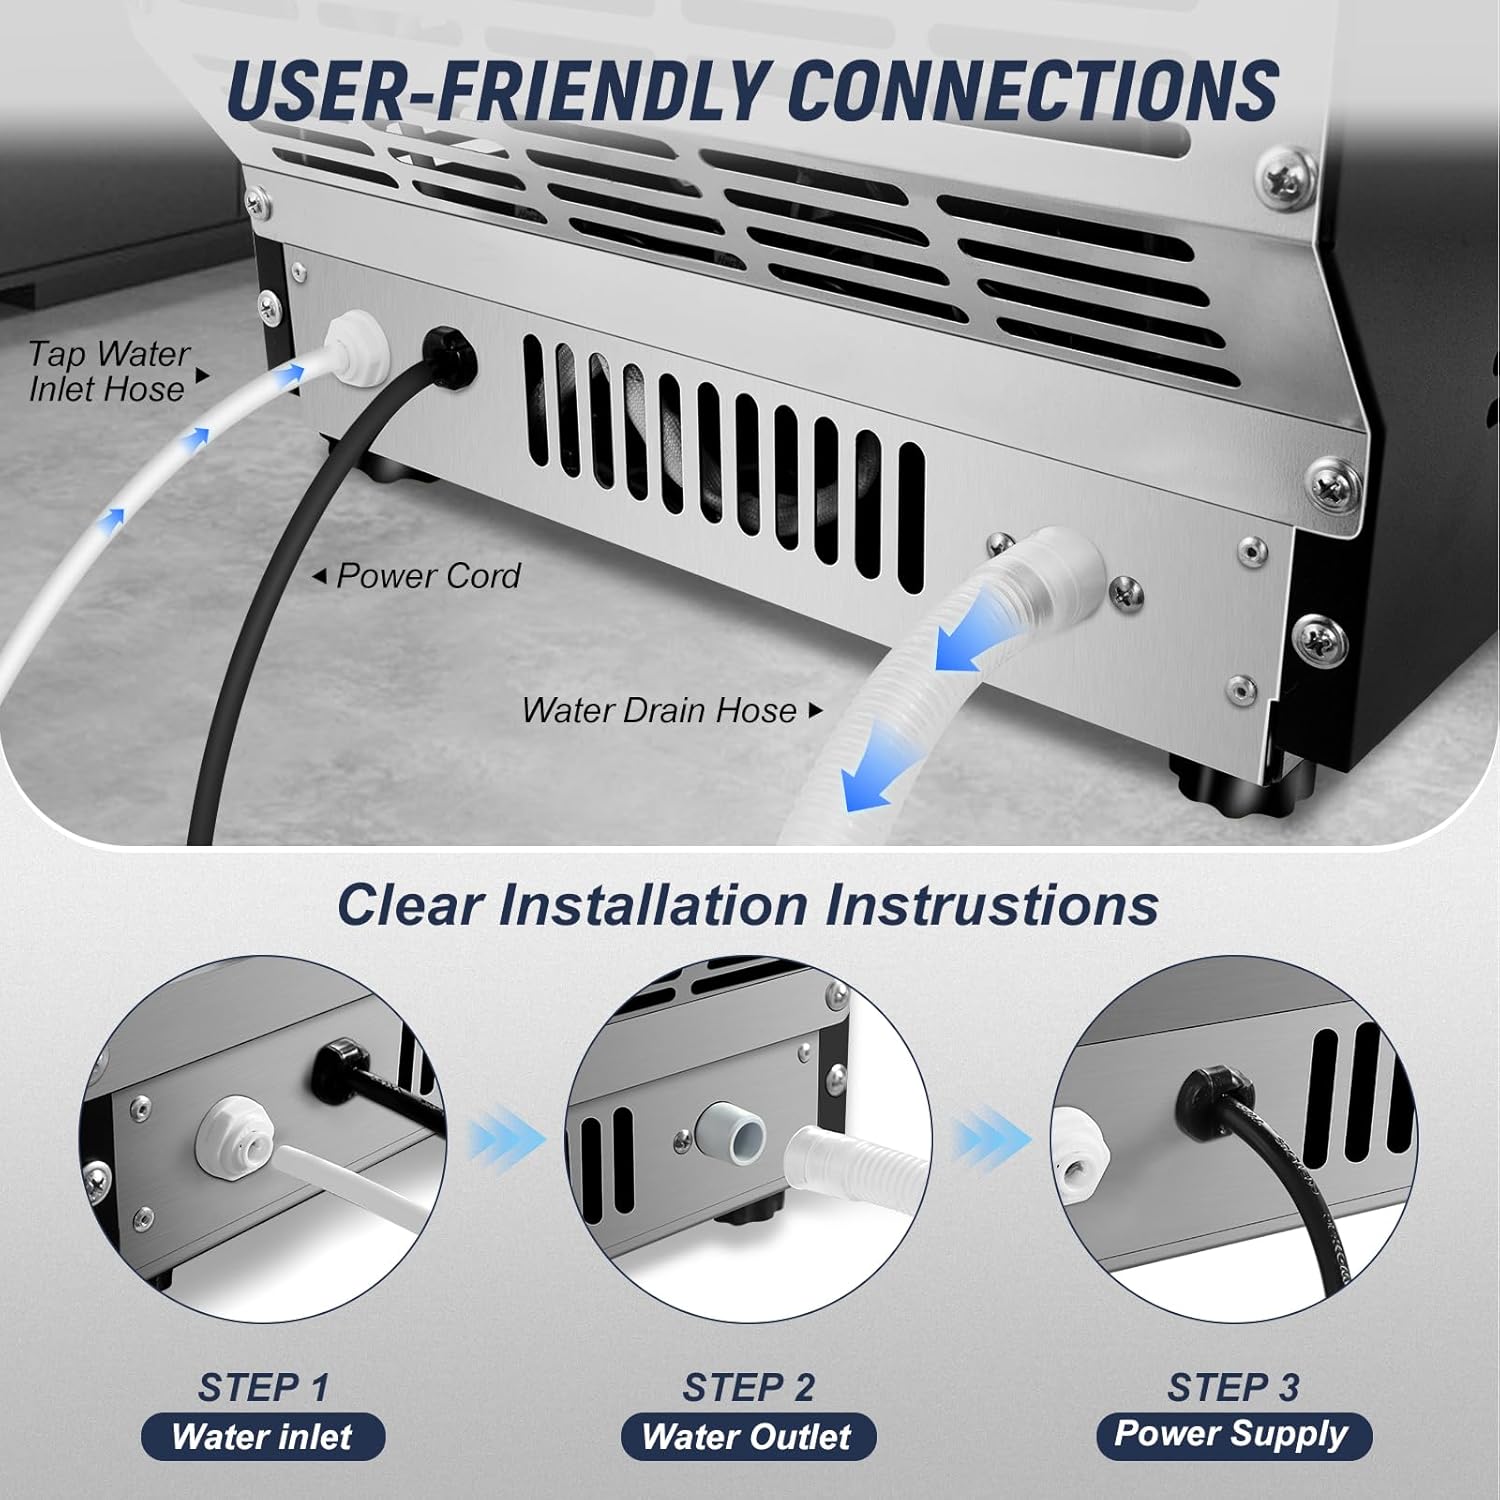
Image: Detailed view of the rear connections for water inlet, power, and drain.
4. Power Connection
Plug the power cord into a grounded electrical outlet. Ensure the voltage and frequency match the specifications of the ice maker.
Operating Instructions
1. Control Panel Overview
The ice maker features an intuitive LCD control panel for easy operation.

Image: Detailed view of the LCD control panel and its various indicators and buttons.
2. Initial Start-up and Ice Production
- Ensure the water supply is connected and the unit is plugged in.
- Press the ON/OFF button to start the ice making process.
- The machine will automatically fill with water and begin the ice production cycle. The first batch of ice may take slightly longer.
- The ice maker will automatically stop when the ice bin is full and resume when ice levels drop.
3. Adjusting Ice Thickness
Use the + and - buttons on the control panel to adjust the ice making time, which in turn controls the ice thickness.
- Thin Ice (6-8 minutes): Suitable for food preservation.
- Medium Ice (9-12 minutes): Ideal for soft drinks.
- Thick Ice (13-16 minutes): Recommended for beer and whiskey.

Image: Guide to adjusting ice cube thickness and corresponding ice production times.
4. Reservation Function
The 24-hour reservation function allows you to schedule ice production in advance.
- Press the Reservation button.
- Use the + and - buttons to set the desired delay time (up to 24 hours) before ice production begins.
- Confirm the setting. The machine will start making ice after the set delay.

Image: Demonstration of the 24-hour ice making reservation feature.
Maintenance and Cleaning
1. Automatic Self-Cleaning
The ice maker is equipped with an automatic self-cleaning function.
- Ensure the unit is connected to a water supply and the drain hose is properly positioned.
- Long press the CLEAN button for 3 seconds to initiate the self-cleaning cycle.
- The machine will automatically perform a cleaning cycle, flushing water through its internal components.
- Once the cycle is complete, the machine will return to standby mode.

Image: Instructions for activating the automatic self-cleaning feature.
2. Regular Cleaning
- Exterior: Wipe the exterior with a soft, damp cloth. Do not use abrasive cleaners.
- Interior: Periodically clean the ice storage bin and water reservoir with a mild detergent and warm water. Rinse thoroughly to remove any residue.
- Water Filter: If using the faucet water mode, regularly check and replace the water filter as needed to ensure optimal ice quality and machine performance.
- Drainage: Ensure the drain hose is clear of obstructions.
Always unplug the ice maker before performing any manual cleaning or maintenance.
Troubleshooting
| Problem | Possible Cause | Solution |
|---|---|---|
| Ice maker does not turn on. | No power supply; power cord not plugged in; circuit breaker tripped. | Check power connection; ensure outlet is functional; reset circuit breaker. |
| No ice production or slow ice production. | Insufficient water supply; water inlet blocked; ambient temperature too high; refrigerant leak. | Check water connections and supply; ensure water filter is not clogged; operate in a cooler environment; contact customer support for refrigerant issues. |
| "Add Water" indicator is on. | Water reservoir is empty or water pressure is too low (faucet mode). | Refill water bottle or check faucet water supply and pressure. |
| "Ice Full" indicator is on, but bin is not full. | Ice sensor is obstructed or malfunctioning. | Clear any ice blocking the sensor; clean the sensor if dirty. |
| Ice cubes stick together in a slab. | Ice thickness setting is too high; ice is melting and refreezing. | Adjust ice thickness to a thinner setting; ensure ice is regularly removed from the bin. |
| Error Code E-05 (or similar). | Internal malfunction, possibly related to water flow or components. | Turn off and unplug the unit for 10 minutes, then restart. If the error persists, contact SOZT customer support. |
Specifications
| Feature | Detail |
|---|---|
| Model Number | SLM36T |
| Brand | SOZT |
| Ice Production Capacity | 100 lbs / 24 hours |
| Ice Storage Capacity | 20 lbs |
| Ice Cube Cycle Time | 6-15 minutes per cycle (36 cubes) |
| Product Dimensions (D x W x H) | 13.5" x 13.2" x 26.4" |
| Weight | 43 Pounds |
| Wattage | 235 watts |
| Water Inlet Modes | Gallon Bottled Water, Faucet Water |
| Material | Stainless Steel (exterior), Food-grade PP (liner) |
Warranty and Support
For detailed warranty information, please refer to the warranty card included with your product or visit the official SOZT website. If you encounter any issues or require technical assistance, please contact SOZT customer support.
Manufacturer: SOZT