Introduction
This manual provides comprehensive instructions for the installation, setup, and operation of your BXLIYER 9-inch Octa Core Android 15 Car Radio. Please read this manual thoroughly before installation and use to ensure proper function and to maximize your experience with the device. Keep this manual for future reference.
Product Features
- Operating System: Android 15
- Processor: Rockchip AC8257 Octa Core, 64-bit, 2.0 GHz
- Memory: 6GB DDR3 RAM, 128GB ROM
- Display: 9-inch IPS screen, 1280*600 HD resolution
- Audio Output: 4 x 50W max (TDA7851 amplifier IC) with DSP (Digital Sound Processor) for 64-band equalizer adjustments, smart bass, balance & delay, loudness & filter.
- Connectivity: Built-in Bluetooth 5.0 (A2DP, hands-free calls, phonebook sync), Dual-band Wi-Fi (2.4GHz/5GHz), USB, Micro SD (up to 500GB).
- Navigation: Online and offline GPS navigation with support for 3D maps and voice guidance.
- Radio: AM/FM tuner with RDS (Radio Data System), DAB+ digital radio support (optional DAB+ box required).
- Smartphone Integration: Wireless Apple CarPlay and Android Auto, MirrorLink (Android via USB/Wi-Fi, iPhone via Wi-Fi/Airplay).
- Camera Support: Supports reversing camera input (free rear view camera included), AHD camera support, 360° panoramic parking function (requires 4 AHD cameras purchased separately).
- Other Features: Steering wheel control, fast boot (within 2 seconds), 4K video (3840 × 2160 pixels) and 1080P HD video playback.
Compatibility
This car radio is designed for perfect compatibility with the following vehicle models:
- Fiat Ducato (2006-2015)
- Peugeot Boxer (2006-2015)
- Citroen Jumper (2006-2015)
If you require assistance with dashboard pictures for compatibility verification, please contact joyx_techsupport@163.com.
What's in the Box
Upon unpacking, please ensure all the following items are present:
- Car Radio Unit
- Accessories
- User Manual (this document)
- Frame Kit
- Power Cable
- GPS Antenna
- USB Cables
- Rear View Camera (LED)
- External Microphone
- Install Brackets
- Canbus Decoder (if applicable)

Image: Contents of the product package, showing the car radio, various cables, GPS antenna, external microphone, rear camera, installation brackets, and frame kit.
Installation
Professional installation is recommended. Ensure the vehicle's power is disconnected before beginning installation.
1. Preparing for Installation

Image: The car radio unit shown alongside the compatible OEM panel for a seamless fit into the vehicle's dashboard.
Identify the existing car radio and the dashboard panel. The provided OEM panel is designed to integrate the new autoradio seamlessly into your vehicle's interior.
2. Wiring Diagram
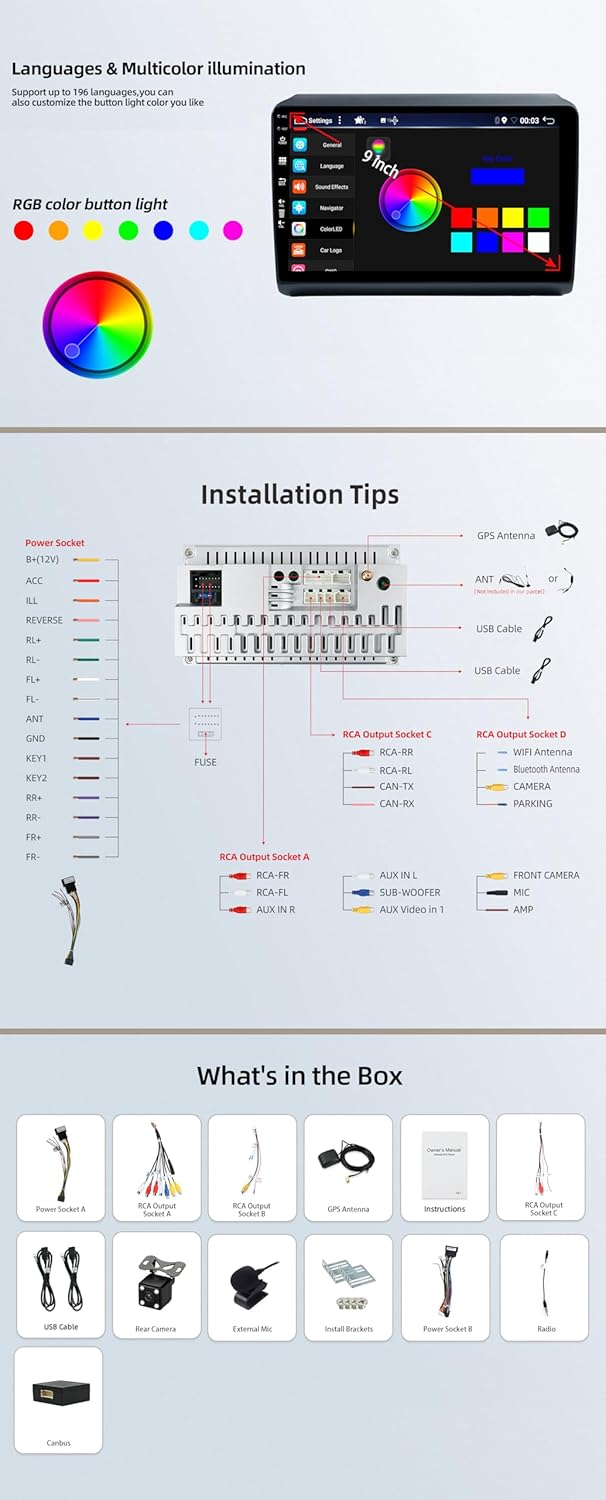
Image: Detailed wiring diagram illustrating connections for power (Power Socket A, B), GPS antenna, USB cables, RCA output sockets (A, C, D) for audio and video, camera input, microphone, and CAN-TX/RX.
Carefully follow the wiring diagram to connect the power, speakers, GPS antenna, USB cables, and any optional accessories like the rear camera or external microphone. Ensure all connections are secure to prevent malfunctions.
3. Mounting the Unit

Image: A visual comparison showing the vehicle's dashboard before and after the installation of the BXLIYER car radio, demonstrating the integrated appearance.
Once wiring is complete, mount the car radio into the dashboard using the provided frame kit and installation brackets. Ensure the unit is firmly secured and the panel fits flush with the dashboard.
Setup
1. Initial Power On
After installation, reconnect the vehicle's power. The unit should boot up automatically. The fast boot feature allows access to the system within 2 seconds.
2. Wi-Fi Connection
Navigate to Settings > Network & Internet > Wi-Fi. Select your desired Wi-Fi network and enter the password to connect. The unit supports both 2.4GHz and 5GHz networks.
3. Bluetooth Pairing
Go to Settings > Connected devices > Bluetooth. Turn on Bluetooth and search for available devices. Select your phone from the list and confirm the pairing code on both devices.
4. GPS Configuration
Ensure the GPS antenna is properly installed. The system will automatically detect GPS satellites. For offline navigation, download maps via a Wi-Fi connection.
5. Language and Illumination Settings
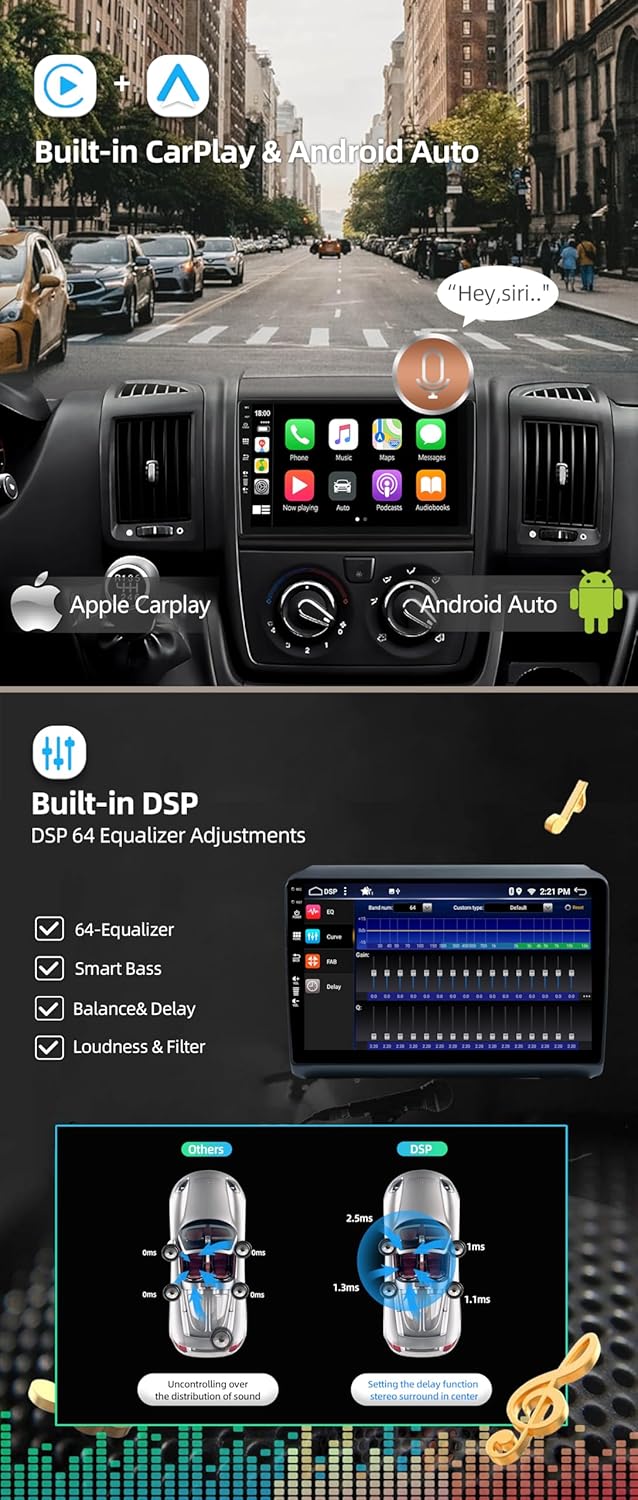
Image: The car radio's settings interface, displaying options for language selection and a customizable RGB color light palette for button illumination.
Access Settings > System > Languages & input to set your preferred language. For button illumination, navigate to Settings > Display > RGB Color Light to customize the color.
Operating Instructions
1. Radio Operation (AM/FM/DAB+)
Select the 'Radio' application from the main menu. You can scan for stations, save presets, and view RDS information. For DAB+ radio, ensure an optional DAB+ adapter is connected. The DAB+ application will then be available for digital radio channels.
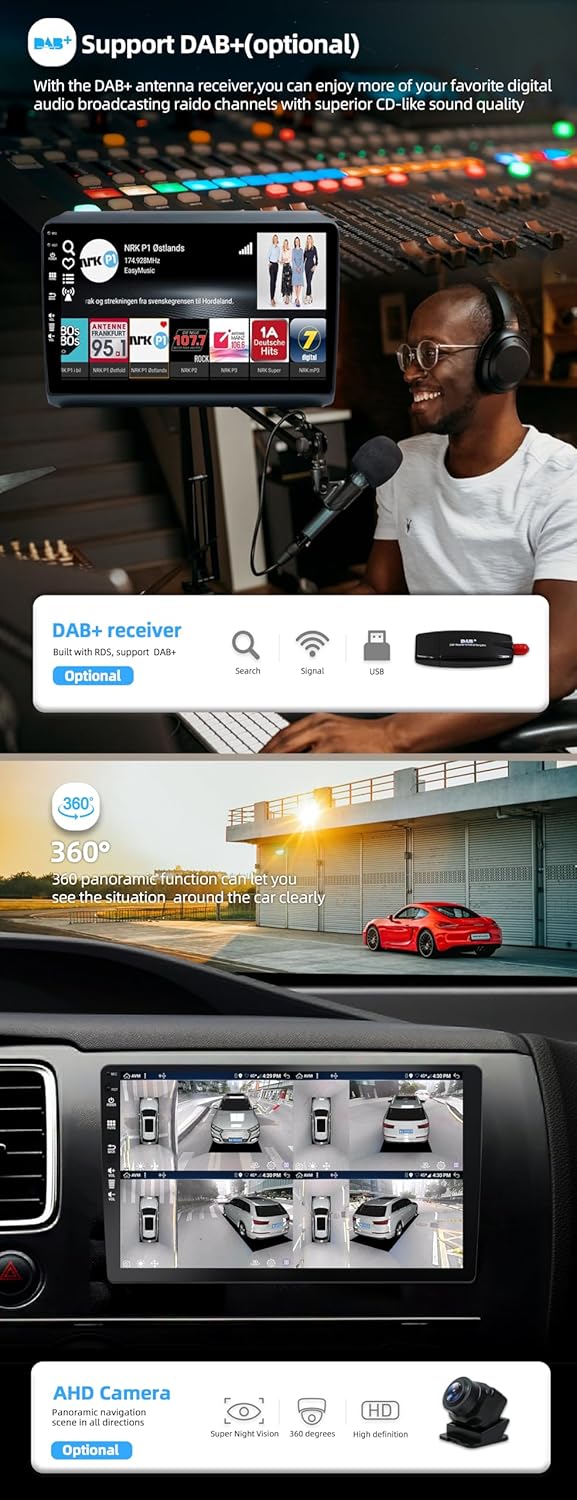
Image: Illustrates the optional DAB+ receiver and its integration, along with a demonstration of the 360-degree panoramic camera view on the car radio display.
2. Wireless CarPlay & Android Auto
Once your phone is paired via Bluetooth, open the 'CarPlay' or 'Android Auto' application. The wireless connection will activate automatically, allowing access to navigation, music, calls, and voice control (Siri/Google Assistant).
Image: The car radio displaying both Apple CarPlay and Android Auto interfaces, showing navigation, music, and phone functions.
3. DSP Audio Settings
Access the 'DSP' application to fine-tune your audio experience. Adjust the 64-band equalizer, enable smart bass, set balance and delay for individual speakers, and configure loudness and filter settings to optimize sound quality.
Image: A visual representation of the built-in DSP settings, highlighting the 64-band equalizer and sound delay adjustments for precise audio control.
4. Steering Wheel Control
The unit supports steering wheel controls. Navigate to Settings > Steering Wheel Control to configure the buttons. This allows you to adjust volume, answer calls, and change tracks without taking your hands off the wheel.
Image: Demonstrates the steering wheel control functionality, showing how to map vehicle steering wheel buttons to control the car radio's functions.
5. Mirror Link Function
For Android phones, connect via USB or Wi-Fi and open the 'Mirror Link' app. For iPhones, connect via Wi-Fi and use Airplay to mirror your screen to the car radio display.
6. Reversing Camera
When the vehicle is shifted into reverse gear, the display will automatically switch to the rear view camera feed, providing a clear view of the area behind your vehicle.
7. Internet Connectivity (3G/4G Optional)
In addition to built-in Wi-Fi, the unit supports external 3G/4G dongles for internet access. Connect the dongle to a USB port to enable mobile data connectivity.
Image: The car radio displaying web content, illustrating its 3G/4G internet support via an optional dongle for continuous online access.
Maintenance
- Cleaning: Use a soft, dry cloth to clean the screen and unit. Avoid abrasive cleaners or solvents.
- Software Updates: Periodically check for system updates via Wi-Fi in the settings menu to ensure optimal performance and access to new features.
- Temperature: Avoid exposing the unit to extreme temperatures, which can affect performance and lifespan.
Troubleshooting
| Problem | Possible Cause | Solution |
|---|---|---|
| Unit does not power on | Incorrect wiring, blown fuse, vehicle power issue | Check power connections and fuses. Ensure vehicle power is active. |
| System is slow or unresponsive | Too many background applications, system overload | Close unnecessary applications. Restart the unit. If issues persist, consider a factory reset (backup data first). |
| Cannot install certain apps (e.g., Waze) | App incompatibility with Android version, regional restrictions | Verify app compatibility with Android 15. Look for alternative navigation apps or check for system updates. |
| No sound output | Speaker wiring issues, volume muted, incorrect audio settings | Check speaker connections. Ensure volume is not muted. Verify audio output settings in DSP. |
| GPS signal loss | GPS antenna obstruction or faulty connection | Ensure GPS antenna is clear of obstructions and securely connected. |
| Bluetooth connection issues | Interference, incorrect pairing, device not discoverable | Ensure both devices have Bluetooth enabled and are in pairing mode. Try re-pairing. |
Specifications
| Feature | Specification |
|---|---|
| Operating System | Android 15 |
| CPU | Rockchip AC8257 Octa Core, 2.0 GHz |
| RAM | 6GB DDR3 |
| ROM | 128GB |
| Display | 9-inch IPS, 1280*600 HD |
| Audio Output Power | 4 x 50W max (200 Watts total) |
| Amplifier IC | TDA7851 |
| Radio IC | TDA7786 |
| Bluetooth Version | 5.0 |
| Wi-Fi | Dual-band (2.4GHz/5GHz) |
| USB/Micro SD Support | Up to 500GB |
| Item Weight | 2.3 Kilograms |
| Model Number | BXLIYER-5I23-D04-6128-J |
Warranty and Support
Your BXLIYER car radio comes with a 1-year warranty from the date of purchase. Additionally, a 30-day return policy is offered. We provide lifetime support for our products.
For installation help, technical inquiries, or any other support needs, please contact our technical support team:
Email: joyx_techsupport@163.com
Our team aims to provide quick responses within 24 hours.