1. Introduction
This manual provides comprehensive instructions for the assembly, setup, operation, and maintenance of your new 59" H Buffet Sideboard Cabinet. Please read all instructions carefully before assembly and use to ensure safe and proper operation. Keep this manual for future reference.
2. Safety Information
- Always follow the assembly instructions precisely.
- Ensure all hardware is securely tightened before use. Periodically check and re-tighten as necessary.
- Do not overload shelves or drawers. Refer to the 'Specifications' section for weight limits.
- Place the cabinet on a flat, stable, and level surface to prevent tipping.
- Keep small parts and packaging materials away from children and pets during assembly.
- When using the integrated power outlet, ensure connected devices do not exceed the outlet's maximum electrical rating. Do not use in wet conditions.
- This cabinet is designed for indoor use only.
3. Package Contents
Before beginning assembly, verify that all components listed below are present and undamaged. If any parts are missing or damaged, contact customer support.
- Assembly Instructions
- Coffee Bar Wine Cabinet components
- Hardware pack (screws, dowels, cam locks, etc.)
4. Assembly Instructions
Assembly is required for this product. Please refer to the detailed 'Assembly Instructions' included in your package for step-by-step guidance. It is recommended to have two adults for assembly. Ensure you have a clear, spacious area for assembly and the necessary tools (e.g., screwdriver, hammer).
General Assembly Steps:
- Unpack all components and lay them out on a soft, clean surface to prevent scratches.
- Identify all parts using the parts list in the assembly instructions.
- Follow the numbered steps in the instruction manual, attaching panels and securing them with the provided hardware.
- Assemble the main frame, then attach doors, drawers, shelves, and the wine rack according to the diagrams.
- Install the power outlet unit into its designated slot.
- Attach the legs to the base of the cabinet.
- Once fully assembled, gently move the cabinet to its desired location.

Figure 4.1: Interior view of the cabinet, showcasing storage compartments and the wine rack.
5. Setup
After assembly, position the cabinet in your desired location. Ensure the surface is level and stable. If using the power outlet, connect the cabinet's power cord to a grounded electrical outlet. The integrated power outlet provides convenient access for small appliances like coffee makers or microwaves.

Figure 5.1: The buffet sideboard cabinet set up in a kitchen environment.

Figure 5.2: Detailed dimensions and features, including the power outlet.
6. Operating the Cabinet Features
Your buffet sideboard cabinet is designed for versatile storage and functionality.
- Storage Doors: The cabinet features multiple doors, some with mesh panels and others with solid wood. Open and close them gently using the handles. Ensure they latch securely.
- Drawers: The pull-out drawers are suitable for storing smaller items. Pull them out smoothly and push them back completely to close.
- Wine Rack: The integrated wine rack is designed to hold standard wine bottles horizontally, keeping corks moist.
- Power Outlet: Use the built-in power outlet for convenient access to electricity for small kitchen appliances or charging devices. Always ensure the total wattage of connected devices does not exceed the outlet's rating.
- Pegboard Backsplash: The pegboard area allows for hanging hooks (if included or purchased separately) to organize utensils, mugs, or other small items.

Figure 6.1: Close-up of a mesh-paneled cabinet door.
7. Maintenance
Proper care will extend the life and appearance of your cabinet.
- Cleaning: Wipe surfaces with a soft, damp cloth. Avoid abrasive cleaners or harsh chemicals that can damage the finish. Dry immediately with a clean cloth.
- Spills: Clean up spills immediately to prevent staining or damage to the wood.
- Hardware: Periodically check all screws and fasteners to ensure they are tight. Re-tighten as needed to maintain stability.
- Sunlight: Avoid prolonged exposure to direct sunlight, which can cause fading or discoloration.
- Heat and Moisture: Protect surfaces from excessive heat and moisture. Use coasters under hot or wet items.
8. Troubleshooting
If you encounter any issues with your cabinet, refer to the following common solutions:
- Cabinet is wobbly: Ensure the cabinet is on a level surface. Check and tighten all assembly hardware.
- Doors do not close properly: Check hinges for proper alignment. Adjust if necessary according to the assembly instructions. Ensure no items are obstructing the door's path.
- Drawers stick or do not slide smoothly: Ensure the drawer slides are correctly installed and free of debris. Check for any loose screws on the slides.
- Power outlet not working: Verify the cabinet's power cord is securely plugged into a functional wall outlet. Check if the wall outlet itself is working by plugging in another device. Ensure the power switch on the outlet unit (if present) is in the 'ON' position.
If problems persist, please contact customer support.
9. Specifications
| Feature | Detail |
|---|---|
| Brand | Generic |
| Model Number | YT-W409P167483 |
| Product Dimensions | 15.75"D x 47.24"W x 43.31"H (Note: Product title states 59" H, please refer to assembly instructions for exact dimensions of your specific model.) |
| Material | Engineered Wood |
| Color | Black and Natural (as per product title, though specifications list 'White') |
| Weight Limit | 99 Pounds |
| Special Feature | Wine Bottle Rack, Power Outlet |
| Assembly Required | Yes |
| Room Type | Dining Room, Kitchen, Living Room |
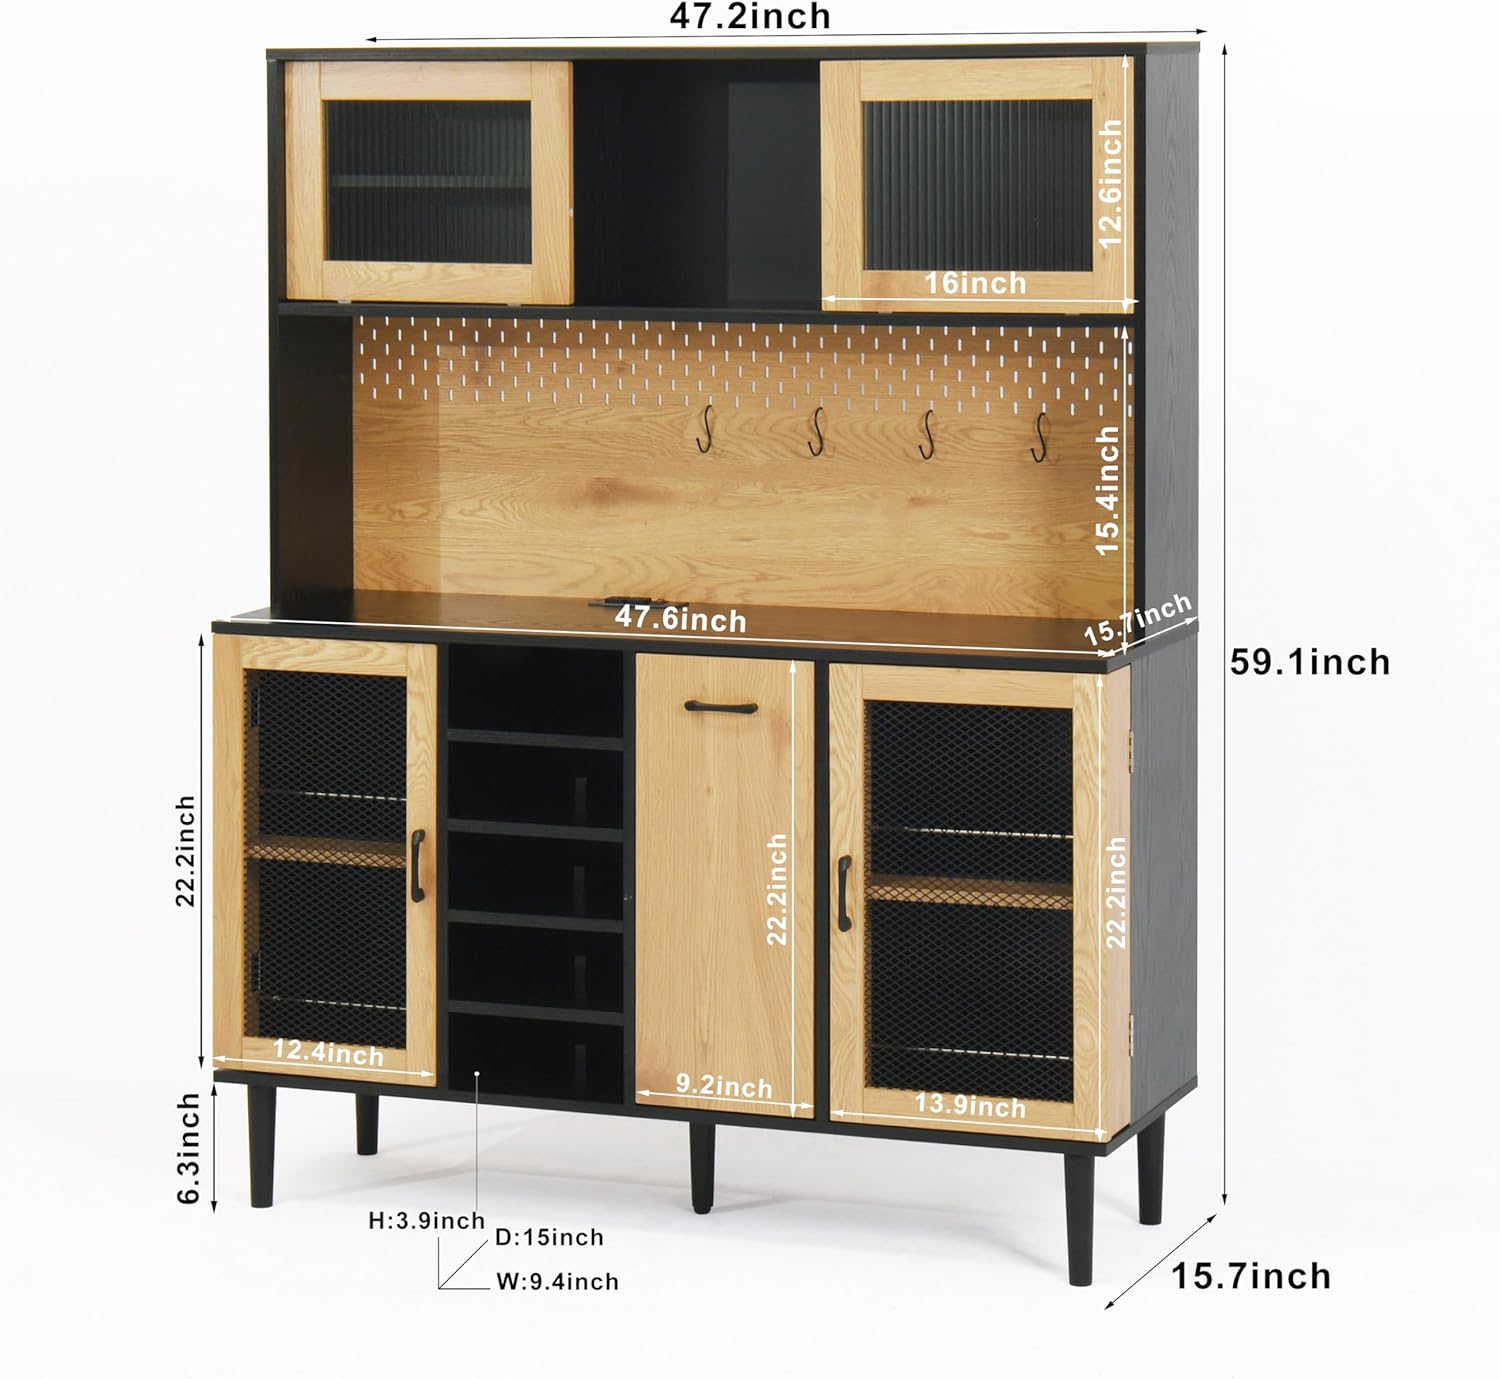
Figure 9.1: Overall dimensions of the cabinet.
10. Product Video
For a visual overview of the product's features and appearance, please watch the official product video below.
Video 10.1: Product details and appearance of the buffet sideboard cabinet.
11. Warranty and Support
This product comes with a standard manufacturer's warranty. For specific warranty details, claims, or technical support, please refer to the warranty card included in your package or contact the retailer where the product was purchased. Please have your model number (YT-W409P167483) and purchase date available when contacting support.


