1. Introduction
The AVHzY CC1 is a compact and high-precision Type-C USB power meter designed to measure voltage, current, and power in USB-C connections. It supports advanced protocols like PD3.1, USB4, and Thunderbolt 4, making it suitable for a wide range of modern devices. This manual provides detailed instructions for its setup, operation, and maintenance.
2. Product Overview
The AVHzY CC1 features a 0.96-inch color IPS LCD screen for clear display of measurement data. It incorporates a 16-bit INA226 independent ADC chip for high accuracy and a 0.003R sampling resistor to minimize interference. The device is designed for direct pass-through operation with 24P USB-C male/female connectors.

Figure 1: AVHzY CC1 Type-C USB Power Meter displaying real-time measurements.

Figure 2: Detailed view of the AVHzY CC1 device.
3. Setup
The AVHzY CC1 is a plug-and-play device. No drivers are required for basic operation. To use the meter:
- Connect the male USB-C end of the AVHzY CC1 to the power source (e.g., charger, power bank, computer USB-C port).
- Connect your device (e.g., smartphone, laptop, tablet) to the female USB-C port of the AVHzY CC1 using a compatible USB-C cable.
- The meter will automatically power on and begin displaying real-time voltage, current, and power readings.
4. Operating Instructions
The AVHzY CC1 features two control buttons, K- and K+, for navigating menus and adjusting settings. The device offers multiple display interfaces to show various data points.
Button Functions:

Figure 3: Quick Start Guide for button operations.
- Short press K- / K+: Switch between previous/next display screens (P1, P2, P3, P4).
- Long press K-: Switch data refresh rate (2 levels).
- Long press K+: Rotate screen display orientation.
- Press and hold K- button, then connect to computer USB: Enter firmware upgrade mode.
- Press and hold K+ button, then connect to power: Enter system settings. Press K- to enable or disable auto-rotate screen within settings.
Display Interfaces:

Figure 4: Overview of the four main display interfaces.
- P1: Large Font Current and Voltage Display Interface (Home Screen)
Shows primary voltage (U), current (I), and power (P) in large, easy-to-read fonts. - P2: Fast Charging Protocol Display and Detection Interface
Displays detailed voltage, current, power, and D+/D- line voltages, useful for identifying fast charging protocols. - P3: Capacity Statistics Interface
Records and displays accumulated capacity (Ah) and energy (Wh) over time. Also shows maximum (MAX) and average (AVG) values for voltage, current, and power. - P4: Ripple Detection
Displays the ripple voltage in mV, along with current voltage, current, and power.
Advanced Button Operations (within specific screens):
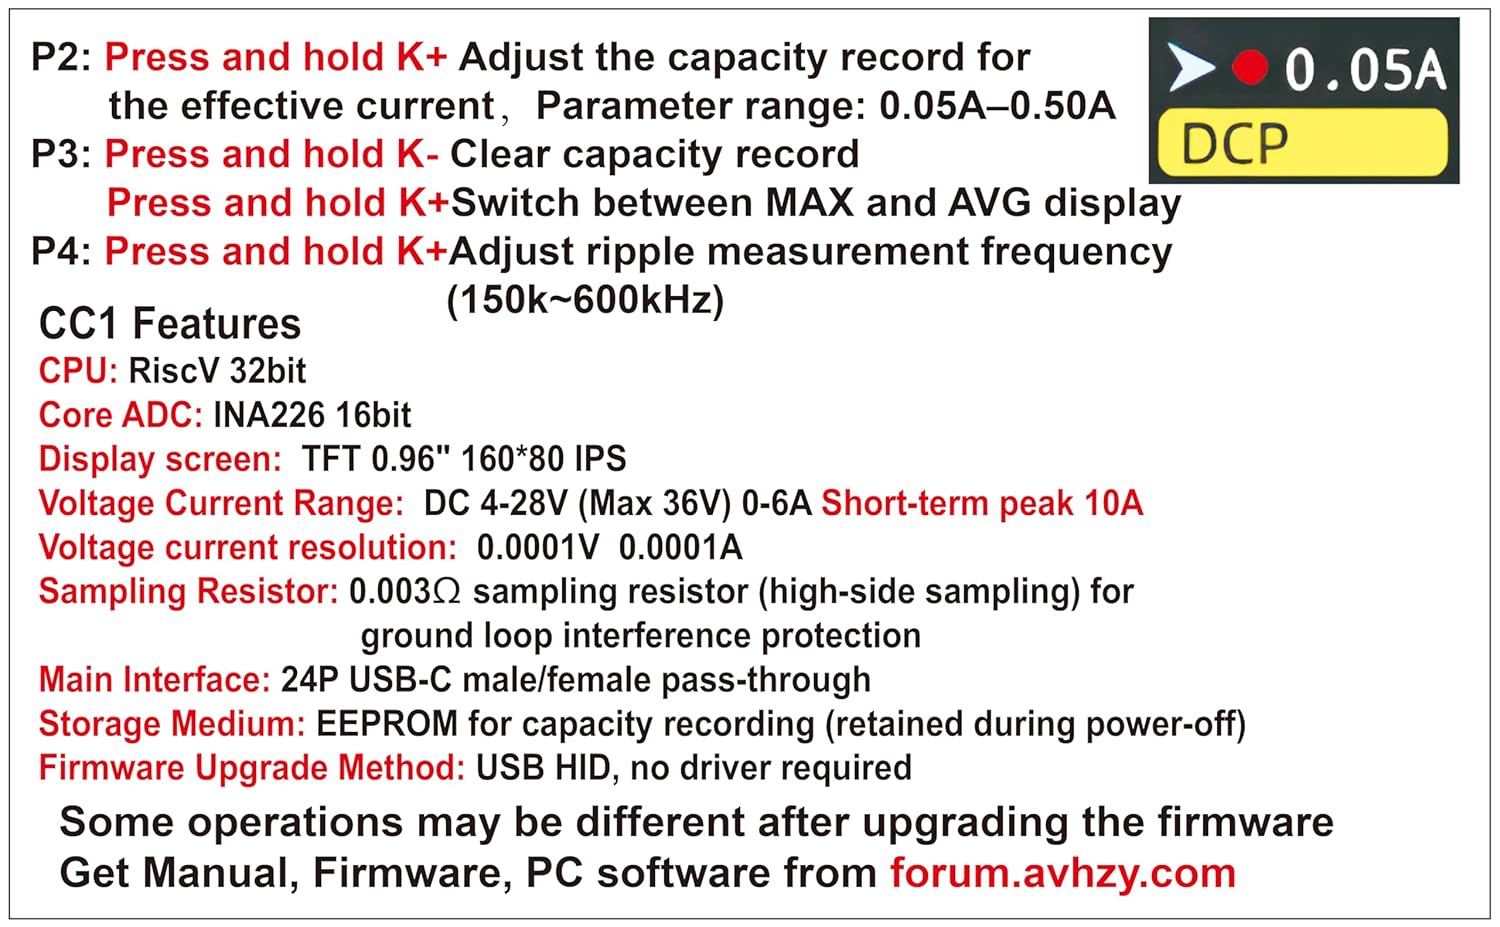
Figure 5: Advanced button operations and features summary.
- On P2 screen, press and hold K+: Adjust the effective current threshold for capacity recording. Parameter range: 0.05A–0.50A.
- On P3 screen, press and hold K-: Clear the recorded capacity data.
- On P3 screen, press and hold K+: Switch between MAX and AVG display for voltage, current, and power.
- On P4 screen, press and hold K+: Adjust ripple measurement frequency (150kHz–600kHz).
5. Features
- Wide Measurement Range: Measures DC voltage from 4V to 28V (max 36V) and current from 0A to 6A (10A short-term peak).
- High Resolution: Voltage and current resolution of 0.0001V and 0.0001A for precise readings.
- Bidirectional Detection: Supports current flow in both directions.
- Capacity and Energy Recording: Records capacity up to 9999Ah and energy up to 9999Wh.
- Offline Storage: EEPROM for capacity recording ensures data is retained even after power-off.
- High-Precision ADC: Utilizes INA226 16-bit independent ADC chip with a 0.003R sampling resistor for accurate measurements and common grounding interference avoidance.
- Advanced Protocol Support: 24P USB-C pass-through supports PD3.1, USB4, and Thunderbolt 4 charging and data transfer.
- High Transmission Speed: Capable of supporting data transfer speeds up to 40Gbps, with actual tests reaching 2000M+ with compatible coaxial cables and SSD boxes.
- Firmware Updatable: Firmware can be updated via USB HID without requiring specific drivers.
- Compact Design: External dimensions of 31.8×16.1×8.1mm (without USB-C connector) for portability.
6. Specifications
| Manufacturer | AVHzY |
| Model Number | CC1 |
| Measuring Voltage Range | DC 4V ~ 28V (Max 36V) |
| Measuring Current Range | 0A ~ 6A (10A short-term peak) |
| Voltage Resolution | 0.0001V |
| Current Resolution | 0.0001A |
| Capacity Recording | 0 ~ 9999Ah |
| Energy Recording | 0 ~ 9999Wh |
| Display | 0.96 inch color IPS LCD, 80x160 resolution |
| ADC Core | INA226 16-bit independent ADC chip |
| Sampling Resistor | 0.003Ω (high-side sampling) |
| Main Interface | 24P USB-C male/female direct passage |
| Storage Medium | EEPROM (power-off memory) |
| Firmware Update | USB HID driver-free |
| External Dimensions | 31.8 × 16.1 × 8.1 mm (without USB-C connector) |
| Supported Protocols | PD3.1, USB4, Thunderbolt 4 |
| Max Data Transmission Speed | 40Gbps |
| Item Weight | 40 g |
| Colour | Grey |
| UPC | 735209487122 |
7. Firmware Update
The AVHzY CC1 firmware can be updated to enhance functionality or fix issues. Follow these steps:
- Download the latest firmware and PC software from the official AVHzY forum: forum.avhzy.com.
- Ensure the AVHzY CC1 is disconnected from any power source.
- Press and hold the K- button on the device.
- While holding the K- button, connect the AVHzY CC1 to your computer's USB port. The device should enter firmware upgrade mode.
- Follow the instructions provided by the PC software to complete the firmware update.
Note: Some operations or display interfaces may change after a firmware upgrade. Refer to the latest documentation on the AVHzY forum for updated information.
8. Care and Maintenance
- Keep the device dry. Moisture can damage electronic components.
- Avoid extreme temperatures. Do not expose to direct sunlight or very cold environments.
- Handle with care. Do not drop or subject the device to strong impacts.
- Clean the screen and body with a soft, dry cloth. Do not use harsh chemicals or abrasive cleaners.
- Ensure USB-C connectors are free from dust and debris before connecting.
9. Troubleshooting
- Device does not power on: Ensure it is correctly connected in-line between a powered source and a device drawing power. Check if the power source is active.
- No readings displayed: Verify both ends of the meter are securely connected. Ensure the connected device is actively drawing power.
- Inaccurate readings: Ensure the connections are stable. High-quality cables are recommended. If issues persist, consider updating the firmware.
- Screen orientation is incorrect: Long press the K+ button to rotate the screen. Alternatively, enter system settings (press and hold K+ then connect to power) and use K- to toggle auto-rotate.
- Cannot enter firmware upgrade mode: Ensure the K- button is held down before connecting to the computer's USB port.
10. Support and Resources
For further assistance, updated manuals, firmware, or PC software, please visit the official AVHzY forum: