Introduction
This manual provides comprehensive instructions for the CUIPPWRJ F405 V3 Stack, an integrated flight controller and electronic speed controller (ESC) solution. Designed for 3-6S long-range drones, this 30x30 stack features a 50A 4-in-1 ESC, INAV compatibility, and Bluetooth connectivity for easy configuration. Please read this manual thoroughly before installation and operation to ensure proper functionality and safety.
Product Overview
Key Features
- Performance: Equipped with a 50A 4-in-1 ESC, ensuring efficient power management for extended flight.
- Compatibility: Supports 3-6S configurations, suitable for various drone setups and requirements.
- Versatility: Ideal for 5-8 inch long-range drones, for enthusiasts and tailored builds.
- Configuration: Features iNAV, allowing customizable flight parameters for enhanced control and stability.
- Size: Compact 30x30 stack design fits well into various drone frames, enhancing overall build efficiency.
Specifications
| Feature | Detail |
|---|---|
| Brand | CUIPPWRJ |
| Model | CUIPPWRJ123 |
| Item Weight | 14.1 ounces |
| Package Dimensions | 1.18 x 0.79 x 0.39 inches |
| ESC Current | 50A (4-in-1) |
| Input Voltage | 3-6S LiPo |
| Mounting Pattern | 30x30 mm |
| Compatibility | INAV, Bluetooth, 5-8 inch long-range drones |
Setup
Component Identification
Refer to the image below for a visual guide to the main components and connection points on the F405 V3 Stack.
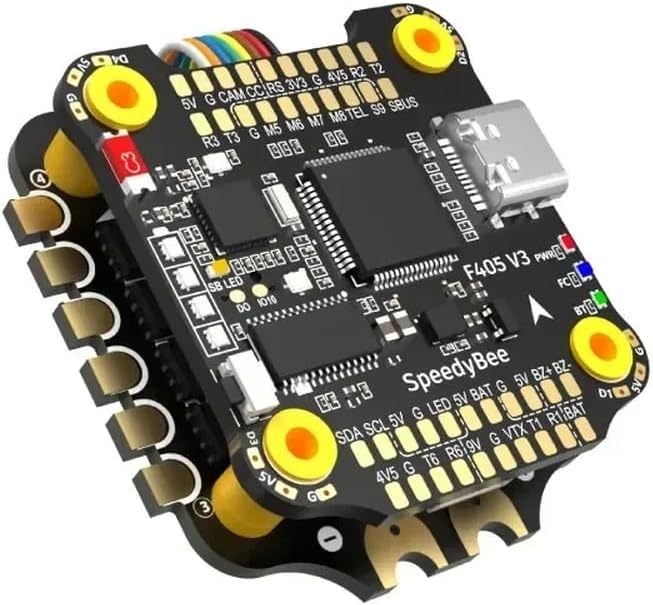
Image Description: A detailed view of the CUIPPWRJ F405 V3 Stack, showing the flight controller board stacked on top of the 4-in-1 ESC. Key labels visible include: F405 V3 (Flight Controller model), SpeedyBee (likely a component or firmware reference), PWR (Power indicator), FC (Flight Controller indicator), BT (Bluetooth indicator). Various solder pads and connectors are labeled for power (5V, 3V3, 9V, BAT), ground (G), camera (CAM), current sensor (CC), receiver (RS, SBUS), telemetry (TEL), motor outputs (M5, M6, M7, M8), and other peripherals like LED, VTX, SDA, SCL. A USB-C port is visible for configuration. The stack features gold-plated pads for secure connections.
Wiring and Connections
Careful wiring is crucial for the proper function and safety of your drone. Always ensure power is disconnected before making any connections.
- Power Connection: Connect your LiPo battery (3-6S) to the BAT pads on the ESC. Ensure correct polarity (positive to positive, negative to negative).
- Motor Connections: Solder your motors to the corresponding motor pads (M1-M4 on the ESC, though the image shows M5-M8 on the FC, implying a specific motor output configuration or additional motor support). Verify motor direction in software after initial setup.
- Receiver Connection: Connect your receiver (e.g., SBUS, Crossfire, ELRS) to the appropriate UART pads (e.g., SBUS, R2, T2, R3, T3). Refer to your receiver's manual for specific wiring.
- Video Transmitter (VTX) & Camera: Connect your VTX to the VTX pad and a corresponding ground. Connect your FPV camera to the CAM pad and its ground. Ensure voltage compatibility.
- GPS (Optional): If using GPS, connect it to an available UART (e.g., R6, T6) and 5V/GND.
- LED (Optional): Connect programmable LEDs to the LED pad and 5V/GND.
Software Configuration (INAV)
The F405 V3 Stack is compatible with INAV firmware. Follow these steps for initial software setup:
- Install INAV Configurator: Download and install the latest INAV Configurator application on your computer.
- Connect via USB: Connect the F405 V3 Flight Controller to your computer using a USB-C cable.
- Flash Firmware: In INAV Configurator, navigate to the "Firmware Flasher" tab. Select the correct target for F405 (e.g., "OMNIBUSF4PRO" or similar F405 target) and flash the latest stable INAV firmware.
- Initial Setup: After flashing, connect to the flight controller. Go through the setup wizard, calibrate the accelerometer, configure ports, receiver, and modes according to your drone's requirements.
- ESC Configuration: The 4-in-1 ESC typically uses BLHeli_S or BLHeli_32 firmware. Use the BLHeliSuite32 or BLHeli_S Configurator (accessible via INAV passthrough) to configure ESC settings and motor direction.
Operating Instructions
Pre-Flight Checks
Before every flight, perform the following checks:
- Verify all connections are secure and free from damage.
- Ensure propellers are correctly installed and tightened.
- Check battery voltage and ensure it is fully charged.
- Confirm radio control link is established and controls respond correctly.
- Check for any error messages or unusual LED patterns on the flight controller.
Flight Modes and Basic Operation
Configure flight modes in INAV Configurator based on your preference and skill level. Common modes include:
- Angle Mode: Self-leveling mode, suitable for beginners.
- Acro Mode: Manual mode, offering full control without self-leveling, for experienced pilots.
- GPS Hold/Return to Home: Utilizes GPS for position holding and automated return functions (requires GPS module).
Arm the motors only when the drone is on a stable, level surface and clear of obstructions. Disarm immediately after landing.
Bluetooth Connectivity
The F405 V3 Stack features Bluetooth for wireless configuration via a mobile application (e.g., SpeedyBee App or similar INAV-compatible app). To connect:
- Power on the flight controller (connect battery).
- Open the compatible mobile application on your smartphone.
- Search for available Bluetooth devices and select your flight controller.
- Once connected, you can adjust PID tuning, OSD settings, and other parameters wirelessly.
Maintenance
- Cleaning: Regularly inspect the stack for dirt, dust, or debris. Use a soft brush or compressed air to clean the boards. Avoid using liquids directly on electronics.
- Firmware Updates: Periodically check for new INAV firmware releases. Updating firmware can provide performance improvements, new features, and bug fixes. Always back up your configuration before updating.
- Physical Inspection: After any crash or hard landing, inspect the stack for physical damage, loose connections, or cracked solder joints.
- Storage: Store the flight controller and ESC in a dry, anti-static environment when not in use.
Troubleshooting
- No Power/No LEDs: Check battery connection and polarity. Ensure the main power lead is securely connected.
- Motors Not Spinning: Verify ESC calibration and motor direction in BLHeliSuite. Check motor wiring and ensure the flight controller is armed.
- No Receiver Input: Confirm receiver is powered and correctly wired to the flight controller. Check UART configuration in INAV Configurator.
- Unstable Flight: Recalibrate accelerometer. Check PID settings. Inspect propellers for damage or imbalance. Ensure the flight controller is soft-mounted to reduce vibrations.
- Bluetooth Connection Issues: Ensure the flight controller is powered. Close and reopen the mobile app. Try restarting your phone's Bluetooth.
Warranty and Support
For warranty information, please refer to the terms and conditions provided by your retailer or the manufacturer, CUIPPWRJ. Keep your proof of purchase for any warranty claims.
For technical support, please contact CUIPPWRJ customer service through their official channels. Provide your product model (CUIPPWRJ123) and a detailed description of the issue for efficient assistance.