1. Introduction
This manual provides essential information for the safe and effective installation, operation, and maintenance of your Kewig K11S 60W Motorcycle Auxiliary LED Fog Light Kit. Please read this manual thoroughly before use and retain it for future reference.
2. Product Overview
The Kewig K11S Auxiliary LED Fog Light Kit is designed to enhance visibility and safety for various vehicles, including motorcycles, ATVs, UTVs, and trucks. Featuring high-quality LED chips and borosilicate optical lenses, these lights provide 60W of power and 6000 lumens of illumination. The robust aluminum alloy body ensures durability and an IP68 waterproof rating.
Key features include:
- Dual Color Modes: Easily switch between white (6000K) and amber (3000K) light for different weather conditions.
- Multiple Strobe Modes: Includes left/right time-sharing strobe, left/right alternating strobe, and left/right simultaneous strobe for warning signals.
- Adjustable Mounting: 360° adjustable bracket with sleeves for 22mm, 25.4mm, and 28.6mm handlebar diameters.
- Quick Disconnect: Wiring harness features quick disconnect connectors for easy removal during inspection or maintenance.
- Durable Construction: CNC one-piece molded aluminum alloy housing with honeycomb design for efficient heat dissipation, extending lifespan to over 50,000 hours. IP68 waterproof, dustproof, and shockproof.
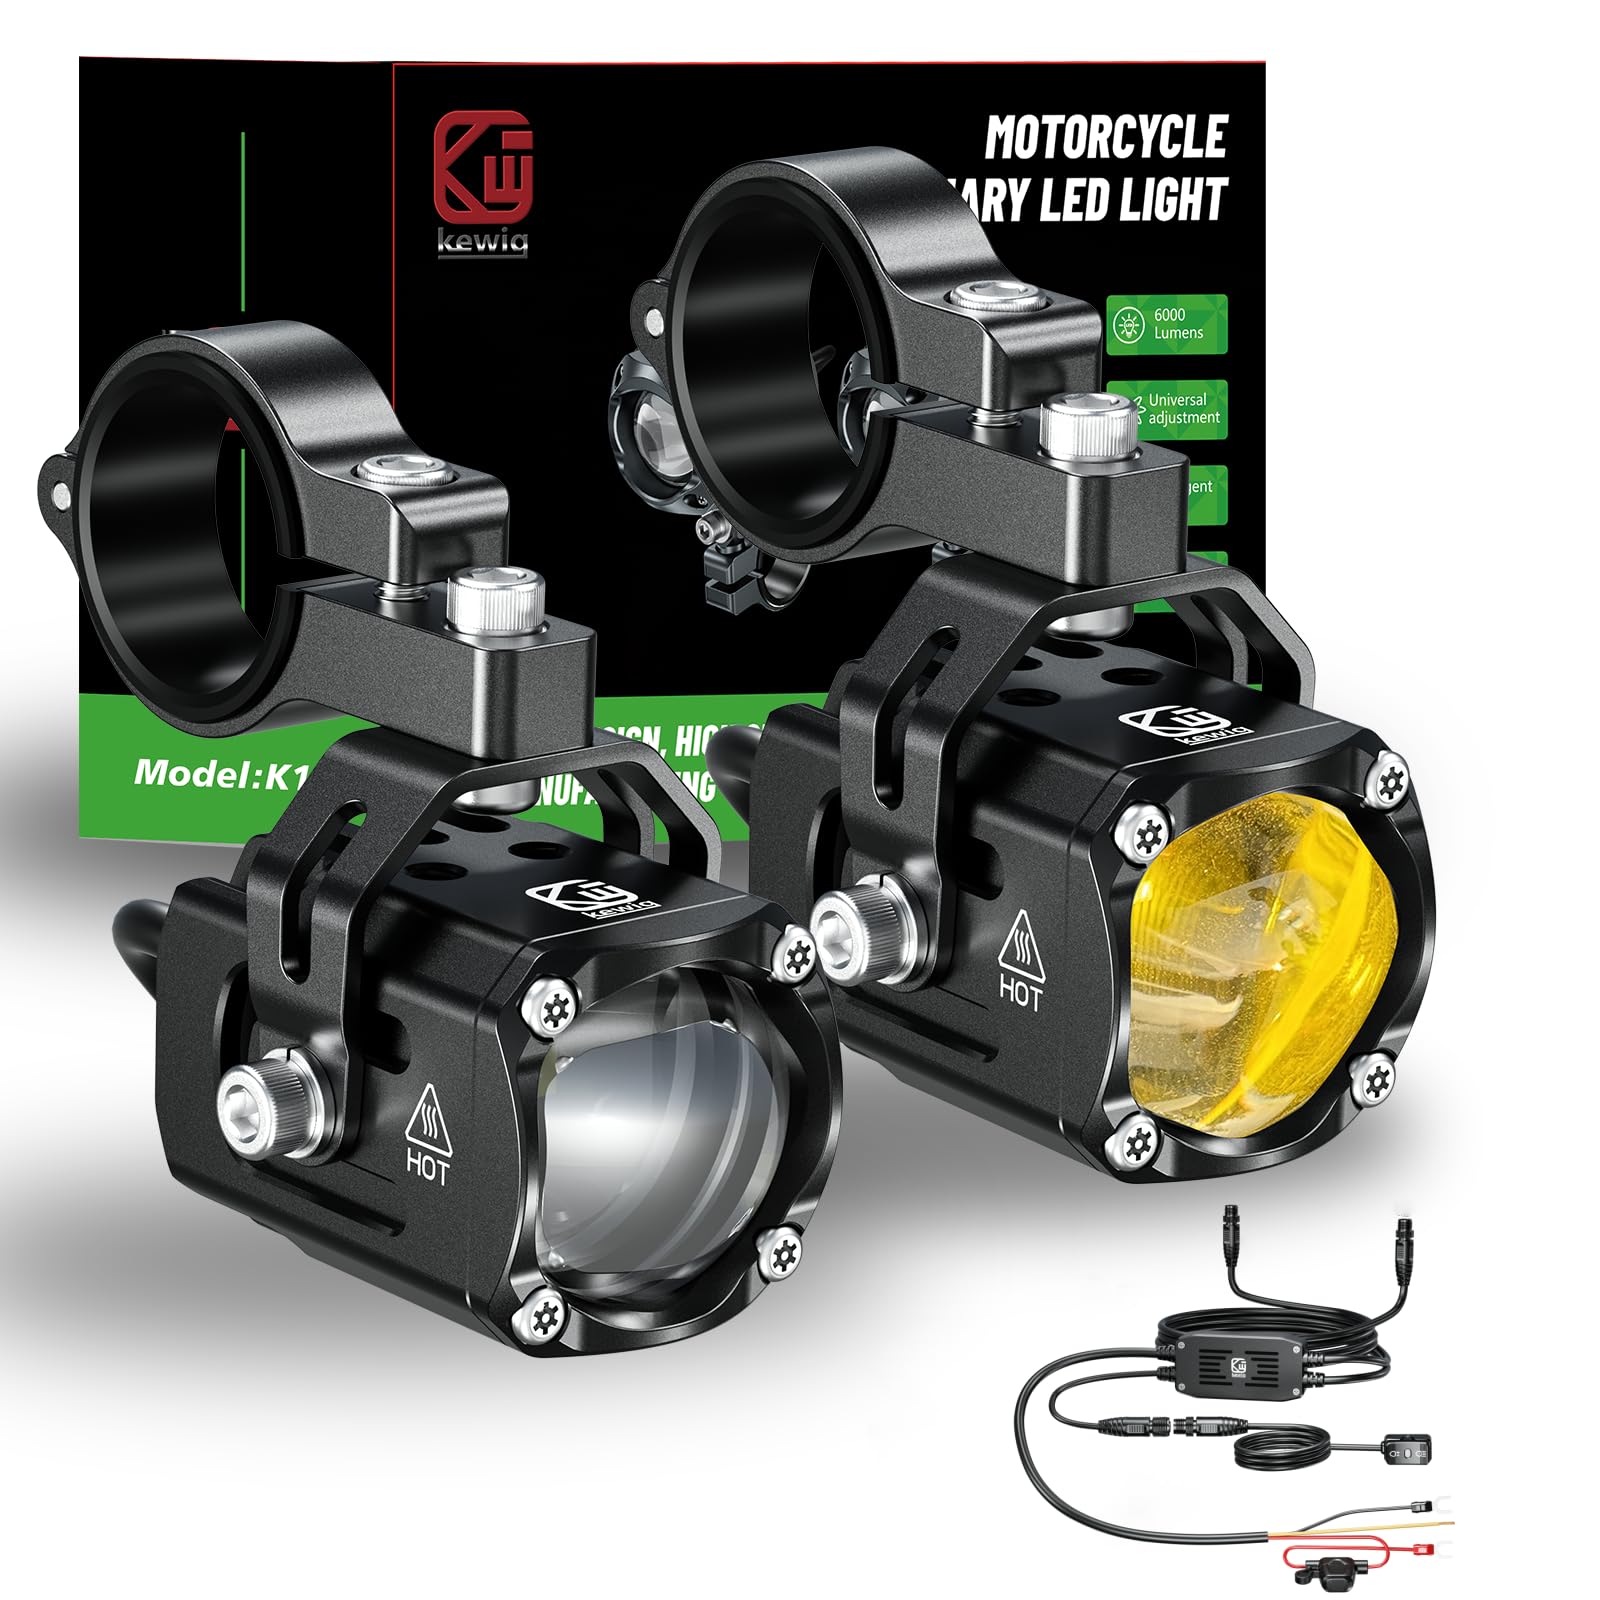
Figure 1: Key features of the Kewig K11S auxiliary LED light, including the advanced LED chip, quick-disconnect wiring, and adjustable mounting bracket.

Figure 2: The IP68 waterproof design ensures the lights function reliably in rain, snow, fog, and dusty conditions.
3. Package Contents
Verify that all components are present and undamaged upon opening the package:
- 2 x Kewig K11S Auxiliary LED Lights
- 1 x Wiring Harness Kit with Switch and Fuse Box
- Mounting Brackets (with 22mm, 25.4mm, 28.6mm sleeves)
- Installation Hardware (screws, nuts, washers)
- Instruction Manual (this document)

Figure 3: Components of the Kewig K11S kit, including the lights, wiring harness, and control switch.
4. Specifications
| Feature | Specification |
|---|---|
| Model Number | K11S |
| Brand | Kewig |
| Power | 60 Watts (per light) |
| Voltage | 12 Volts |
| Lumen Output | 6000 Lumens (total) |
| Color Temperature | White: 6000K, Amber: 3000K |
| Material | Aluminum Alloy, Stainless Steel |
| Waterproof Rating | IP68 |
| Lifespan | Over 50,000 hours |
| Item Weight | 1.24 Kilograms (total package) |

Figure 4: Detailed specifications and performance metrics of the high-quality LED chip used in the K11S lights.
5. Safety Information
- Always disconnect the vehicle's battery before performing any electrical work.
- Ensure all wiring connections are secure and properly insulated to prevent short circuits.
- Mount lights securely to prevent vibration and detachment during vehicle operation.
- Do not look directly into the LED lights when they are on, as this may cause eye damage.
- Verify that the installation complies with all local and national regulations for vehicle lighting.
- The yellow wire must be connected to an ACC (Accessory) power source or the positive electrode of the power supply for proper function of all light modes.
6. Setup and Installation
Follow these steps for proper installation of your Kewig K11S Auxiliary LED Fog Light Kit:
6.1 Mounting the Lights
- Identify a suitable mounting location on your vehicle, such as handlebars or crash bars. Ensure the location provides a clear beam path and does not obstruct other vehicle components.
- Select the appropriate sleeve size (22mm, 25.4mm, or 28.6mm) for your handlebar diameter.
- Attach the mounting bracket to the light and then secure it to the chosen location using the provided hardware. The bracket allows for 360° angle adjustment. Tighten all fasteners securely.

Figure 5: Examples of flexible installation and angle adjustment for the auxiliary lights.
6.2 Wiring Connections
- Connect the red wire from the wiring harness to the positive terminal of your vehicle's battery.
- Connect the black wire from the wiring harness to the negative terminal of your vehicle's battery or a suitable ground point on the chassis.
- Connect the yellow wire to an ACC (Accessory) power source. This connection is crucial for enabling all light modes. If an ACC source is unavailable, connect it to the positive electrode of the power supply, but be aware that the lights may remain on when the vehicle is off if not switched manually.
- Plug the auxiliary lights into the quick disconnect connectors on the wiring harness. Ensure a firm connection.
- Mount the control switch in an easily accessible location on your handlebars.
- Secure all wiring with zip ties or electrical tape to prevent chafing, entanglement, or damage from heat and moving parts.
Figure 6: Wiring diagram for the Kewig K11S auxiliary light kit.
7. Operating Instructions
The Kewig K11S lights offer multiple lighting modes controlled by the included switch:
- Single Click: Turns on low beam (white light). Click again to switch to high beam (amber light). Subsequent clicks cycle through the three warning light modes.
- Warning Light Modes: The three strobe modes are left/right time-sharing strobe, left/right alternating strobe, and left/right simultaneous strobe.
- Overtaking Light: Use the switch to activate the overtaking light function.
Video 1: Demonstration of the various light modes, including high beam white, high beam flash, and different flashing patterns.
Video 2: Shows the adjustable angle feature and the lights installed on a motorcycle, demonstrating their brightness and IP68 waterproof capability.
Video 3: Footage of the Kewig auxiliary lights in use during a group motorcycle ride on a dark mountain trail, highlighting their effectiveness in low-light conditions.
8. Maintenance
- Cleaning: Regularly clean the lenses with a soft, damp cloth to remove dirt and debris. Avoid abrasive cleaners that could scratch the lens.
- Connection Check: Periodically inspect all wiring connections for tightness and signs of corrosion or damage.
- Mounting Security: Ensure mounting brackets remain secure and free from looseness. Tighten as necessary.
- Heat Dissipation: Keep the cooling fins on the light housing free from obstruction to ensure proper heat dissipation.
9. Troubleshooting
| Problem | Possible Cause | Solution |
|---|---|---|
| Lights do not turn on. | No power, loose connection, blown fuse. | Check battery connections. Verify all wiring is secure. Inspect the fuse in the wiring harness and replace if blown. Ensure the yellow wire is connected to a power source. |
| Only one light works. | Faulty light, loose connection to one light. | Check the quick disconnect connector for the non-working light. Inspect the light for visible damage. |
| Lights flicker or dim. | Insufficient power, loose connection, voltage fluctuations. | Ensure stable 12V power supply. Check all wiring for secure connections. |
| Cannot switch between all light modes. | Incorrect yellow wire connection. | Ensure the yellow wire is correctly connected to an ACC power source or the positive electrode of the power supply. |
10. Warranty and Support
The Kewig K11S Motorcycle Auxiliary LED Fog Light Kit comes with a 1-year warranty from the date of purchase. This warranty covers manufacturing defects and material faults under normal use.
For warranty claims, technical support, or any inquiries regarding your product, please contact Kewig customer service through the retailer where the product was purchased or visit the official Kewig brand store online.
Manufacturer: Kewig
Model Number: K11S