GarveeHome MAz8AnFjVXBcRCat3HK5EAMu35f
GarveeHome Fluted Dresser User Manual
Model: MAz8AnFjVXBcRCat3HK5EAMu35f
Introduction
Thank you for purchasing the GarveeHome Fluted Dresser. This manual provides detailed instructions for assembly, operation, maintenance, and troubleshooting to ensure safe and proper use of your new furniture. Please read this manual thoroughly before beginning assembly and retain it for future reference.
Safety Information
- Always assemble the dresser on a soft, clean surface to prevent scratches.
- Ensure all parts are present and undamaged before assembly. Do not proceed with assembly if any parts are missing or damaged.
- Follow all assembly steps in the order provided.
- Do not overtighten screws, as this may damage the material.
- For safety, it is highly recommended to secure the dresser to a wall using the provided anti-tip kit to prevent tipping.
- Keep small parts and packaging materials away from children and pets.
- Do not stand or sit on the dresser.
- Distribute weight evenly in drawers. Do not overload drawers.
Parts List
Please verify that all parts listed below are included in your package before beginning assembly.
| Part | Description | Quantity |
|---|---|---|
| A | Top Panel | 1 |
| B | Side Panel (Left) | 1 |
| C | Side Panel (Right) | 1 |
| D | Bottom Panel | 1 |
| E | Back Panel | 1 |
| F | Drawer Front (Fluted) | 3 |
| G | Drawer Side | 6 |
| H | Drawer Back | 3 |
| I | Drawer Bottom | 3 |
| J | Legs (Gold) | 4 |
Hardware List
Ensure all hardware components are present before starting assembly.
| Item | Description | Quantity |
|---|---|---|
| 1 | Cam Locks | 16 |
| 2 | Cam Dowels | 16 |
| 3 | Wood Dowels | 12 |
| 4 | Drawer Slides (Left) | 3 |
| 5 | Drawer Slides (Right) | 3 |
| 6 | Drawer Handles | 3 |
| 7 | Handle Screws | 6 |
| 8 | Leg Screws | 12 |
| 9 | Back Panel Nails | 20 |
| 10 | Anti-Tip Kit | 1 |
Tools Required
- Phillips Head Screwdriver
- Hammer (for back panel nails)
- Measuring Tape (optional, for placement)
Setup: Assembly Instructions
Follow these steps carefully to assemble your GarveeHome Fluted Dresser. It is recommended to have two people for assembly.
- Prepare the Workspace: Clear a spacious, clean, and soft area to prevent damage to the dresser components during assembly.
- Attach Cam Dowels: Insert Cam Dowels (Item 2) into the pre-drilled holes on the Top Panel (A), Bottom Panel (D), and Side Panels (B, C). Ensure they are fully seated.
- Assemble Frame Sides: Attach the Side Panels (B, C) to the Bottom Panel (D) using Cam Locks (Item 1) and Wood Dowels (Item 3). Turn the Cam Locks clockwise to secure.
- Install Drawer Slides: Secure Drawer Slides (Items 4, 5) to the inner sides of the Side Panels (B, C) and the internal support beams (if applicable) using appropriate screws. Ensure they are level and aligned.
- Attach Top Panel: Place the Top Panel (A) onto the assembled frame, aligning the Cam Dowels and securing with Cam Locks (Item 1).
- Assemble Drawers: For each drawer:
- Attach Drawer Sides (G) and Drawer Back (H) to the Drawer Front (F) using cam locks and dowels.
- Slide the Drawer Bottom (I) into the grooves.
- Secure the remaining Drawer Side (G) to complete the drawer box.
- Attach Drawer Handles (Item 6) to the Drawer Fronts (F) using Handle Screws (Item 7).
- Insert Drawers: Carefully slide the assembled drawers onto the installed drawer slides within the dresser frame.
- Attach Back Panel: Align the Back Panel (E) with the back of the dresser frame and secure it using Back Panel Nails (Item 9). Ensure the panel is flush.
- Install Legs: Attach the Legs (J) to the bottom of the dresser using Leg Screws (Item 8).
- Install Anti-Tip Kit: Secure the dresser to the wall using the provided Anti-Tip Kit (Item 10) according to the kit's instructions. This is a crucial safety step.
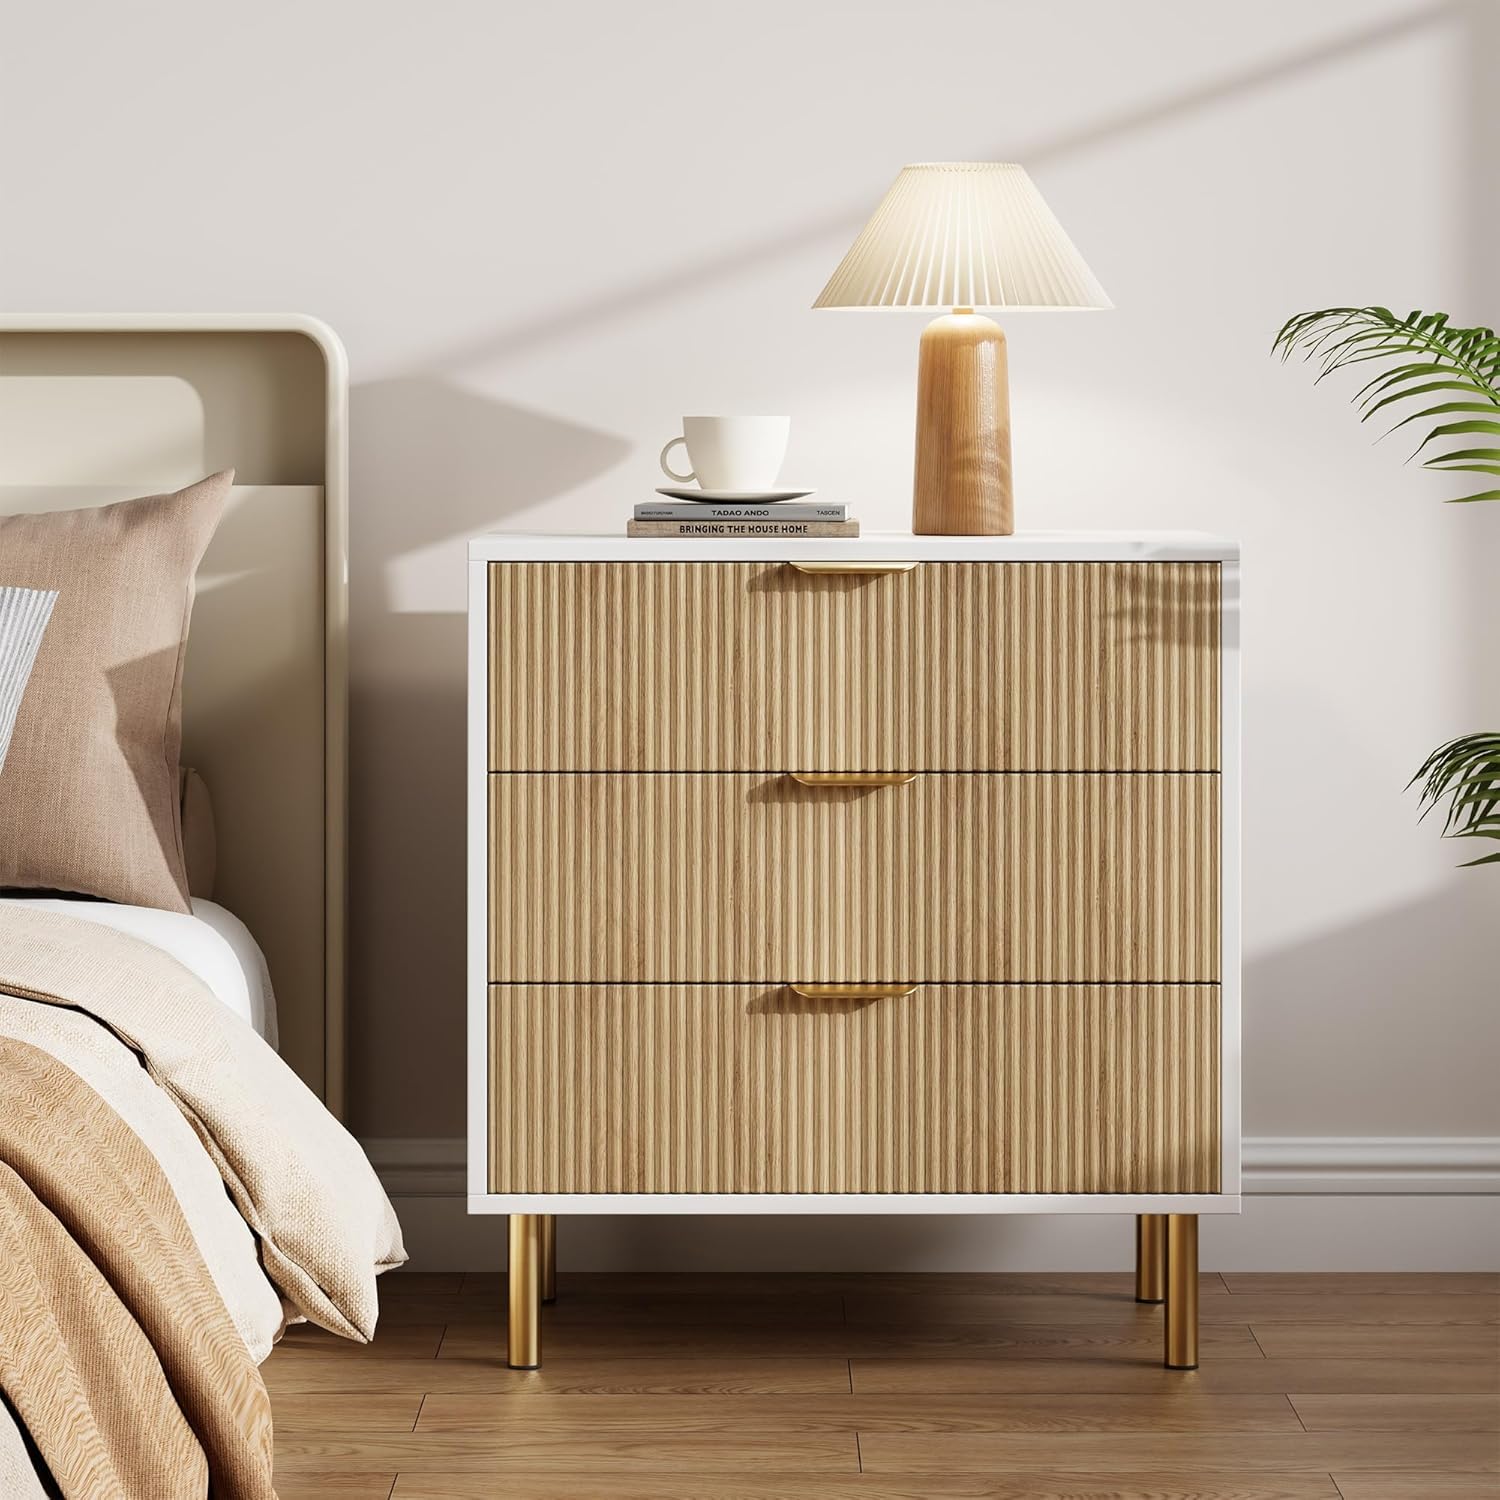
Image: The fully assembled GarveeHome Fluted Dresser, showcasing its unique design with fluted drawer fronts, gold handles, and splayed legs.
Operating Instructions
- Opening/Closing Drawers: Gently pull or push the drawer handles to open and close the drawers. Avoid forcing them.
- Weight Distribution: Distribute items evenly within the drawers. Avoid placing excessively heavy items in a single drawer or on the top surface to prevent tipping or damage.
- Top Surface Use: The top surface can be used for decorative items or light storage. Do not place hot items directly on the surface without protection.
Maintenance
- Cleaning: Wipe surfaces with a soft, damp cloth. Avoid using harsh chemicals, abrasive cleaners, or polishes that may damage the finish.
- Spills: Clean up spills immediately to prevent staining or water damage.
- Sunlight Exposure: Avoid prolonged exposure to direct sunlight to prevent fading or discoloration of the wood finish.
- Humidity: Maintain a stable room temperature and humidity level to prevent warping or cracking of the wood.
- Hardware Check: Periodically check all screws and fasteners to ensure they are tight. Retighten if necessary, but do not overtighten.
Troubleshooting
| Problem | Possible Cause | Solution |
|---|---|---|
| Drawers do not slide smoothly. | Misaligned drawer slides or debris in tracks. | Remove drawer, check slide alignment, clear any debris. Apply a silicone-based lubricant if needed. |
| Dresser wobbles. | Uneven floor or loose assembly hardware. | Ensure dresser is on a level surface. Check and tighten all assembly screws. Use shims if necessary for uneven floors. |
| Drawer front is loose. | Loose screws connecting the handle or drawer front. | Tighten the screws securing the handle or the internal screws holding the drawer front to the drawer box. |
| Missing parts during assembly. | Packaging not thoroughly checked. | Carefully re-check all packaging materials. If still missing, contact GarveeHome customer support. |
Specifications
| Feature | Detail |
|---|---|
| Brand | GarveeHome |
| Product Dimensions | 16.9"D x 27.9"W x 30"H |
| Color | Natural Oak |
| Mounting Type | Floor Mount |
| Room Type | Bedroom |
| Special Feature | Scratch Resistant |
| Assembly Required | Yes |
| Model Name | fwLNfyFJOz4KXVDDZqlP1AbWga6 |
| Size | 16.9"D x 27.9"W x 30"H (3 Drawers) |
| UPC | 199108781062 |
| Manufacturer | GarveeHome |
| Item Weight | 62.8 pounds |
| ASIN | B0DR2PFSLQ |
| Item model number | MAz8AnFjVXBcRCat3HK5EAMu35f |
| Date First Available | December 20, 2024 |
Related Documents - MAz8AnFjVXBcRCat3HK5EAMu35f
 |
GarveeHome Pop-Up Screen Tent Gazebo Assembly and Setup Guide Comprehensive guide for assembling and setting up your GarveeHome Pop-Up Screen Tent Gazebo (Model ggve1606). Learn how to quickly deploy and secure your outdoor shelter. |
Ask a question about this manual
Ask about setup, troubleshooting, compatibility, parts, safety, or missing instructions. Manuals+ will review the question and use this page’s manual context to help answer it.