1. Introduction
This manual provides detailed instructions for the installation, operation, and maintenance of your Hikity Android 15 Autoradio. Please read this manual thoroughly before using the product to ensure proper functionality and safety.
1.1 Product Overview
The Hikity Android 15 Autoradio is an advanced in-car entertainment and navigation system featuring a 7-inch HD capacitive touchscreen. It integrates a 4-core CPU with 2GB RAM and 64GB ROM, offering a responsive user experience. Key features include wireless Carplay and Android Auto, Mirror Link, built-in GPS navigation, WiFi connectivity, FM/RDS radio, Bluetooth, and support for a rear view camera.
1.2 Vehicle Compatibility
This autoradio is specifically designed for Fiat Tipo Egea models manufactured between 2015 and 2020.
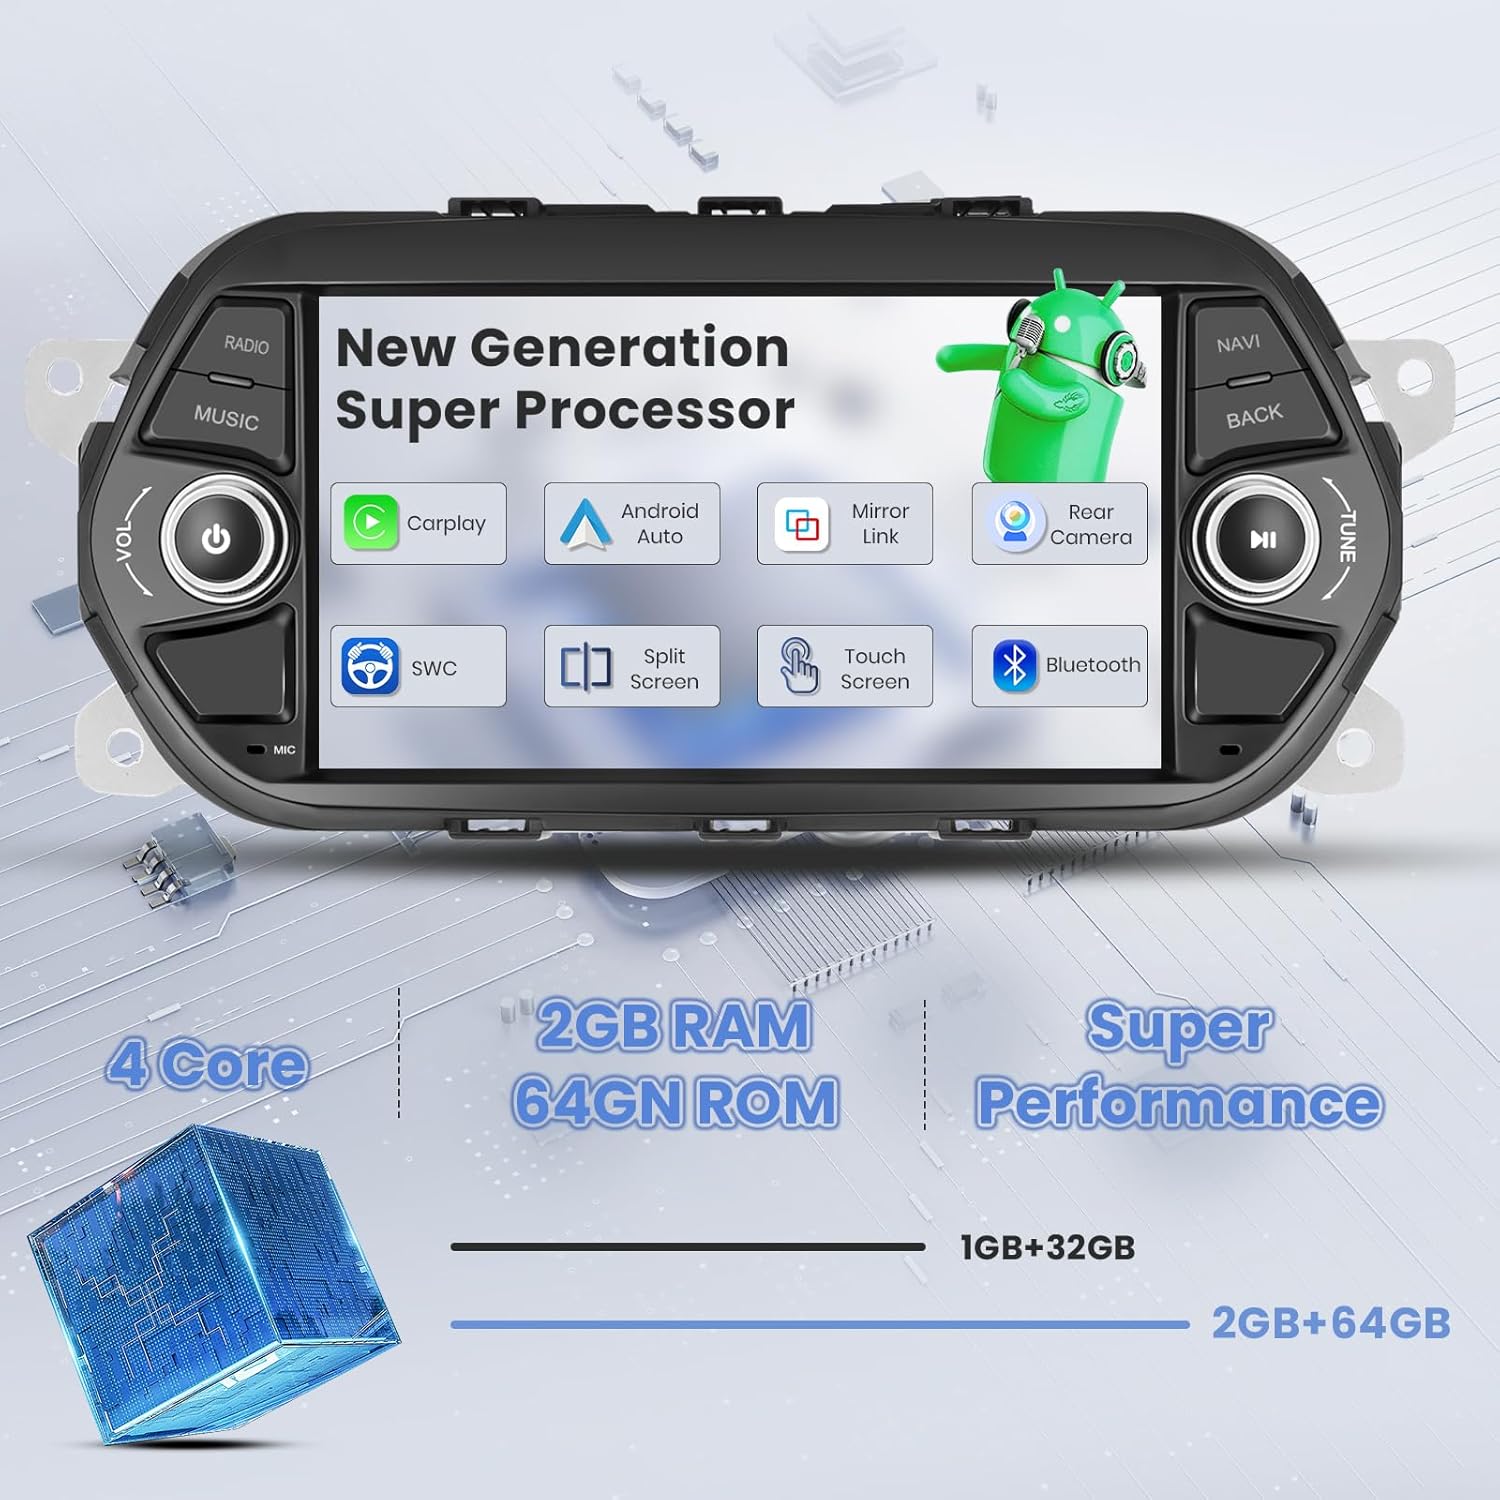
Figure 1.1: Compatibility check for Fiat Tipo Egea 2015-2020. The image illustrates the correct fitment in the dashboard, contrasting with an incompatible setup.
2. Package Contents
Please verify that all items listed below are included in your package:
- Android Autoradio Unit
- Rear View Camera
- Microphone
- Power Cable
- GPS Antenna
- RCA Cable Set
- USB Cable (Original)
- Canbus Decoder (if applicable for your vehicle model)
- Radio Antenna Adapter
- Reverse Line Cable

Figure 2.1: Product dimensions and a visual representation of the package contents.
3. Installation Guide
Professional installation is recommended. Ensure the vehicle's power is disconnected before beginning installation.
3.1 Wiring Diagram
Carefully follow the wiring instructions to connect the autoradio to your vehicle's electrical system.

Figure 3.1: Rear view of the autoradio showing numbered wiring ports and a detailed connection diagram for the main harness.
3.2 Rear Camera Connection
The included AHD rear view camera provides a wide-angle view and automatically displays when reversing. Connect the camera as shown in the diagram.
- Connect the red wire to the car's reversing light positive (+12V).
- Connect the black wire to the car's reversing light negative (GND).
- Connect the video cable from the camera to the 'CAM IN' port on the autoradio.
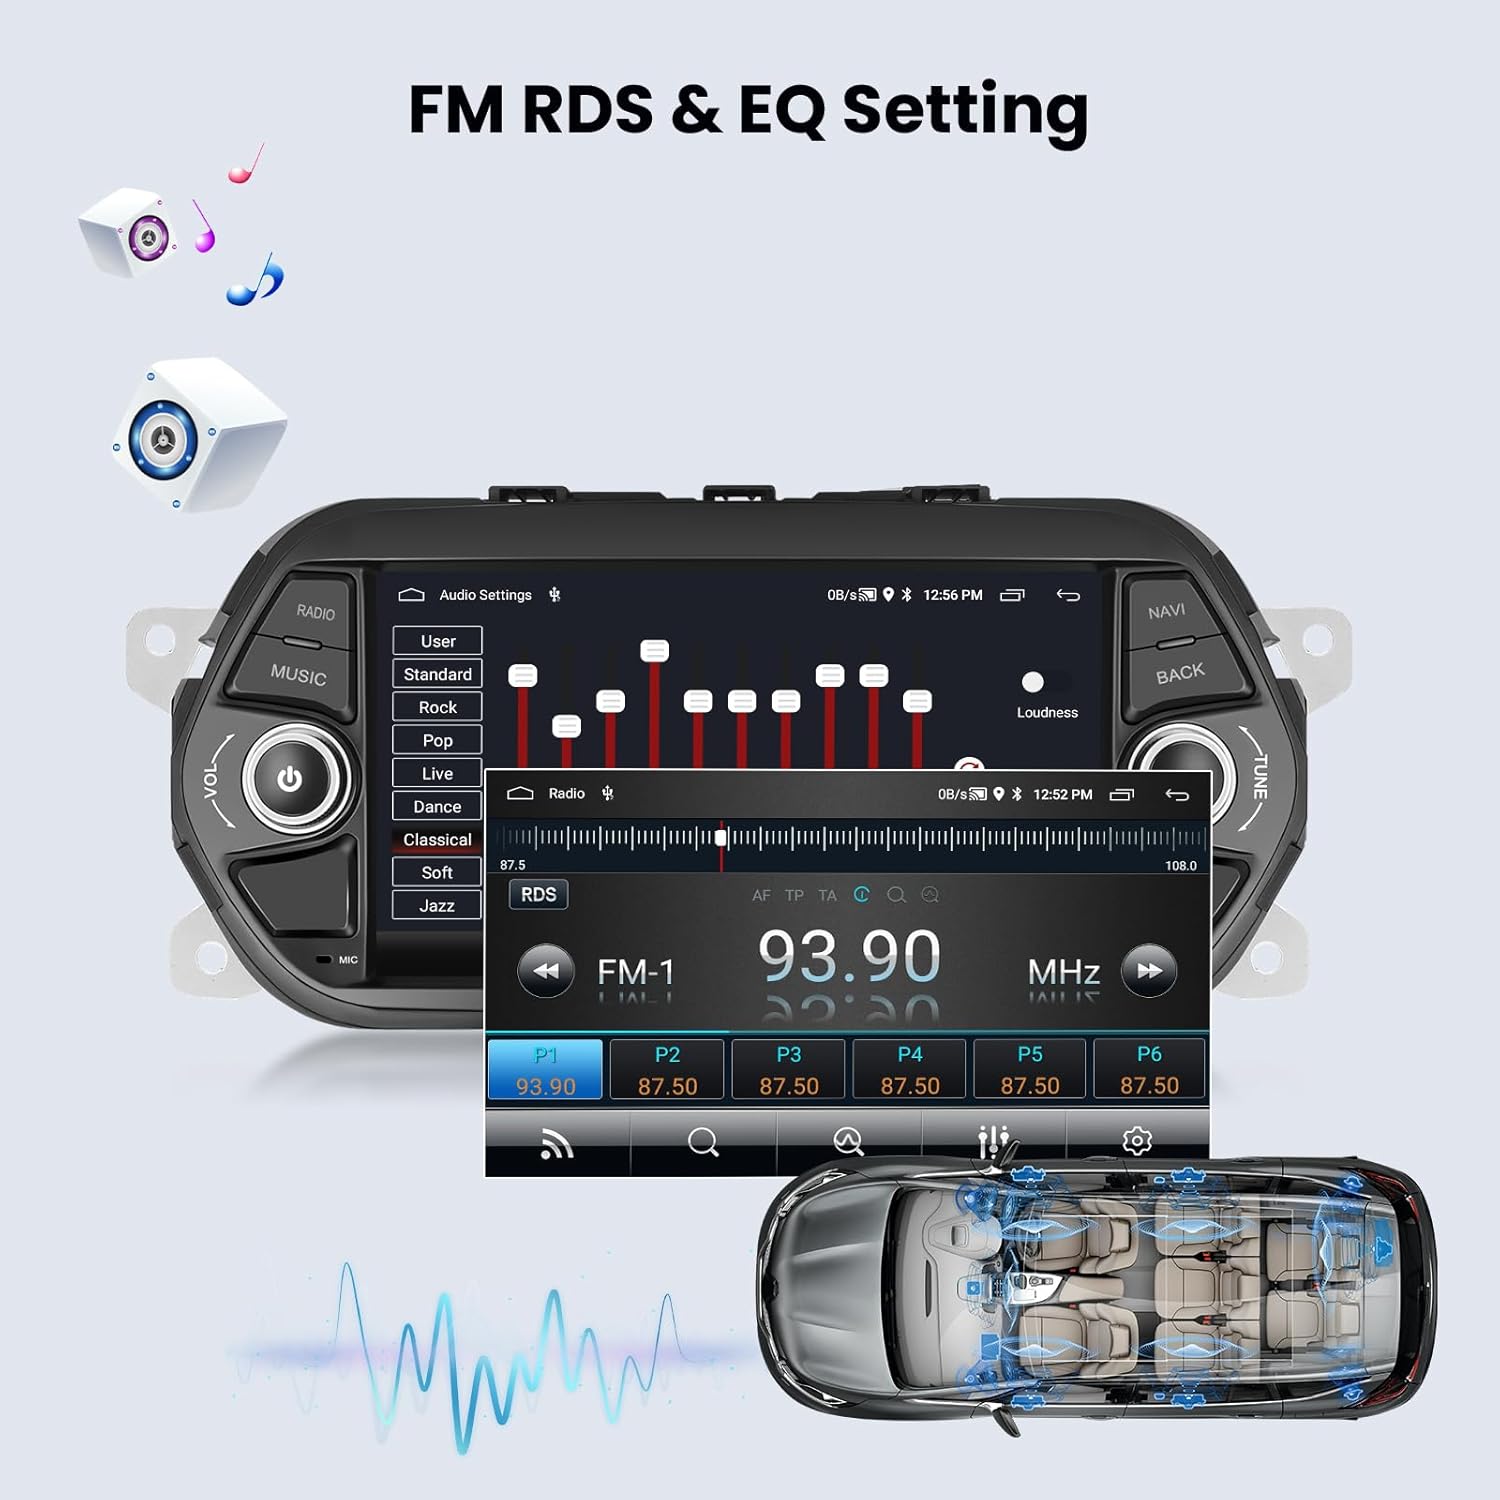
Figure 3.2: Wiring instructions for the AHD rear view camera, including power and video signal connections.
3.3 Steering Wheel Control Setup
To enable original steering wheel controls, follow these steps:
- Go to Settings.
- Select Factory Settings (Password: 1234).
- Navigate to Protocol settings.
- Select the appropriate Protocol Box Brand (refer to the surface of your Canbus protocol box).
- Follow the on-screen instructions to program the steering wheel buttons.

Figure 3.3: Guide for configuring original steering wheel controls with the autoradio.
4. Basic Operation
4.1 Power On/Off
Press and hold the power button (usually marked with a power symbol) on the front panel to turn the unit on or off. A short press typically mutes or unmutes the audio.
4.2 Touchscreen Interface
The 7-inch HD capacitive touchscreen supports multi-touch gestures. Navigate through menus and applications by tapping, swiping, and pinching.

Figure 4.1: The responsive 1080P touchscreen interface, highlighting its clarity and sensitivity.
4.3 UI Themes
The autoradio offers multiple user interface themes to personalize your experience. Access theme settings through the system menu to choose from various designs.

Figure 4.2: A visual representation of the diverse UI themes available for customization.
5. Connectivity Features
5.1 Wireless Carplay & Android Auto
Connect your iPhone or Android smartphone wirelessly to access navigation, music, calls, and messages directly from the autoradio's screen. This feature supports both wireless and wired connections.
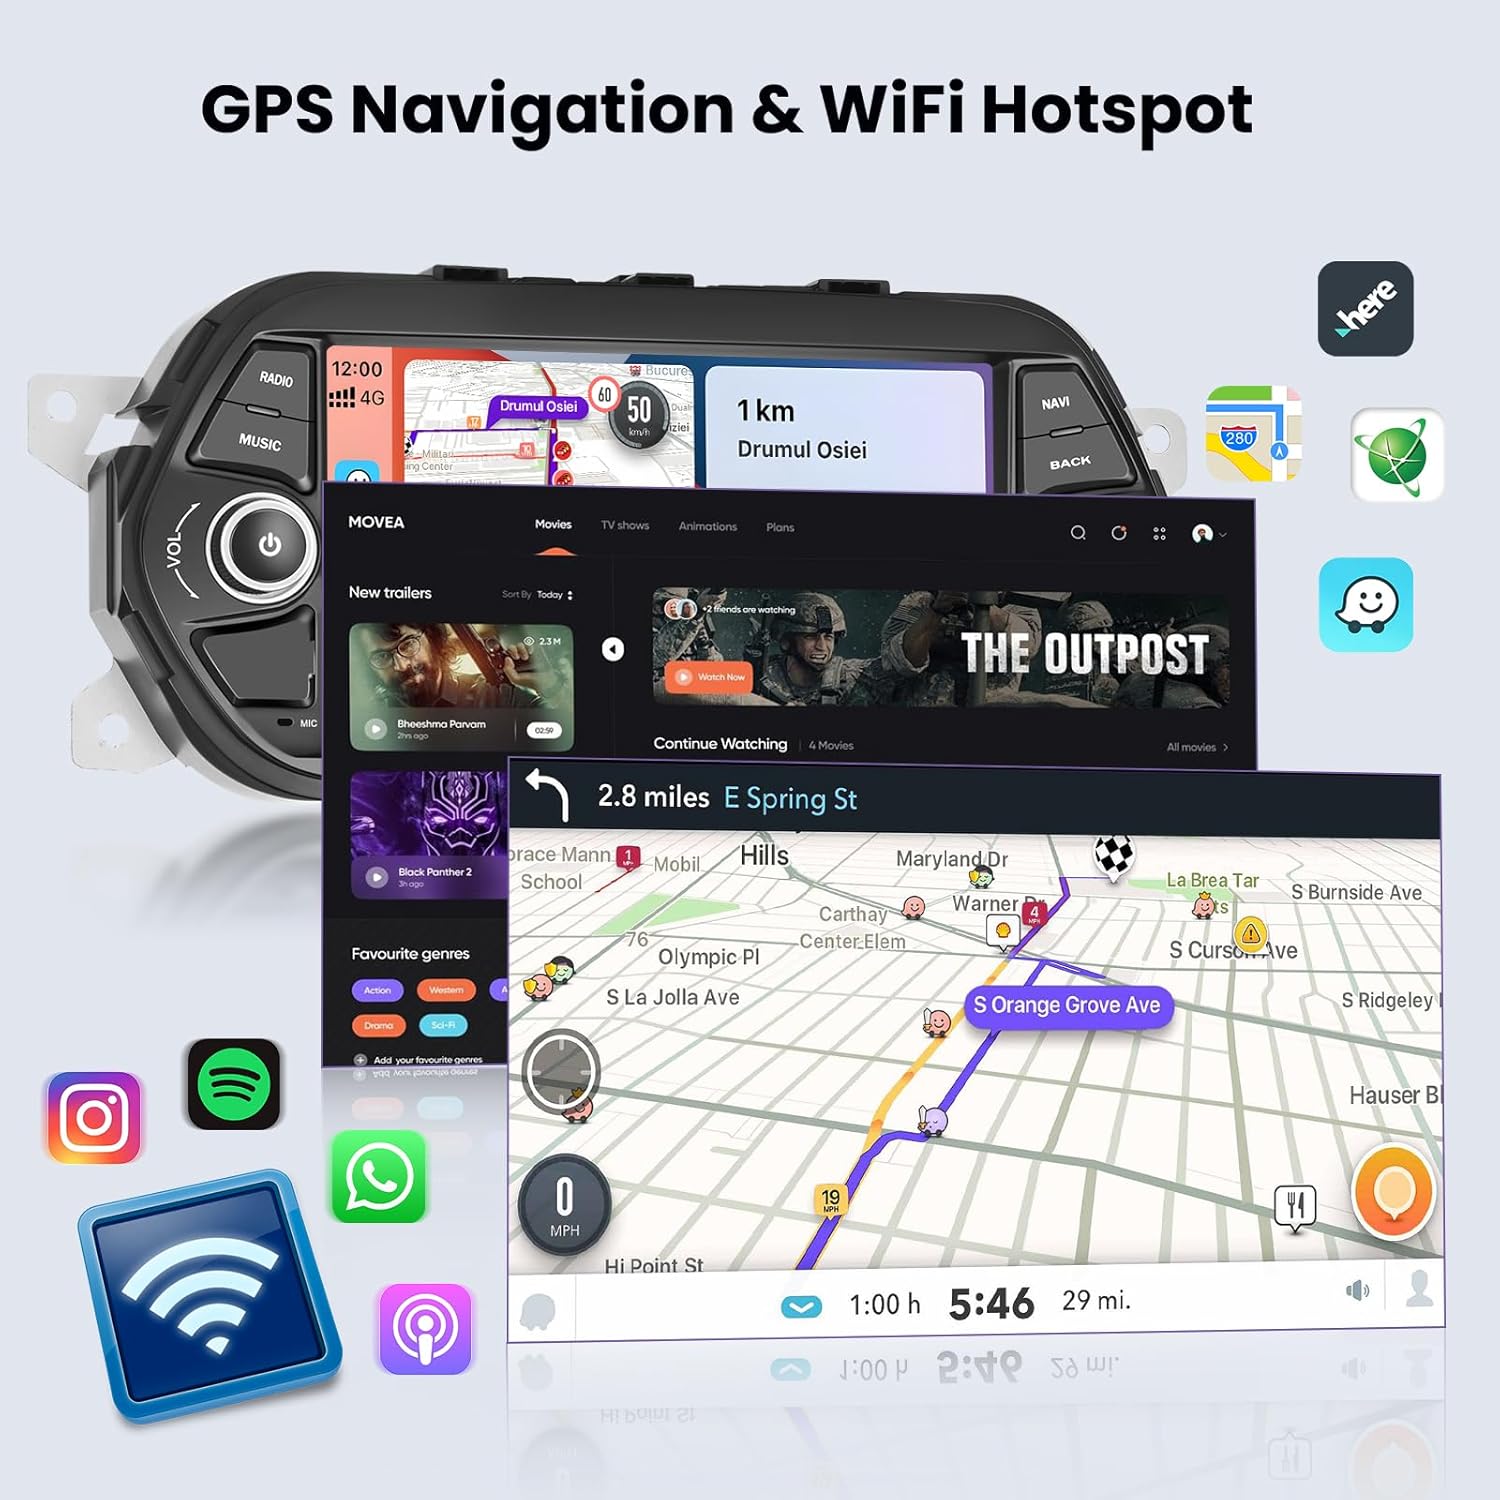
Figure 5.1: Illustration of wired and wireless connectivity options for Carplay and Android Auto.
5.2 Mirror Link
Mirror Link allows you to display your smartphone's screen directly onto the autoradio's display, enabling control of phone applications from the larger screen.

Figure 5.2: Visual representation of Wireless Carplay, Android Auto, and Mirror Link capabilities.
5.3 Bluetooth Pairing
Pair your smartphone via Bluetooth for hands-free calling and audio streaming. Access the Bluetooth menu on the autoradio to search for and connect to your device.

Figure 5.3: Bluetooth interface for calls and music, including voice assistant interaction.
5.4 WiFi Hotspot & Internet Access
Connect the autoradio to a WiFi hotspot (e.g., from your smartphone) to access online services, stream videos, browse the internet, and download applications from the app store.

Figure 5.4: The autoradio connected to WiFi, enabling online navigation and media streaming.

Figure 5.5: Built-in WiFi functionality for internet access and app downloads.
6. Navigation & Multimedia
6.1 GPS Navigation (Online/Offline Maps)
The autoradio features integrated GPS navigation. You can use online maps when connected to WiFi or download offline maps for navigation without an internet connection.

Figure 6.1: Online and offline GPS navigation options.
6.2 FM/RDS Radio
Tune into your favorite radio stations with the built-in FM tuner. RDS (Radio Data System) provides additional information like station names and song titles where available.
6.3 Audio Equalizer (EQ)
Customize your audio experience with the integrated equalizer. Select from preset sound modes (e.g., Pop, Rock, Jazz) or adjust individual frequency bands to match your preferences.
Figure 6.2: FM RDS radio interface and audio equalizer settings for sound customization.
7. Maintenance
To ensure the longevity and optimal performance of your autoradio, follow these maintenance guidelines:
- Cleaning the Screen: Use a soft, lint-free cloth to gently wipe the touchscreen. For stubborn smudges, slightly dampen the cloth with water or a screen-cleaning solution. Avoid harsh chemicals or abrasive materials.
- General Cleaning: Keep the unit free from dust and debris. Use a soft brush or compressed air to clean vents and buttons.
- Software Updates: Periodically check for available software updates to ensure you have the latest features and bug fixes. Updates can usually be found through the system settings or the manufacturer's website.
- Avoid Extreme Temperatures: Do not expose the unit to extreme heat or cold for extended periods, as this can affect its performance and lifespan.
8. Troubleshooting
If you encounter any issues with your Hikity Autoradio, refer to the following common problems and solutions:
| Problem | Possible Cause | Solution |
|---|---|---|
| Unit does not power on | Incorrect wiring, blown fuse, vehicle battery issue | Check power cable connections. Verify vehicle fuse box. Ensure car battery is charged. |
| No sound | Volume muted, incorrect speaker wiring, audio settings | Check volume level and mute status. Verify speaker connections. Adjust audio output settings. |
| Touchscreen unresponsive | System freeze, calibration issue | Restart the unit. If issue persists, perform a factory reset (data will be lost). |
| GPS signal lost or inaccurate | GPS antenna obstruction, poor satellite reception | Ensure GPS antenna is properly installed and has a clear view of the sky. Move to an open area. |
| Bluetooth connection issues | Device not discoverable, pairing error | Ensure Bluetooth is enabled on both devices. Delete previous pairings and re-pair. Restart both devices. |
| Rear camera not displaying | Incorrect wiring, camera fault | Check camera power and video signal connections. Ensure the vehicle is in reverse gear. |
If the problem persists after attempting these solutions, please contact Hikity customer support for further assistance.
9. Specifications
| Feature | Detail |
|---|---|
| Brand | Hikity |
| Model Number | Hikity-A3836A4MI2EU26-C304 |
| Screen Size | 7 Inches / 18 cm |
| Operating System | Android 15 |
| Processor | 4 Core CPU |
| RAM | 2GB |
| ROM | 64GB |
| Connectivity Technology | Bluetooth, USB, Wi-Fi |
| Special Features | Android Auto, Built-in Bluetooth, GPS Navigation, FM Tuner, Wireless Carplay, Mirror Link |
| Compatible Devices | Smartphone |
| Total USB Ports | 2 |
| Audio Output Mode | Stereo |
| Surround Sound Channel Configuration | 4 |
| Video Encoding Support | MKV/RMVB/AVI/MP4/MDV etc. |
| Product Dimensions | 27.3D x 6.5W x 12H centimeters |
10. Warranty & Support
10.1 Manufacturer's Warranty
This product comes with a 12-month manufacturer's warranty. Hikity provides lifetime online assistance for inquiries and aims to respond within 24 hours.
10.2 Customer Support
For technical support, warranty claims, or any other assistance, please visit the official Hikity store on Amazon or contact their customer service directly.
Visit the Hikity Store for more information and support.