Important Safeguards
When using electrical appliances, basic safety precautions should always be followed to reduce the risk of fire, electric shock, and injury to persons. Please read all instructions carefully before using this appliance.
- Do not touch hot surfaces. Use handles or knobs.
- To protect against electrical shock, do not immerse cord, plugs, or appliance in water or other liquid.
- Close supervision is necessary when any appliance is used by or near children.
- Unplug from outlet when not in use and before cleaning. Allow to cool before putting on or taking off parts, and before cleaning the appliance.
- Do not operate any appliance with a damaged cord or plug, or after the appliance malfunctions or has been damaged in any manner.
- The use of accessory attachments not recommended by the appliance manufacturer may cause injuries.
- Do not use outdoors.
- Do not let cord hang over edge of table or counter, or touch hot surfaces.
- Do not place on or near a hot gas or electric burner, or in a heated oven.
- Extreme caution must be used when moving an appliance containing hot oil or other hot liquids.
- Always attach plug to appliance first, then plug cord into the wall outlet. To disconnect, turn any control to "off", then remove plug from wall outlet.
- Do not use appliance for other than intended use.
- The cool-touch locking handle and anti-slip feet are designed for enhanced safety during operation.
Product Overview
The SIMPLUS Electric Sandwich Maker SMZJ001 is a compact and efficient appliance designed for quick meal preparation. It features non-stick plates for easy food release and cleaning, indicator lights for operational status, and a cool-touch handle for safe use.
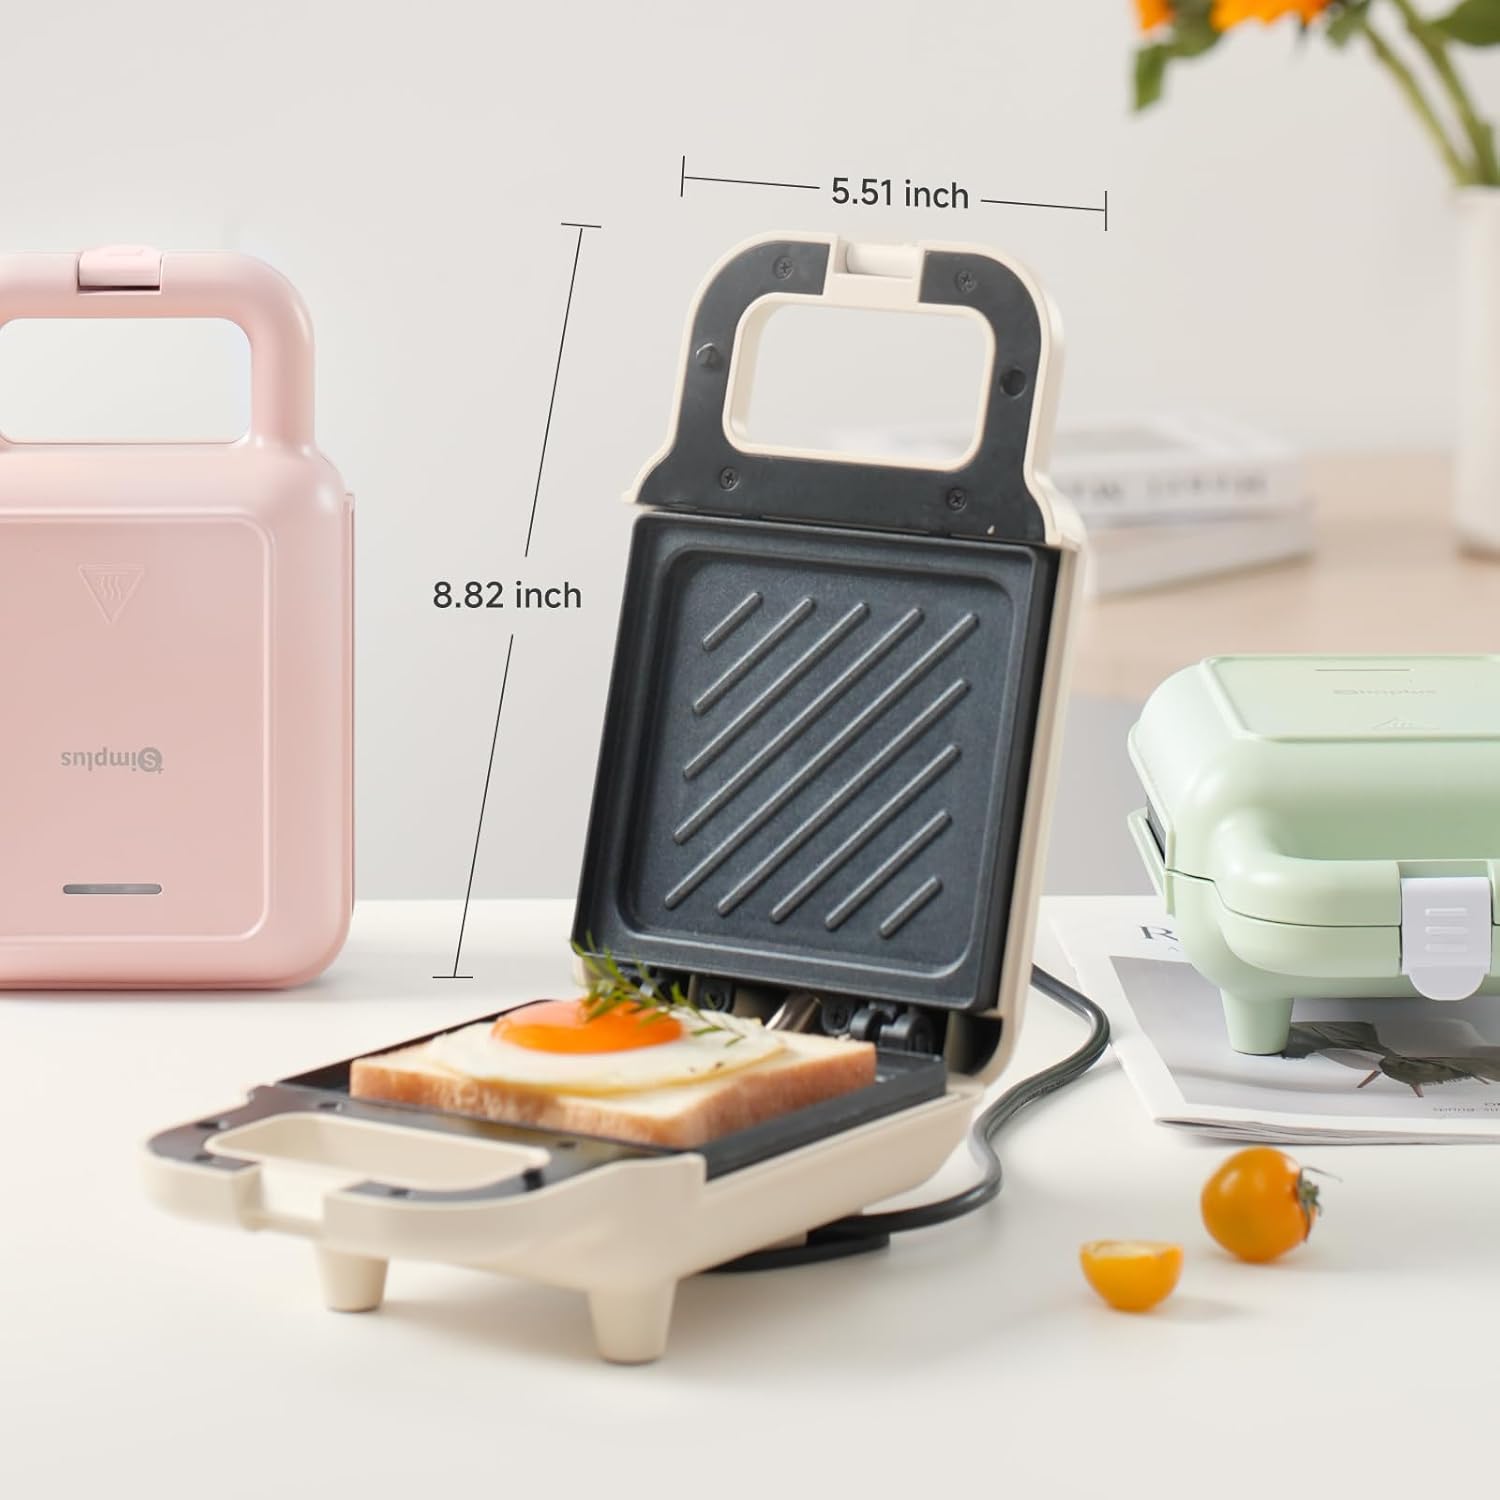
Image: The SIMPLUS Electric Sandwich Maker, open to show the cooking plates, with dimensions indicating a width of 5.51 inches and a height of 8.82 inches when open. A fried egg on bread is visible on the lower plate. Another pink sandwich maker and a green one are in the background.
Key Components
- Non-Stick Cooking Plates: For easy food release and cleaning.
- Indicator Lights: Power and preheat indicators for operational status.
- Cool-Touch Handle: Ensures safe handling during and after use.
- Safety Buckle: Secures the appliance during cooking and storage.
- Cord Storage Design: For convenient and tidy storage.
- Anti-Slip Feet: Provides stability on countertops.
- Overheat Protection: Automatically regulates temperature to prevent overheating.

Image: A collage showing close-up details of the sandwich maker: a safety buckle, a cord storage design on the bottom, a convenient handle, and an overheat protection indicator light.
Before First Use
- Unpack the appliance and remove all packaging materials.
- Wipe the non-stick cooking plates with a damp cloth or sponge. Do not use abrasive cleaners or scouring pads.
- Dry thoroughly.
- For the first use, it is recommended to lightly grease the cooking plates with a small amount of cooking oil or butter. This helps to condition the non-stick surface.
Operating Instructions
Basic Operation
- Prepare Ingredients: Gather your desired ingredients for sandwiches, omelets, or other items.
- Preheat: Plug the sandwich maker into a 110V electrical outlet. The power indicator light will illuminate. Allow the appliance to preheat for approximately 3-5 minutes until the preheat indicator light (if present) signals readiness.
- Add Ingredients: Open the sandwich maker using the cool-touch handle. Place your ingredients onto the bottom cooking plate. For sandwiches, you may brush bread with butter or oil as desired.
- Close and Cook: Carefully close the lid and secure the safety buckle. The appliance will begin cooking. Cooking time for sandwiches is typically around 5 minutes, but may vary based on ingredients and desired crispness.
- Remove Food: Once cooking is complete, open the lid and carefully remove the cooked food using a non-metallic utensil to avoid scratching the non-stick surface.
- Unplug: Unplug the appliance from the outlet when finished cooking.

Image: A pink SIMPLUS Electric Sandwich Maker with a sandwich inside, illustrating that it cooks in approximately 5 minutes with a '5 Mins' timer graphic.
Step-by-Step Visual Guide

Image: A four-step visual guide showing how to use the sandwich maker: 1. Add ingredients (egg on bread). 2. Plug in and close the buckle. 3. Wait for 5 minutes. 4. Transfer to a plate and enjoy.
Versatile Cooking Options
Beyond traditional sandwiches, this appliance can be used to prepare a variety of breakfast and snack items:
- Omelets: Pour whisked eggs directly onto the preheated plates.
- French Toast: Dip bread in egg mixture and cook until golden brown.
- Grilled Cheese: Classic grilled cheese sandwiches.
- Tuna Melts: Combine tuna salad with cheese and bread for a warm meal.
- Other Snacks: Experiment with various ingredients for quick, hot snacks.

Image: A collage demonstrating versatile cooking with the sandwich maker, showing a cooked sandwich, waffles, steak, and a fried egg.
Official Product Video
Video: An official SIMPLUS video demonstrating the use of the sandwich maker, including cooking eggs and sandwiches, and showing the easy cleaning process.
Cleaning and Maintenance
Proper cleaning and maintenance will ensure the longevity and optimal performance of your sandwich maker.
- Cool Down: Always unplug the appliance and allow it to cool completely before cleaning.
- Clean Plates: The non-stick surface allows for easy cleaning. Wipe the cooking plates with a damp cloth or sponge. For stubborn residue, a small amount of mild dish soap can be used, followed by wiping with a clean damp cloth. Do not use abrasive materials or metal utensils, as these can damage the non-stick coating.
- Clean Exterior: Wipe the exterior of the appliance with a soft, damp cloth. Do not immerse the appliance in water or any other liquid.
- Storage: Once clean and dry, the compact and lightweight design allows for upright storage, saving space. Utilize the cord storage design to keep the power cord tidy.

Image: A green SIMPLUS Electric Sandwich Maker with its non-stick plates being wiped clean with a cloth, highlighting its easy-to-clean design and PTFE coating (PFOS free, PFOA free).
Troubleshooting
If you encounter issues with your SIMPLUS Electric Sandwich Maker, please refer to the following common problems and solutions:
| Problem | Possible Cause | Solution |
|---|---|---|
| Appliance does not heat up. | Not plugged in; power outlet malfunction; internal fault. | Ensure the appliance is securely plugged into a working outlet. Check the circuit breaker. If the issue persists, contact customer support. |
| Food sticks to the plates. | Plates not properly greased; excessive sugar in ingredients; damaged non-stick coating. | Lightly grease plates before each use. Avoid using metal utensils. If coating is damaged, consider replacement. |
| Indicator lights not working. | Bulb failure; internal wiring issue. | The appliance may still function. If it affects operation, contact customer support. |
| Uneven cooking. | Uneven distribution of ingredients; insufficient preheating. | Ensure ingredients are spread evenly. Allow the appliance to fully preheat before adding food. |
Product Specifications
| Feature | Detail |
|---|---|
| Brand | SIMPLUS |
| Model Number | SMZJ001 |
| Special Feature | Lightweight, Temperature Control |
| Color | Pink |
| Material | Plastic |
| Product Dimensions | 10.04"D x 7.17"W x 4.92"H |
| Wattage | 650.0 W |
| Item Weight | 1.98 Pounds |
| Included Components | Sandwich Maker |
| Voltage | 110 Volts |
| Number of Settings | 1 |
Warranty and Support
For warranty information, please refer to the documentation included with your purchase or visit the official SIMPLUS website. If you require technical assistance, have questions about product operation, or need to report a defect, please contact SIMPLUS customer support through their official channels.
Contact information can typically be found on the product packaging, the SIMPLUS website, or by searching for 'SIMPLUS customer support' online.