1. Introduction
Thank you for choosing the LUTHXAY 44-inch Bathroom Vanity. This manual provides essential information for the safe and correct installation, operation, and maintenance of your new vanity. Please read all instructions carefully before beginning installation and retain this manual for future reference.
2. Safety Information
- Always ensure the power supply is disconnected before any electrical installation or maintenance.
- Installation should be performed by qualified personnel if you are unsure about any steps.
- Wear appropriate safety gear, including gloves and eye protection, during installation.
- Ensure the wall structure is capable of supporting the weight of the vanity and its contents.
- Keep small parts and packaging materials away from children.
3. Package Contents
Verify that all components are present and undamaged before beginning assembly.
- Vanity Cabinet (Wall Mount)
- Integrated Countertop with Sink
- Defog LED Mirror
- Floating Glass Cabinet (if included in your specific model)
- Faucet Set
- Drain Pipe
- Mounting Hardware (screws, anchors, brackets)
- Instruction Manual
4. Specifications
| Feature | Detail |
|---|---|
| Brand | LUTHXAY |
| Model Size | 44 inches |
| Product Dimensions | 22"D x 44"W x 20"H |
| Color | Black & White |
| Mounting Type | Wall Mount |
| Material | Solid Wood (Cabinet), Ceramic (Basin) |
| Special Features | LED Defog Mirror, Large Storage, Soft-Closing Drawers, Integrated Basin |
| Included Components | Defog LED mirror, vanity cabinet, countertop with sink, faucet set |
Dimensions of the vanity and mirror are provided for planning your installation space.
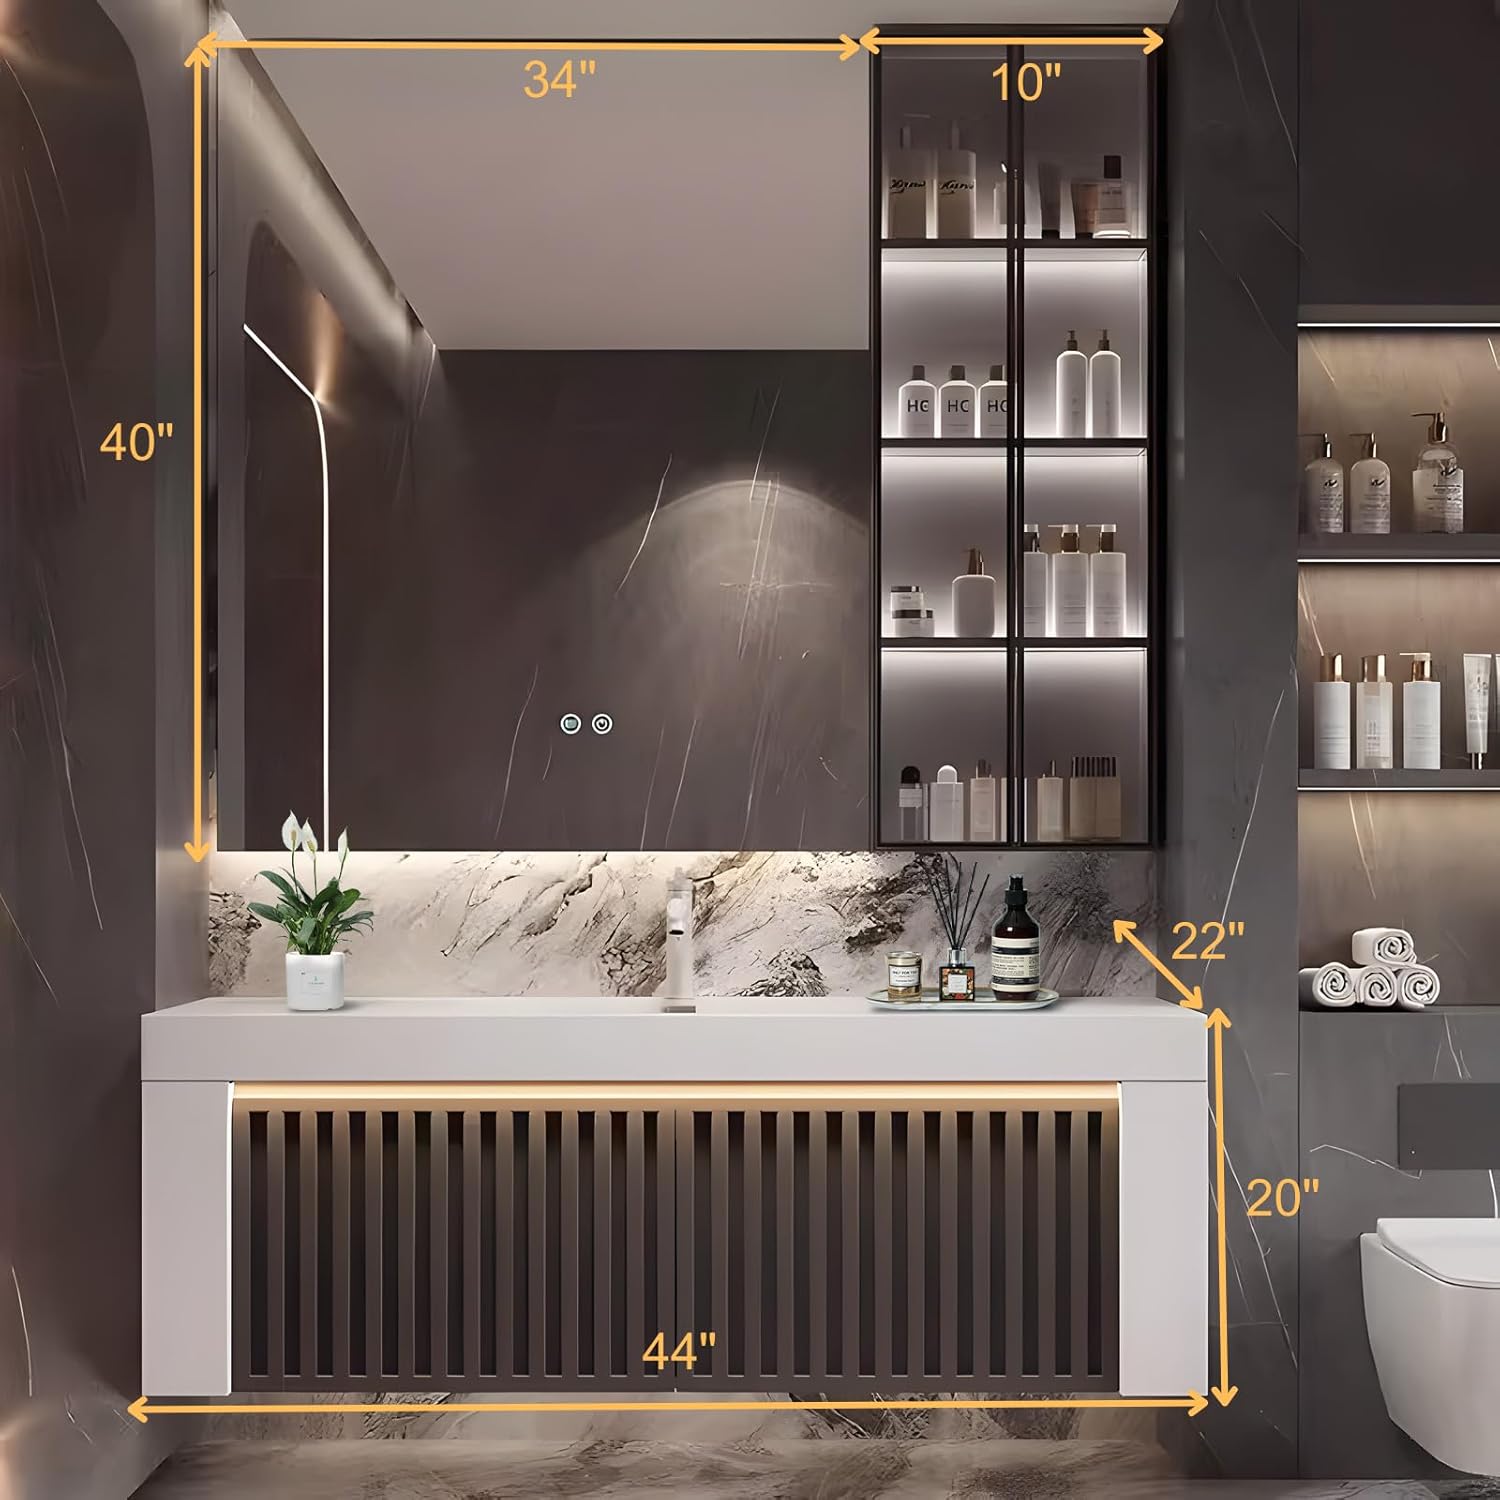
Image: Detailed dimensions of the LUTHXAY 44-inch bathroom vanity and mirror.
5. Setup and Installation
This section outlines the steps for installing your LUTHXAY bathroom vanity. It is recommended to watch the installation video for visual guidance.
5.1 Installation Video Guide
Video: Step-by-step installation guide for the LUTHXAY Bathroom Vanity, demonstrating wall mounting, faucet, sink, and mirror setup.
5.2 Wall Mounting the Cabinet
- Measure and Mark: Use a tape measure to determine the desired height for your vanity. Mark the drilling points on the wall according to the cabinet's mounting brackets.
- Drill Holes: Drill pilot holes at the marked locations. Insert wall anchors if necessary, ensuring they are flush with the wall surface.
- Secure Brackets: Attach the mounting brackets to the wall using the provided screws. Ensure they are level and securely fastened.
- Mount Cabinet: Carefully lift the vanity cabinet and align it with the wall brackets. Secure the cabinet to the brackets.
5.3 Faucet and Drain Installation
- Install Faucet: Insert the faucet into the designated hole on the countertop. Secure it from underneath with the provided washers and nuts.
- Connect Water Lines: Attach the hot and cold water supply lines to the faucet and connect them to your home's water supply. Ensure all connections are tight to prevent leaks.
- Install Drain: Place the drain assembly into the sink's drain hole. Secure it with the gasket and nut from underneath. Connect the drain pipe to the P-trap and wall drain.
5.4 Sink Placement
- Position Sink: Carefully place the integrated countertop with the pre-installed faucet and drain onto the vanity cabinet. Ensure it is properly aligned.
- Secure Sink: Apply a bead of silicone sealant along the top edge of the cabinet where the sink will rest to create a watertight seal. Press the sink firmly into place.

Image: The elegant integrated basin, designed for easy cleaning and durability.
5.5 Mirror and Floating Glass Cabinet Installation
- Mark Mirror Position: Determine the desired height and center for the LED mirror above the vanity. Mark the mounting points.
- Install Mirror Brackets: Drill holes and install the mirror mounting brackets or hardware as per the mirror's specific instructions.
- Mount Mirror: Carefully hang the LED mirror onto the installed brackets.
- Install Floating Glass Cabinet: If your model includes a floating glass cabinet, follow similar steps to mount it securely to the wall, ensuring it is level with the mirror or vanity as desired.
5.6 Electrical Wiring for LED Mirror and Cabinet Lights
The LED lights in the mirror and cabinet require a power connection. It is recommended to reserve power outlets behind the mirror or under the bathroom cabinet.
- Solution A (Direct Connection): Connect the vanity's power cord directly to a reserved light cord in the wall. This typically requires professional electrical wiring.
- Solution B (Plug-in): Purchase a power cord with a plug. Connect this cord to the vanity's reserved light cord, then plug it into a nearby electrical socket.

Image: Wiring methods for the LED mirror and cabinet lights.
6. Operating Instructions
6.1 LED Defog Mirror
The LED mirror features a built-in advanced electric heating module for defogging.
- Activate Defogger: Touch the designated sensor button on the mirror surface to activate the defogging function. This will quickly clear water mist after bathing.
- Adjust Lighting: The mirror may also have touch controls for adjusting LED light brightness or color temperature. Refer to the specific mirror's instructions for detailed operation.
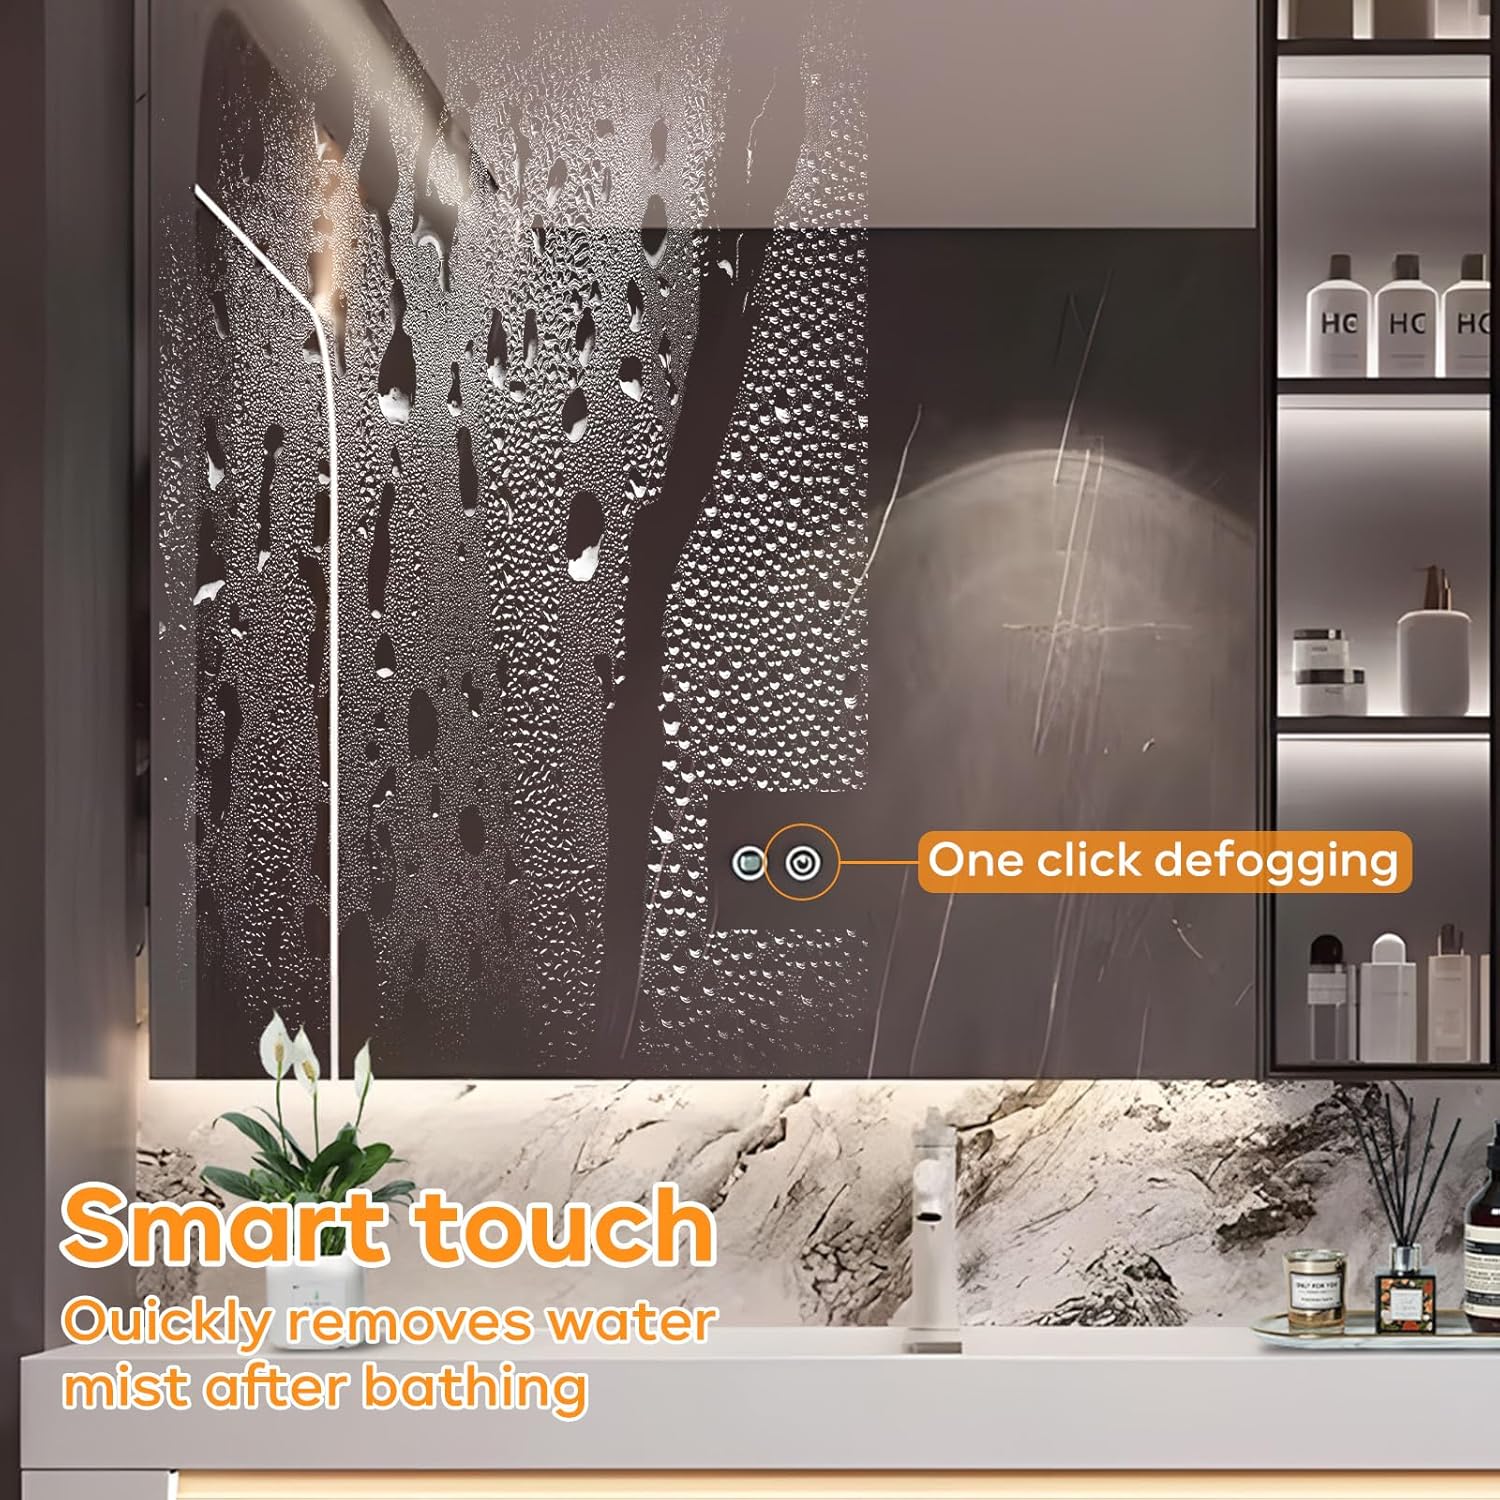
Image: Smart touch defogging feature of the LED mirror.
6.2 Soft-Closing Drawers and Doors
The vanity is equipped with adjustable soft-close hinges and slides for quiet and smooth operation.
- Operation: Gently push the drawers or cabinet doors to close them. The soft-close mechanism will engage, preventing slamming and minimizing wear.
- Adjustment: If a drawer or door is not closing smoothly, the hinges and slides can be adjusted. Consult a professional or refer to specific hardware instructions for adjustment procedures.

Image: High-quality soft-closing hardware for drawers and doors.
7. Maintenance
7.1 Cleaning the Basin and Countertop
- Use a soft cloth and mild, non-abrasive cleaner for daily cleaning.
- Avoid harsh chemicals, abrasive pads, or acidic cleaners, as these can damage the surface.
- Wipe spills immediately to prevent staining.
7.2 Cabinet Care
- Wipe cabinet surfaces with a soft, damp cloth. Dry immediately to prevent moisture damage.
- Avoid prolonged exposure to excessive moisture or humidity.
- Do not use silicone-based polishes or waxes, as they can build up over time.
7.3 Mirror Care
- Clean the mirror surface with a glass cleaner and a soft, lint-free cloth.
- Do not spray cleaner directly onto the mirror; instead, apply it to the cloth first.
- Avoid getting moisture into the electrical components of the LED mirror.
8. Troubleshooting
| Problem | Possible Cause | Solution |
|---|---|---|
| LED Mirror not lighting up | No power supply; loose connection; faulty switch | Check power outlet and connections. Ensure the wall switch is on. If issues persist, contact customer support. |
| Defogger not working | Defogger not activated; electrical issue | Ensure the defogger touch button is pressed. Verify power supply to the mirror. |
| Drawers/Doors not closing smoothly | Hinges/slides need adjustment; obstruction | Check for any obstructions. Adjust the soft-close hinges or slides as needed. |
| Water leaks from faucet/drain | Loose connections; improper sealing | Tighten all water supply and drain connections. Apply plumber's putty or silicone sealant where necessary. |
9. Warranty and Support
9.1 Warranty Information
LUTHXAY products are manufactured with high-quality materials and craftsmanship. This product comes with a standard manufacturer's warranty covering defects in materials and workmanship under normal use. Please retain your proof of purchase for warranty claims. Specific warranty terms and duration may vary; refer to your purchase documentation for details.
9.2 Customer Support
For any questions, assistance, or to report issues, please contact LUTHXAY customer support. You can find more information and contact details on our official brand store:
Our team is dedicated to providing support and ensuring your satisfaction.

Image: General information on product aspects and customer contact.