MechMaxx Farming HD Backup 1080P Camera System User Manual
Model: Farming HD Backup 1080P Camera System
Brand: MechMaxx
1. Introduction
This manual provides detailed instructions for the installation, operation, and maintenance of your MechMaxx Farming HD Backup 1080P Camera System. This system is designed to enhance visibility and safety for agricultural and heavy-duty commercial vehicles, offering a high-resolution 1080P camera and a 7-inch LCD monitor. Please read this manual thoroughly before using the product to ensure proper function and longevity.
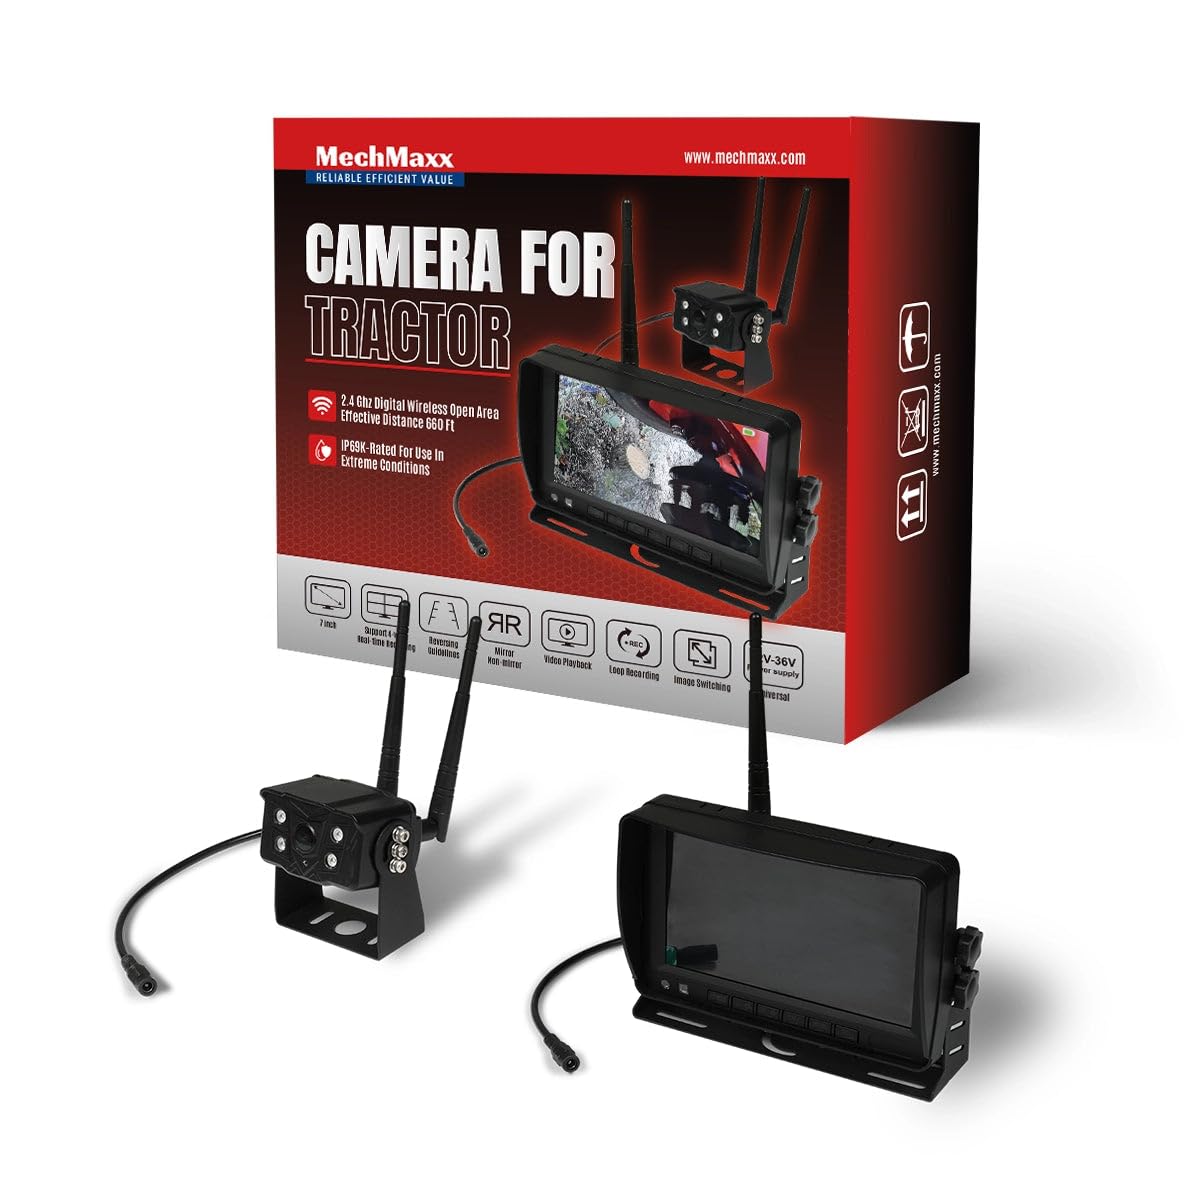
Figure 1: MechMaxx Farming HD Backup 1080P Camera System
2. Package Contents
Verify that all items listed below are included in your package:
- 7-inch HD LCD Monitor
- 1080P HD Camera Unit with IR Lights
- Power Cable for Monitor (Cigarette Lighter Adapter)
- Power Cable for Camera (Direct Battery Connection)
- Antennas for Wireless Transmission
- Mounting Bracket for Monitor
- Mounting Hardware (Screws, wrench)
- Remote Control
- User Manual

Figure 2: Package Contents
3. Setup & Installation
The MechMaxx camera system is designed for straightforward installation. Follow these steps for optimal performance.
3.1 Camera Unit Installation
- Mounting: Securely attach the camera unit to the rear or desired location on your vehicle using the provided mounting hardware. Ensure a clear line of sight for the camera.
- Antenna Connection: Screw the antennas firmly onto the designated ports on the camera unit.
- Power Connection: Connect the camera's power cable to a 12-36V DC power source. This can be directly to the vehicle's battery or an ignition-switched power source.
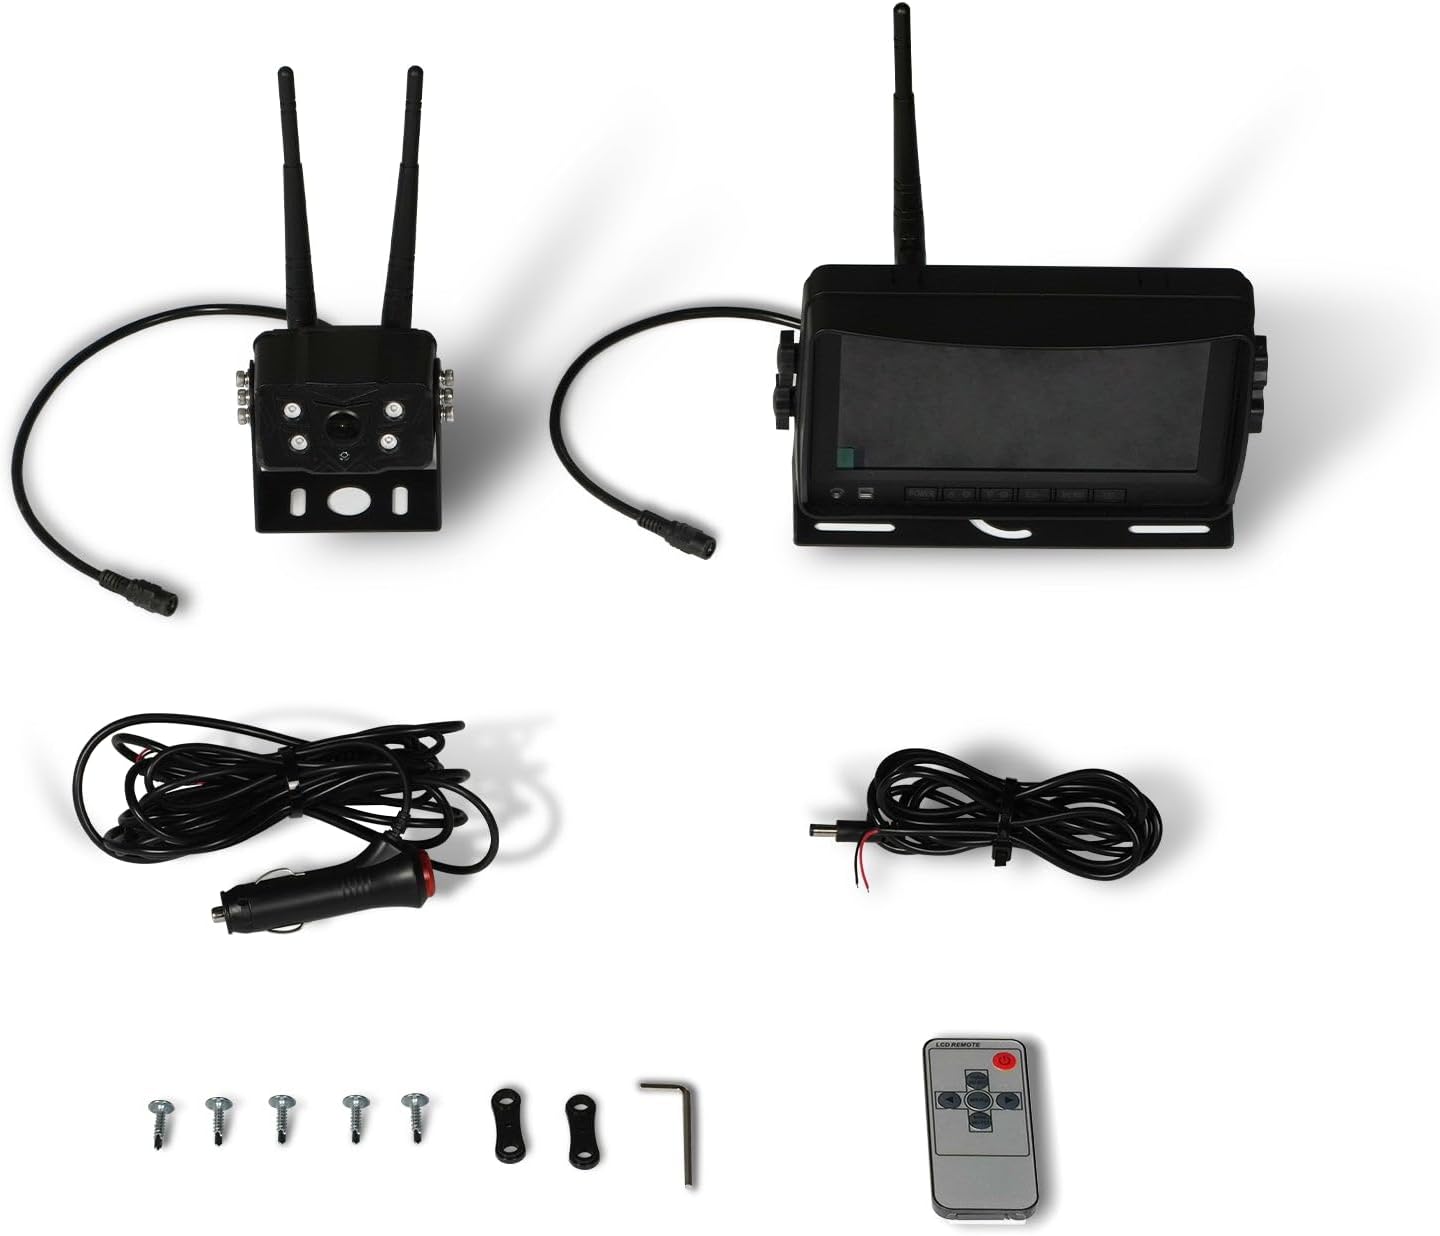
Figure 3: Camera Unit with Antennas

Figure 4: Camera Unit Detail
3.2 Monitor Installation
- Mounting: Attach the 7-inch LCD monitor to your dashboard or windshield using the provided suction cup or surface mount bracket. Adjust the angle for optimal viewing.
- Power Connection: Connect the monitor's power cable to your vehicle's cigarette lighter socket. The monitor will power on/off with the vehicle's ignition.

Figure 5: 7-inch LCD Monitor
3.3 Wiring Diagram
The system offers a simple 1-step installation for power. The monitor can be powered via a cigarette lighter, and the camera can be wired directly to the vehicle's battery or an ignition-controlled fuse.

Figure 6: Simplified Wiring Diagram
4. Operating Instructions
Once installed, the system is ready for use. The monitor will automatically display the camera feed when powered on.
4.1 Basic Operation
- Power On/Off: The system powers on automatically with the vehicle's ignition. You can also use the power button on the monitor or remote control.
- Viewing Modes: The 7-inch LCD provides a clear, full-color display. The camera offers a wide 120-degree field of view.
- Night Vision: The camera features strong IR lights for enhanced visibility in low-light conditions.
4.2 Monitor Controls
The monitor includes buttons for various settings and adjustments. Refer to the on-screen menu for detailed options.
- Menu (M): Access system settings.
- OK: Confirm selections.
- CH (Channel): Switch between multiple cameras if additional units are connected (not included in standard package).
- +/-: Adjust brightness, contrast, or navigate menu options.
5. Maintenance
To ensure the longevity and optimal performance of your camera system, follow these maintenance guidelines:
- Cleaning: Regularly clean the camera lens and monitor screen with a soft, damp cloth. Avoid abrasive cleaners that may scratch surfaces.
- Cable Inspection: Periodically check all cables and connections for wear, damage, or loose fittings. Secure any loose connections.
- Environmental Protection: While the camera is heavy-duty and designed for outdoor use, extreme weather conditions may affect performance. Ensure proper mounting to prevent vibration damage.
6. Troubleshooting
If you encounter issues with your MechMaxx camera system, refer to the following common problems and solutions:
| Problem | Possible Cause | Solution |
|---|---|---|
| No image on monitor | Loose power connection; Camera/monitor not powered; Interference | Check all power connections; Ensure vehicle ignition is on; Reduce distance between camera and monitor or check for obstructions. |
| Poor image quality | Dirty lens; Low light conditions; Signal interference | Clean camera lens; Ensure IR lights are active in low light; Check for strong signal interference sources. |
| Monitor not turning on | No power from cigarette lighter; Faulty power cable | Check vehicle's cigarette lighter fuse; Test power cable with another device if possible. |
If the problem persists after attempting these solutions, please contact MechMaxx customer support.
7. Specifications
Key technical specifications for the MechMaxx Farming HD Backup 1080P Camera System:
| Feature | Detail |
|---|---|
| Screen Size | 7 Inches |
| Display Technology | LCD |
| Optical Sensor Technology | CMOS |
| Lens Type | Wide Angle |
| Field Of View | 120 Degrees |
| Connector Type | AHD |
| Installation Type | Surface Mount |
| Compatible Devices | Monitor |
| Item Weight | 12 pounds |
| Color | Black |

Figure 7: Additional Specifications
8. Warranty & Support
For warranty information, technical support, or service inquiries, please refer to the contact details provided with your product packaging or visit the official MechMaxx website. Keep your purchase receipt as proof of purchase for warranty claims.


