Coolski IM90BX-1
Coolski 150 lbs/24H Commercial Ice Maker Machine User Manual
Model: IM90BX-1
1. Introduction
This user manual provides detailed instructions for the installation, operation, maintenance, and troubleshooting of your Coolski 150 lbs/24H Commercial Ice Maker Machine. Please read this manual thoroughly before operating the appliance to ensure safe and efficient use. Keep this manual for future reference.

Image 1.1: Front view of the Coolski 150 lbs/24H Commercial Ice Maker Machine with ice scoop and a glass of iced drink.
2. Safety Instructions
Always follow basic safety precautions when using electrical appliances to reduce the risk of fire, electric shock, and injury to persons.
- Ensure the appliance is properly grounded.
- Do not operate the machine with a damaged cord or plug.
- Keep ventilation openings clear of obstructions.
- Do not store explosive substances such as aerosol cans with a flammable propellant in this appliance.
- Unplug the machine before cleaning or performing any maintenance.
- This appliance is not intended for use by persons (including children) with reduced physical, sensory or mental capabilities, or lack of experience and knowledge, unless they have been given supervision or instruction concerning use of the appliance by a person responsible for their safety.
- Children should be supervised to ensure that they do not play with the appliance.
- Ensure the protective film on the stainless steel body is removed before first use.
3. Product Features
- High Ice Production: Produces up to 150 lbs (68 kg) of ice per 24 hours, with a storage capacity of 35 lbs (15.88 kg).
- Quick Ice Making: Capable of producing 45 ice cubes in approximately 6 minutes.
- Adjustable Ice Thickness: Customize ice cube thickness (thin, medium, thick) via the control panel.
- Self-Cleaning Function: One-touch automatic cleaning for easy maintenance.
- Durable Construction: High-quality, rust-free, corrosion-resistant stainless steel exterior with excellent insulation.
- Smart Control Panel: LED digital display for precise control and fault diagnosis.
- Compact Design: External dimensions of 20W × 15D × 33H inches (50.8W x 38.1D x 83.8H cm), suitable for freestanding or under-counter installation.
- Efficient Cooling: Features a quality compressor and rapid heat dissipation for environmental protection and performance.

Image 3.1: Illustration showing the continuous ice supply capability of 150 lbs per day, producing over 7000 ice cubes and 750 drinks daily.

Image 3.2: Close-up of the LED digital display and control buttons (Power, Mode, Clean, Set) with indicators for making ice, full ice, no water, high temp, and overtime.

Image 3.3: Visual representation of customizable ice cube thickness (Thin, Medium, Thick) based on ice-making duration (12, 15, 18 minutes).
4. Specifications
| Attribute | Value |
|---|---|
| Model Name | IM90BX-1 |
| Ice Production per Day | 150 lbs (68 kg) |
| Ice Storage Capacity | 35 lbs (15.88 kg) |
| Ice Cube Size | 0.9'' × 0.9'' × 0.9'' inches (approx.) |
| Voltage/Frequency | 115V / 60Hz |
| Wattage | 255 watts |
| Refrigerant Type | R290a |
| Product Dimensions (D x W x H) | 15D x 20W x 33H inches (38.1D x 50.8W x 83.8H cm) |
| Material | Stainless Steel |

Image 4.1: Diagram illustrating the product dimensions and included accessories: ice scoop, water filter, drain hose, and water hoses.
5. Package Contents
The Coolski Commercial Ice Maker Machine package includes:
- 1 x Coolski 150 lbs/24H Commercial Ice Maker Machine
- 1 x Water Inlet Hose
- 1 x Outlet Hose (Drain Hose)
- 1 x Water Filter
- 1 x Ice Scoop
- 1 x User Manual (this document)
6. Setup and Installation
Before installation, ensure the machine has been upright for at least 24 hours. This allows the refrigerant to settle properly.
6.1 Choosing a Location
- Place the ice maker on a flat, stable surface.
- Ensure adequate ventilation around the machine. Maintain at least 6 inches (15 cm) of space from walls or other objects.
- Avoid direct sunlight or heat sources.
- The machine can be used freestanding or built-in under a counter.

Image 6.1: Examples of the ice maker installed as a freestanding unit and built-in under a counter.
6.2 Connecting Water and Power
The ice maker requires a continuous water supply and a drain connection.
- Water Inlet: Connect the provided water inlet hose to a potable water supply. It is recommended to use the included water filter.
- Water Outlet (Drain): Connect the outlet hose to a suitable drain. Ensure the drain hose has a continuous downward slope to prevent water backup.
- Power Supply: Plug the machine into a grounded 115V / 60Hz electrical outlet.
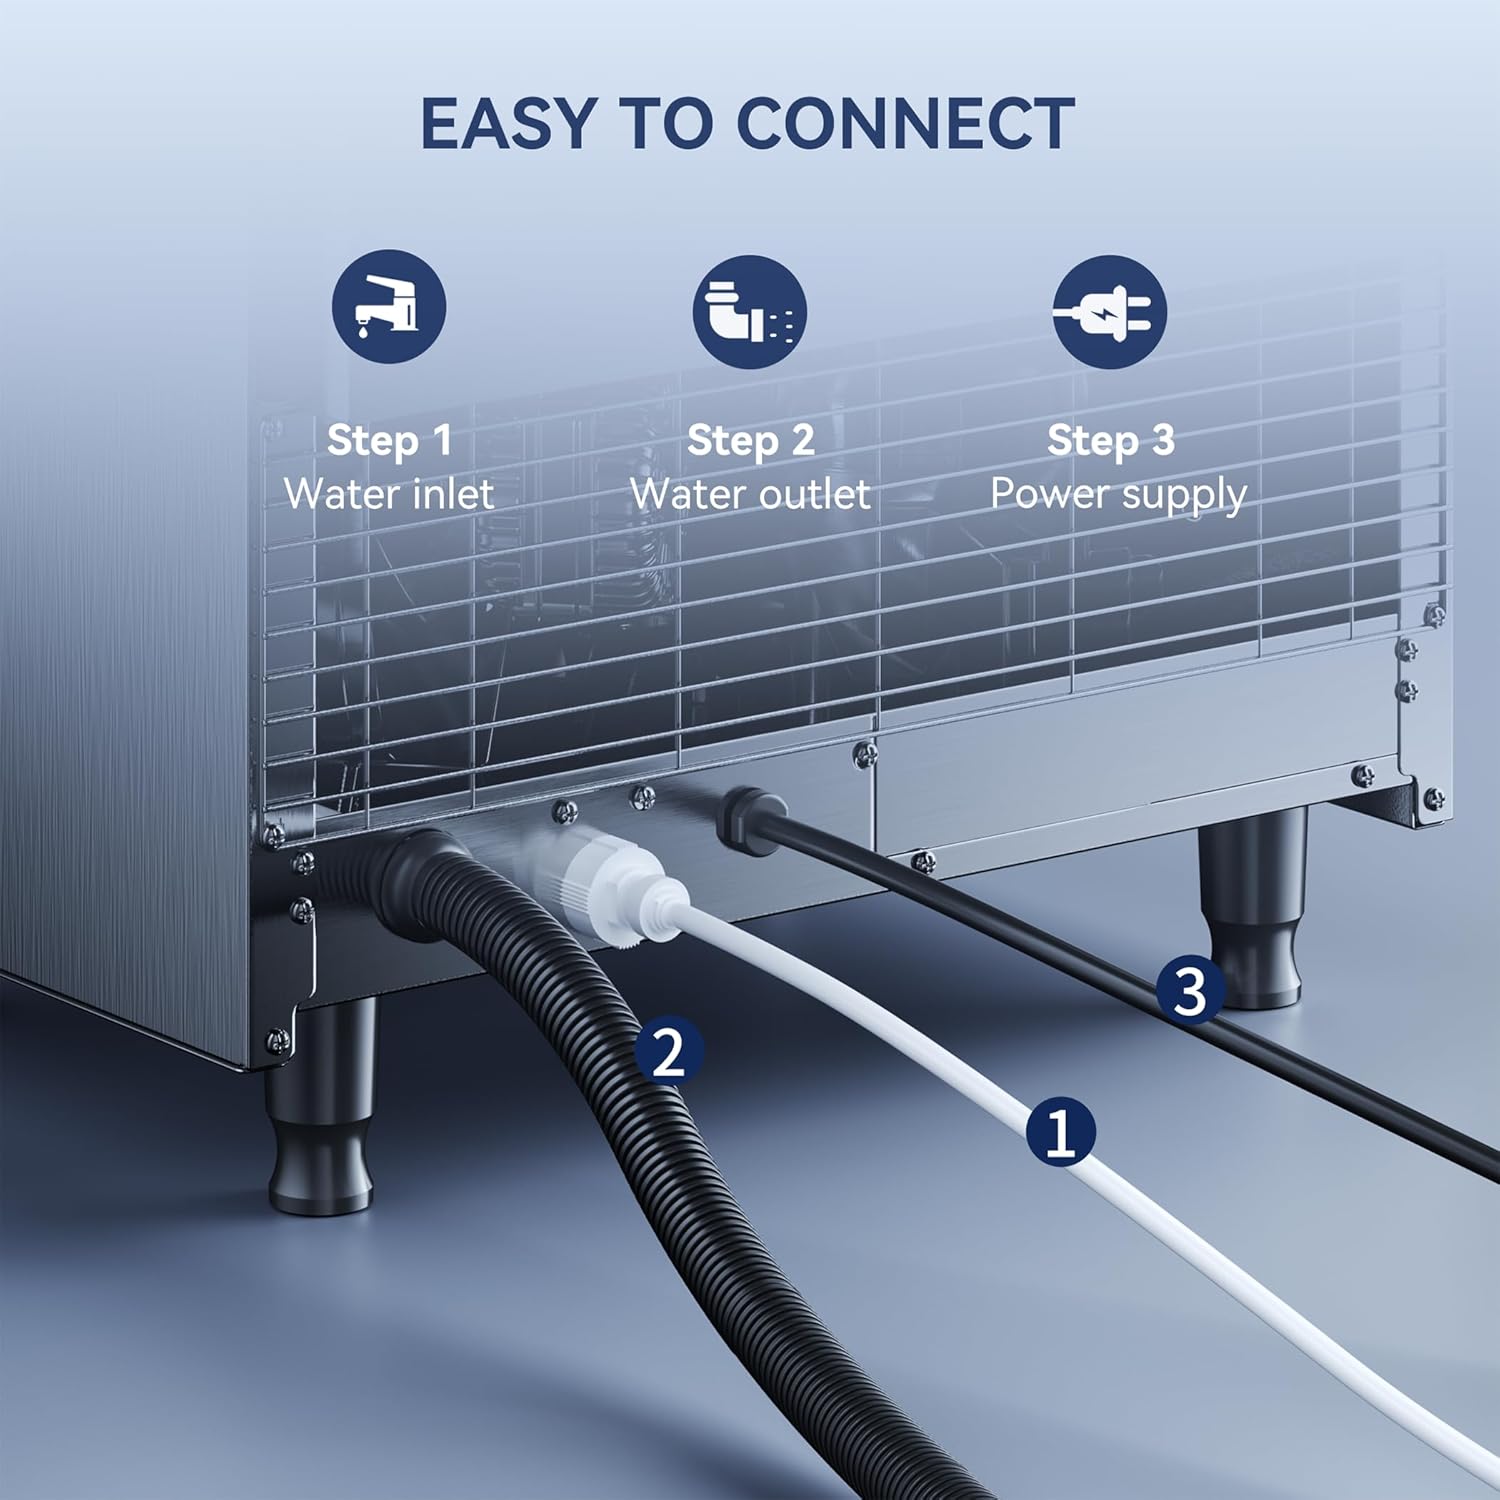
Image 6.2: Diagram showing the connection points for water inlet, water outlet, and power supply at the rear of the ice maker.
7. Operating Instructions
7.1 Initial Startup
- After connecting water and power, press the "Power" button on the control panel to turn on the machine.
- The machine will automatically begin the ice-making cycle. The "Making Ice" indicator light will illuminate.
- Discard the first few batches of ice to ensure cleanliness and remove any manufacturing residues.
7.2 Adjusting Ice Thickness
To adjust the ice cube thickness:
- Press and hold the "Set" button for more than 3 seconds to enter the ice cube thickness setting mode.
- Use the up/down buttons (often integrated with "Mode" or "Set" depending on the specific panel design, refer to Image 3.2) to adjust the ice-making time. Longer times result in thicker ice.
- Press "Set" again to confirm your selection.
7.3 Control Panel Indicators
- Making Ice: Indicates the machine is actively producing ice.
- Ice Full: Illuminates when the ice storage bin is full, pausing ice production.
- No Water: Indicates insufficient water supply. Check water connection and filter.
- High TEMP: Indicates the internal temperature is too high. Ensure proper ventilation.
- Overtime: Indicates an extended ice-making cycle, potentially due to issues.
8. Maintenance
8.1 Automatic Self-Cleaning
The machine features an automatic self-cleaning function:
- Ensure the machine is connected to water and power.
- Press and hold the "Clean" button for 3 seconds to initiate the self-cleaning cycle.
- The cleaning process typically takes about 16 minutes. Do not interrupt the cycle.
- After cleaning, drain any remaining water and wipe down the interior.

Image 8.1: Illustration of the internal water circulation during the automatic self-cleaning process.
8.2 Regular Cleaning and Care
- Exterior: Wipe the stainless steel exterior with a soft cloth and mild detergent. Avoid abrasive cleaners.
- Interior: Periodically clean the ice storage bin and water reservoir with a solution of water and white vinegar or a food-grade ice maker cleaner. Rinse thoroughly.
- Water Filter: Replace the water filter regularly as per manufacturer recommendations or if ice quality deteriorates.
- Condenser Coils: Clean the condenser coils (located behind the front grille) every few months using a soft brush or vacuum cleaner to ensure efficient cooling.
9. Troubleshooting
| Problem | Possible Cause | Solution |
|---|---|---|
| Machine not making ice. | No power; No water supply; Ice bin full; High ambient temperature. | Check power connection; Ensure water supply is on and filter is not clogged; Empty ice bin; Ensure proper ventilation and lower room temperature. |
| "No Water" indicator on. | Water supply off; Clogged water filter; Kinked water inlet hose. | Turn on water supply; Replace water filter; Straighten hose. |
| Ice cubes are too small/thin. | Ice thickness setting too low; Low water pressure. | Adjust ice thickness setting to a longer cycle; Check water pressure. |
| Machine is noisy. | Machine not level; Loose parts; Compressor noise (normal). | Adjust leveling feet; Check for loose components; Some compressor noise is normal. |
| "High TEMP" indicator on. | Poor ventilation; High ambient temperature; Dirty condenser coils. | Ensure adequate space around machine; Lower room temperature; Clean condenser coils. |
10. Warranty and Support
Coolski ice machines have passed strict ETL and DOE certifications, ensuring quality and safety. For warranty information, technical support, or service inquiries, please contact Coolski customer service. Refer to the product packaging or the official Coolski website for contact details.
Note: The protective film on the shell should be removed before use to reveal the stainless steel body.
Ask a question about this manual
Ask about setup, troubleshooting, compatibility, parts, safety, or missing instructions. Manuals+ will review the question and use this page’s manual context to help answer it.