1. Introduction
This manual provides essential instructions for the installation, maintenance, and troubleshooting of your Braun Front Housing Sealing Cover. This component is designed to ensure the proper function and sealing of your compatible Braun electric shaver.
Please read these instructions carefully before proceeding with installation or maintenance to ensure safe and correct usage.
2. Product Overview
The Braun Front Housing Sealing Cover is an original OEM replacement part that includes the integrated switch button. It is crucial for maintaining the waterproof integrity and operational functionality of your shaver's front housing.
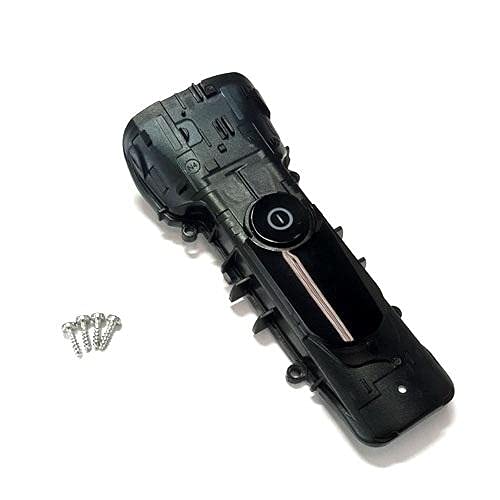
Figure 1: Braun Front Housing Sealing Cover with integrated switch button. This image shows the complete replacement part.
2.1 Key Features:
- Original OEM Product: Ensures compatibility and quality.
- Integrated Switch Button: Replaces the entire front housing cover including the power switch.
- Sealing Function: Essential for maintaining the shaver's water resistance.
3. Compatibility
This Front Housing Sealing Cover is compatible with the following Braun shaver types and models:
3.1 Compatible Shaver Types:
- 5790
- 5791
- 5793
- 5795
3.2 Compatible Shaver Models (Series 9):
- 9030s, 9040s, 9050cc, 9070cc, 9075cc, 9080cc, 9090cc, 9093s, 9095cc
- 9240s, 9242s, 9250cc, 9260s, 9280cc, 9290cc, 9291cc, 9292cc, 9293s, 9295cc, 9296cc, 9297cc, 9299s
3.3 Compatible Shaver Models (Series 8):
- 8325s, 8330s, 8340s, 8345s, 8350s, 8359s, 8360cc, 8365cc, 8370cc, 8371cc, 8380cc, 8385cc, 8390cc, 8391cc
- 8410s, 8413s, 8417s, 8450cc, 8453cc, 8457cc, 8460cc, 8463cc, 8467cc
- 8510s, 8513s, 8517s, 8560cc, 8563cc, 8567cc, 8577cc, 8617s, 8663cc
Note: Always verify your shaver's type number (usually found on the shaver body) to ensure full compatibility before purchasing or installing this part.
4. Installation (Setup)
Replacing the front housing sealing cover requires careful handling. If you are unsure about any step, it is recommended to seek professional assistance or refer to a detailed service manual for your specific shaver model.
4.1 Required Tools:
- Small Phillips head screwdriver
- Plastic prying tool (optional, for delicate separation)
- Clean, soft cloth
4.2 Installation Steps:
- Power Off: Ensure your shaver is completely turned off and disconnected from any power source.
- Remove Shaver Head: Carefully detach the shaver head from the body.
- Locate Screws: Identify and remove any screws securing the front housing. These are typically located on the back or sides of the shaver body.
- Gently Pry Open: Using a plastic prying tool or your fingernails, carefully separate the old front housing cover from the shaver body. Work slowly to avoid damaging internal components or plastic clips.
- Disconnect Switch: If the switch button assembly is separate, carefully disconnect any small wires or connectors associated with the old switch. The new part includes the switch, so ensure the connection points are clear.
- Clean Sealing Area: Before installing the new cover, gently clean the sealing surfaces on the shaver body to ensure a proper, watertight seal. Use a clean, soft cloth.
- Install New Cover: Align the new Front Housing Sealing Cover with the shaver body. Ensure the switch button aligns correctly with the internal mechanism.
- Press into Place: Gently press the new cover into place until all clips engage and the cover sits flush with the shaver body.
- Secure Screws: Reinsert and tighten the screws removed in step 3. Do not overtighten.
- Reattach Shaver Head: Reattach the shaver head.
- Test Functionality: Turn on the shaver to ensure the switch button functions correctly.
Warning: Improper installation can compromise the shaver's water resistance and may lead to damage. Proceed with caution.
5. Operation
Once the Front Housing Sealing Cover is correctly installed, the operation of your Braun shaver remains unchanged. The integrated switch button will function as before, allowing you to power the shaver on and off.
- Power On/Off: Press the switch button to turn the shaver on or off.
- Cleaning: The sealing cover ensures the shaver remains water-resistant for cleaning under running water, as per your shaver's original instructions.
6. Maintenance
Regular maintenance of your shaver, including the newly installed front housing, will prolong its lifespan and ensure optimal performance.
6.1 Cleaning the Cover:
- After each use, rinse the shaver head and the front housing under warm running water.
- Use a small brush (often supplied with the shaver) to remove any trapped hair from around the switch button and seams.
- Allow the shaver to air dry completely before storing.
6.2 Inspection:
- Periodically inspect the sealing cover for any signs of damage, cracks, or wear.
- Ensure the switch button operates smoothly and does not stick.
- If any damage is observed, consider replacing the part to maintain water resistance and functionality.
7. Troubleshooting
This section addresses common issues that may arise after installing the front housing sealing cover.
| Problem | Possible Cause | Solution |
|---|---|---|
| Shaver does not turn on/off after installation. | Switch button not properly aligned or connected. | Re-open the housing and ensure the switch mechanism is correctly seated and connected. |
| Water ingress during cleaning. | Improper sealing of the front cover; cover not fully seated or damaged. | Carefully inspect the edges of the cover for gaps. Ensure all clips are engaged and screws are tightened. If damaged, replace the cover. |
| Front cover does not sit flush. | Internal components obstructing the cover; clips not engaged. | Verify that no wires or components are pinched. Ensure all plastic clips are aligned and fully engaged. |
If the issue persists after attempting these solutions, contact Braun customer support or a qualified service technician.
8. Specifications
- Part Type: Front Housing Sealing Cover with Switch Button
- Manufacturer: Braun
- Item Weight: Approximately 85.05 g
- Compatibility: Braun Shaver Types 5790, 5791, 5793, 5795; Braun Series 9 and Series 8 models (refer to Section 3 for full list).
- Material: Durable plastic and sealing components.
9. Warranty and Support
As an Original OEM Product, this part is covered by Braun's standard warranty policy for replacement parts. Please retain your proof of purchase for warranty claims.
9.1 Warranty Information:
For detailed warranty terms and conditions, please refer to the documentation provided with your original Braun shaver or visit the official Braun website.
9.2 Customer Support:
If you require further assistance with installation, troubleshooting, or have questions regarding this product, please contact Braun customer support:
- Online Support: Visit the official Braun website for FAQs and support resources.
- Contact Information: Refer to your shaver's original manual or the Braun website for regional contact numbers and email support.
Note: Unauthorized repairs or use of non-OEM parts may void your shaver's warranty.