
Budora PL-W11314394
W11314394 Suspension Springs User Manual
For Whirlpool Front Loading Washing Machines
Product Overview
The Budora W11314394 Suspension Springs are designed as direct replacement parts for various Whirlpool front-loading washing machine models. These springs play a crucial role in balancing the washer tub during spin cycles, reducing vibration and noise, and ensuring the longevity of your appliance. This manual provides essential information for proper installation, maintenance, and troubleshooting.
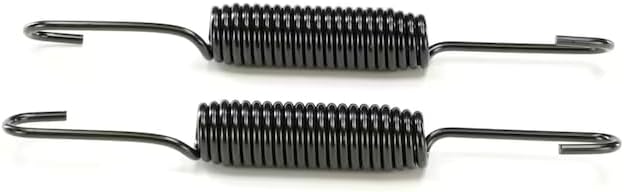
Image: Two black suspension springs, essential for stabilizing the washing machine's drum.
Key Features
- Direct Replacement: Engineered to replace W11314394, AP6835700, and W10896675 part numbers.
- Enhanced Stability: Helps to absorb vibrations and maintain the balance of the washing machine tub during operation.
- Durable Construction: Manufactured for long-lasting performance in demanding washing machine environments.
- Wide Compatibility: Compatible with a broad range of Whirlpool, Maytag, KitchenAid, Jenn-Air, Amana, Magic Chef, Admiral, Norge, Roper, and Kenmore models.
Product Components
- Suspension Springs (typically sold in sets, e.g., 2 springs per package)
Specifications
| Part Number | PL-W11314394 |
| Cross Reference Part Numbers | W11314394, AP6835700, W10896675 |
| Item Weight | 12.8 ounces |
| Product Dimensions | 10 x 3 x 2 inches |
| Included Components | Suspension Springs |
| Manufacturer | Budora |
| Country of Origin | China |
Compatibility
These suspension springs are compatible with a wide range of front-loading washing machines from various brands. Always verify your appliance's model number before purchasing to ensure proper fit.
Compatible Brands
- Whirlpool
- Maytag
- KitchenAid
- Jenn-Air
- Amana
- Magic Chef
- Admiral
- Norge
- Roper
- Sears
- Kenmore
- And others
Partial List of Compatible Models
Below is a partial list of washing machine models known to be compatible with W11314394 suspension springs. This list is not exhaustive. Please refer to your appliance's documentation or consult a qualified technician if unsure.
- MHW5630HC0
- MHW5630HW0
- MHW6630HC0
- MHW6630HW0
- NFW5800HW0
- WFW5620HW0
- WFW6620HC0
- WFW6620HW0
- MHW5630HW1
- 7MMHW6621HC0
- 7MMHW6621HC1
- 7MMHW6621HC2
- 7MMHW6621HW0
- 7MMHW6621HW1
- 7MWFC9822HC0
- 7MWFC9822HC1
- 7MWFC9822HW0
- 7MWFW560CHW2
- 7MWFW5622HW0
- 7MWFW5622HW2
- 7MWFW6621HC0
- 7MWFW6621HC2
- 7MWFW6622HW0
- 7MWFW6622HW2
- 8TMHW6630HW0
- 8TMHW6630HW2
- 8TWFC6810LW0
- 8TWFC6820LC0
- 8TWFC6820LW0
- 8TWFW5620HW0
- 8TWFW5620HW1
- 8TWFW5620HW2
- 8TWFW6620HW0
- 8TWFW6620HW1
- 8TWFW6620HW2
- 8TWFW8620HW0
- 8TWFW8620HW1
- 8TWFW8620HW2
- BNF15ASANA0
- BNF15ASANA1
- IFW5900HW0
- IFW5900HW1
- IFW5900HW2
- IFW5900HW3
- IFW5900HW4
- MFW7020RF0
- MFW7020RU0
- MFW7020RW0
- MHW5630HC1
- MHW5630HC3
- MHW5630MBK0
- MHW6630HC1
- MHW6630HC2
- MHW6630HC3
- MHW6630HW1
- MHW6630HW2
- MHW6630HW3
- MHW6630MBK0
- MHW8630HC0
- MHW8630HC1
- MHW8630HC2
- MHW8630HC3
- MHW8630HC4
- MHW8630HW0
- MHW8630HW1
- MHW8630HW2
- MHW8630HW3
- MHW8630HW4
- NFW5800HW1
- NFW5800HW2
- NFW5800HW3
- WFC682CLW0
- WFC9820HC0
- WFW4720RW0
- WFW5220RW0
- WFW5605MC1
- WFW5605MW0
- WFW5605MW1
- WFW560CHW0
- WFW560CHW1
- WFW560CHW2
- WFW560CHW3
- WFW560CHW4
- WFW5620HW2
- WFW5720RR0
- WFW5720RU0
- WFW5720RW0
- WFW6605MC0
- WFW6605MC1
- WFW6605MW0
- WFW6605MW1
- WFW6620HC2
- WFW6620HW1
- WFW6620HW2
- WFW6620HW3
- WFW6720RR0
- WFW6720RU0
- WFW6720RW0
- WFW8620HC0
- WFW8620HC1
- WFW8620HC3
- WFW8620HC4
- WFW8620HW0
- WFW8620HW1
- WFW8620HW2
- WFW8620HW3
- WFW8620HW4
- WFW862CHC0
- WFW862CHC1
- WFW862CHC2
- WFW862CHC3
- WFW9620HBK0
- WFW9620HBK1
- WFW9620HBK2
- WFW9620HBK3
- WFW9620HC0
- WFW9620HC1
- WFW9620HC2
- WFW9620HC3
- WFW9620HW0
- WFW9620HW2
Installation Guide
Replacing washing machine suspension springs requires caution and basic mechanical skills. If you are uncomfortable performing this repair, it is recommended to consult a qualified appliance technician.
Safety Precautions
- Disconnect Power: Always unplug the washing machine from the electrical outlet before beginning any repair.
- Turn Off Water Supply: Close the hot and cold water supply valves to the washing machine.
- Wear Protective Gear: Use work gloves to protect your hands and safety glasses to protect your eyes.
- Proper Lifting: Washing machines are heavy. If you need to move or tilt the machine, do so with assistance to prevent injury.
- Handle Springs with Care: Springs are under tension. Be careful when removing and installing them to avoid sudden release.
Tools Required
- Screwdriver set (Phillips and flathead)
- Nut driver or socket set
- Pliers (optional, for spring removal/installation)
- Work gloves
- Safety glasses
Step-by-Step Installation
- Prepare the Washer:
- Unplug the washing machine from the power outlet.
- Turn off the hot and cold water supply valves.
- Disconnect the water inlet hoses and the drain hose.
- Carefully pull the washer away from the wall to allow access.
- Access the Springs:
- Depending on your washer model, you may need to remove the top panel, front panel, or tilt the machine backward to access the suspension springs. Consult your specific washer's service manual for exact panel removal instructions.
- Locate the existing suspension springs. They are typically attached to the outer tub and the frame of the washing machine.
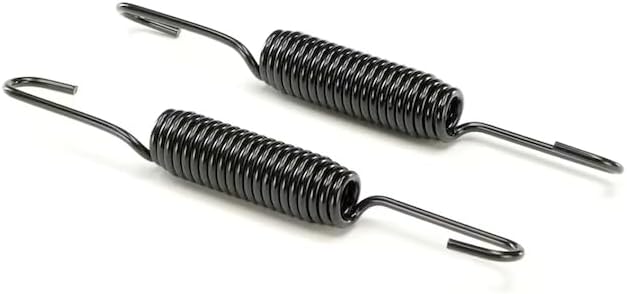
Image: Close-up view of the suspension springs, showing the hooks for attachment.
- Remove Old Springs:
- Carefully unhook the old suspension springs from both the washer frame and the outer tub. You may need pliers or a spring puller tool for stubborn springs. Note the orientation of the springs before removal.
- Inspect the mounting points for any damage or wear.
- Install New Springs:
- Attach one end of the new W11314394 suspension spring to its designated hook on the washer frame.
- Carefully stretch the spring and attach the other end to the corresponding hook on the outer tub. Ensure the spring is securely seated.
- Repeat for all suspension springs that need replacement. It is often recommended to replace all springs at once for balanced performance.

Image: Another angle of the suspension springs, illustrating their design for tension.
- Reassemble and Test:
- Reattach any panels or components that were removed to access the springs. Ensure all screws and fasteners are tightened.
- Reconnect the water inlet hoses and drain hose.
- Plug the washing machine back into the electrical outlet.
- Run a small, empty load cycle to check for proper operation, reduced vibration, and no leaks.
Post-Installation Check
After installing the new suspension springs, perform the following checks to ensure optimal performance and safety:
- Vibration Test: Run a spin cycle with a small load (e.g., a few towels). The machine should operate with significantly less vibration and noise compared to before the spring replacement.
- Leveling: Ensure the washing machine is perfectly level. Adjust the leveling feet if necessary. An unlevel machine can still cause excessive vibration even with new springs.
- Leak Check: During the test cycle, visually inspect all hose connections for any signs of water leaks.
- Secure Panels: Confirm that all access panels and covers are securely reattached.
Maintenance
While suspension springs are designed for durability, periodic inspection can help identify potential issues early and extend the life of your washing machine.
Routine Inspection
- Visual Check: Approximately once a year, or if you notice increased vibration, inspect the suspension springs for signs of wear, rust, stretching, or breakage. This may require removing access panels.
- Mounting Points: Check the hooks and mounting points where the springs attach for any signs of damage or corrosion.
- Cleanliness: Keep the area around the springs and the washing machine's base clean and free of lint, debris, or detergent residue, which can contribute to corrosion.
Troubleshooting
If your washing machine exhibits issues related to balance or vibration after spring replacement, or if you suspect spring failure, refer to the table below.
| Problem | Possible Cause | Solution |
|---|---|---|
| Excessive vibration or shaking during spin cycle |
|
|
| Loud banging or thumping noise during operation |
|
|
| Washer "walks" or moves across the floor |
|
|
Warranty and Support
Warranty Information
These Budora W11314394 Suspension Springs come with a One Year Warranty from the date of purchase. This warranty covers defects in material and workmanship under normal use. Please retain your proof of purchase for warranty claims.
Disclaimer: Any use of the manufacturers brand name, part numbers or model designation for this product is made solely for purposes of demonstrating and for identification compatibility and are displayed for descriptive purposes only. Use of the Manufacturers trade names and logos are the registered trademarks of their respective owners. Use of them does not associated with, imply any affiliation or endorsement by any.
Customer Support
For technical assistance, warranty claims, or further inquiries regarding your Budora W11314394 Suspension Springs, please contact the retailer or manufacturer directly. Refer to your purchase documentation for specific contact details.
Ask a question about this manual
Ask about setup, troubleshooting, compatibility, parts, safety, or missing instructions. Manuals+ will review the question and use this page’s manual context to help answer it.