1. Introduction
Thank you for choosing the Generic G1200 Digital Microscope. This device is designed for detailed observation, inspection, and analysis of various objects, offering a 12-megapixel camera and a 7-inch LCD display with 1-1200X continuous magnification. This manual provides essential information for the safe and effective use of your microscope.
2. Safety Information
- Keep the microscope away from water and other liquids to prevent electric shock or damage.
- Do not disassemble or modify the device. Repairs should only be performed by qualified personnel.
- Avoid exposing the device to direct sunlight or high temperatures.
- Handle the lens and screen with care to prevent scratches.
- This product is not a toy; keep it out of reach of children without adult supervision.
3. Package Contents
Please check the package contents upon unboxing:
- G1200 Digital Microscope Unit (with 7-inch LCD)
- Adjustable Stand and Base
- USB Power Cable
- User Manual (this document)
- Calibration Ruler (may vary by package)
4. Product Overview
The G1200 Digital Microscope features a robust design for stable observation and a clear display for detailed viewing.

Figure 4.1: Front view of the G1200 Digital Microscope displaying a circuit board.
The microscope consists of a main unit with an integrated 7-inch LCD screen, a high-resolution lens, and an adjustable stand. The stand allows for precise positioning and stable observation of specimens.

Figure 4.2: The adjustable stand allows for flexible viewing angles.
The 7-inch LCD provides a large, clear viewing area, enhancing the user experience for prolonged observation and group viewing.
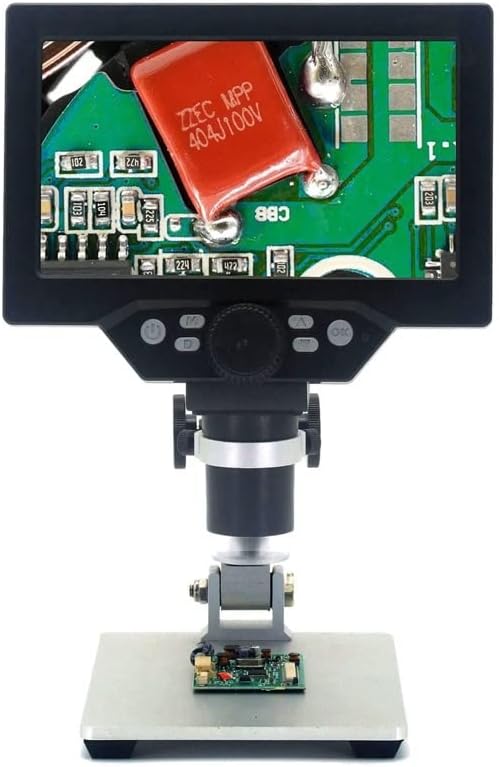
Figure 4.3: The G1200 features a 7-inch display for enhanced viewing clarity.
5. Setup
- Unpack: Carefully remove all components from the packaging.
- Assemble the Stand: Attach the microscope unit to the adjustable stand. Ensure all screws are tightened securely to prevent wobbling.
- Power Connection: Connect the USB power cable to the microscope's power input port and then to a suitable USB power adapter (not included) or a powered USB port. For the Bluit Battery Model, ensure the internal battery is charged before first use.
- Initial Power On: Press and hold the power button located on the microscope unit until the LCD screen illuminates.
6. Operating Instructions
6.1 Powering On/Off
- Power On: Press and hold the power button for approximately 3 seconds.
- Power Off: Press and hold the power button again for approximately 3 seconds until the screen turns off.
6.2 Placing a Specimen
Place the object you wish to observe directly on the base plate beneath the microscope lens. Ensure it is centered for optimal viewing.
6.3 Adjusting Focus and Magnification
- Height Adjustment: Use the knob on the stand to raise or lower the microscope unit, bringing the lens closer or further from the specimen.
- Fine Focus: Rotate the focus wheel on the microscope unit to achieve a clear image.
- Magnification: The G1200 offers 1-1200X continuous amplification. Adjust the distance between the lens and the object, and then fine-tune the focus to change the magnification level.
6.4 Using the LCD Display and Controls
The 7-inch LCD displays the live view from the microscope camera. Buttons on the unit typically include:
- Menu Button: Accesses settings for image resolution, video resolution, date/time, language, etc.
- Mode Button: Switches between photo, video, and playback modes.
- Capture/Record Button: Takes a photo or starts/stops video recording.
- Up/Down Buttons: Navigate menus or adjust digital zoom (if available).
Refer to the on-screen menu for specific functions and settings.
7. Maintenance
- Cleaning the Lens: Use a soft, lint-free cloth specifically designed for optical lenses. Do not use abrasive materials or harsh chemicals.
- Cleaning the Screen: Wipe the LCD screen gently with a soft, dry microfiber cloth.
- Storage: Store the microscope in a clean, dry, and dust-free environment when not in use.
- Battery Care (Bluit Battery Model): For optimal battery life, avoid fully discharging the battery frequently. Charge the device regularly, even if not in use for extended periods.
8. Troubleshooting
- No Power: Ensure the USB power cable is securely connected and the power source is active. For battery models, check if the battery is charged.
- Blurry Image: Adjust the height of the microscope unit and rotate the focus wheel until the image is clear. Ensure the specimen is flat and well-lit.
- Screen Not Displaying: Check power connection. If the device is on but no image appears, try restarting the microscope.
- Buttons Unresponsive: Power off the device and restart it. If the issue persists, ensure no debris is obstructing the buttons.
9. Specifications
| Feature | Specification |
|---|---|
| Model Name | G1200 (EENKNDXQA-BLUITBATTERYMODEL-1-1200X) |
| Display | 7-inch LCD |
| Magnification Ratio | 1-1200X Continuous Amplification |
| Camera Resolution | 12 Megapixels |
| Material | Plastic |
| Item Weight | 2.2 pounds (1000 Grams) |
| Package Dimensions | 1.18 x 0.79 x 0.39 inches |
| Power Source | USB Powered / Built-in Battery (Bluit Battery Model) |
10. Warranty and Support
For warranty information and customer support, please refer to the documentation provided at the time of purchase or contact your retailer. The manufacturer is committed to providing high-quality after-sales service.


