1. Introduction
Thank you for choosing the UHRLGHS Glass Halogen Air Fryer Oven. This appliance offers a healthy alternative to traditional cooking methods, utilizing hot air to prepare a variety of dishes with little to no oil. Its versatile design allows for steaming, broiling, and frying, making it suitable for preparing meals for the entire family.
This manual provides essential information for the safe and efficient operation, maintenance, and troubleshooting of your new air fryer. Please read it thoroughly before first use and retain it for future reference.

Image 1.1: The UHRLGHS Glass Halogen Air Fryer Oven, showcasing its transparent cooking bowl and control unit, with a fresh salad prepared inside.
2. Important Safety Instructions
To ensure safe operation and prevent damage, always follow these basic safety precautions:
- Read all instructions before using the appliance.
- Do not touch hot surfaces. Use handles or knobs.
- To protect against electrical shock, do not immerse the cord, plugs, or the main unit in water or other liquid.
- Close supervision is necessary when any appliance is used by or near children.
- Unplug from outlet when not in use and before cleaning. Allow to cool before putting on or taking off parts.
- Do not operate any appliance with a damaged cord or plug, or after the appliance malfunctions or has been damaged in any manner.
- The use of accessory attachments not recommended by the appliance manufacturer may cause injuries.
- Do not use outdoors.
- Do not let the cord hang over the edge of a table or counter, or touch hot surfaces.
- Do not place on or near a hot gas or electric burner, or in a heated oven.
- Extreme caution must be used when moving an appliance containing hot oil or other hot liquids.
- Always attach plug to appliance first, then plug cord into the wall outlet. To disconnect, turn any control to “off”, then remove plug from wall outlet.
- Do not use the appliance for other than intended use.
- Ensure adequate ventilation around the appliance during use.
3. Product Components and Accessories
Your UHRLGHS Glass Halogen Air Fryer Oven comes with several components and useful accessories to enhance your cooking experience:
- Main Control Unit (with Halogen Lamp and Fan)
- Glass Cooking Bowl (12L capacity)
- Heightening Ring (expands capacity to 17L)
- Non-slip Heat Insulation Base
- Retrieval Folder (Clip)
- High Rack
- Low Rack

Image 3.1: Included accessories: a clip for handling hot items, a high rack, and a low rack for varied cooking.

Image 3.2: An overview of all components, including the main control unit, glass bowl, heightening ring, and racks.
4. Setup and First Use
4.1 Unpacking and Placement
- Carefully remove all components from the packaging.
- Place the air fryer on a stable, heat-resistant, and level surface, ensuring adequate space around the unit for ventilation.
- Ensure the power cord is not obstructed or near any heat sources.
4.2 Assembling the Heightening Ring (Optional)
To expand the cooking capacity from 12L to 17L, place the heightening ring securely on top of the glass cooking bowl before placing the main control unit.
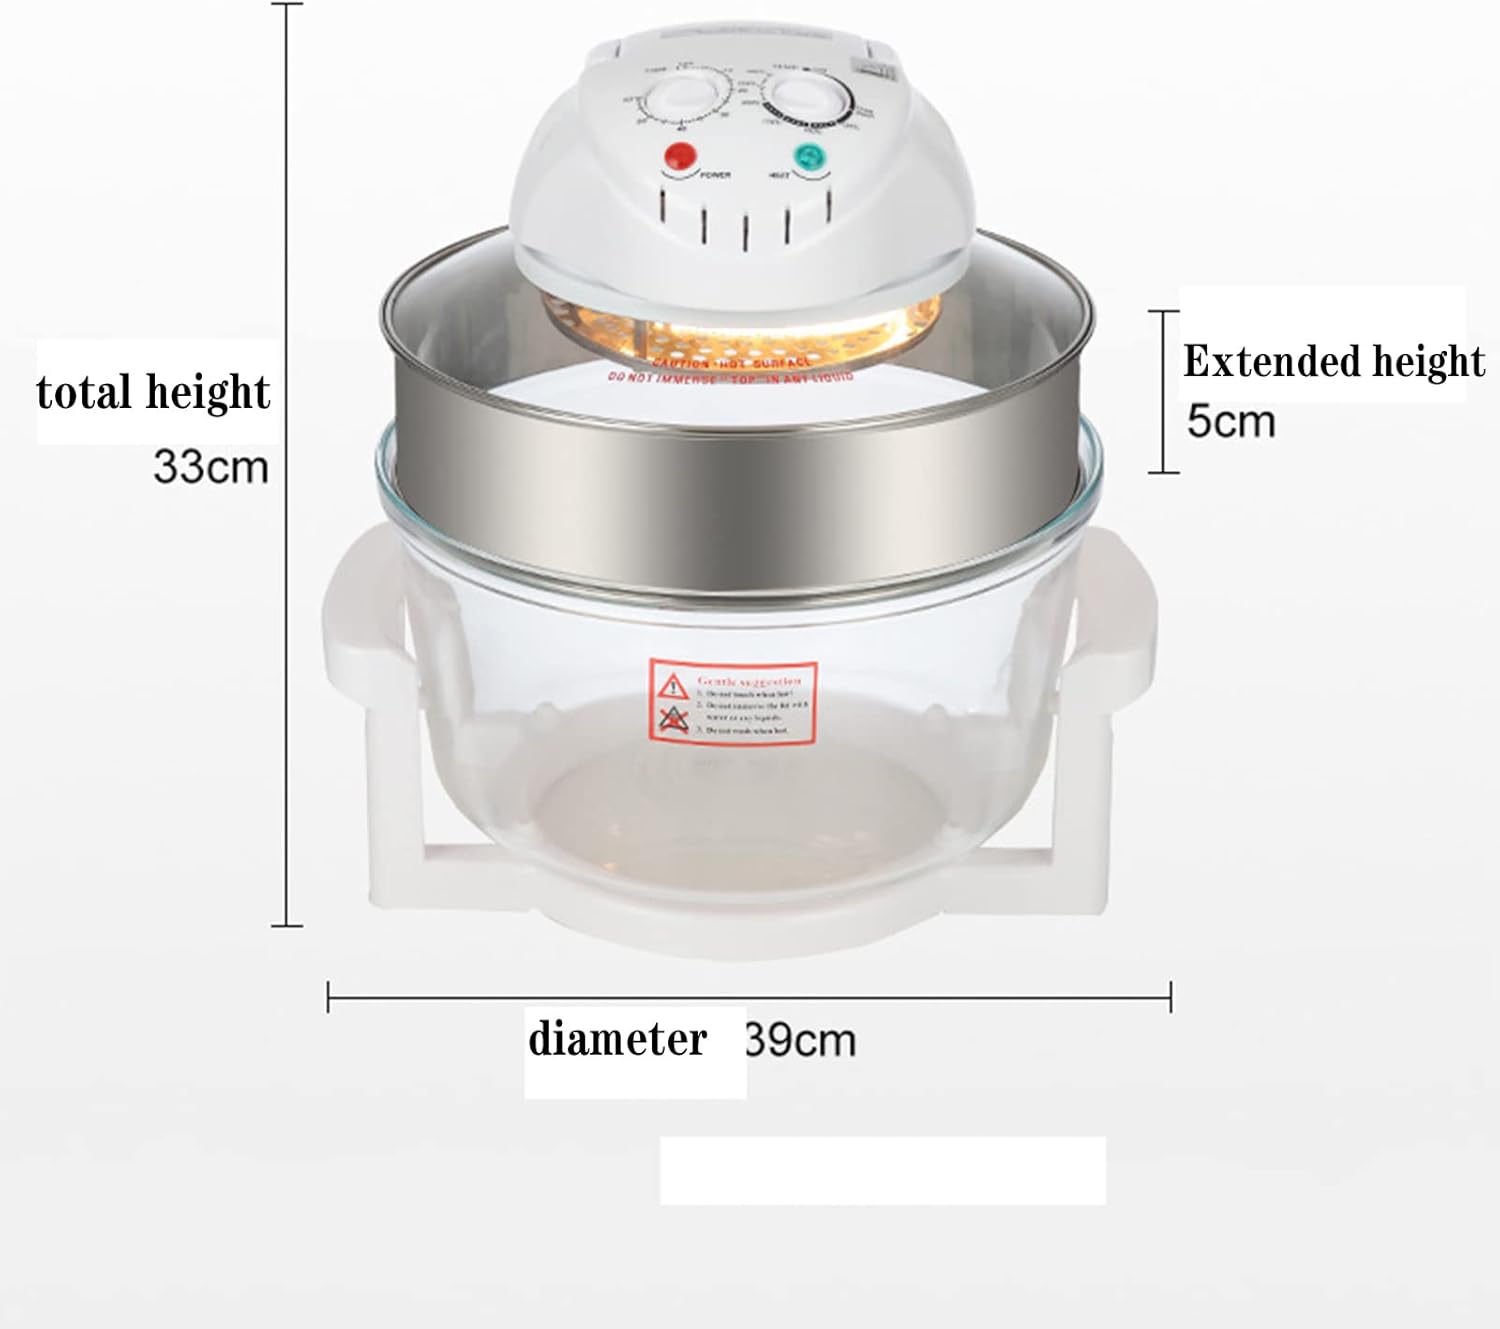
Image 4.1: The air fryer's dimensions, illustrating how the detachable heightening ring adds 5cm to the total height, increasing capacity.
4.3 Initial Cleaning
Before first use, wash the glass bowl and all accessories (racks, clip, heightening ring) with warm, soapy water. Rinse thoroughly and dry completely. Wipe the main control unit with a damp cloth; do not immerse it in water.
5. Operating Instructions
The UHRLGHS Glass Halogen Air Fryer Oven features simple knob operation for temperature and timer settings.
5.1 Basic Operation
- Place food on the appropriate rack inside the glass bowl.
- Place the main control unit securely on top of the glass bowl (or heightening ring).
- Plug the power cord into a grounded electrical outlet.
- Adjust the Temperature Knob to your desired cooking temperature. The range is typically 257°F to 482°F (125°C to 250°C).
- Set the Timer Knob to the required cooking time (up to 60 minutes). The appliance will begin heating automatically.
- The indicator lights will illuminate, indicating power and heating.
- When the timer reaches zero, the appliance will automatically shut off, and a bell will sound.
- Carefully remove the main control unit and use the retrieval folder to remove cooked food.

Image 5.1: A hand demonstrating the adjustment of the timer knob on the control panel, highlighting the ease of use.

Image 5.2: Visual representation of key features including precise 60-minute timer function, adjustable temperature range (257-482°F), and rapid 5-minute heating.
5.2 Cooking Examples
The air fryer is suitable for a wide range of dishes. Here are some examples:
- Roast Chicken
- Ribs
- Pork Chops
- Sea Bass
- Skewers
- Fries
- Baked goods
- Dehydrating (e.g., cashews)
- Thawing frozen foods

Image 5.3: A collage illustrating various food items that can be prepared using the air fryer, from roast chicken to seafood and baked goods.
6. Maintenance and Cleaning
Regular cleaning ensures the longevity and optimal performance of your air fryer.
6.1 Self-Cleaning Mode
The UHRLGHS Glass Halogen Air Fryer Oven features a convenient self-cleaning mode. To use:
- Add a small amount of water and a few drops of dish soap to the glass bowl.
- Set the temperature to a medium setting (e.g., 200°C / 392°F).
- Set the timer for 10-15 minutes.
- The hot, soapy water will circulate, helping to loosen grease and food residue.
- After the cycle, unplug the unit, allow it to cool, then carefully empty the water and wipe the interior with a sponge.
6.2 Manual Cleaning
- Always unplug the appliance and allow it to cool completely before cleaning.
- The glass bowl, heightening ring, and racks can be washed by hand with warm, soapy water or placed in a dishwasher.
- Wipe the exterior of the main control unit with a damp cloth. Do not use abrasive cleaners or immerse the control unit in water.
- Ensure all parts are thoroughly dry before reassembling or storing the appliance.
7. Troubleshooting
If you encounter any issues with your air fryer, please refer to the following common problems and solutions:
| Problem | Possible Cause | Solution |
|---|---|---|
| Appliance does not turn on | Not plugged in; Timer not set; Power outage | Ensure plug is securely in outlet; Set the timer knob; Check household power supply. |
| Food not cooking evenly | Overcrowding; Incorrect temperature/time; Food not turned | Do not overcrowd the bowl; Adjust temperature/time; Turn or shake food halfway through cooking. |
| White smoke from appliance | Grease/oil residue; Fatty food cooking | Clean the appliance thoroughly; This is normal for very fatty foods, ensure good ventilation. |
| Food not crispy | Too much moisture; Not enough oil (if desired) | Pat food dry before cooking; Lightly brush with oil for extra crispiness. |
If the problem persists after attempting these solutions, please contact customer support.
8. Specifications
| Feature | Specification |
|---|---|
| Rated Power | 1300W |
| Rated Capacity | 12L (expandable to 17L with heightening ring) |
| Weight | 6 KG |
| Dimensions (approx.) | 390mm (Diameter) * 330mm (Total Height without ring) |
| Operation Mode | Knob Control |
| ASIN | B0DQPVKS6P |
| Manufacturer | UHRLGHS |
9. Warranty and Support
This product is covered by a standard manufacturer's warranty. Please refer to your purchase documentation for specific warranty terms and conditions.
For technical support, troubleshooting assistance beyond what is provided in this manual, or warranty claims, please contact UHRLGHS customer service through the retailer where the product was purchased or visit the official UHRLGHS website for contact information.
Please have your model number (Glass Halogen Oven Cooker) and ASIN (B0DQPVKS6P) ready when contacting support.