1. Introduction and Overview
This manual provides essential information for the safe and efficient operation of your Generic 3000W Pure Sine Inverter Kit. This kit converts 12V DC battery power into 120V AC household power, suitable for a wide range of applications including RVs, boats, and backup power systems. Please read this manual thoroughly before installation and use to ensure proper function and safety.
2. Safety Information
WARNING: High voltage present. Do not open the inverter casing. Refer all servicing to qualified personnel. Improper installation or use can result in electric shock, fire, or damage to equipment.
- Ensure the inverter is installed in a well-ventilated, dry, and cool environment, away from flammable materials.
- Always connect the inverter to a 12V DC battery system. Connecting to a different voltage may damage the unit.
- Properly ground the inverter chassis to a reliable earth ground.
- Use appropriate cable gauges for DC input connections to prevent overheating.
- Disconnect the battery before performing any wiring or maintenance.
- Do not expose the inverter to rain, moisture, or direct sunlight.
- Keep children away from the inverter and its connections.
3. Package Contents
Verify that all items listed below are included in your package:
- 3000 Watt Pure Sine Inverter
- 11 ft 4/0 AWG Cables (Red and Black)
- ANL Fuse Block with Fuse
- Remote On/Off Switch
- Instruction Manual
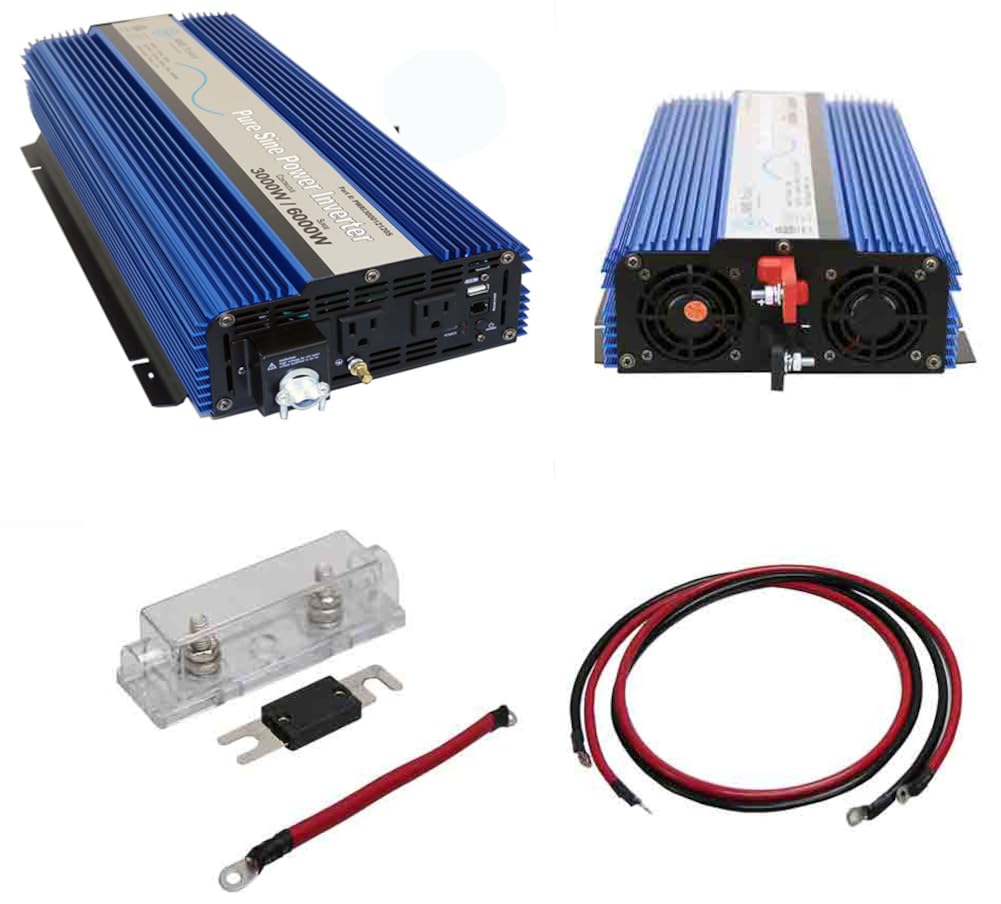
Image: The 3000W Pure Sine Inverter, including the main unit, DC input cables, and ANL fuse block with fuse.
4. Product Features
- Reliable Power Conversion: Provides 3000 watts continuous and 6000 watts peak surge power.
- Pure Sine Wave Output: Ensures safe and efficient operation for sensitive electronic devices.
- Comprehensive Kit: Includes fuse block, cables, and remote switch for easy installation.
- Versatile Application: Ideal for RVs, boats, mobile workstations, and off-grid power needs.
- High Safety Standards: Built-in protections for overvoltage, undervoltage, overtemperature, overload, and short circuit.
- Compact and Durable: Lightweight design with industrial-grade construction.
- Multiple Outputs: Features dual AC outlets, a direct connect hardwire terminal block, and a USB outlet (2.1 amps).
5. Specifications
| Feature | Specification |
|---|---|
| Continuous Output Power | 3000 Watt |
| Surge Power Capability (Peak) | 6000 Watt |
| DC Input / Operating Voltage | 9.5 - 16 Volt |
| AC Output Voltage | 120 Volt AC |
| Wave Form | Pure Sine Wave |
| Output Frequency | 60 Hz |
| Full Load Efficiency | 90% |
| Battery Low Voltage Alarm | 9.8 +/- 0.5 Volt |
| Battery Low Voltage Shutdown | 9.5 +/- 0.5 Volt |
| High Input Voltage Shutdown | 16 Volt |
| Operating Temperature (Min) | 32 degrees Fahrenheit |
| Operating Temperature (Max) | 104 degrees Fahrenheit (automatic shutdown) |
| AC Outlets | 2 standard outlets + direct connect terminal block |
| USB Outlet | 2.1 Amps |
| Dimensions (Inverter) | 16 x 8 x 5 Inches |
| Unit Weight | 12 Pounds |
| Model Name | KITPWRI300012S |
6. Setup and Installation
Proper installation is critical for the safe and efficient operation of your inverter. Follow these steps carefully:
6.1 Mounting the Inverter
- Choose a secure, dry, and well-ventilated location.
- Ensure there is sufficient clearance around the inverter for airflow, especially around the cooling fans.
- Mount the inverter horizontally on a flat, non-flammable surface using appropriate fasteners.
6.2 DC Input Connections (Battery)
CAUTION: Incorrect polarity will damage the inverter and void the warranty. Always connect the negative terminal first, then the positive.
- Connect the large red cable to the positive (+) terminal of your 12V battery bank and to the positive (+) terminal on the inverter.
- Connect the large black cable to the negative (-) terminal of your 12V battery bank and to the negative (-) terminal on the inverter.
- Ensure all connections are tight and secure to prevent voltage drop and overheating.

Image: Rear view of the inverter, highlighting the DC input terminals and cooling fans.
6.3 Fuse Installation
- Install the provided ANL fuse block in the positive (+) DC cable, as close to the battery as possible. This protects the inverter and wiring from overcurrent.
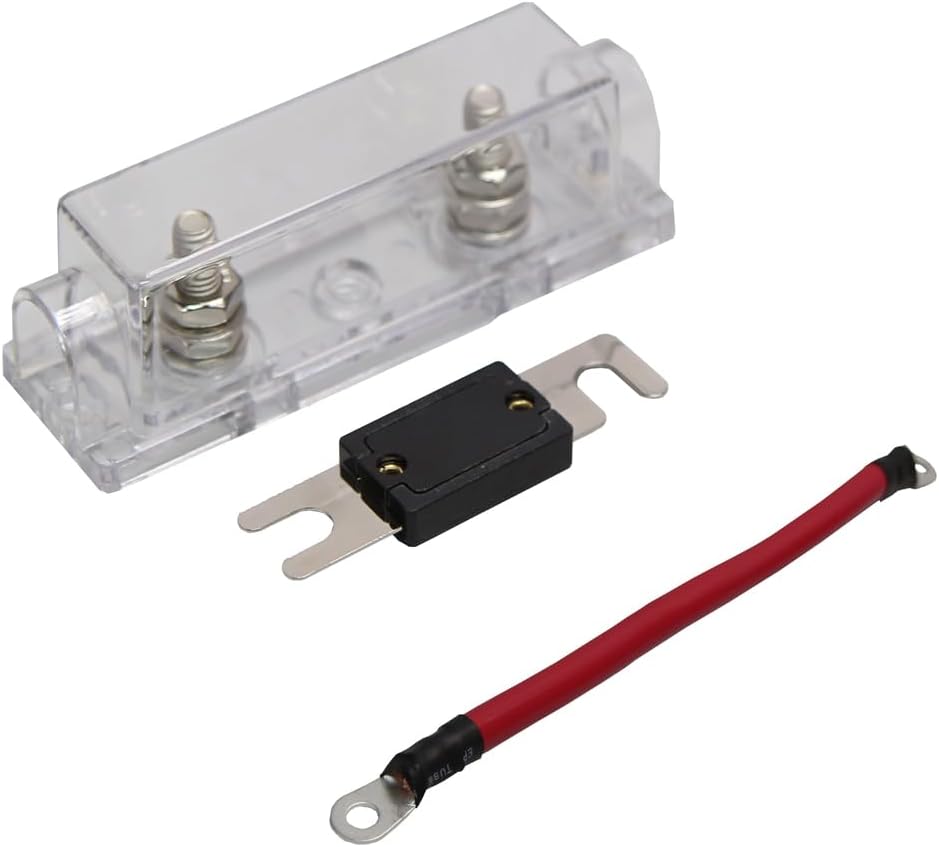
Image: The ANL fuse block, fuse, and a short red cable for installation in the positive DC line.
6.4 Grounding
- Connect the inverter's chassis ground terminal to a reliable earth ground using a suitable gauge wire. This is a critical safety measure.
6.5 AC Output Connections
- Plug your 120V AC appliances directly into the two standard AC outlets on the inverter.
- For permanent installations or higher power loads, use the direct connect hardwire terminal block. Ensure proper wiring (Live, Neutral, Ground) according to local electrical codes.
- The USB outlet can be used to charge compatible USB devices.

Image: Front view of the inverter, showing the AC outlets, USB port, and the hardwire terminal block.
7. Operating Instructions
7.1 Powering On/Off
- Ensure all DC and AC connections are secure before powering on.
- Press and hold the power button on the inverter or the remote control for a few seconds until the 'POWER' indicator illuminates.
- To turn off, press and hold the power button again until the 'POWER' indicator turns off.
7.2 Remote Control
The included remote control allows for convenient power management from a distance.

Image: The remote control unit for the inverter, featuring a power button and indicator lights for Inverter/AC Mode and Fault.
7.3 Indicator Lights
- POWER (Green): Indicates the inverter is on and operating normally.
- FAULT (Red): Indicates an error condition (e.g., overload, over-temperature, low voltage). Refer to the Troubleshooting section.
7.4 Connecting AC Devices
- Plug your AC devices into the inverter's outlets. Ensure the total wattage of all connected devices does not exceed the inverter's continuous output power (3000W).
- For devices with high startup surge requirements, ensure the inverter's surge capability (6000W) is sufficient.
8. Maintenance
- Cleaning: Periodically clean the inverter's exterior with a dry cloth. Ensure cooling vents and fans are free from dust and debris to maintain optimal performance.
- Connections: Regularly check all DC and AC connections for tightness. Loose connections can cause overheating and power loss.
- Battery Maintenance: Ensure your 12V battery bank is properly maintained and charged according to the battery manufacturer's recommendations.
- Fuse Check: If the inverter stops producing power, check the ANL fuse in the positive DC line. Replace with a fuse of the same rating if blown.
9. Troubleshooting
If you encounter issues with your inverter, refer to the table below for common problems and solutions:
| Problem | Possible Cause | Solution |
|---|---|---|
| No AC output, POWER light off | Inverter is off; Loose DC connections; Blown fuse; Low battery voltage | Turn on inverter; Check and tighten DC cables; Replace fuse; Charge battery |
| FAULT light on, no AC output | Overload; Over-temperature; Low/High input voltage; Short circuit | Reduce load; Allow inverter to cool; Check battery voltage; Disconnect load and restart |
| Low AC output voltage | Excessive load; Long or thin DC cables; Low battery voltage | Reduce load; Use thicker/shorter DC cables; Charge battery |
| Inverter shuts down frequently | Overload; Over-temperature; Low battery voltage | Reduce load; Improve ventilation; Charge battery |
If the problem persists after attempting these solutions, please contact customer support.
10. Warranty and Support
This Generic 3000W Pure Sine Inverter Kit is covered by a manufacturer's warranty. Please refer to the warranty documentation provided with your purchase for specific terms and conditions.
Additionally, 2-year technical support is available for this product. For technical assistance, troubleshooting beyond this manual, or warranty claims, please contact your retailer or the manufacturer's customer service department.