Outsunny B0DQL8CJMR
Outsunny Raised Garden Bed with Polycarbonate Greenhouse User Manual
Model: B0DQL8CJMR
1. Introduction
Thank you for purchasing the Outsunny Raised Garden Bed with Polycarbonate Greenhouse. This product is designed to provide a protected environment for your plants, combining a durable raised garden bed with a versatile cold frame greenhouse. It offers excellent ventilation and protection from various weather conditions, allowing your plants to thrive.

Image: The Outsunny Raised Garden Bed with Polycarbonate Greenhouse, showcasing its combined structure of a gray wooden cold frame on top of a galvanized steel raised bed.
2. Safety Instructions
Please read and understand all instructions before assembly and use. Keep this manual for future reference.
- Ensure all parts are present and undamaged before beginning assembly.
- Assemble on a flat, stable surface to prevent tipping or injury.
- Use appropriate tools as specified in the assembly instructions.
- Do not overtighten screws or bolts to avoid damaging components.
- Keep children and pets away from the assembly area.
- Periodically check all connections to ensure they remain secure.
- Do not climb on or lean heavily on the structure.
- In strong winds, consider securing the unit or closing the roof panels to prevent damage.
3. Setup and Assembly
Assembly of the Outsunny Raised Garden Bed with Polycarbonate Greenhouse requires careful attention to detail. Follow these steps to ensure proper construction.
3.1. Unpacking and Part Identification
Carefully unpack all components. Verify that all parts listed in the packing list (not provided in this manual, refer to your product's specific packing list) are present and undamaged. Separate similar parts to avoid confusion during assembly.
3.2. Assembling the Raised Garden Bed
- Begin by assembling the galvanized steel panels of the raised garden bed. Connect the panels using the provided fasteners, ensuring they form a stable rectangular or square shape.
- Secure the corner supports or frames if included, ensuring the bed is rigid.
- Place the assembled raised bed in its desired outdoor location. Ensure the ground is level and provides adequate drainage, as the bed features an open-bottom design.

Image: Illustration of the open-bottom design of the raised garden bed, showing water drainage into the ground, which promotes proper drainage and root breathing.
3.3. Assembling the Polycarbonate Greenhouse (Cold Frame)
- Assemble the wooden frame components of the cold frame greenhouse. Connect the side panels, front, and back panels according to the diagrams in your product's specific assembly guide.
- Insert the polycarbonate sheets into the designated grooves or attach them to the frame using the provided clips or fasteners. Ensure the sheets are securely fitted to provide insulation and protection.
- Attach the roof panels. The roof is designed with two independent openable sections for ventilation. Ensure the hinges and support arms are correctly installed, allowing the roof to open and close smoothly.
- Once the cold frame is assembled, carefully place it on top of the raised garden bed. Align it properly and secure it to the raised bed using the provided hardware, if applicable, to prevent displacement.

Image: Close-up view of the greenhouse roof, highlighting the two independent openable panels for ventilation and sunlight control.

Image: Detail of the pointed roof design, illustrating how it helps prevent rainwater accumulation.
3.4. Dual Use Configuration
This product can be used as a combined raised garden bed with a cold frame greenhouse, or the cold frame greenhouse can be used independently as a ground-level plant protector.

Image: A collage showing the product's dual use: the raised bed alone, the cold frame alone, and the combined unit.
4. Operating Instructions
4.1. Ventilation and Temperature Control
The cold frame greenhouse features two independently openable roof panels. These panels allow for precise control over ventilation and temperature within the greenhouse. Open the panels to release excess heat and humidity, especially on sunny days, to prevent overheating and fungal growth. Close them during colder periods or at night to retain warmth.
4.2. Plant Protection
The polycarbonate panels provide protection against cold, wind, rain, and UV scorching, while allowing approximately 90% of nourishing sunlight to reach your plants. This makes it ideal for extending growing seasons, hardening off seedlings, or protecting delicate plants from harsh weather and pests.
4.3. Watering
Water plants as needed. The openable roof provides easy access for watering. The open-bottom design of the raised bed ensures proper drainage into the ground, preventing waterlogging.
5. Maintenance
5.1. Cleaning
- Clean the polycarbonate panels periodically with a soft cloth and mild soapy water. Avoid abrasive cleaners or brushes that could scratch the surface.
- Wipe down the wooden frame with a damp cloth to remove dirt and debris.
- Rinse the galvanized steel bed as needed to remove soil residue.
5.2. Material Care
- Wood Frame: The fir wood frame is stained for outdoor use. To prolong its lifespan, consider applying a wood sealant or stain annually, especially if exposed to harsh weather conditions.
- Polycarbonate Panels: Avoid direct impact to prevent cracking. While UV-resistant, prolonged exposure to extreme temperatures or chemicals can affect their clarity and durability.
- Galvanized Steel Bed: Galvanized steel is resistant to rust. However, avoid using harsh chemicals or abrasive tools that could damage the protective coating.
5.3. Seasonal Considerations
- Winter: In areas with heavy snowfall, clear snow from the roof to prevent excessive weight accumulation. Ensure the roof panels are closed and latched during cold snaps.
- Summer: Ensure adequate ventilation by opening the roof panels during hot periods to prevent plants from overheating.
6. Troubleshooting
- Problem: Water accumulation on the roof.
Solution: The pointed roof design is intended to shed water. Ensure the unit is level and that the roof panels are properly aligned and closed. Clear any debris that might be obstructing water flow. - Problem: Plants overheating inside the greenhouse.
Solution: Open the two independent roof panels to increase ventilation and allow hot air to escape. Consider partially shading the greenhouse during peak sun hours if temperatures remain too high. - Problem: Difficulty opening/closing roof panels.
Solution: Check hinges and support arms for any obstructions or damage. Lubricate hinges with a silicone-based spray if they are stiff. Ensure all assembly screws are tightened correctly. - Problem: Raised bed appears unstable.
Solution: Verify that all fasteners connecting the galvanized steel panels and corner supports are securely tightened. Ensure the bed is placed on a firm, level surface.
7. Specifications
| Overall Dimensions | 35.5" W x 31.5" D x 36" H |
| Garden Bed Size | 35.5" W x 31.5" D x 12" H |
| Planting Area Size | 32.5" W x 28.5" D x 12" H |
| Cold Frame Size | 33.25" W x 29.5" D x 23.75" H |
| Item Weight | 22 Pounds |
| Color | Gray |
| Materials | Fir Wood (frame), Polycarbonate (panels), Galvanized Steel (raised bed) |
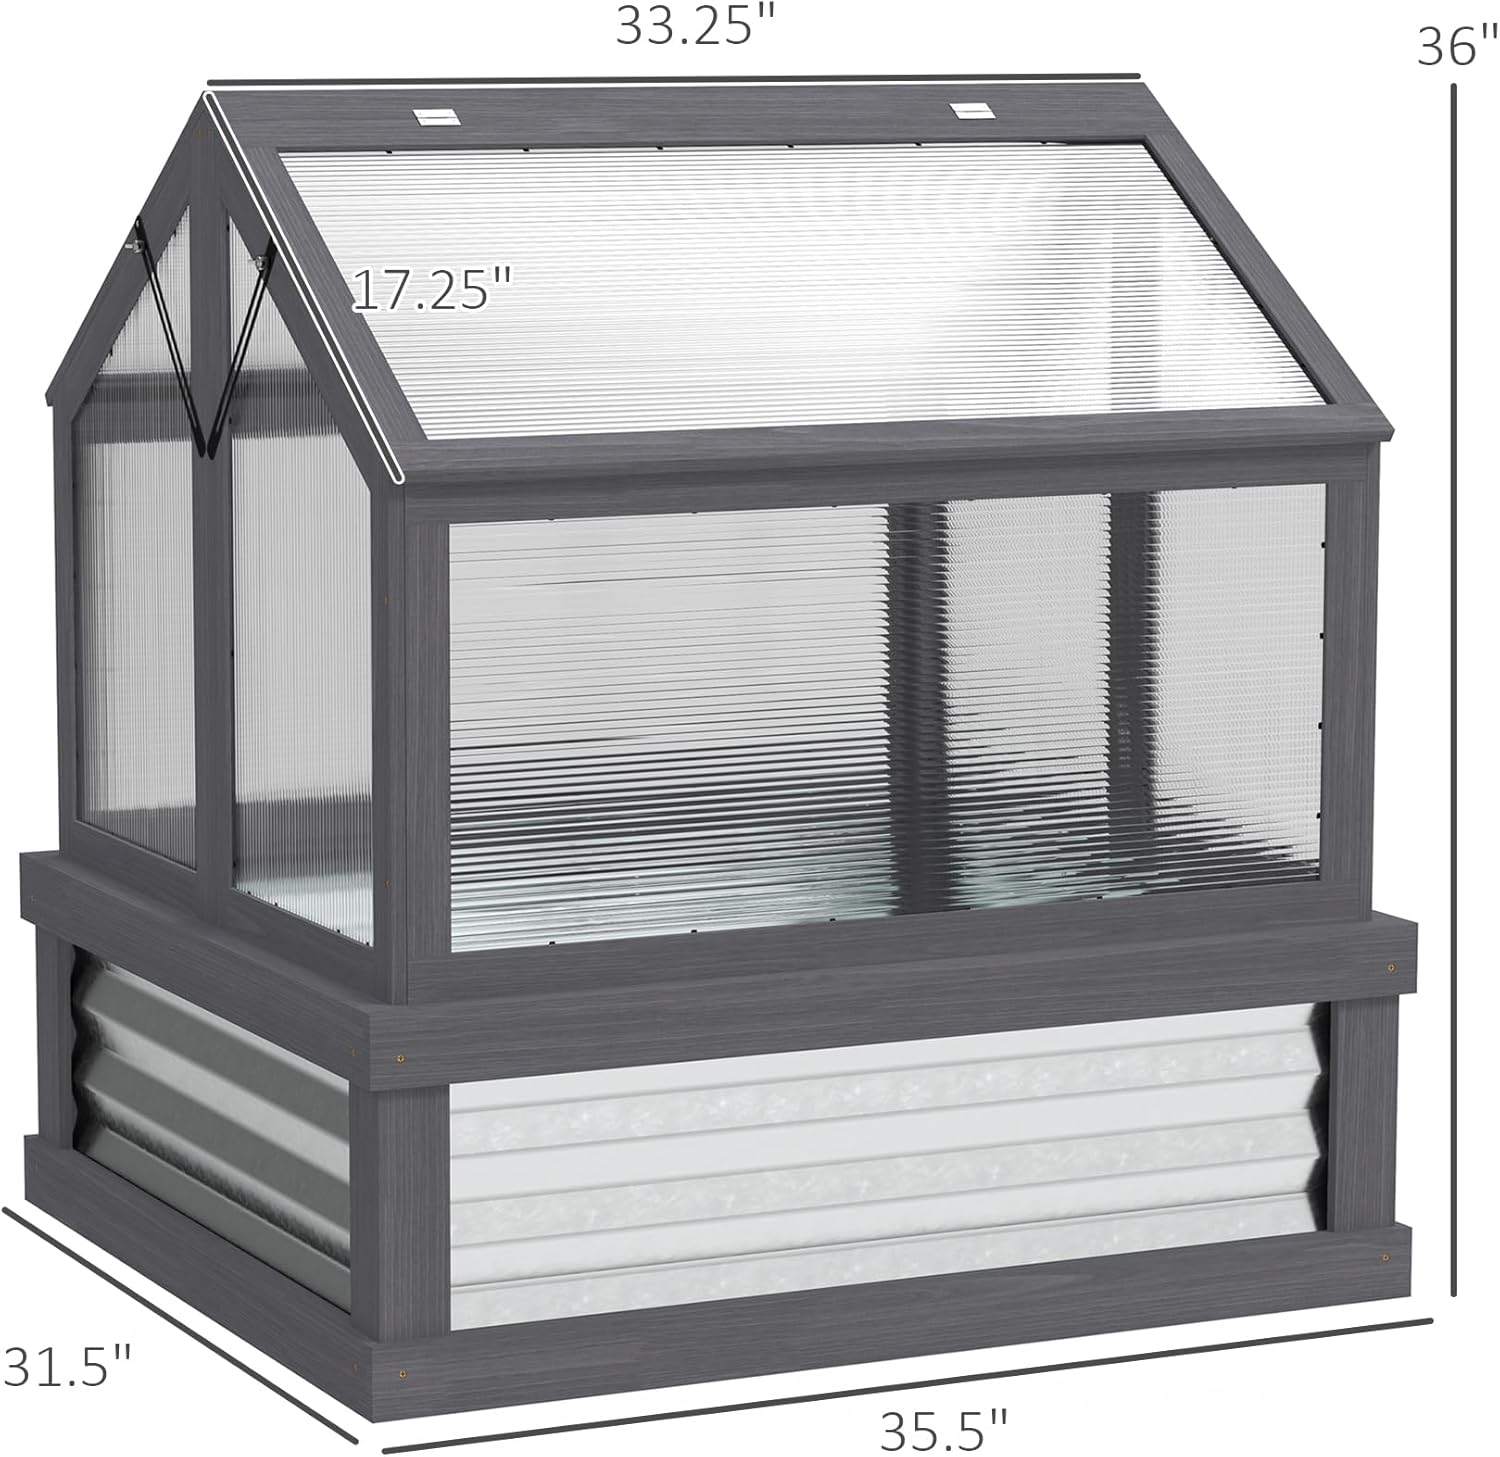
Image: Technical drawing showing the key dimensions of the assembled raised garden bed and greenhouse unit.
8. Warranty and Support
For warranty information or technical support, please refer to the warranty card included with your product or contact Outsunny customer service directly. Contact details can typically be found on the product packaging or the official Outsunny website.
Please have your model number (B0DQL8CJMR) and purchase date ready when contacting support.
Ask a question about this manual
Ask about setup, troubleshooting, compatibility, parts, safety, or missing instructions. Manuals+ will review the question and use this page’s manual context to help answer it.