1. Introduction
Thank you for choosing the Relaxweex Mini Digital Camera Keychain. This compact and portable camera is designed for capturing moments in 1080p resolution, featuring a built-in flash and a user-friendly interface. This manual provides essential information for setting up, operating, and maintaining your device to ensure optimal performance.
2. Product Overview
2.1 Package Contents
- 1 x Mini Digital Camera Keychain
- 1 x Charging Base
- 1 x 16GB TF Card (pre-installed or separate)
- 1 x USB Charging Cable
- 1 x Keychain Accessory
- 1 x Wristband
2.2 Camera Components
Familiarize yourself with the camera's physical components:

Image: The Relaxweex Mini Digital Camera Keychain shown with its charging base, USB cable, 16GB TF card, keychain accessory, and wristband.
- Lens: Main camera lens for capturing images and videos.
- Flash Light: Provides illumination for low-light conditions.
- Display Screen: 1.44-inch color screen for live view, playback, and menu navigation.
- Power Button: Turns the camera on/off.
- Mode Button: Switches between photo and video modes.
- Shutter/Record Button: Initiates photo capture or video recording.
- Navigation Buttons (+/-): Used for menu navigation, zooming, and filter selection.
- Memory Card Slot: For inserting the TF (MicroSD) card.
- USB-C Port: For charging and data transfer.
- Keychain/Lanyard Loop: Attachment point for accessories.

Image: A detailed view of the camera's side, highlighting the action buttons for mode switching and filter selection, and the 1.44-inch screen.
3. Setup
3.1 Inserting the Memory Card
The camera requires a TF (MicroSD) card for storing photos and videos. A 16GB card is included.
- Locate the memory card slot on the side of the camera.
- Insert the TF card with the printed side facing up, gently pushing until it clicks into place. Ensure it is fully seated.
- To eject, gently press the card inward until it springs out.

Image: A close-up showing a 16GB memory card being inserted into the camera's designated slot, with an arrow indicating the correct direction.
3.2 Charging the Battery
Before first use, fully charge the camera's built-in battery.
- Connect the charging base to the camera's USB-C port.
- Connect the USB charging cable to the charging base and a power source (e.g., computer USB port, USB wall adapter).
- The charging indicator light will show the charging status. A full charge provides approximately 600 minutes of operation.

Image: The camera is shown connected to its charging base, which is then connected via a USB cable to a power source, illustrating the charging process.
3.3 Attaching Accessories
Attach the keychain or wristband for convenient carrying and to prevent loss.
- Thread the keychain or wristband loop through the designated attachment point on the camera.
- Secure the accessory as needed.

Image: A hand is shown attaching a keychain accessory to the camera's loop, demonstrating how to secure it for portability.
4. Operating Instructions
4.1 Power On/Off
- To power on, press and hold the Power Button until the screen illuminates.
- To power off, press and hold the Power Button again until the screen turns off.
4.2 Photo Mode
- Ensure the camera is powered on.
- Press the Mode Button to switch to photo mode (indicated by a camera icon on the screen).
- Frame your shot using the display screen.
- Press the Shutter Button to take a picture.
- To apply filters, use the Navigation Buttons (+/-) to cycle through available options (e.g., Cool Color, Warm Color, Black & White, Retro, Fresh).
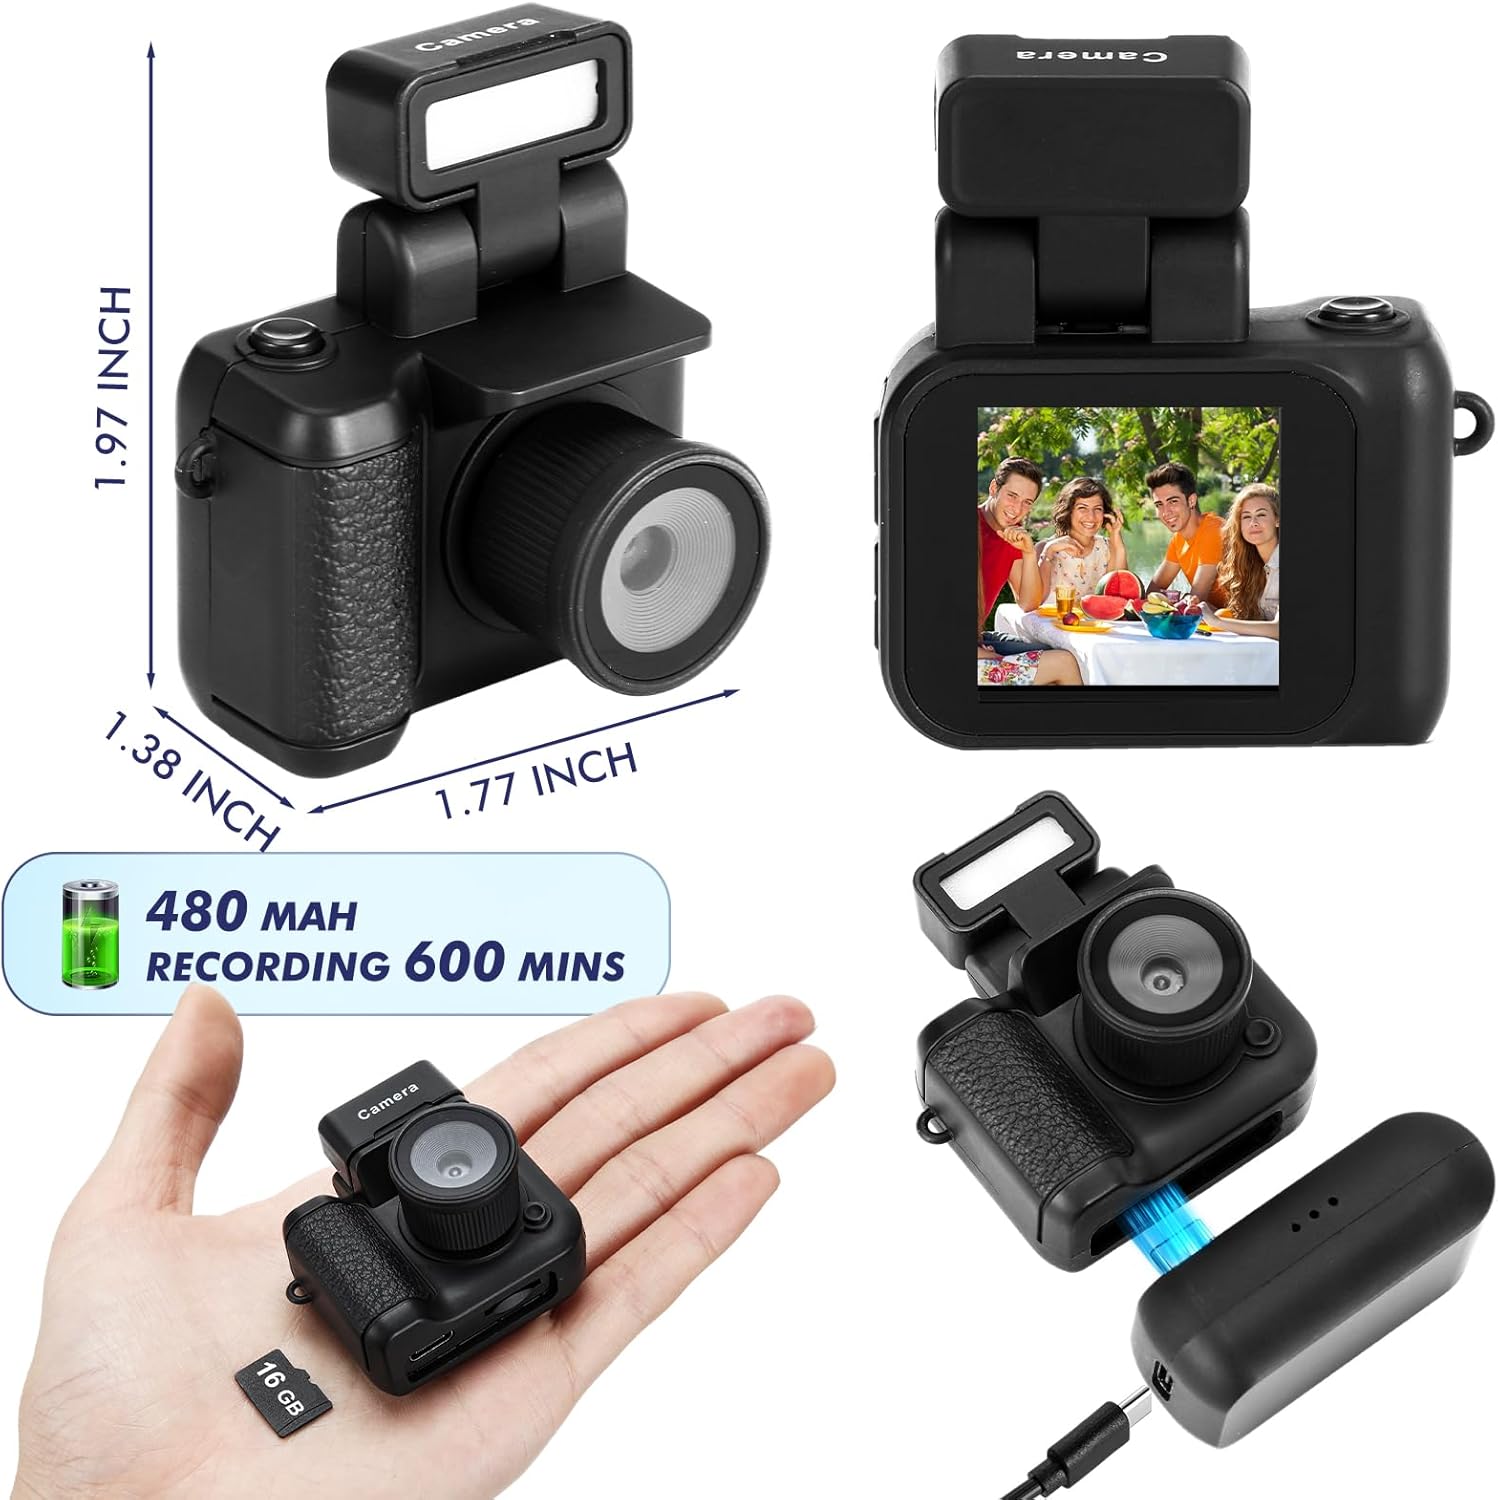
Image: The camera's screen displays different photo filters such as Original Image, Cool Color, Warm Color, Black & White, Retro, and Fresh, demonstrating the creative options available.
4.3 Video Mode
- Ensure the camera is powered on.
- Press the Mode Button to switch to video mode (indicated by a video camera icon on the screen).
- Press the Record Button to start recording. A red indicator or timer will appear on the screen.
- Press the Record Button again to stop recording.
Video: This video demonstrates the various features and usage scenarios of the Relaxweex Mini Digital Camera, including switching between photo and video modes, applying filters, and attaching accessories.
4.4 Flash Function
The camera features a built-in flash for improved visibility in dark environments.
- The flash component can be installed or removed as needed.
- When installed, the flash can be activated to provide continuous light or to flash during photo capture. Refer to the on-screen menu for flash settings (On/Fill).
Image: Two images show a person on a bicycle, one with the flash off (Close Flash Effect) and one with the flash on (Open Flash Effect), illustrating the illumination provided by the camera's flash.
4.5 Viewing Photos and Videos
You can review your captured content directly on the camera's screen.
- In either photo or video mode, use the Navigation Buttons (+/-) to scroll through your saved files.
- Press the Shutter/Record Button to play a video or view a photo in full screen.
5. Memory Card Management
5.1 Transferring Files to a Computer
To access your photos and videos, connect the camera to a computer:
- Power off the camera.
- Connect the camera to your computer using the provided USB cable.
- The camera will appear as a removable disk drive on your computer.
- Open the drive to access and copy your files.
5.2 Formatting the Memory Card
Formatting the memory card will erase all data. Back up important files before proceeding.
- Navigate to the camera's settings menu (usually accessible by holding the Mode button or a specific combination).
- Select the 'Format Card' option.
- Confirm your selection to format the card.
6. Maintenance
- Cleaning: Use a soft, dry cloth to clean the camera body. For the lens and screen, use a specialized lens cleaning cloth. Avoid abrasive materials or harsh chemicals.
- Storage: Store the camera in a cool, dry place away from direct sunlight and extreme temperatures.
- Battery Care: For long-term storage, charge the battery to about 50% to prolong its lifespan.
7. Troubleshooting
| Problem | Possible Cause | Solution |
|---|---|---|
| Camera does not turn on. | Low battery. | Charge the camera fully using the provided USB cable and charging base. |
| Memory card error. | Card not inserted correctly or corrupted. | Reinsert the TF card. If the issue persists, try formatting the card (after backing up data) or using a different TF card. |
| Poor image/video quality. | Low light, dirty lens, or incorrect settings. | Ensure adequate lighting. Clean the lens. Check if flash is enabled in low light. |
| Charging base feels loose. | Minor manufacturing variation. | Ensure the camera is securely seated in the charging base and the USB cable is firmly connected. Handle with care during charging. |
| TF card difficult to insert/remove. | Misalignment or tight slot. | Ensure correct orientation. Apply gentle, even pressure. Do not force the card. If it's consistently difficult, contact support. |
8. Specifications
| Feature | Detail |
|---|---|
| Model Name | HAT0879 |
| Video Resolution | 1080p |
| Photo Sensor Resolution | 2.1 MP |
| Screen Size | 1.44 inches (approx. 1 Centimeter) |
| Battery Type | Built-in Lithium Ion |
| Battery Average Life | Up to 600 minutes (recording) |
| Memory Storage Capacity | 16 GB (TF Card included) |
| Supported File Format | JPEG (photos), MP4 (videos) |
| Connectivity Technology | USB |
| Special Features | Flash Function, Long Life Battery, Color Screen |
| Dimensions (approx.) | 1.97 x 1.77 x 1.38 inches |
9. Warranty and Support
For warranty information or technical support, please refer to the product packaging or contact Relaxweex customer service through the retailer where the product was purchased. Keep your purchase receipt for warranty claims.