1. Introduction
Thank you for choosing the ToruKeep 2.5 Cuft Large Safe Box. This manual provides essential information for the safe and efficient operation of your new security product. Please read these instructions carefully before installation and use, and retain them for future reference.
2. Product Overview
The ToruKeep 2.5 Cuft Large Safe Box is designed to provide secure storage for your valuables. It features a robust construction, digital keypad access, and an intelligent alarm system.
Key Features:
- Large Capacity: 2.5 cubic feet for documents, laptops, jewelry, and more.
- Sturdy & Pry-Proof: 42mm anti-explosion steel door, three 20mm locking bolts, and pry-resistant hinges.
- Fireproof & Waterproof Bag: Includes a basic bag for added protection of documents.
- Full Coverage Lining: Soft interior lining to prevent scratches on delicate items.
- Flexible Access: Multiple opening methods including emergency key, personal code, and external battery with code.
- Smart Alarm System: Locks for 20 seconds after 3 wrong codes and 300 seconds after 6 attempts, with an audible alarm.
- Silent Mode: Option for discreet access.
- Removable Shelf: For flexible storage organization.
- Sensor Light: Illuminates the interior when opened with a password.
Included Components:
- 1 x Safe Box
- 1 x External Battery Box
- 4 x Expansion Screws
- 2 x Emergency Keys
- 1 x User Manual (this document)

Image: ToruKeep Safe Box showing dimensions (12.2"D x 13.78"W x 16.53"H) and included accessories like the fireproof bag, expansion screws, emergency keys, external battery box, and user manual.

Image: Detailed view of the safe's interior features, including soft lining to protect items, a fireproof bag for documents, an intelligent sensor light for visibility, and a removable shelf for flexible storage.
3. Setup Instructions
3.1 Initial Opening and Battery Installation
- Open with Emergency Key: For the first use, push the emergency lock cover on the keypad. Insert one of the emergency keys into the keyhole and turn it. Simultaneously, turn the knob clockwise to open the door.
- Install Batteries: Locate the battery compartment inside the safe door. Insert 4 AA batteries (not included) into the compartment, ensuring correct polarity.
- Program Password: With the door open, press the red reset button located on the inside of the safe door. The yellow indicator light on the keypad will flash twice.
- Set User Code: Input your desired 3 to 8 digit user code on the keypad, then press the '#' button to confirm. The yellow light will flash twice with two buzzer beeps to confirm success. If the yellow light flashes three times with three beeps, the code change was not effective; please try again.
- Set Master Code (Optional): With the door unlocked, press '00' then the reset button. Input your desired 3 to 8 digit master code, then press the '#' button to confirm. The yellow light will flash twice with two buzzer beeps to confirm success. If the yellow light flashes three times with three beeps, the code change was not effective; please try again.

Image: Visual guide for the initial setup, showing how to use the emergency key, install 4 AA batteries, and press the reset button to program a password.

Image: Instructions for setting both user and master passwords, detailing the sequence of pressing the reset button, entering the code, and confirming with '#'.
3.2 Mounting the Safe
For enhanced security, the safe can be bolted to a wall or floor.
- Place the safe in your desired location. Use a pencil to mark the mounting holes on the floor or wall.
- Move the safe and drill holes for the expansion bolts (or clamping screws).
- Insert the expansion bolt (included) into the mounting holes. Turn the clamping screw counter-clockwise to separate.
- Ensure the safe is mounted in place as required and then tighten all screws securely.

Image: Step-by-step visual guide for securely mounting the safe to a wall or floor using expansion screws.
4. Operating Instructions
4.1 Opening the Safe
- Using Personal Code: Enter your programmed user password, then press the '#' key. The green light will illuminate. Rotate the knob clockwise and pull the door open within 5 seconds.
- Using Master Code: Enter your programmed master password, then press the '#' key. The green light will illuminate. Rotate the knob clockwise and pull the door open within 5 seconds.
- Using Emergency Key: If batteries are dead or you forget your code, use the emergency key as described in section 3.1.
- Using External Battery Box: If the internal batteries are dead and you don't have the emergency key, insert 4 AA batteries into the external battery box. Plug the external battery box into the port below the keypad. Enter your user password and press '#'. The green light will illuminate. Rotate the knob clockwise and pull the door open within 5 seconds.
4.2 Silent Mode
- Activate Silent Mode: Press '*' and then '633'. This will disable keypad typing sounds.
- Deactivate Silent Mode: Press '*' and then '66'. This will re-enable keypad typing sounds.
4.3 Alarm System
- 3 Wrong Codes: If three consecutive incorrect passwords are entered, the keypad will be locked for 20 seconds, and the safe will emit an alarm.
- 6 Wrong Codes: If six consecutive incorrect passwords are entered, the keypad will be locked for 5 minutes, and the safe will emit an alarm. During this time, any input is ineffective.
- Stopping the Alarm: To stop the alarm, open the safe using the emergency key and remove the batteries.
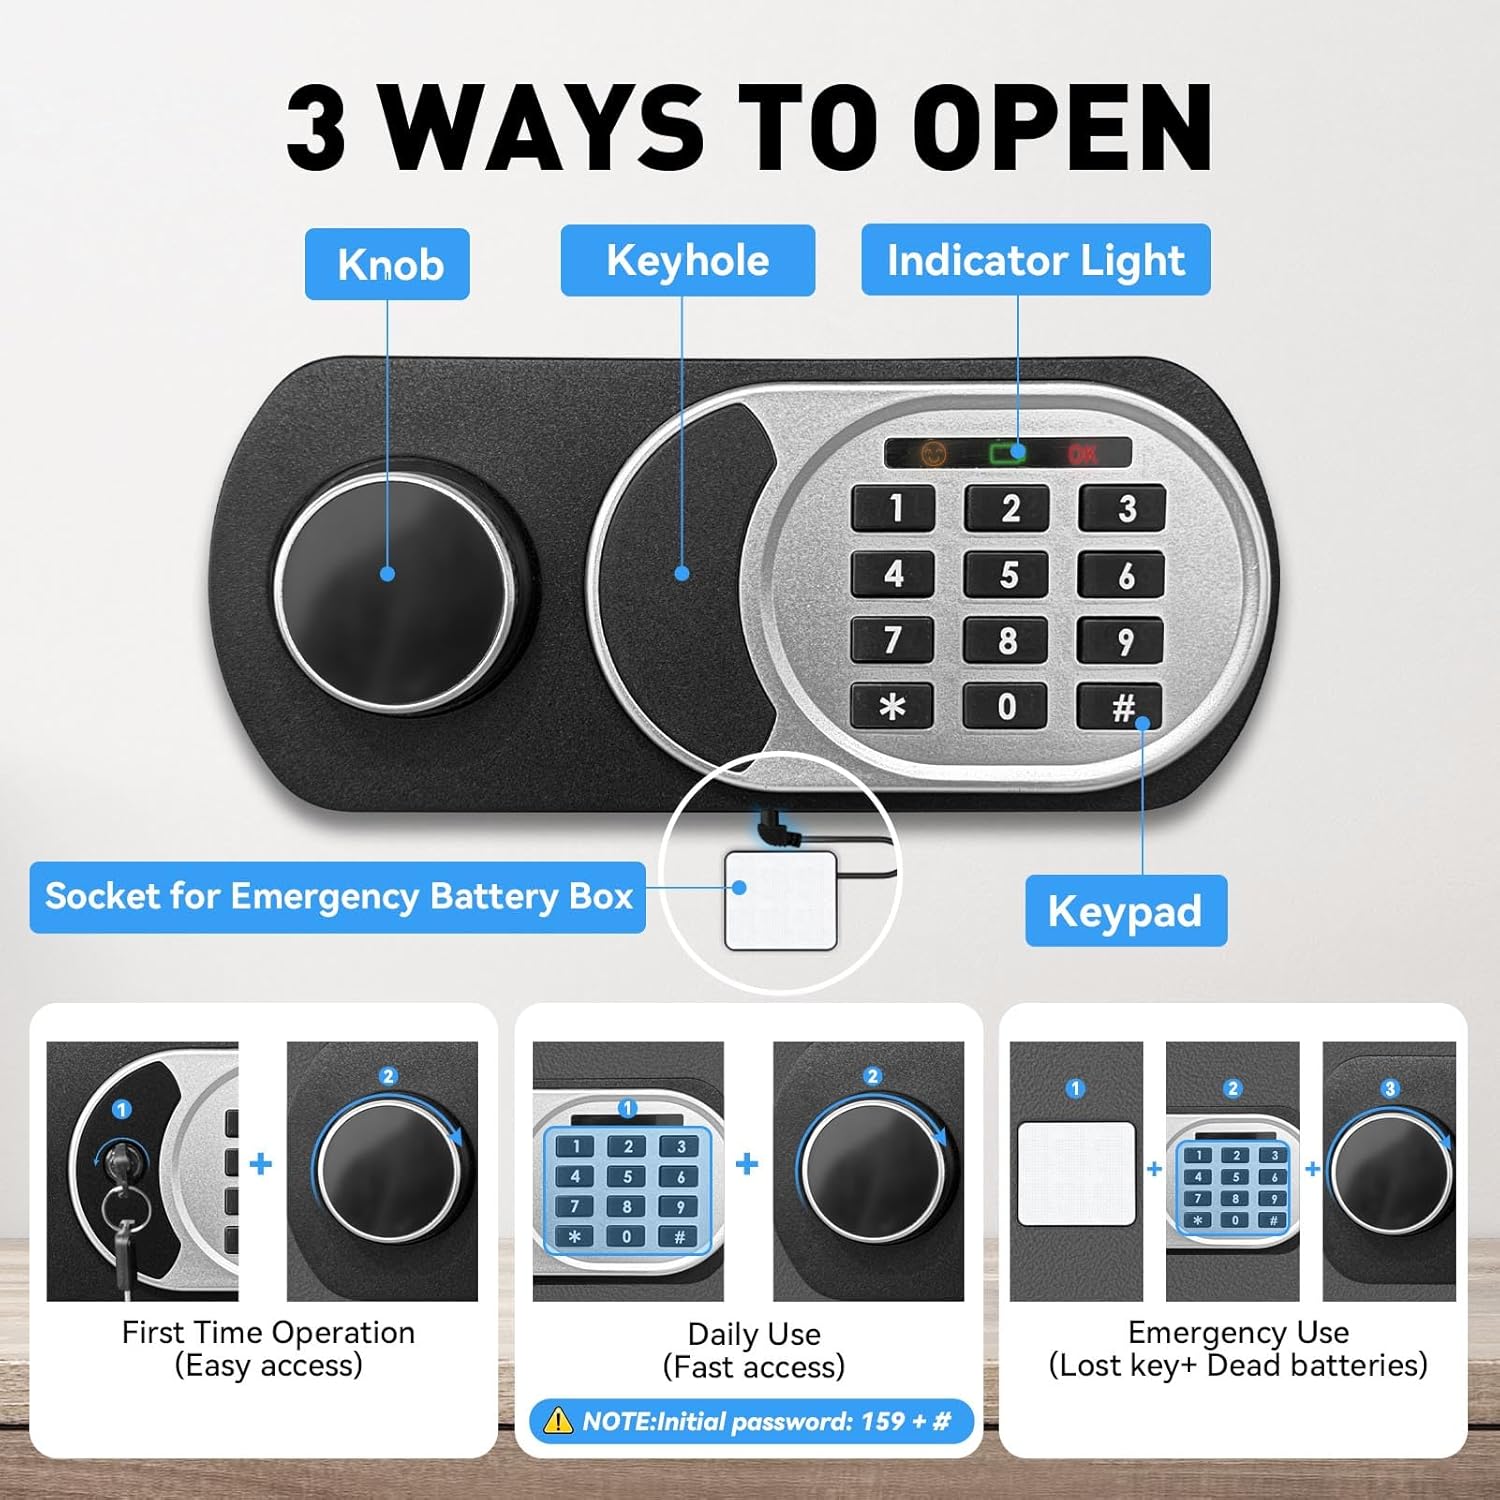
Image: Visual representation of the three primary methods to open the safe: using the emergency key and knob, using a personal code and knob, or using an external battery box with a code and knob.

Image: Explanation of the safe's dual alarm system, indicating that 3 invalid code entries lock the keypad for 20 seconds with an alarm, and 6 invalid entries lock it for 5 minutes with an alarm.
Video: This video demonstrates various features and operations of the ToruKeep safe, including initial opening, battery installation, setting user and master codes, activating/deactivating silent mode, and the alarm system's response to incorrect password entries. It also shows how to use the emergency battery box and stop the alarm.
5. Maintenance
- Battery Replacement: Replace batteries annually or when the low battery indicator appears. Always use 4 new AA batteries.
- Cleaning: Clean the safe's exterior with a soft, damp cloth. Avoid abrasive cleaners or solvents.
- Key Storage: Always store emergency keys in a secure location away from the safe. Never store them inside the safe.
- Interior Lining: The soft lining helps protect items. Ensure it remains intact and free from damage.
6. Troubleshooting
- Safe does not open with code:
- Ensure batteries are correctly installed and not depleted. Replace if necessary.
- Verify the code entered is correct. Remember to press '#' after entering the code.
- If the keypad is locked due to multiple incorrect attempts, wait for the lockout period to expire.
- Use the emergency key to open the safe and check the internal battery compartment.
- If internal batteries are dead, use the external battery box to power the keypad.
- Alarm sounds unexpectedly:
- This indicates multiple incorrect password entries.
- To stop the alarm, open the safe with the emergency key and remove the batteries.
- Keypad is unresponsive:
- Check battery levels. Replace batteries if low.
- Ensure the external battery box is properly connected if used.
- If the keypad is locked due to incorrect entries, wait for the lockout period.
7. Specifications
| Feature | Detail |
|---|---|
| Brand | ToruKeep |
| Model Number | FA |
| Product Dimensions | 12.2"D x 13.78"W x 16.54"H |
| Lock Type | Electronic Combination Lock |
| Color | Black |
| Capacity | 2.5 Cubic Feet |
| Material | Alloy Steel |
| Item Weight | 29.9 pounds |
| Mounting Type | Wall Mount |
| Special Features | Alarm System, Anti-Theft, Combination Lock, Removable Shelf, Sensor Light |
8. Warranty and Support
For any questions or support regarding your ToruKeep safe, please contact us at support@kepsate.com.
Please refer to your purchase documentation for specific warranty details.