
ATEngeus TAD07+TAD073
ATEngeus TAD07+TAD073 Air Duster User Manual
Model: TAD07+TAD073
1. Introduction
Thank you for choosing the ATEngeus TAD07+TAD073 Electric Air Duster. This device is designed to provide a powerful and eco-friendly solution for cleaning dust and debris from various electronics, computer components, and other hard-to-reach areas. Featuring a brushless motor and stepless speed regulation, it offers efficient and precise cleaning without the need for disposable compressed air cans.
Please read this manual thoroughly before operating the device to ensure safe and optimal performance. Keep this manual for future reference.
2. Safety Instructions
- Read All Instructions: Before using the air duster, read all safety warnings and instructions. Failure to follow the warnings and instructions may result in electric shock, fire, and/or serious injury.
- Keep Away from Water: Do not expose the air duster to rain or wet conditions. Water entering the device will increase the risk of electric shock.
- Proper Ventilation: Use the device in a well-ventilated area.
- Avoid Direct Contact: Do not direct the airflow directly at eyes, ears, nose, or mouth.
- Children and Pets: Keep the device out of reach of children and pets. This is not a toy.
- Charging: Only use the provided charging cable and adapter. Do not charge the device near flammable materials.
- Storage: Store the device in a cool, dry place when not in use.
- Maintenance: Do not attempt to disassemble or repair the device yourself. Refer all servicing to qualified service personnel.
3. Package Contents
Please check the package contents upon opening. If any items are missing or damaged, contact customer support.
- ATEngeus TAD07+TAD073 Electric Air Duster
- Charging Cable (USB-C)
- Nozzle Attachments (e.g., brush nozzle, narrow nozzle)
- User Manual
4. Product Overview
Familiarize yourself with the components of your ATEngeus Air Duster:

Figure 4.1: ATEngeus TAD07 and TAD073 Air Dusters. The image displays two models of the air duster. The left duster is black with green accents and a long, narrow nozzle. The right duster is black with red and blue internal lighting, featuring a wider nozzle and a more compact design. Both are shown from a side perspective.
- Air Outlet: Where the compressed air is expelled.
- Power Button/Speed Control: Activates the device and adjusts airflow.
- Charging Port: USB-C port for recharging the internal battery.
- LED Indicator: Shows battery status or operating mode.
- Nozzle Attachment Point: Where various nozzles can be attached.
5. Setup
- Initial Charge: Before first use, fully charge the air duster. Connect the provided USB-C cable to the charging port on the device and the other end to a compatible USB power adapter (not included) or computer USB port. The LED indicator will show charging status (e.g., blinking while charging, solid when fully charged).
- Attach Nozzle: Select the appropriate nozzle for your cleaning task. Align the nozzle with the air outlet and firmly push it into place until it clicks or is securely seated.
6. Operating Instructions
6.1 Basic Operation
- Power On/Off: Press and hold the power button for 2-3 seconds to turn the device on or off.
- Adjusting Airflow (Stepless Speed Regulation): Once powered on, rotate the speed control dial (often integrated with the power button or a separate dial) to increase or decrease the airflow intensity.

Figure 6.1: Stepless Free Speed Regulation. This image illustrates how to adjust the wind speed of the air duster. It shows a hand holding the duster, pointing towards a laptop keyboard, with a circular dial on the duster highlighted. Three smaller diagrams show the dial at 30%, 60%, and 100% power settings, indicating variable speed control.
- Accelerated Key Mode (Max Speed): Some models feature an additional button for instant maximum speed. Press this dedicated button for a burst of the strongest airflow.
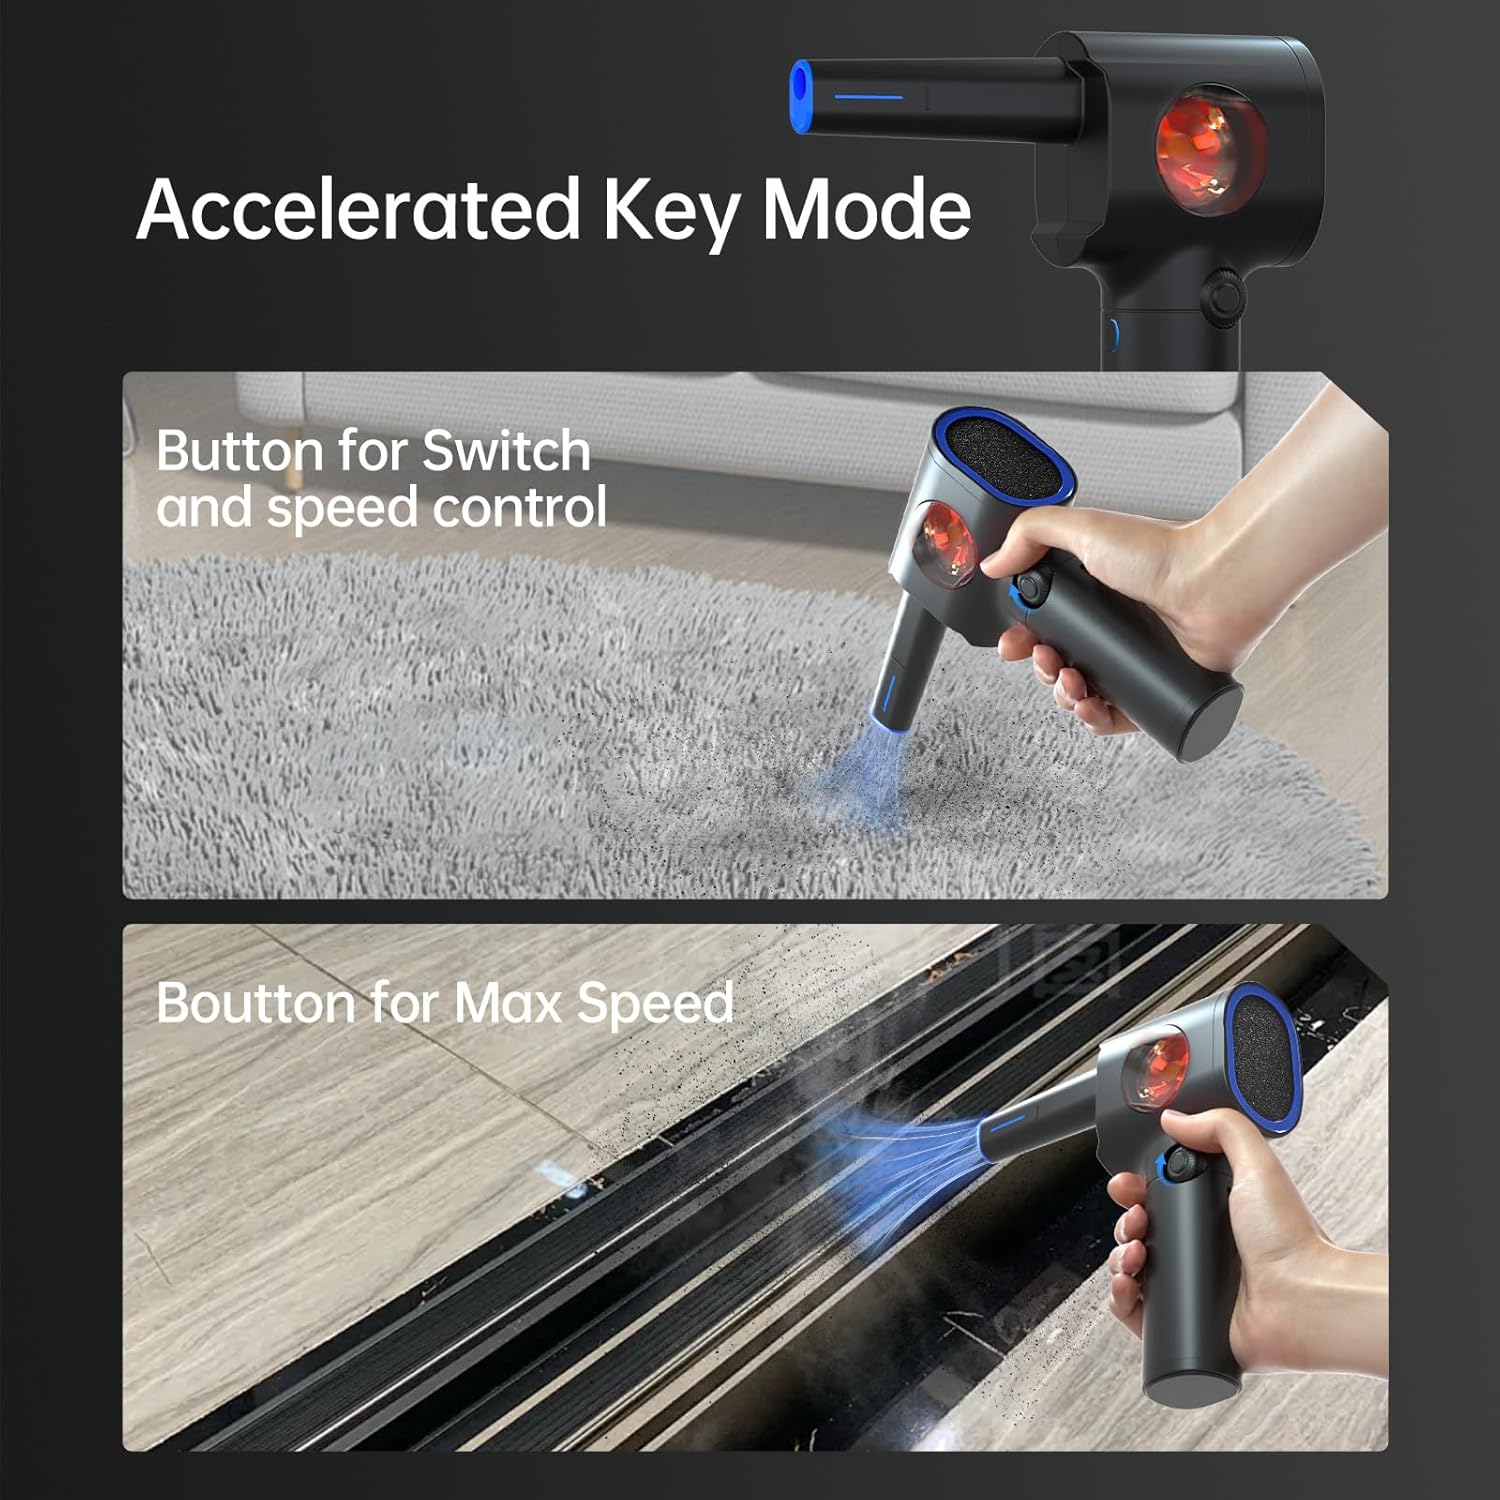
Figure 6.2: Accelerated Key Mode. This image demonstrates two operational modes. The top panel shows the main button for switching on and controlling speed. The bottom panel shows a separate button for activating maximum speed, useful for stubborn dust.
- Cleaning: Direct the nozzle towards the area to be cleaned. Use short bursts of air for delicate components or continuous airflow for larger areas.

Figure 6.3: Cleaning an Air Filter. A person is shown using the electric air duster to clean a dusty air filter. The image also includes "Before" and "After" comparisons of the filter, demonstrating the effectiveness of the duster. An illustration of discarded compressed air cans emphasizes the eco-friendly aspect.

Figure 6.4: LED Lighting Design in Use. This image shows the air duster being used to clean the interior of a computer tower. The duster's built-in LED light illuminates the area being cleaned, highlighting its utility in dark or confined spaces.
6.2 Battery Indicator
The LED indicator light provides information about the battery status:
- Solid Light: Fully charged or sufficient battery.
- Blinking Light: Battery is low and needs recharging.
- Light Off (while charging): Fully charged.
7. Maintenance
- Cleaning the Device: Wipe the exterior of the air duster with a soft, dry cloth. Do not use harsh chemicals or abrasive cleaners.
- Nozzle Care: If nozzles become clogged, gently clear them with a small brush or compressed air (from another source, if available). Ensure they are dry before reattaching.
- Storage: Store the air duster in a clean, dry environment, away from extreme temperatures and direct sunlight.
- Battery Care: To prolong battery life, avoid completely draining the battery frequently. Recharge the device regularly, even if not in constant use.
8. Troubleshooting
| Problem | Possible Cause | Solution |
|---|---|---|
| Device does not turn on. | Battery is depleted. | Charge the device fully. |
| Device does not turn on. | Power button not pressed correctly. | Press and hold the power button for 2-3 seconds. |
| Weak airflow. | Battery is low. | Recharge the device. |
| Weak airflow. | Nozzle is partially blocked. | Remove and clean the nozzle. |
| Device stops unexpectedly. | Overheating protection activated. | Allow the device to cool down for 10-15 minutes before resuming use. |
| Charging indicator not working. | Faulty charging cable or adapter. | Try a different USB-C cable and power adapter. |
9. Specifications
- Model: TAD07+TAD073
- Motor Type: Brushless DC Motor
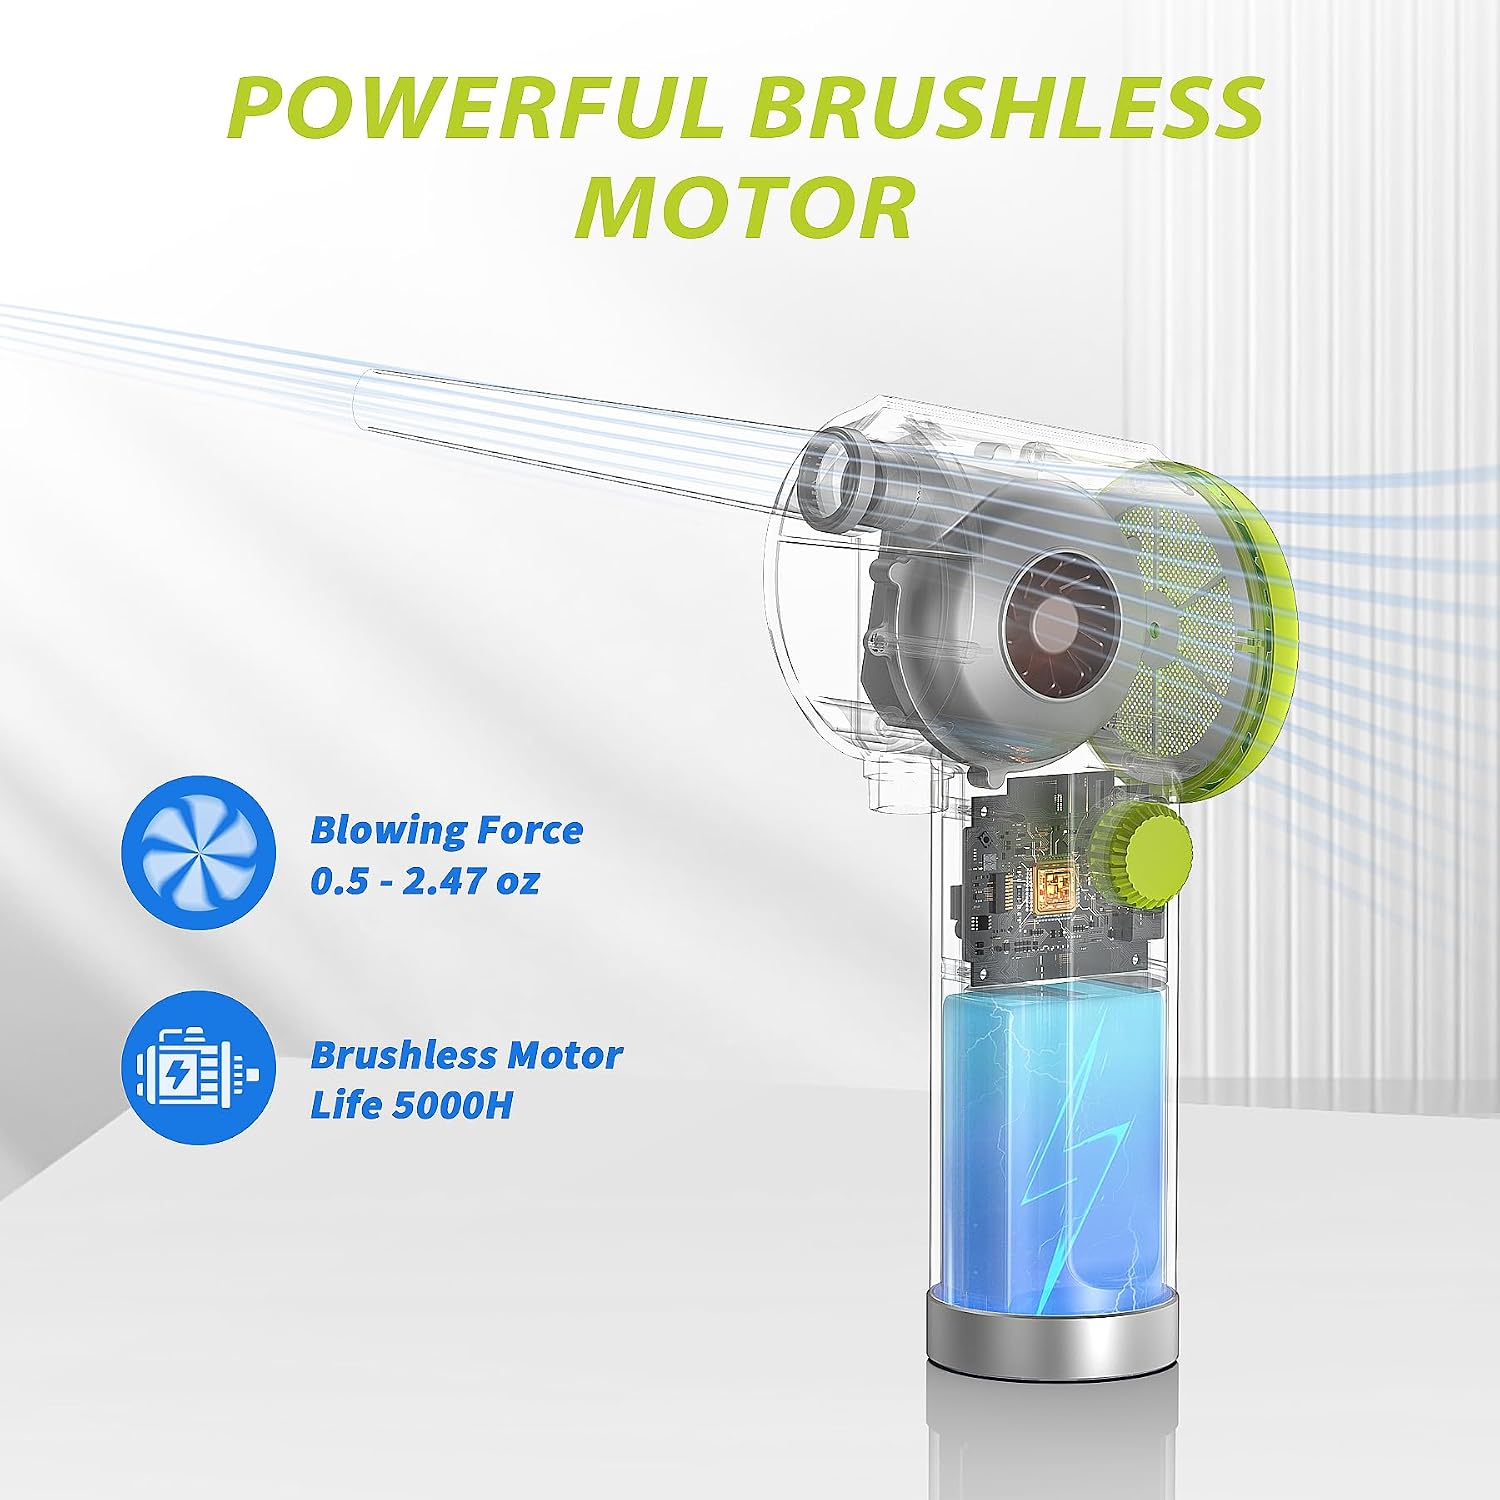
Figure 9.1: Powerful Brushless Motor. This diagram shows the internal structure of the air duster, highlighting the brushless motor and its airflow path. Key features like "Blowing Force 0.5 - 2.47 oz" and "Brushless Motor Life 5000H" are indicated.

Figure 9.2: Super Brushless Motor Comparison. This image visually compares the advantages of the brushless motor used in the ATEngeus duster ("Ours") against typical motors ("others"). It highlights benefits such as high wind speed, low noise, long life, more power, longer runtimes, quiet operation, and extended motor life.
- Speed Control: Stepless Speed Regulation
- Blowing Force: 0.5 - 2.47 oz (approximate, based on image)
- Motor Life: Up to 5000 hours (approximate, based on image)
- Charging Port: USB-C
- Features: LED Lighting Design, Accelerated Key Mode
- First Available Date: December 16, 2024
10. Warranty and Support
ATEngeus products are designed for durability and performance. For warranty information, technical support, or any questions regarding your TAD07+TAD073 Air Duster, please contact ATEngeus customer service through the retailer where you purchased the product or visit the official ATEngeus store on Amazon:
Visit the ATEngeus Store on Amazon
Please have your product model number (TAD07+TAD073) and purchase details ready when contacting support.
Related documentsTAD07+TAD073

Ask a question about this manual
Ask about setup, troubleshooting, compatibility, parts, safety, or missing instructions. Manuals+ will review the question and use this page’s manual context to help answer it.