
1. Introduction
This manual provides detailed instructions for the safe installation, operation, and maintenance of your Americangaslogs 18 Inch Liquid Propane Ventless Fireplace Logs. Please read all instructions carefully before installation and use. Retain this manual for future reference.
2. Important Safety Information
WARNING: Improper installation, adjustment, alteration, service, or maintenance can cause injury or property damage. Refer to this manual. For assistance or additional information, consult a qualified installer, service agency, or the gas supplier.
- Always ensure adequate ventilation when operating ventless gas logs.
- Do not store or use gasoline or other flammable vapors and liquids in the vicinity of this or any other appliance.
- Never obstruct the flow of combustion and ventilation air.
- Keep the area around the appliance clear and free from combustible materials, gasoline, and other flammable vapors and liquids.
Gas Type Warning!

WARNING: Please select your gas type (Natural Gas or Propane) first, then pick the size. Selecting the wrong type may cause compatibility issues and safety hazards. This product is designed for Liquid Propane.

If propane gas is displayed first, you can click on the indicated area to select natural gas if your model supports it. Ensure your model is compatible with the chosen gas type.
3. Package Contents
Verify that all components are present before beginning installation:
- Gas Log Burner Assembly
- Ceramic Fireplace Logs (Birch style)
- Remote Control Unit
- Control Box
- Lava Rocks
- Rock Wool (Glowing Embers)
- Instruction Manual
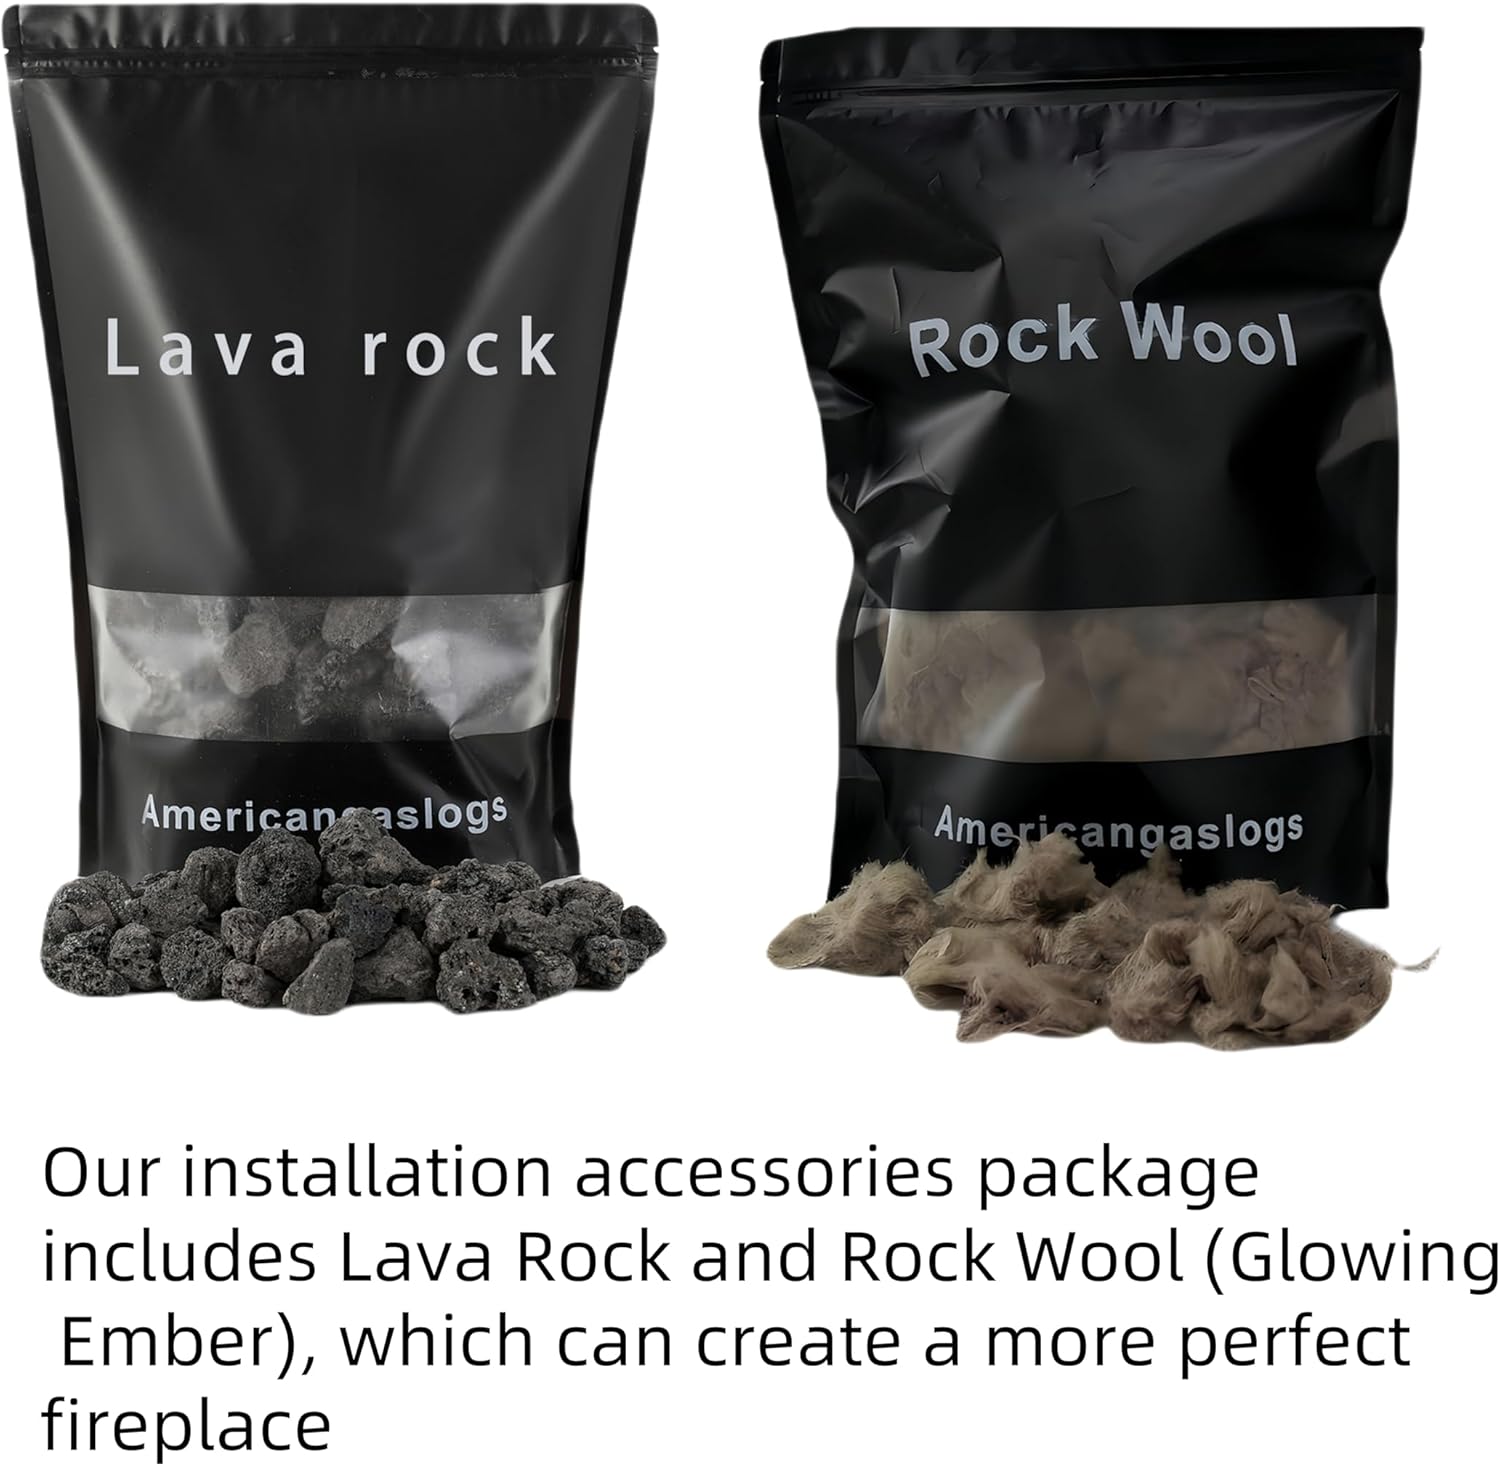
The installation accessories package includes Lava Rock and Rock Wool (Glowing Embers) to enhance the fireplace's appearance.
4. Setup and Installation
4.1 Component Identification
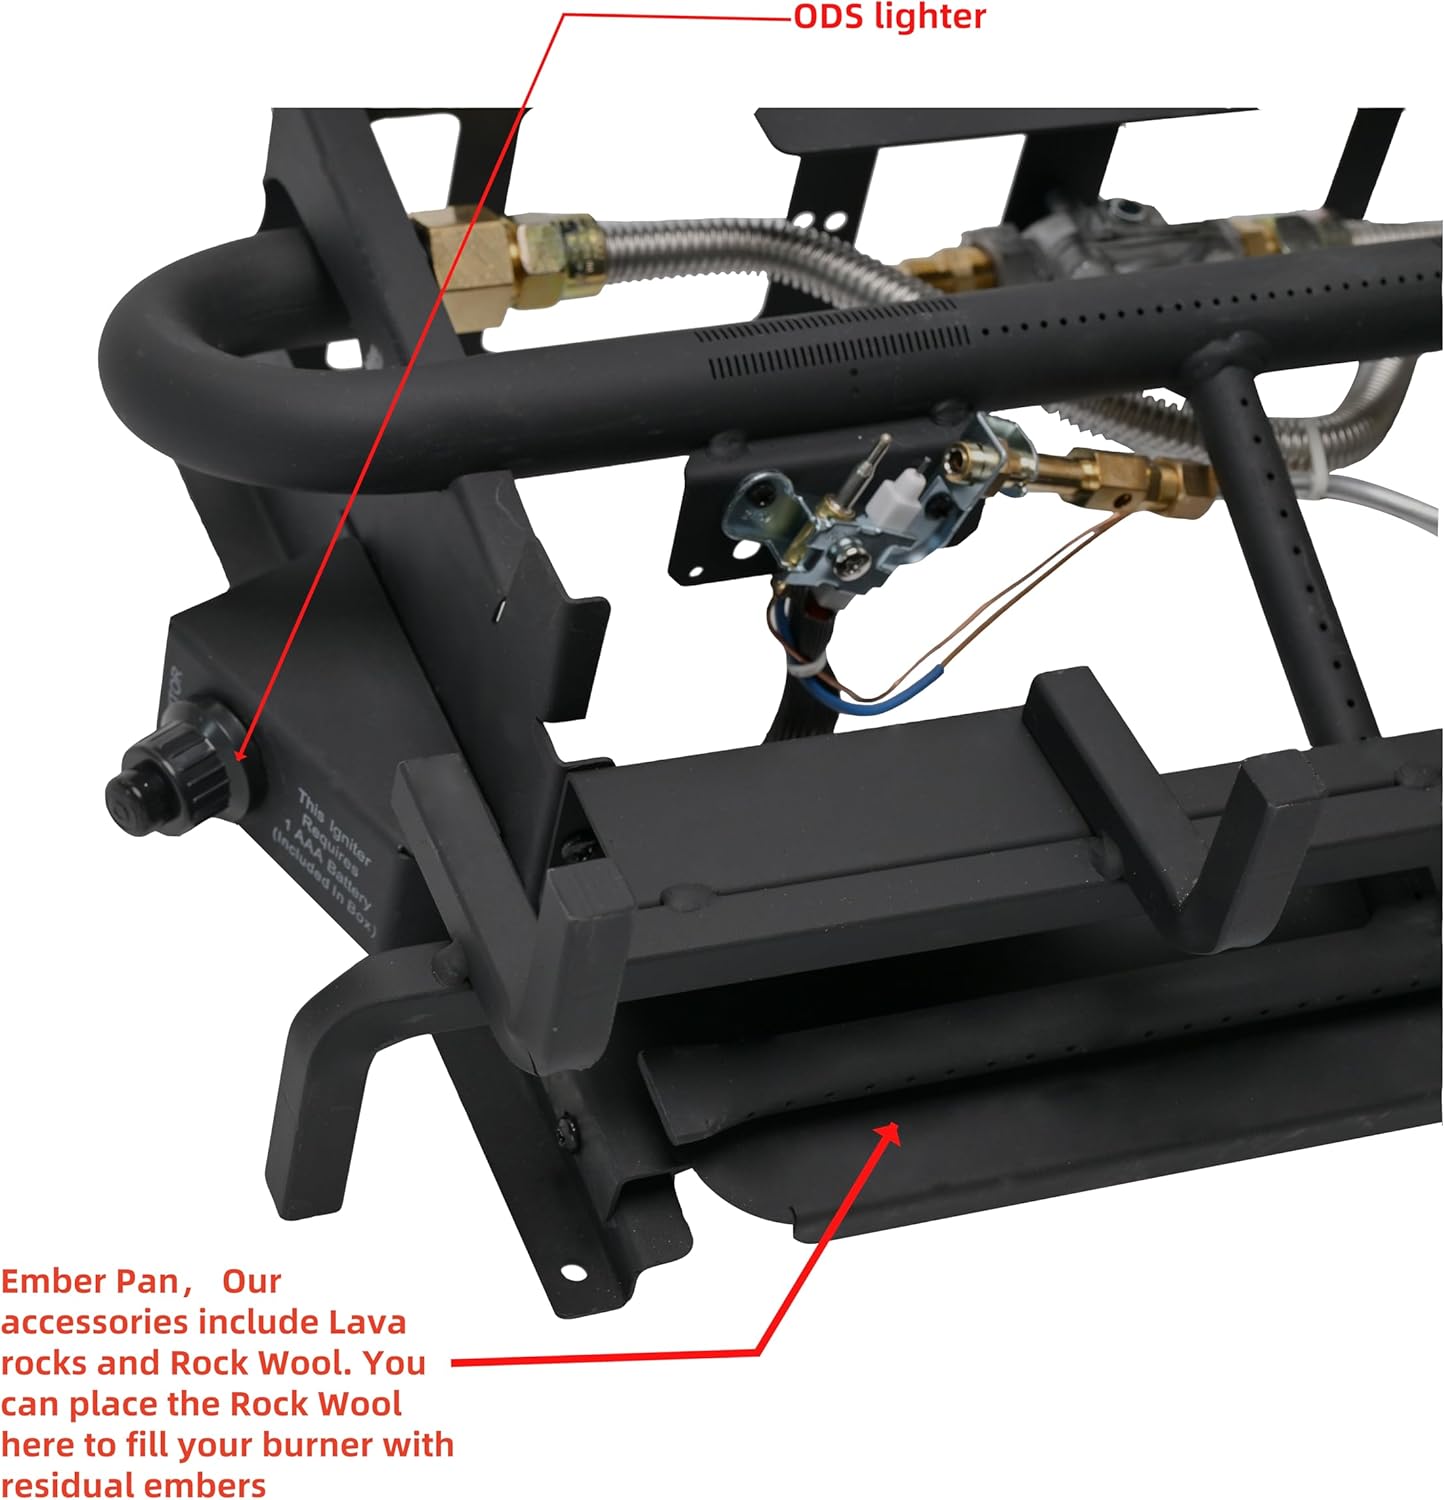
This image highlights key components of the burner: the ODS (Oxygen Depletion Sensor) lighter and the Ember Pan. The Ember Pan is where you place Lava Rocks and Rock Wool to simulate residual embers.
4.2 Wiring Connections
When connecting the controller, ensure correct polarity:
- Connect the red wire from the controller to the red wire of the unit.
- Connect the black wire from the controller to the black wire of the unit.
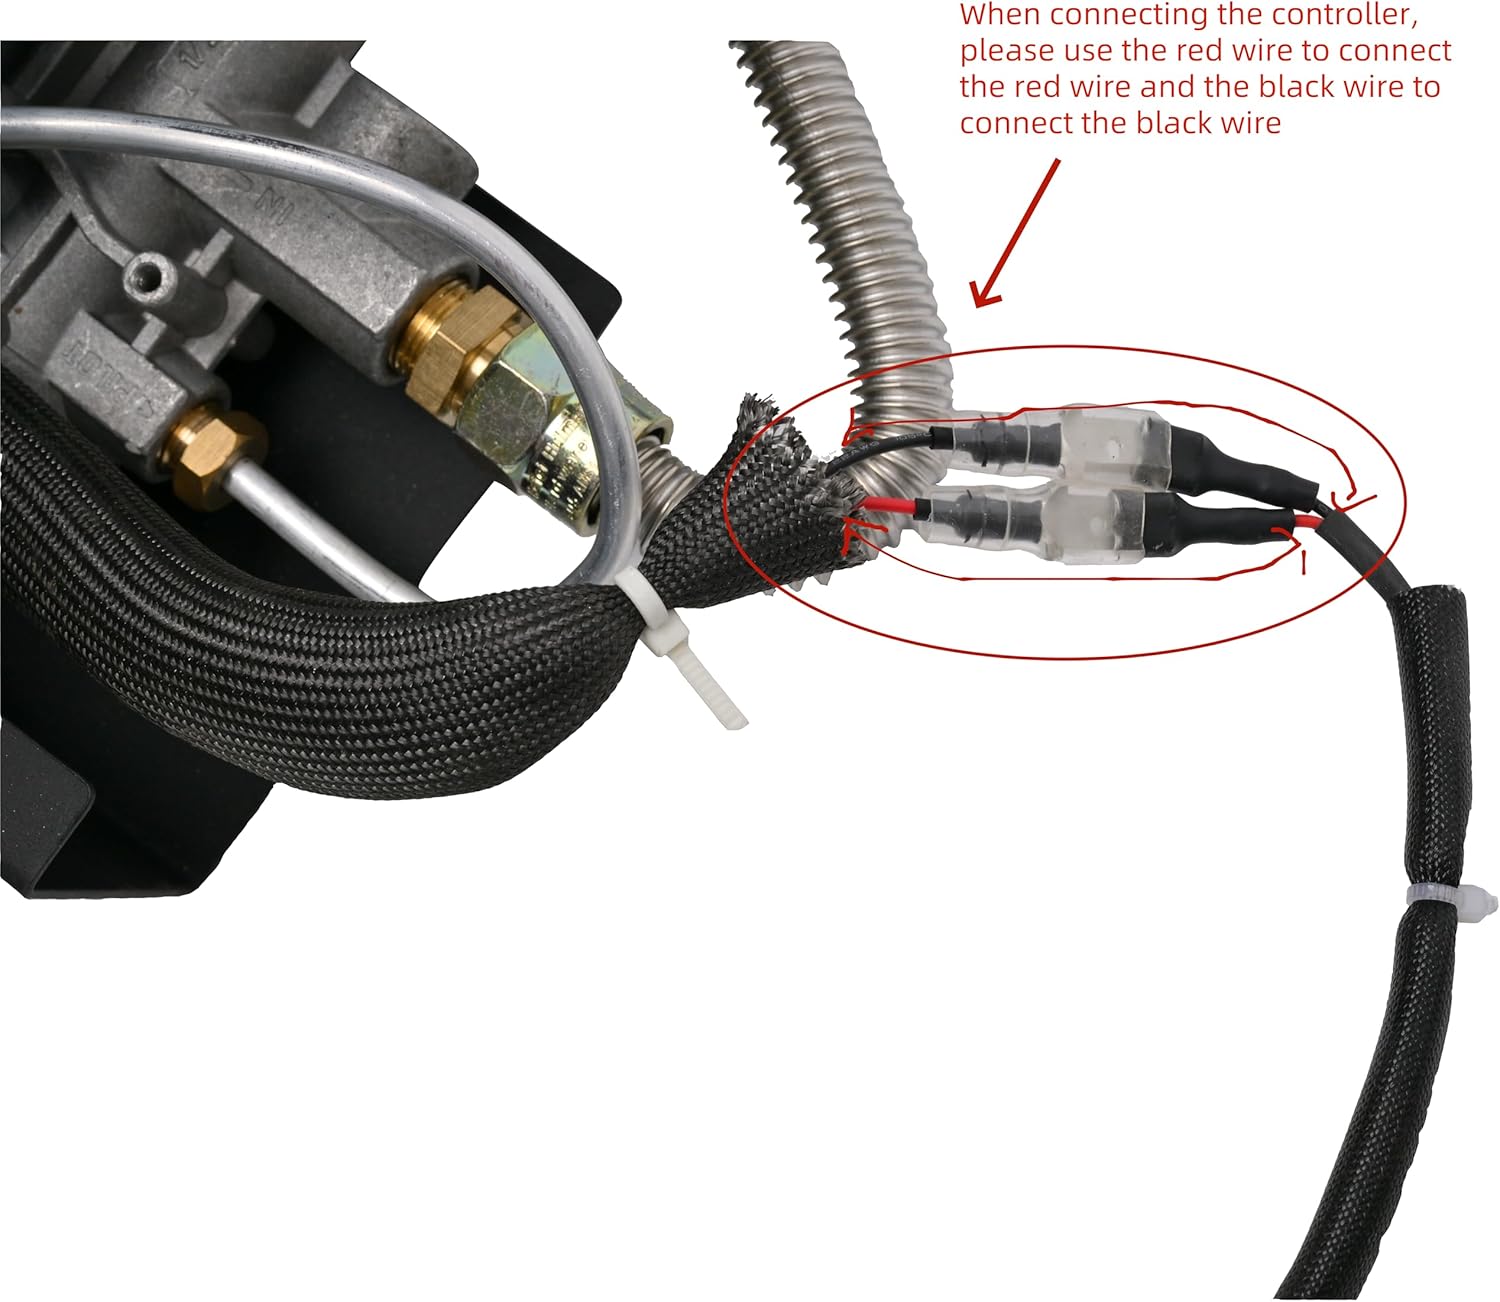
Detailed view of the wiring connections. Ensure the red wires are connected together and the black wires are connected together for proper controller function.
4.3 Log and Ember Placement
Carefully arrange the ceramic logs on the burner grate. Place the lava rocks and rock wool into the ember pan to create a realistic glowing ember effect when the unit is operating.

Birch style ceramic logs, designed for realistic appearance and heat distribution.
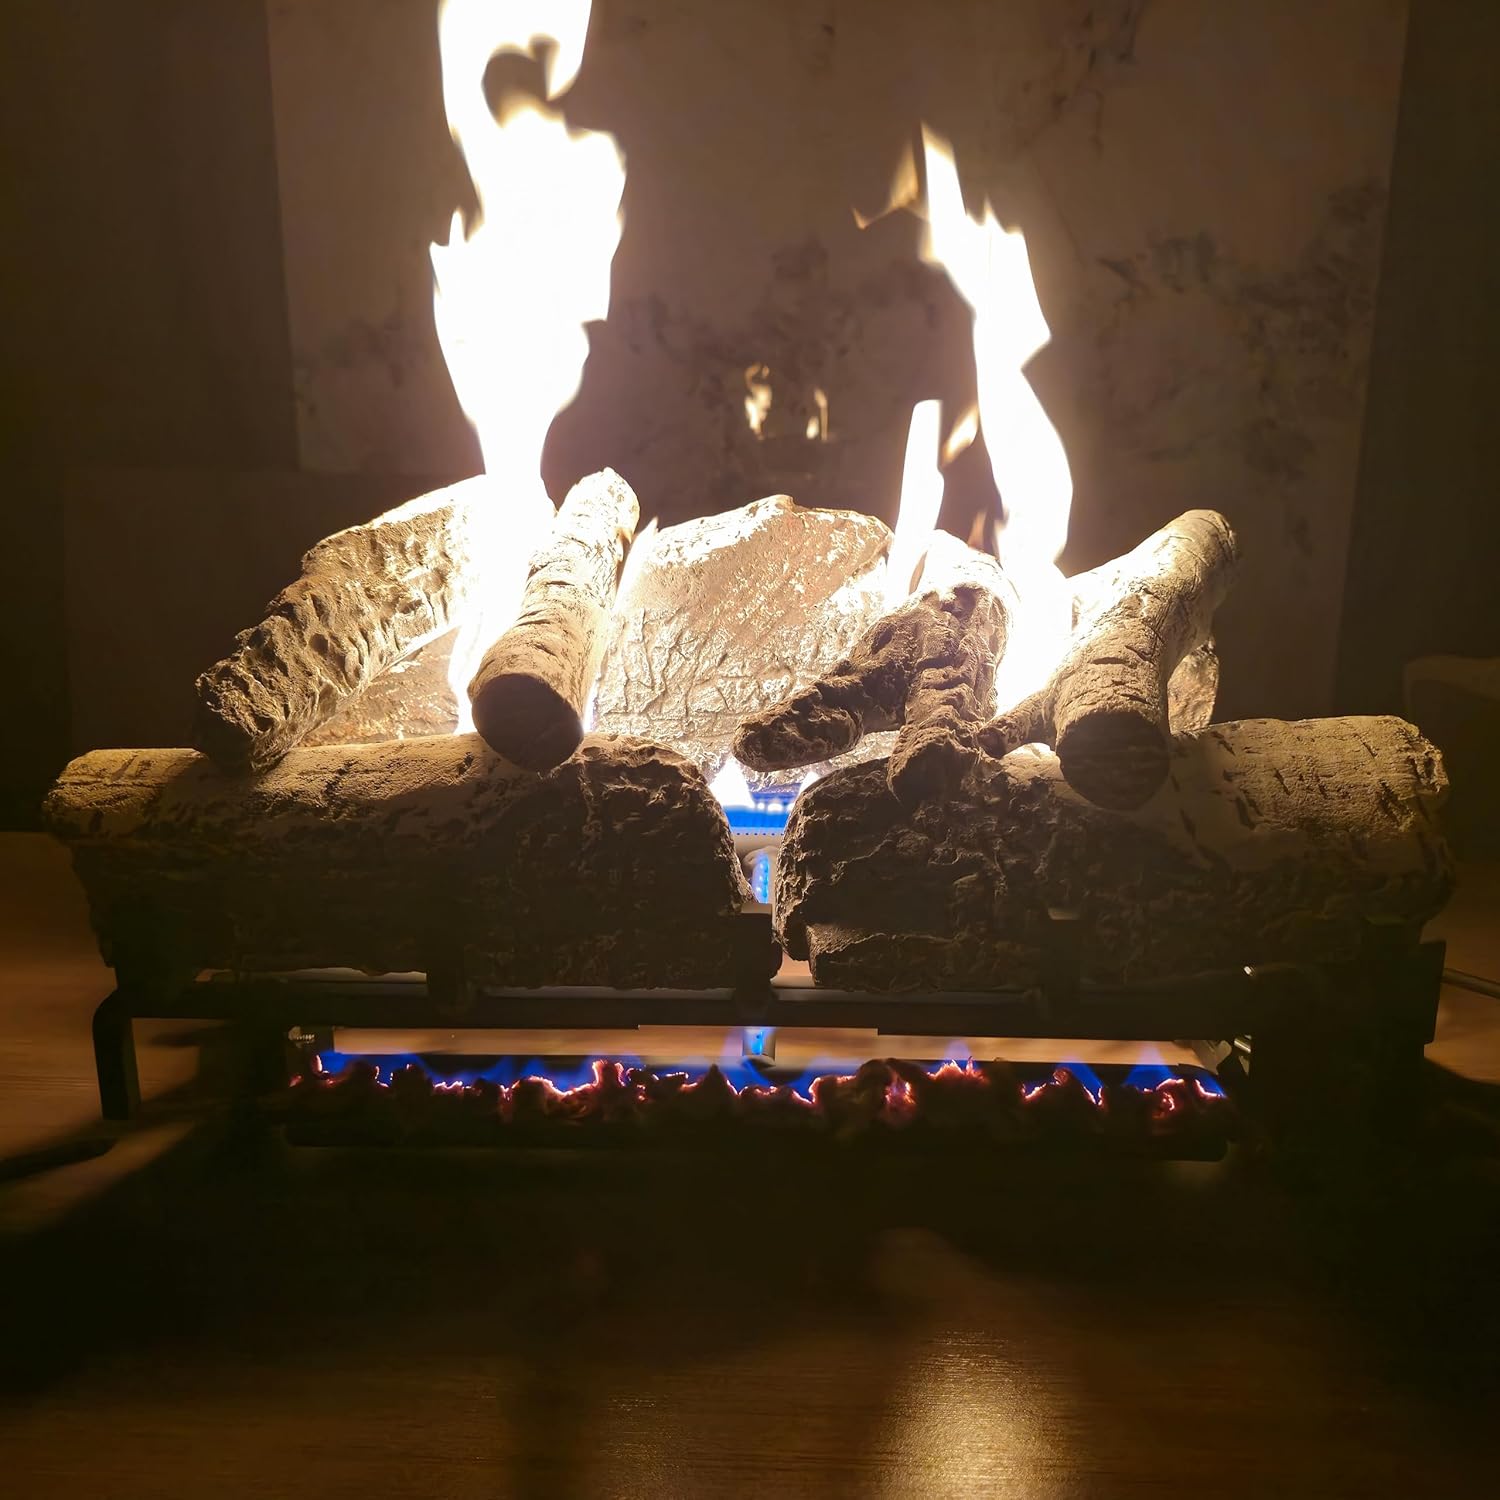
An example of the logs in operation, showing active flames and the glowing ember effect from properly placed lava rocks and rock wool.
4.4 Remote Control Wall Clip Installation
The remote control comes with a wall clip for convenient storage. Attach the wall clip to a suitable surface using appropriate fasteners (not included). The remote control slides into the wall clip slot.

The back of the remote control unit, illustrating the wall clip and the corresponding slot for secure mounting.
5. Operating Instructions
5.1 Remote Control Functions

The remote control features a backlit screen for clear visibility in low light conditions. It includes buttons for ON, OFF, MODE, UP, and DOWN.
- 1. TEMP: Indicates the current temperature.
- 2. DISPLAY: Shows the current room temperature.
- 3. Valve opening indication: Indicates when the gas valve is open.
- 4.A. Thermostat function: Activates thermostat mode.
- 5.M. Manual function: Activates manual operation mode.
- 6. Remote control battery display: Shows battery level.
- 7. °F or °C: Indicates temperature units (Fahrenheit or Celsius).
- ON Button: Turns the fireplace logs ON.
- OFF Button: Turns the fireplace logs OFF.
- MODE Button: Cycles through operating modes (e.g., manual, thermostat).
- UP Button: Increases temperature setting or other parameters.
- DOWN Button: Decreases temperature setting or other parameters.
5.2 Control Box Functions
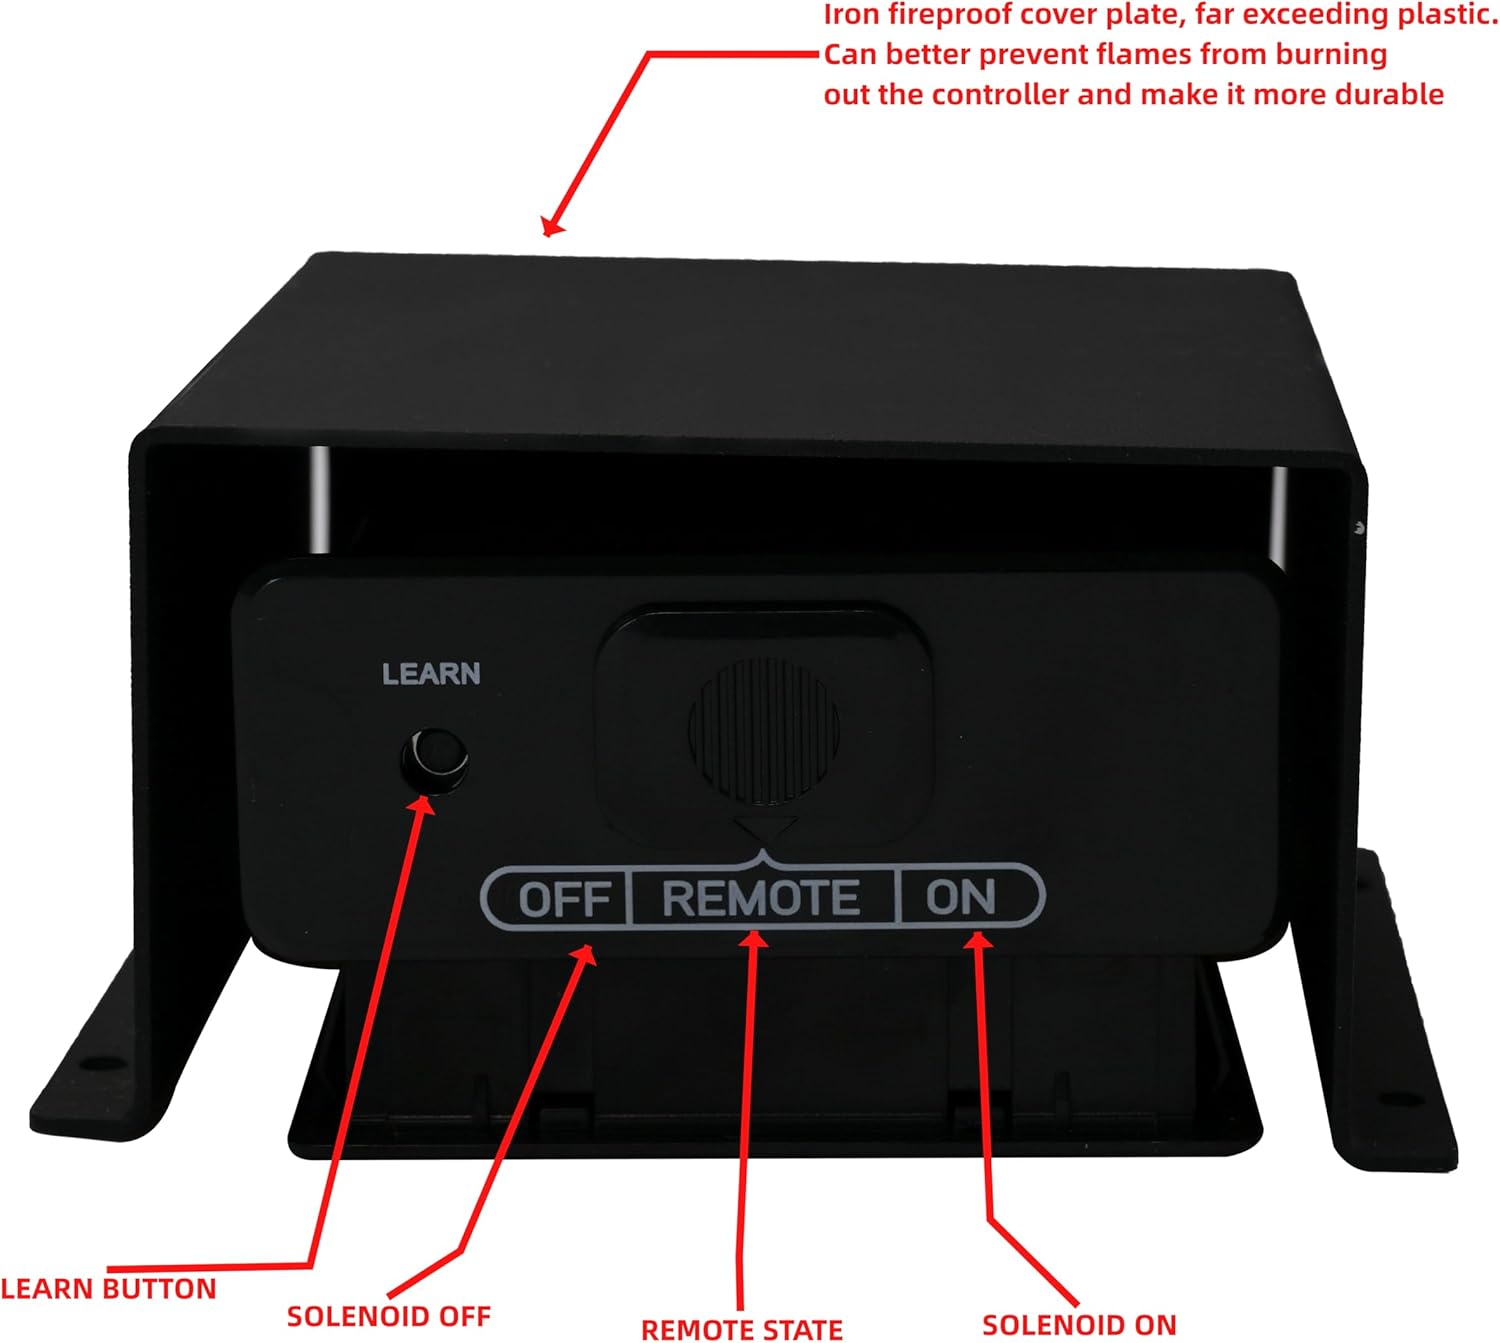
The control box features an iron fireproof cover plate for durability and protection against flames. It includes a LEARN button and switches for Solenoid OFF, REMOTE STATE, and Solenoid ON.
- LEARN Button: Used to pair the remote control with the receiver.
- SOLENOID OFF: Manually turns off the gas solenoid.
- REMOTE STATE: Allows control via the remote.
- SOLENOID ON: Manually turns on the gas solenoid.
5.3 Ignition Procedure
- Ensure the gas supply is connected and turned on.
- Verify the control box is set to 'REMOTE STATE' or 'SOLENOID ON' if operating manually.
- Press the 'ON' button on the remote control or activate the manual ignition on the burner (if applicable, often involves pressing and holding a knob while igniting).
- The ODS lighter will initiate the flame. If the flame does not ignite, wait 5 minutes and repeat the process.
- Adjust flame height or temperature using the remote control as desired.
6. Maintenance
Regular maintenance ensures safe and efficient operation of your fireplace logs.
- Cleaning: Periodically clean the logs and burner area when the unit is cool. Use a soft brush or vacuum to remove dust and debris. Do not use abrasive cleaners.
- Pilot Light/ODS: Keep the pilot light and ODS sensor clean. A dirty sensor can cause the unit to shut off unexpectedly.
- Gas Connections: Annually inspect all gas connections for leaks using a soap and water solution. Bubbles indicate a leak.
- Log Arrangement: Ensure logs are correctly positioned according to the initial setup to prevent flame impingement and sooting.
- Battery Replacement: Replace remote control batteries annually or when the battery indicator shows low power. When replacing batteries, all batteries must be replaced.
7. Troubleshooting
If you encounter issues, refer to the following common troubleshooting steps:
| Problem | Possible Cause | Solution |
|---|---|---|
| Logs do not ignite | No gas supply Pilot light out Remote batteries low Incorrect wiring | Check gas valve Relight pilot (refer to ignition) Replace remote batteries Verify wiring connections |
| Flame is weak or yellow | Low gas pressure Dirty burner ports Incorrect log placement | Contact gas supplier Clean burner ports Adjust log placement |
| Unit shuts off unexpectedly | ODS sensor activated (low oxygen) Pilot light issues Loose connections | Ensure adequate ventilation Clean ODS sensor/pilot Check all electrical and gas connections |
| Remote control not working | Dead batteries Not paired with receiver Obstruction | Replace batteries Re-pair remote (use LEARN button) Remove obstructions between remote and receiver |
If problems persist after attempting these solutions, contact a qualified service technician.
8. Specifications
| Feature | Specification |
|---|---|
| Brand | Americangaslogs |
| Model Name | 11 |
| Size | 18 Inch |
| Style | Liquid propane fireplace Birch |
| Power Source | Fuel Powered (Liquid Propane) |
| Material | Metal |
| Installation Type | Tabletop |
| Ventilation Type | Vent Free |
| Specific Uses For Product | Indoor |
| Orientation | Front-facing |
| Maximum Compatible Size | 18 Inches |
9. Warranty and Support
For warranty information or technical support, please refer to the product packaging or contact Americangaslogs customer service directly. Keep your purchase receipt as proof of purchase.