RDINSCOS MT19
RDINSCOS MT19 Pinless Moisture Meter User Manual
Model: MT19
Introduction
This manual provides detailed instructions for the safe and effective operation of your RDINSCOS MT19 Pinless Moisture Meter. This device is designed for non-invasive moisture detection in various materials such as wood, drywall, and concrete, helping you identify potential moisture issues without causing surface damage.
Important Safety Instructions
- Read all instructions thoroughly before using the device.
- Do not attempt to modify or repair the device yourself. Refer to qualified personnel for service.
- Keep the device away from water, high humidity, and extreme temperatures to prevent damage.
- Ensure the surface to be tested is clean and free of debris before taking measurements.
- Avoid testing near metal objects or stacked materials, as these can interfere with readings.
- Keep hands clear of the sensor area during measurements to ensure accuracy.
Package Contents
Verify that all items are present in your package:
- 1 x RDINSCOS MT19 Pinless Moisture Meter
- 1 x User Manual
- 1 x USB Type-C Charging Cable
- 1 x Lithium Polymer Battery (pre-installed)
Product Overview
Familiarize yourself with the components of your MT19 moisture meter:

Image: Front view of the RDINSCOS MT19 Pinless Moisture Meter, showing the display, control buttons, ball-type sensor, and USB charging cable.
- Ball-type Sensor: The spherical probe used for non-invasive moisture detection.
- LCD Display: Shows moisture readings, MAX/MIN values, battery status, and alarm indicators.
- Power Button: To turn the device on or off.
- MEAS Button: To initiate or refresh a measurement.
- SET Button: Used for adjusting alarm thresholds.
- HOLD Button: To freeze the current reading on the display.
- Up/Down Buttons: For navigation or adjusting settings.
- USB Type-C Port: For charging the internal battery.
Setup
1. Charging the Device
The MT19 includes a rechargeable Lithium Polymer battery. Connect the provided USB Type-C cable to the device's charging port and to a compatible USB power source (e.g., computer, wall adapter). The battery indicator on the display will show the charging status. Ensure the device is fully charged before first use.
2. Powering On/Off
Press and hold the Power button (marked with a power symbol) for approximately 2 seconds to turn the device on. To turn it off, press and hold the Power button again.
Operating Instructions
1. Basic Measurement
- Turn on the device using the Power button.
- Place the ball-type sensor firmly and perpendicularly against the surface of the material you wish to measure.
- Ensure the measured material thickness is greater than 5mm for accurate readings.
- The device will automatically display the moisture reading on the LCD screen.

Image: The MT19 moisture meter in use, showing the ball sensor pressed against a wall, with a diagram illustrating measurement depth of 5-40mm.
Video: Demonstration of the MT19 Pinless Moisture Meter in use, showing how to place the sensor on a wall and interpret the readings.
2. Understanding Readings
The display will show a numerical value and may include visual indicators (DRY, RISK, WET) and sound alerts. Refer to the table below for general guidance:
| Material | LCD Display (digits) | Moisture Level |
|---|---|---|
| Plaster and Anhydrite | < 30 | DRY |
| Plaster and Anhydrite | 30 ~ 60 | RISK |
| Plaster and Anhydrite | > 60 | WET |
| Cement-based Materials | < 25 | DRY |
| Cement-based Materials | 25 ~ 50 | RISK |
| Cement-based Materials | > 50 | WET |
| Wood | < 50 | DRY |
| Wood | 50 ~ 80 | RISK |
| Wood | > 80 | WET |
3. HOLD Function
Press the "HOLD" button to freeze the current reading on the display. This is useful for recording measurements in hard-to-reach areas. Press it again to release the hold and resume live measurements.
4. MAX/MIN Measurement
The device automatically tracks and displays the maximum (MAX) and minimum (MIN) moisture readings detected during a measurement session. This helps in identifying the highest and lowest moisture points in an area.
5. Threshold Adjustment (SET Button)
Use the "SET" button to adjust the alarm thresholds for moisture levels. This allows you to customize when the device triggers a "RISK" or "WET" alert based on your specific material and project requirements. Refer to the on-screen prompts or the table above for recommended values.
6. Sound and Light Alarm
The MT19 features a visual LED indicator and an audible alarm that activates when moisture levels exceed the preset threshold. A slow sound indicates a "RISK" level, while a fast, continuous sound indicates a "WET" level, alerting you to significant moisture presence.
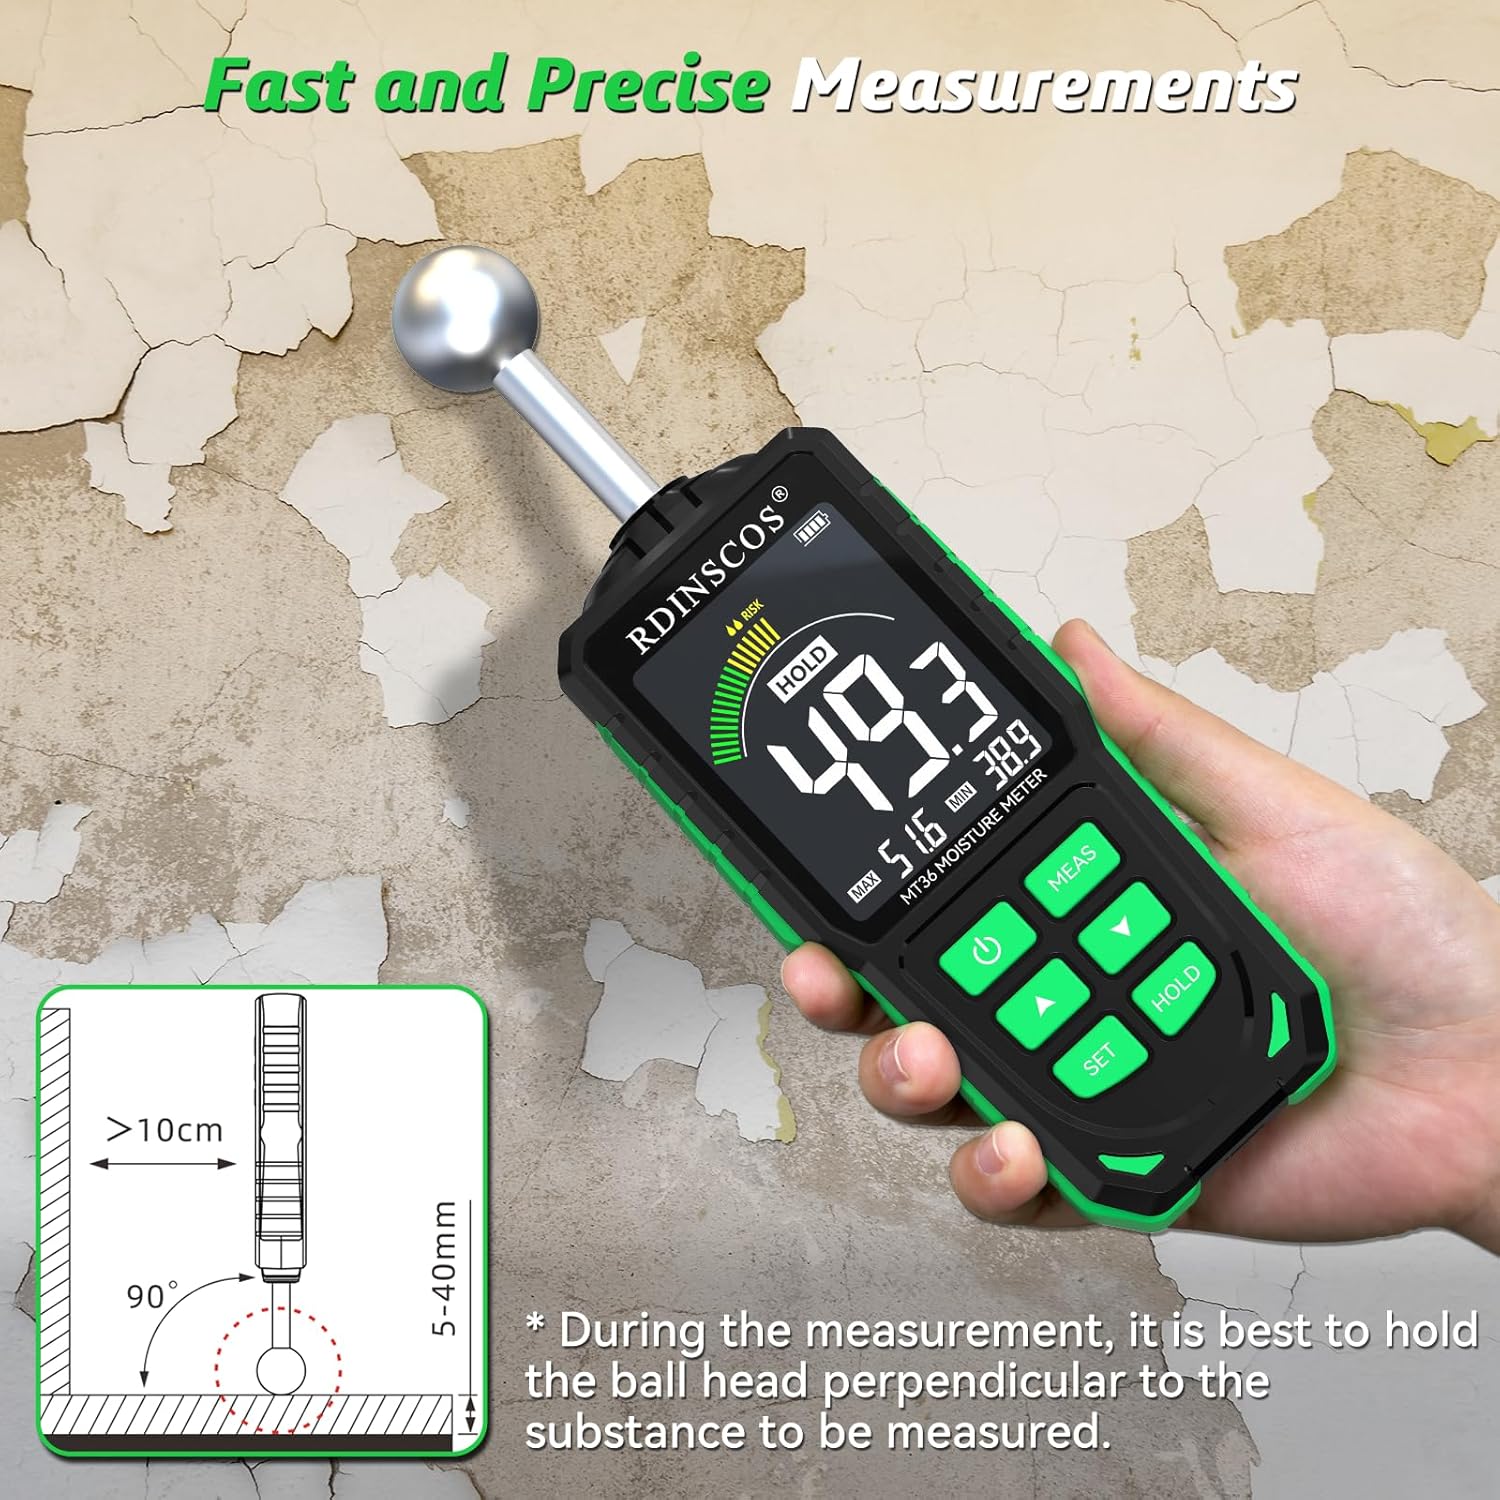
Image: The MT19 moisture meter displaying a high moisture reading (49.3) on a wall, with an illustration of holding the device perpendicularly.
Best Practices for Accurate Readings
To ensure the most reliable measurements from your MT19 moisture meter, follow these guidelines:
- Surface Preparation: Always ensure the surface being tested is clean and dry. Dust, dirt, or surface moisture can affect readings.
- Avoid Metal Interference: The device uses electromagnetic fields. Avoid testing near metal objects such as pipes, rebar, nails, or electrical conduits. Maintain at least 2 inches (5 cm) clearance from any metal.
- Hand Placement: Keep your hands away from the sensor area during measurements to prevent interference from body moisture or electrical fields.
- Relative Readings: Understand that the readings are relative, not absolute. Different materials, densities, and compositions can affect the measured value. Use the provided tables as a general guide.
- Subsurface Materials: Be aware that materials located beneath your subject surface may influence the readings.

Image: The MT19 moisture meter demonstrating the importance of keeping the sensor at least 10cm away from metal objects for accurate readings.
Video: Demonstration of how metal objects can interfere with the MT19 Pinless Moisture Meter's readings, emphasizing the need for clearance.
Maintenance
Care and Storage
- Cleaning: Clean the device with a soft, dry cloth. Do not use abrasive cleaners, solvents, or immerse the device in water.
- Storage: Store the meter in a cool, dry place, away from direct sunlight and extreme temperatures.
- Battery Life: Ensure the device is fully charged before long-term storage to maintain battery health. The automatic shutdown function (after 30 minutes of inactivity) helps conserve battery life during normal use.
Troubleshooting
1. Inaccurate or Inconsistent Readings
- Possible Causes: Presence of metal objects, hands on the sensor, material thickness less than 5mm, or surface debris.
- Solutions: Ensure the sensor is at least 2 inches (5 cm) away from metal. Keep hands clear of the sensor. Verify the material thickness is greater than 5mm. Clean the surface before testing. Remember that readings are relative and can vary with material composition.
2. Device Not Powering On
- Possible Cause: Low or depleted battery.
- Solution: Charge the device using the provided USB Type-C cable. Allow sufficient time for charging.
3. No Reading Displayed (0.00%)
- Possible Causes: Sensor not making proper contact, or the material is extremely dry.
- Solutions: Ensure the ball sensor is pressed firmly and perpendicularly against the surface. If the material is genuinely very dry, a 0.00% reading is expected.
Specifications
Technical details for the RDINSCOS MT19 Pinless Moisture Meter:
| Feature | Detail |
|---|---|
| Model Number | MT19 |
| Measurement Principle | Pinless, Dielectric Scanning (EMF Technology) |
| Measurement Depth | 5-40 mm (0.2-1.6 inches) |
| Power Source | 1 Lithium Polymer Battery (included) |
| Charging | USB Type-C |
| Automatic Shutdown | After 30 minutes of inactivity |
| Item Weight | 9.9 ounces |
| Product Dimensions | 3.94 x 1.57 x 1.18 inches |
| Manufacturer | SHENZHEN REDDRAGON INSTRUMENTS CO.,LTD |
Warranty and Support
RDINSCOS products are designed for reliability and performance. For any questions, technical assistance, or warranty claims, please contact our customer support team. We are committed to providing well-done service without restrictions.
You can visit the official RDINSCOS store for more information and support:

Image: Graphic encouraging users to contact customer support for assistance.
Ask a question about this manual
Ask about setup, troubleshooting, compatibility, parts, safety, or missing instructions. Manuals+ will review the question and use this page’s manual context to help answer it.