Introduction
The KYKYK VF-6900 is a high-definition digital satellite finder designed for precise satellite signal installation and alignment. It supports DVB-S/S2 standards and includes a CCTV tester function for AHD, TVI, and CVI cameras up to 8MP. Its portable design and comprehensive features make it an essential tool for satellite dish installers and CCTV technicians.
Product Features
- 3.5-inch TFT Color LCD Screen for live TV program display.
- Full support for DVB-S/DVB-S2, MPEG2/MPEG4 compliant signals.
- Integrated CCTV tester module for AHD, AVI, and TVI cameras up to 8MP.
- Displays key signal parameters: Signal Strength, Quality, Bit Error Rate (BER), Power (PWR), Signal-to-Noise Ratio (SNR), and Modulation Error Ratio (MER).
- Built-in 4000mAh Li-ion battery with fast charging, offering extended standby time and low power consumption.
- Spectrum Analyzer, Motor Setup, and Constellation functions.
- Supports DISEQC 1.0 / 1.1 / 1.2 and USALS for advanced satellite system control.
- LNB short-circuit protection with indicator.
- Low-voltage charging with auto wake-up from sleep mode.
- Video alarm for signal intensity level and audible signal lock notification (On/Off).
- LED high brightness lighting and backlit keys (On/Off).
- USB port for software updates.
Package Contents
Verify that all items listed below are included in your package. If any items are missing or damaged, please contact customer support.

Image: Contents of the KYKYK VF-6900 package, including the main unit, power adapter, car charger, AV cable, carrying case, and user manual.
- KYKYK VF-6900 Satellite Finder Unit
- AC Power Adapter
- Car Charger
- AV Cable
- Carrying Case
- User Manual
- Shoulder Strap
Device Overview
Front Panel and Interface
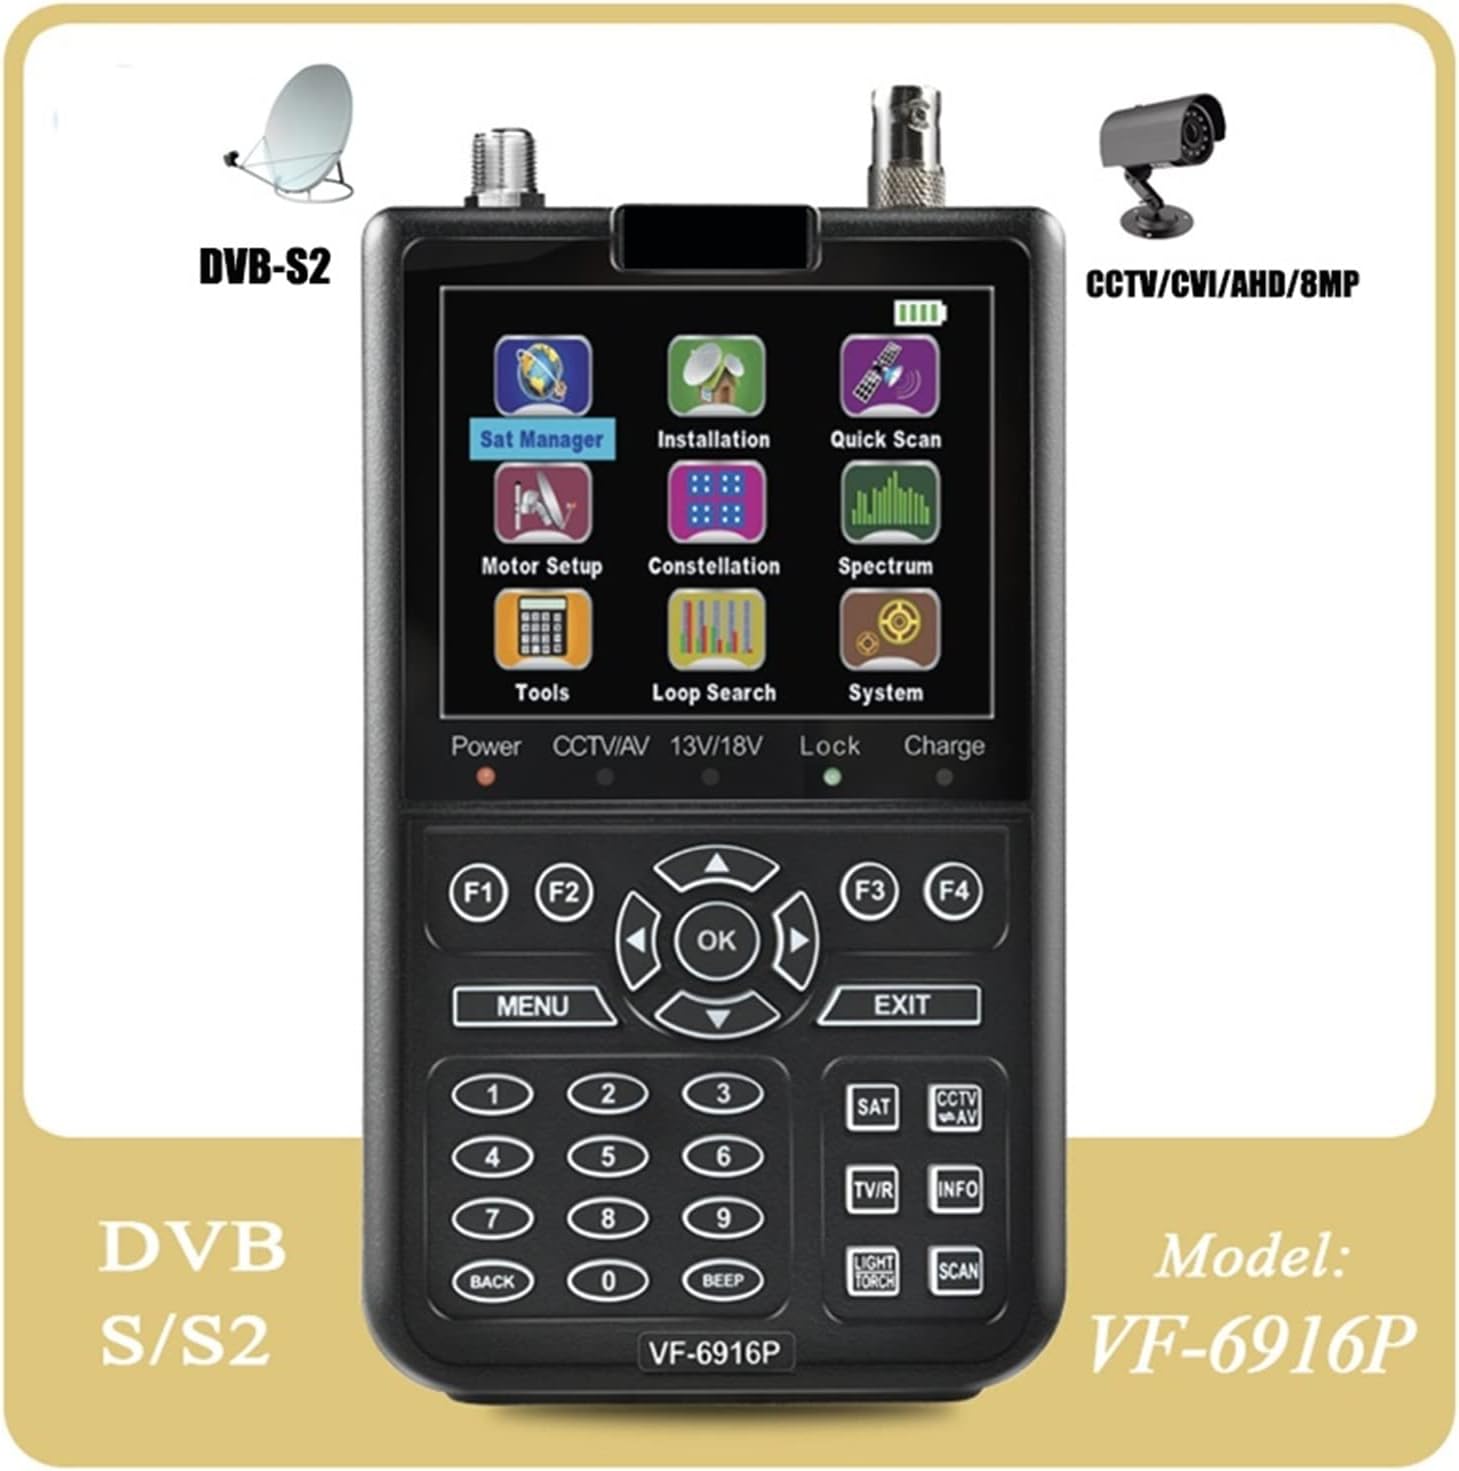
Image: Front view of the satellite finder, displaying the 3.5-inch LCD screen with various menu icons (Sat Manager, Installation, Quick Scan, Motor Setup, Constellation, Spectrum, Tools, Loop Search, System, Charge) and the control panel with navigation buttons, numeric keypad, and function keys (F1-F4, MENU, OK, EXIT, SAT, CCTV/AV, TV/IR, INFO, LIGHT/TORCH, SCAN, BACK, BEEP).
The front panel features a 3.5-inch TFT LCD screen for displaying menus, signal information, and live video. Below the screen are the control buttons, including a directional pad with an "OK" button, a numeric keypad, and dedicated function buttons for various operations such as menu access, exit, satellite selection, CCTV/AV input, TV/IR functions, information display, flashlight/torch, and scanning.
Side and Rear Connections

Image: Side view of the satellite finder, highlighting the built-in speaker, flashlight, BNC connector for AHD/TVI/CVI HD cameras, and F-type connector for satellite dish input.
On the side, you will find the built-in speaker and a flashlight. Input ports include an F-type connector for satellite dish connection and a BNC connector for AHD, TVI, or CVI HD camera input.

Image: Another side view of the satellite finder, showing the power switch, DC power input jack, USB port for software updates, and a connector for CCTV camera output.
This side features the main power switch, a DC input jack for charging and external power, and a USB port for software updates. There is also a dedicated connector for connecting CCTV cameras.

Image: Rear view of the satellite finder, displaying printed technical specifications such as Power Input (DC12V 2A), DVB-S Input Frequency (950-2150MHz), Input Impedance (75Ω), Software Upgrade by USB, and Li-ION Battery (4000mAh).
The rear panel provides a summary of key technical specifications, including power input, DVB-S input frequency range, input impedance, and battery details.
Setup
- Charging the Device: Connect the provided AC power adapter to the DC IN port on the side of the VF-6900 and plug it into a wall outlet. The device can also be charged using the car charger. Ensure the device is fully charged before initial use for optimal battery life. The battery indicator on the screen will show charging status.
- Powering On/Off: Locate the power switch on the side of the device. Flip it to the "ON" position to power on the unit. To power off, flip the switch to the "OFF" position.
- Language Selection: Upon first power-on, you may be prompted to select your preferred language. Navigate using the arrow keys and confirm with the "OK" button. You can change the language later in the System settings.
- Initial Satellite Database Setup: Access the "Installation" menu. Here you can add, edit, or delete satellites and transponders. It is recommended to update the satellite database via USB if a newer version is available.
Operating Instructions
Satellite Signal Finding
- Connect LNB: Connect the LNB cable from your satellite dish to the "LNB IN" F-type connector on the VF-6900.
- Select Satellite: From the main menu, navigate to "Installation" or "Sat Manager". Select the desired satellite from the list.
- Select Transponder: Choose a transponder frequency for the selected satellite.
- Adjust Dish: Slowly adjust the azimuth and elevation of your satellite dish. Observe the signal strength and quality bars on the VF-6900 screen. The device will provide an audible tone when a signal is locked, and the video alarm will indicate intensity.
- Optimize Signal: Fine-tune the dish position until the signal quality and strength are maximized. Use the Spectrum Analyzer and Constellation functions for advanced optimization if needed.
- DISEQC/USALS Setup: If using a multi-LNB system or a motorized dish, configure DISEQC or USALS settings in the "Installation" menu as per your setup.
CCTV Camera Testing
- Connect Camera: Connect your AHD, TVI, or CVI camera to the BNC input connector on the side of the VF-6900.
- Select CCTV Mode: Press the "CCTV/AV" button on the control panel to switch to CCTV testing mode.
- View Feed: The camera's live video feed will be displayed on the 3.5-inch screen.
- Power Output (Optional): The device may provide DC 12V output to power the camera. Refer to the device's specific port for this function.
System Settings and Updates
- Access System Menu: Navigate to the "System" icon from the main menu.
- Language/Time Settings: Adjust system language, time, and date as required.
- Software Update: To update the software, download the latest firmware from the official website onto a USB flash drive. Insert the USB drive into the VF-6900's USB port. Go to the "System" menu and select "SW Update by USB". Follow the on-screen instructions. Do not power off the device during the update process.
Maintenance
- Cleaning: Use a soft, dry cloth to clean the device. Do not use liquid cleaners or solvents.
- Storage: Store the device in a cool, dry place away from direct sunlight and extreme temperatures.
- Battery Care: To prolong battery life, avoid fully discharging the battery frequently. Charge the device regularly, even if not in use for extended periods.
- Software Updates: Periodically check for software updates to ensure optimal performance and access to new features.
- LNB Protection: The device features LNB short-circuit protection. If an LNB short is detected, disconnect the LNB and check for cable damage or LNB malfunction.
Troubleshooting
| Problem | Possible Cause | Solution |
|---|---|---|
| Device does not power on. | Battery is discharged; Power switch is off; Faulty power adapter. | Charge the device fully. Ensure the power switch is in the "ON" position. Test with a different power adapter if available. |
| No signal detected. | LNB not connected; Incorrect satellite/transponder selected; Dish not aligned; Faulty LNB/cable. | Check LNB cable connection. Verify selected satellite and transponder. Adjust dish alignment. Test LNB and cable. |
| Poor signal quality. | Dish misalignment; Obstruction; LNB skew incorrect; Weather interference. | Fine-tune dish alignment. Ensure clear line of sight. Adjust LNB skew. Wait for weather conditions to improve. |
| CCTV camera not displaying. | Incorrect input mode; Camera not powered; Faulty camera/cable. | Ensure "CCTV/AV" mode is selected. Verify camera is powered. Check camera and cable connections. |
| Software update failed. | Incorrect firmware file; USB drive issue; Power interruption during update. | Ensure correct firmware for VF-6900. Use a properly formatted USB drive. Do not interrupt power during update. Try again. |
| LNB short-circuit indicator active. | Short circuit in LNB or coaxial cable. | Immediately disconnect the LNB cable. Inspect the LNB and cable for damage or exposed wires. Replace faulty components. |
| Screen is blank or frozen. | System error; Low battery. | Try restarting the device by holding the power button or cycling the power switch. Ensure the battery is charged. If problem persists, contact support. |
| Buttons are unresponsive. | System freeze; Physical damage. | Restart the device. If physical damage is suspected, contact support. |
| Battery drains quickly. | Aging battery; High brightness/volume settings; Frequent use of power-intensive features. | Reduce screen brightness and volume. Minimize use of flashlight. Consider battery replacement if significantly degraded. |
| Device gets hot during use/charging. | Normal operation; Overcharging; Poor ventilation. | Some warmth is normal. Ensure adequate ventilation. Disconnect charger once fully charged. If excessively hot, discontinue use and contact support. |
| Audio alarm not working. | Alarm disabled; Speaker issue. | Check settings to ensure audible signal lock notification is enabled. If still no sound, speaker may be faulty. |
| Flashlight not working. | Flashlight off; LED malfunction. | Press the "LIGHT/TORCH" button to activate. If it still doesn't work, the LED may be faulty. |
| Backlit keys not working. | Backlight feature disabled; LED malfunction. | Check system settings for backlit key option. If enabled and not working, LEDs may be faulty. |
| Cannot edit transponders. | Locked settings; User error. | Ensure you are in the correct menu (Edit Transponder). Some settings might require specific permissions or be locked by default. |
| Loop searching not functioning. | Incorrect configuration; System error. | Verify loop search settings. Restart the device. |
| Motor setup issues. | Incorrect motor type selected; Wiring issues; Motor malfunction. | Ensure correct DISEQC 1.2 or USALS settings. Check motor wiring. Test motor independently if possible. |
| Constellation diagram not displayed. | No signal lock; Signal too weak. | Ensure a strong signal lock. Constellation display requires a stable signal. |
| Spectrum analyzer not showing data. | No input signal; Incorrect frequency range. | Verify LNB connection and signal presence. Check spectrum analyzer settings for frequency range. |
| DC 12V output not working. | Overload protection; Device fault. | Ensure the connected device does not exceed the output current limit. Disconnect and reconnect. If still not working, contact support. |
Specifications
| Feature | Detail |
|---|---|
| Display | 3.5-inch TFT Color LCD |
| Satellite Standard | DVB-S/S2, MPEG2/MPEG4 Compliant |
| CCTV Support | AHD, AVI, TVI (up to 8MP) |
| Signal Measurement | Strength, Quality, BER, PWR, SNR, MER |
| Input Frequency | 950-2150MHz (DVB-S) |
| Input Impedance | 75Ω |
| LNB Power | 13V/18V/22KHz/DISEQC 1.0/1.1/1.2, USALS |
| Battery | 4000mAh Li-ion Battery |
| Power Input | DC 12V 2A |
| Connectivity | USB for Software Update |
| Special Features | Spectrum Analyzer, Constellation, Motor Setup, Loop Searching, LNB Short-circuit Protection, LED Flashlight, Backlit Keys |
| Dimensions (Approx.) | Refer to device images for visual scale. |
| Weight (Approx.) | Refer to device images for visual scale. |
Warranty and Support
No specific warranty information is provided in the product details. For warranty claims or technical support, please refer to the contact information provided with your purchase or visit the KYKYK official website.
When contacting support, please have your product model (VF-6900) and purchase details ready.