1. Introduction
This user manual provides detailed instructions for the installation, operation, and maintenance of the AHNHUDNGHI ZK-AS21 2.1 Channel Digital Power Amplifier Board. This high-quality audio amplifier module is designed to deliver powerful and clear sound for your home audio setup, featuring independent control for subwoofer, left/right channels, treble, and bass.
2. Safety Instructions
- Ensure the power supply voltage is within the specified range (DC 12-38V) to prevent damage to the device.
- Do not expose the amplifier board to moisture, water, or extreme temperatures.
- Avoid placing the device in direct sunlight or near heat sources.
- Ensure proper ventilation around the amplifier board, especially around the cooling fan, to prevent overheating.
- Disconnect power before making any connections or disconnections.
- Do not attempt to disassemble or modify the amplifier board. Refer all servicing to qualified personnel.
- Keep out of reach of children.
3. Package Contents
Please check the package contents upon opening. If any items are missing or damaged, contact your retailer.
- ZK-AS21 2.1 Channel Digital Power Amplifier Board
- User Manual (this document)
- (Additional accessories like power adapter, audio cables, or speaker wires may be sold separately or included depending on the specific product bundle.)
4. Product Overview
The ZK-AS21 amplifier board features a compact design with clearly labeled inputs, outputs, and controls. Below is an image illustrating the various components and their functions.
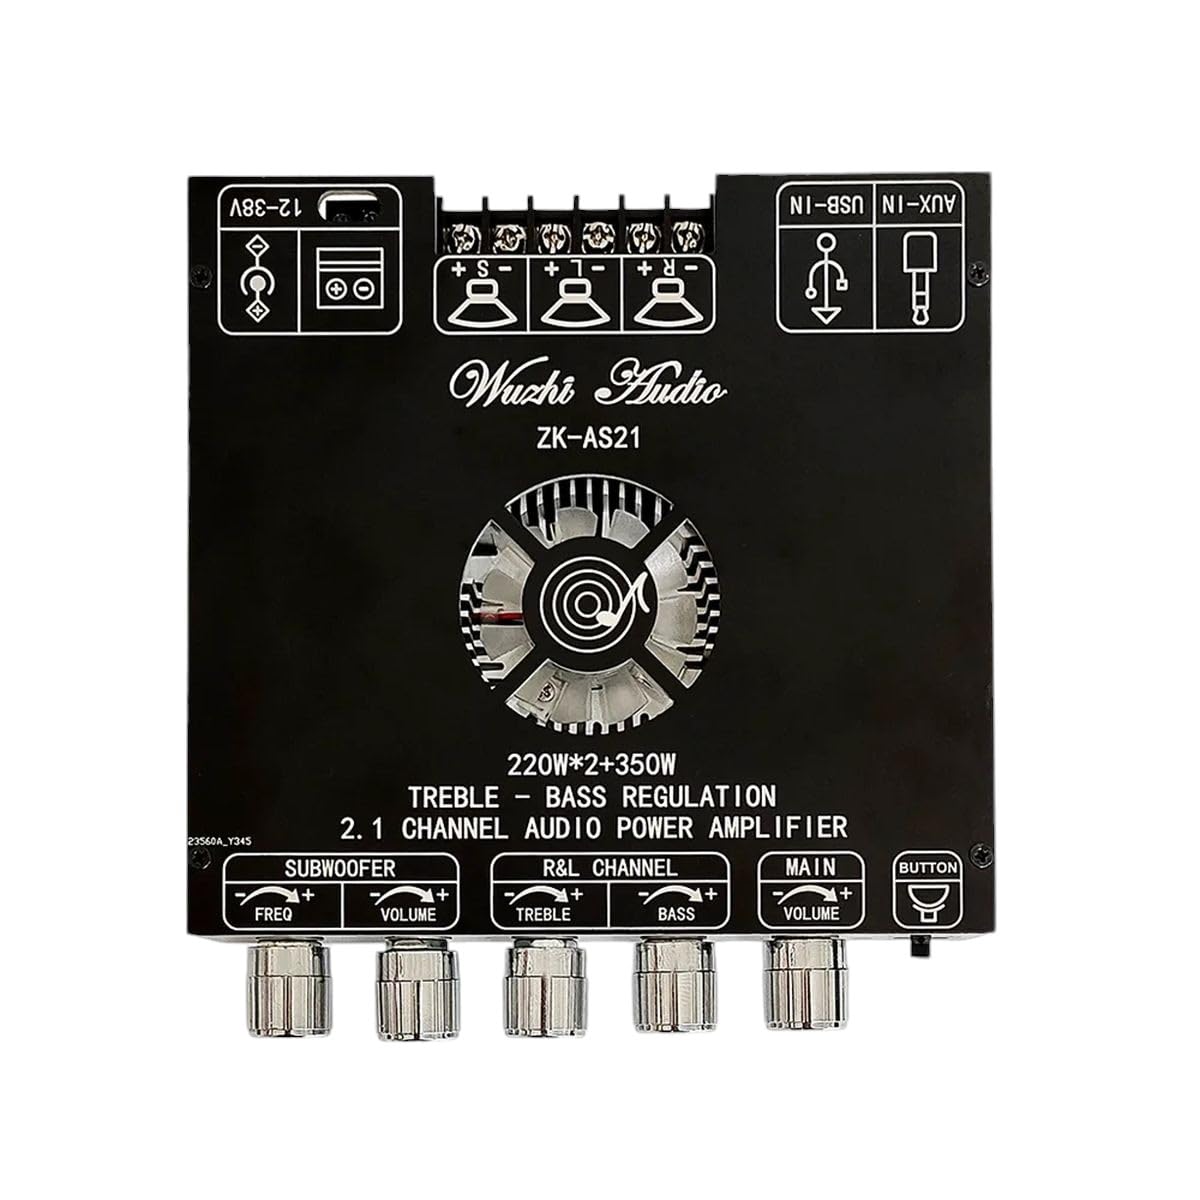
Figure 4.1: ZK-AS21 Amplifier Board Layout
This image displays the top view of the ZK-AS21 amplifier board. Key features visible include the central cooling fan, various screw terminals for power and speaker connections, and multiple rotary knobs for audio control. On the top left, there's a power input terminal labeled "12-38V". To its right are speaker output terminals for subwoofer, left, and right channels. On the top right, there are AUX-IN and USB-IN ports for audio input. At the bottom, from left to right, are control knobs for Subwoofer Frequency (FREQ), Subwoofer Volume, R&L Channel Treble, R&L Channel Bass, and Main Volume. A "BUTTON" is also visible on the far right.
4.1. Inputs and Outputs
- DC Power Input (12-38V): Terminal for connecting the DC power supply. Ensure correct polarity.
- Speaker Outputs: Screw terminals for connecting speakers.
- Subwoofer Output (+S -S): For connecting a passive subwoofer.
- Left Channel Output (+L -L): For connecting the left main speaker.
- Right Channel Output (+R -R): For connecting the right main speaker.
- AUX-IN: 3.5mm audio jack for connecting external audio sources (e.g., phone, PC) via an audio cable.
- USB-IN: USB port for connecting digital audio sources.
4.2. Controls
- SUBWOOFER FREQ: Adjusts the crossover frequency for the subwoofer output.
- SUBWOOFER VOLUME: Controls the volume level of the subwoofer.
- R&L CHANNEL TREBLE: Adjusts the high-frequency response for the left and right main channels.
- R&L CHANNEL BASS: Adjusts the low-frequency response for the left and right main channels.
- MAIN VOLUME: Controls the overall volume level of the main left and right channels.
- BUTTON: (Function not explicitly labeled, typically used for input selection or power toggle. Refer to specific product documentation if available.)
5. Setup
- Power Connection: Connect a DC power supply (12-38V) to the "12-38V" screw terminals. Ensure correct polarity (+ to +, - to -).
- Speaker Connection:
- Connect your passive subwoofer to the "+S" and "-S" terminals.
- Connect your left main speaker to the "+L" and "-L" terminals.
- Connect your right main speaker to the "+R" and "-R" terminals.
- Ensure all speaker wires are securely fastened and do not short circuit.
- Audio Input Connection:
- For analog audio, connect your audio source (e.g., smartphone, PC, MP3 player) to the "AUX-IN" 3.5mm jack using an audio cable.
- For digital audio, connect your audio source to the "USB-IN" port.
- Only one audio input can be active at a time. If both are connected, the amplifier may prioritize one or require selection via the "BUTTON".
- Initial Power On: Once all connections are secure, connect the power supply to a wall outlet. The amplifier board should power on.
6. Operating Instructions
- Power On/Off: The amplifier powers on automatically when connected to a power source. Disconnect power to turn off. (If the "BUTTON" controls power, press it to toggle.)
- Input Selection: If multiple audio inputs are connected, use the "BUTTON" (if applicable) to cycle through available inputs (AUX, USB).
- Volume Adjustment:
- Rotate the "MAIN VOLUME" knob clockwise to increase the overall volume of the main channels, and counter-clockwise to decrease.
- Rotate the "SUBWOOFER VOLUME" knob to adjust the subwoofer's output level independently.
- Tone Control:
- Rotate the "R&L CHANNEL TREBLE" knob to adjust the high-frequency response of the main channels.
- Rotate the "R&L CHANNEL BASS" knob to adjust the low-frequency response of the main channels.
- Subwoofer Frequency Adjustment: Rotate the "SUBWOOFER FREQ" knob to set the desired crossover frequency for the subwoofer, allowing it to reproduce only frequencies below the set point.
7. Maintenance
- Cleaning: Disconnect power before cleaning. Use a soft, dry cloth to wipe the surface of the amplifier board. Do not use liquid cleaners or aerosols.
- Ventilation: Ensure the cooling fan and vents are free from dust and obstructions. Periodically clean dust buildup with compressed air.
- Storage: If storing the device for an extended period, disconnect it from power and store it in a cool, dry place away from direct sunlight.
8. Troubleshooting
| Problem | Possible Cause | Solution |
|---|---|---|
| No sound output. |
|
|
| Distorted sound. |
|
|
| Subwoofer not working. |
|
|
| Overheating. |
|
|
9. Specifications
| Parameter | Value |
|---|---|
| Model | ZK-AS21 |
| Channels | 2.1 Channel |
| Main Channel Output Power | 220W x 2 |
| Subwoofer Output Power | 350W |
| Total Output Power | 220W*2 + 350W |
| Input Voltage | DC 12-38V |
| Audio Inputs | AUX-IN (3.5mm), USB-IN |
| Manufacturer | AHNHUDNGHI |