1. Introduction
Thank you for choosing the CinusLinus 360-12 Green Laser Level. This device is designed to provide precise and accurate leveling for a wide range of applications, from home DIY projects to professional construction sites. Featuring a 4x360° green laser, self-leveling capabilities, and a versatile tripod, this tool enhances efficiency and accuracy in your work. Please read this manual thoroughly before operation to ensure safe and correct usage.
2. Safety Information
Your safety is paramount. Please observe the following precautions:
- Laser Radiation: This product emits Class II laser radiation (<1mW power output). Avoid direct eye exposure to the laser beam.
- Eye Protection: Never stare directly into the laser beam. Doing so can cause permanent eye damage.
- Environmental Conditions: Avoid outdoor usage or in environments with intense natural light, as this can significantly impair laser visibility. Direct sunlight will weaken the laser energy. It is best to use the device indoors.
- Children: Keep the device out of reach of children.
- Maintenance: Do not attempt to disassemble or modify the laser level. Repairs should only be performed by authorized service personnel.
3. Package Contents
Ensure all items are present upon unboxing:
- CinusLinus 360-12 Laser Level Unit
- 46.45" Aluminum Laser Level Tripod
- Rechargeable Lithium-ion Batteries (4800mAh, 2 included)
- Remote Control
- Magnetic Bracket
- Mini Tripod Base
- USB-C Charging Cable and Adapter
- User Manual
4. Product Overview
The CinusLinus 360-12 Laser Level features a robust design with intuitive controls for ease of use. It projects four 360° green laser lines (two horizontal, two vertical) for comprehensive coverage.
Key Components:
- Laser Emitters: Project bright green laser lines.
- Control Panel: Features intelligent touch buttons for various modes and brightness adjustment.
- Battery Compartment: Houses the rechargeable lithium-ion batteries.
- USB-C Charging Port: For convenient charging.
- Lock/Unlock Switch: Engages self-leveling or manual mode.
- Mounting Thread: Standard 1/4" thread for tripod attachment.
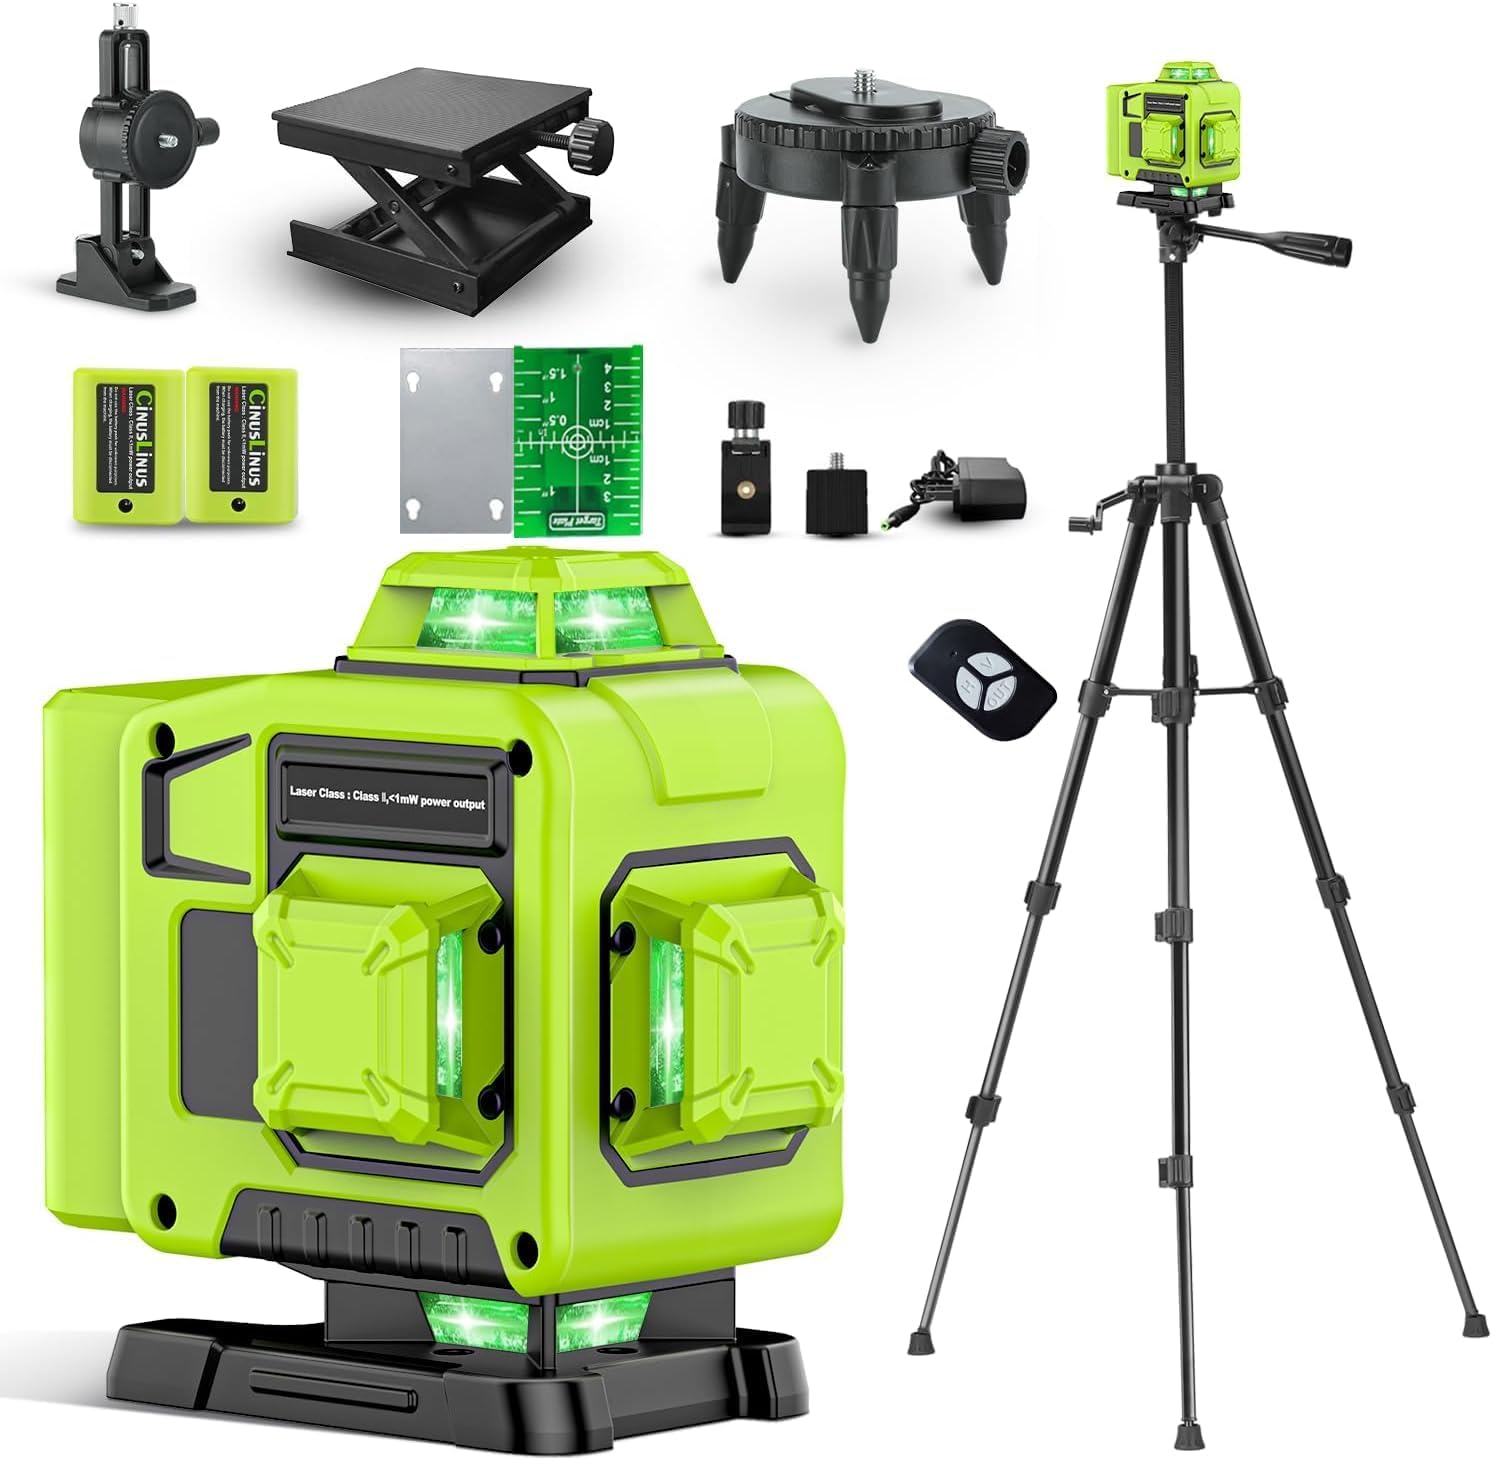
Figure 1: CinusLinus 360-12 Laser Level Unit
5. Setup
5.1. Battery Installation and Charging
- Open the battery compartment cover.
- Insert the two rechargeable lithium-ion batteries, ensuring correct polarity.
- Close the battery compartment cover securely.
- To charge, connect the USB-C charging cable to the device and a power source using the provided adapter. The battery indicator on the device will show charging status.
Video 1: Unboxing, Setup, and Charging the Laser Level
5.2. Attaching to Tripod or Mount
- Locate the 1/4" mounting thread at the bottom of the laser level.
- Attach the device to the included 46.45" tripod or magnetic bracket by screwing it onto the mounting thread.
- Ensure the tripod legs are fully extended and stable before securing the bracket.

Figure 2: Laser Level mounted on the included tripod.

Figure 3: Different mounting options for the laser level.
6. Operating Modes
The CinusLinus 360-12 offers multiple operating modes to suit your needs:
6.1. Self-Leveling Mode
- Slide the Lock/Unlock switch to the 'unlock' position.
- The tool will automatically adjust to a horizontal position within a ±4° range.
- If the tilt exceeds 4°, a flashing green laser and an auditory signal will indicate that the device is out of level. Adjust the device's position until it self-levels.
6.2. Manual Mode
- To engage Manual Mode, press and hold the central function button (often labeled 'OUT' or similar) for 2-3 seconds.
- In this mode, the self-leveling function is deactivated, allowing you to project laser lines at any desired angle, such as for diagonal lines on stairs.
6.3. Pulse Mode
- A brief tap of the central function button activates Pulse Mode.
- This mode is intended for use with a laser receiver (not included) in diminished light scenarios or over longer distances to extend the working range.

Figure 4: Visual representation of Self-Leveling, Manual, and Pulse operating modes.
Video 2: Demonstration of Self-Leveling, Manual, and Remote Control Modes
7. Brightness Adjustment
The laser level allows for brightness adjustment to optimize visibility in various indoor lighting conditions:
- Press the "H" button to increase the green laser brightness.
- Press the "V" button to decrease the green laser brightness.
- Note: Brightness adjustment cannot be used simultaneously with Pulse Mode.
8. Remote Control Operation
The included remote control provides convenient operation of the laser level from a distance, allowing you to adjust settings without disturbing the device's position.
- The remote control features buttons corresponding to the laser level's functions (e.g., horizontal line, vertical line, brightness adjustment).
- Simply press the desired function button on the remote to control the laser level.

Figure 5: Remote control in use for various laser level functions.
9. Applications
The CinusLinus 360-12 Laser Level is suitable for a variety of tasks requiring precise alignment:
- Floor installation
- Picture hanging
- Door and window fitting
- Woodworking projects
- Wallpaper installation
- Cabinet installation
- General construction and renovation projects

Figure 6: Multi-scenario use of the 4x360° laser level.
10. Maintenance
Proper maintenance ensures the longevity and accuracy of your laser level:
- Cleaning: Use a soft, dry cloth to clean the device. Do not use abrasive cleaners or solvents.
- Storage: Store the laser level in its carrying case in a dry, cool place when not in use. Remove batteries if storing for extended periods.
- Calibration: Regular calibration checks are recommended to ensure continued accuracy. Refer to a professional for calibration services if needed.
- Battery Care: Charge batteries fully before first use and periodically during long storage to maintain battery health.
11. Troubleshooting
If you encounter issues, refer to the following common solutions:
- Laser Lines Not Visible:
- Check ambient light conditions; green lasers are less visible in bright sunlight.
- Ensure batteries are charged.
- Adjust brightness using the 'H' button.
- Device Beeps and Laser Flashes in Self-Leveling Mode:
- The device is tilted beyond its ±4° self-leveling range. Adjust the device's position or the tripod until it is within range.
- Remote Control Not Responding:
- Ensure the remote control batteries are functional.
- Check for obstructions between the remote and the laser level.
12. Specifications
| Feature | Detail |
|---|---|
| Brand | CinusLinus |
| Model Number | 360-12 |
| Laser Class | Class II, <1mW |
| Laser Color | Green |
| Laser Lines | 4x360° (2 Horizontal, 2 Vertical) |
| Self-Leveling Range | ±4° |
| Indoor Visibility Range | Up to 165 feet |
| Power Source | Battery Powered |
| Battery Type | Lithium Ion (2 CR5 batteries included) |
| Battery Capacity | 4800mAh (approx. 8-hour runtime) |
| Charging Port | USB-C |
| Material | Aluminum |
| Item Weight | 2.4 kg |
| Parcel Dimensions | 40 x 25.8 x 12.4 cm |
| Country of Origin | China |
13. Warranty and Support
For warranty information, technical support, or service inquiries, please refer to the contact details provided with your purchase or visit the official CinusLinus website. Keep your purchase receipt as proof of purchase for warranty claims.