
1. Important Safety Information
Read all instructions carefully before operating the snow shovel. Failure to follow these instructions may result in electric shock, fire, and/or serious injury.
- Personal Safety: Always wear appropriate personal protective equipment, including safety glasses, hearing protection, and non-slip footwear. Do not operate the snow shovel while barefoot or wearing open-toed sandals.
- Work Area Safety: Keep the work area clean and well-lit. Do not operate the snow shovel in explosive atmospheres, such as in the presence of flammable liquids, gases, or dust. Keep children and bystanders away while operating the snow shovel.
- Electrical Safety: Avoid body contact with grounded surfaces. Do not expose the snow shovel to rain or wet conditions. Water entering an electric tool will increase the risk of electric shock.
- Battery Safety: Use only the charger specified by the manufacturer. Charge batteries indoors in a dry, well-ventilated area. Do not incinerate the battery even if it is severely damaged. Batteries can explode in a fire.
- Operation Safety: Never direct discharge snow towards people or fragile objects. Always maintain proper footing and balance. Do not overreach. Clear snow only from surfaces designed to withstand the snow shovel's operation.
2. Product Overview
The dosiwlatever Electric Snow Shovel is a cordless, battery-powered tool designed for efficient snow removal from driveways, sidewalks, patios, and decks. It features a lightweight design, dual battery system for extended runtime, and an adjustable handle for user comfort.

Figure 2.1: Overview of the dosiwlatever 20V Electric Snow Blower, highlighting its maximum cleaning height of 16cm, cleanup width of 32cm, and maximum throw range of 8m.
Key Features:
- Efficient Snow Clearing: Clears snow up to 6 inches deep with a 13-inch clearing width and 26-foot throw distance.
- Dual Battery System: Includes two 20V 4.0Ah batteries for extended operation (40-60 minutes runtime with both batteries).
- Powerful Motor: 1200W motor provides strong snow throwing capability.
- User-Friendly Design: Lightweight (3.6 kg), easy assembly, push-button operation, and a 90° adjustable ergonomic handle.
- Portable and Disassembled Design: Allows for compact storage.
3. Package Contents
Verify that all items listed below are included in your package. If any items are missing or damaged, contact customer support.
- Electric Snow Shovel Unit
- 2 x 20V 4.0Ah Lithium-ion Batteries
- Battery Charger
- User Manual (this document)

Figure 3.1: Illustration of the snow shovel's overall size (118-139cm height, 30cm width) and the included accessories: two batteries, charger, gloves, and safety glasses.
4. Assembly and Setup
The dosiwlatever Electric Snow Shovel is designed for easy assembly. Follow these steps to prepare your unit for operation.
4.1 Assembling the Handle and Pole
- Unpack all components from the box.
- Connect the upper pole section to the lower pole section. Ensure the locking mechanism clicks into place securely.
- Attach the front auxiliary handle to the pole at a comfortable height. The handle can be adjusted 90° for ergonomic use.
- Ensure all connections are firm before proceeding.

Figure 4.1: The snow shovel features a disassembled design for space-saving storage. To disassemble, pull the lock mechanism on the pole.
4.2 Adjusting Pole Length
The telescopic pole allows for length adjustment to suit different user heights and preferences.
- Locate the adjustment collar on the pole.
- Loosen the collar and extend or retract the pole to the desired length (between 46.4 and 54.7 inches / 118-139 cm).
- Tighten the collar firmly to secure the pole in position.

Figure 4.2: The snow shovel's pole can be adjusted in length, shown here at 93cm and 125cm, for user comfort and adaptability.
5. Battery Charging and Installation
Ensure batteries are fully charged before first use. Always use the provided charger.
5.1 Charging the Batteries
- Connect the charger to a standard electrical outlet.
- Slide the battery pack onto the charger. Ensure it is seated correctly.
- The charger indicator light will show the charging status. Refer to the charger's specific instructions for light indications.
- Once fully charged, remove the battery from the charger.
5.2 Installing the Batteries
- Locate the battery compartment on the snow shovel unit.
- Align the battery pack with the compartment and slide it in until it clicks securely into place.
- To remove the battery, press the release button and slide the battery out.

Figure 5.1: The snow shovel is powered by a 1200W copper wire motor and uses a removable, universal lithium battery for convenience and extended life.
6. Operating Instructions
Follow these steps for safe and effective snow removal.
6.1 Pre-Operation Checklist
- Ensure batteries are fully charged and securely installed.
- Check that all fasteners are tight and the handle is adjusted to a comfortable height.
- Clear the area of any debris, rocks, or objects that could be thrown by the snow shovel.
- Wear appropriate safety gear.
6.2 Starting and Stopping
- To start, press and hold the safety button, then squeeze the trigger switch.
- To stop, release the trigger switch. The auger will stop rotating.
6.3 Snow Clearing Technique
- Push the snow shovel forward at a steady pace. Do not force the unit into heavy snow.
- For deep snow, clear in layers, taking smaller passes.
- Adjust the snow throwing direction as needed. The unit allows for 3 directions of adjustment.
- Clear snow in overlapping paths to ensure complete coverage.

Figure 6.1: A user demonstrating the operation of the lightweight and portable electric snow shovel, effectively clearing snow with one hand.

Figure 6.2: The snow shovel's powerful snow clearing and fast snow throwing function, designed to quickly clear heavy snow piles from paths.
7. Maintenance
Regular maintenance ensures optimal performance and extends the life of your snow shovel. Always remove batteries before performing any maintenance.
7.1 Cleaning
- After each use, clear any snow, ice, or debris from the auger housing and chute.
- Use a damp cloth to wipe down the exterior of the unit. Do not use harsh chemicals or abrasive cleaners.
- Ensure all vents are clear of obstructions.
7.2 Storage
- Store the snow shovel in a dry, secure location, away from direct sunlight and extreme temperatures.
- Remove batteries from the unit before long-term storage. Store batteries in a cool, dry place.
- The disassembled design allows for compact storage.
8. Troubleshooting
If you encounter issues with your snow shovel, refer to the following common problems and solutions.
| Problem | Possible Cause | Solution |
|---|---|---|
| Snow shovel does not start. | Battery not installed correctly or discharged. Safety button not pressed. | Ensure battery is fully charged and properly seated. Press safety button before squeezing trigger. |
| Reduced snow throwing distance. | Wet, heavy snow. Auger housing clogged. Low battery charge. | Clear snow in smaller passes. Turn off unit and clear any clogs (use a clearing tool, not hands). Recharge battery. |
| Unit stops during operation. | Overload protection activated. Battery discharged. | Reduce load on the unit. Allow motor to cool. Recharge or replace battery. |
If the problem persists after attempting these solutions, please contact customer support.
9. Specifications
Technical specifications for the dosiwlatever Electric Snow Shovel.
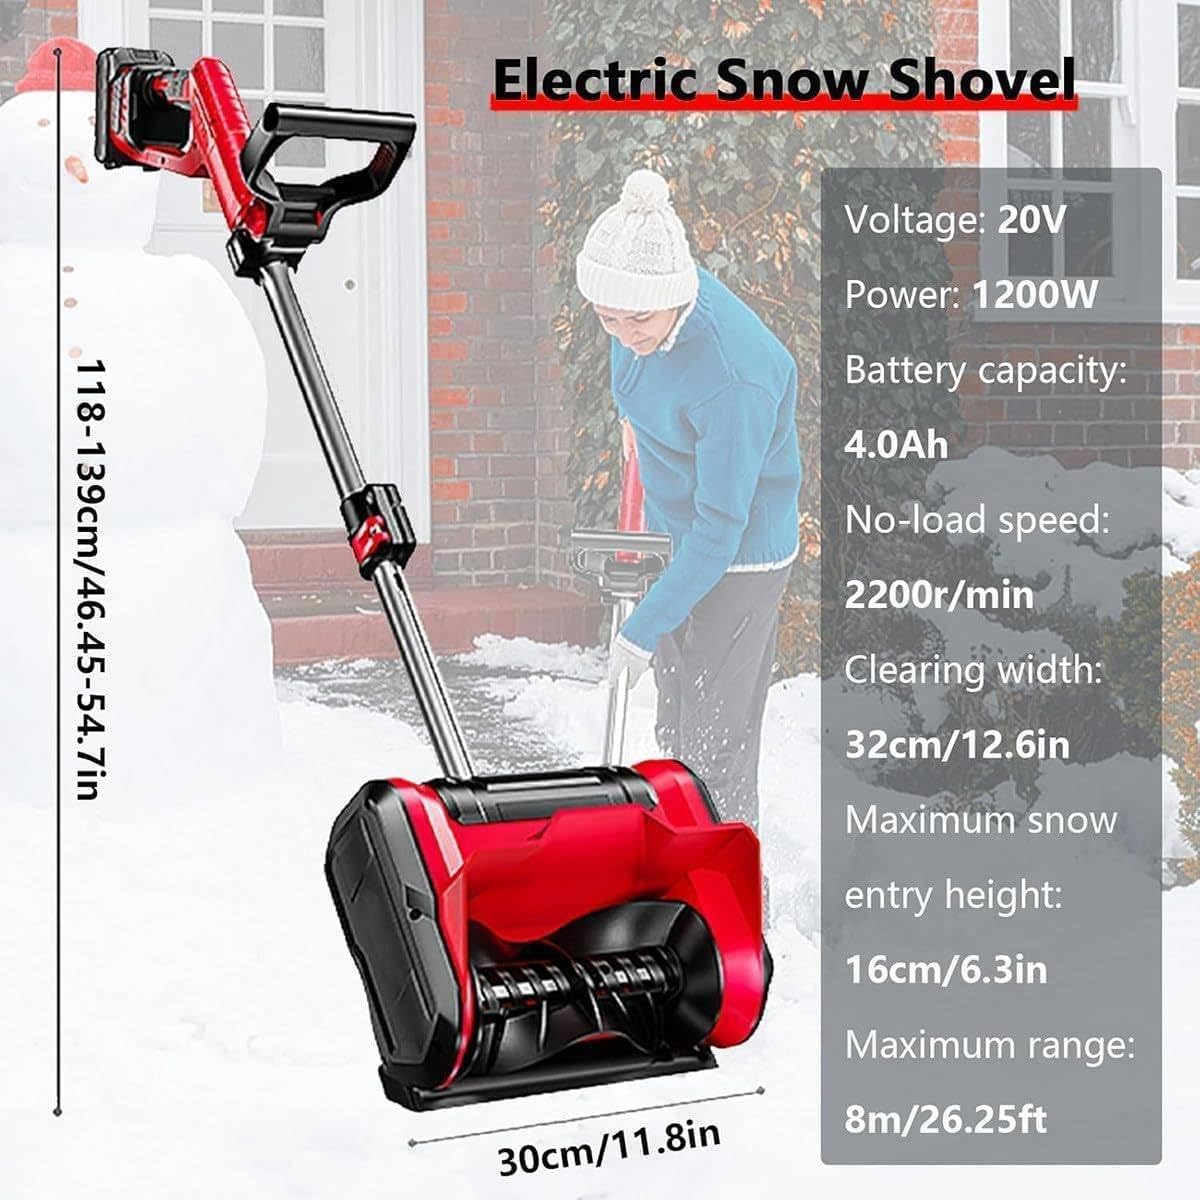
Figure 9.1: Key specifications of the electric snow shovel, including Voltage (20V), Power (1200W), Battery capacity (4.0Ah), No-load speed (2200r/min), Clearing width (32cm/12.6in), Max snow entry height (16cm/6.3in), and Max range (8m/26.25ft).
| Parameter | Value |
|---|---|
| Model | B0DQD8WLTS |
| Voltage | 20V |
| Power | 1200W |
| Battery Capacity | 2 x 4.0Ah Lithium-ion |
| No-load Speed | 2200 r/min |
| Clearing Width | 32 cm (12.6 inches) |
| Max Snow Entry Height | 16 cm (6.3 inches) |
| Max Throw Distance | 8 m (26.25 feet) |
| Weight | 3.6 kg (8 lbs) |
| Adjustable Pole Length | 118-139 cm (46.4-54.7 inches) |
10. Warranty and Support
10.1 Warranty Information
This product is covered by a limited warranty against defects in materials and workmanship. The warranty period typically begins from the date of purchase. Please retain your proof of purchase for warranty claims. Specific warranty terms and conditions may vary; refer to the warranty card included with your product or contact customer support for details.
10.2 Customer Support
For technical assistance, troubleshooting, replacement parts, or any questions regarding your dosiwlatever Electric Snow Shovel, please contact our customer support team. Contact information can typically be found on the product packaging or our official website.
When contacting support, please have your product model number (B0DQD8WLTS) and purchase date available to expedite service.