1. Product Overview
The MASTERFUN JSM13BN Automatic Chicken Coop Door is designed to provide automated access for poultry, featuring multiple operating modes, dual power options, and integrated safety mechanisms. Its side-opening design is compatible with various coop configurations.

Figure 1: Overview of the MASTERFUN Automatic Chicken Coop Door, including the main unit, solar panel, and remote control. A chicken is shown standing near the open door.
Key Features:
- Side-Opening Design: Horizontal opening mechanism suitable for coops with limited overhead space.
- Extra-Large Opening: Door dimensions of 11.42"H x 8.86"L accommodate larger poultry breeds.
- Multiple Operating Modes: Includes Timer, Light Sensor, Combo (Timer + Light), Remote Control, and Manual modes.
- Dual Power Options: Equipped with a 7W solar panel for charging and a USB port for backup power.
- Integrated Safety Features: Anti-pinch obstacle sensors, intrusion alarm, and manual override knob.
- Weather Resistant: Constructed from durable aluminum, designed to withstand various weather conditions.
2. Package Contents
Verify that all components are present in the package before beginning installation.

Figure 2: Included components of the MASTERFUN Automatic Chicken Coop Door system.
- Automatic Chicken Coop Door Unit
- 7W Solar Panel (with 2.8m cable)
- Remote Control
- USB Charging Cable (1.0m)
- Mounting Screws Kit
- User Manual (this document)
- Universal Wheel (for manual operation)
3. Installation and Setup
Follow these steps to properly install your automatic chicken coop door.
- Prepare the Opening: Ensure your coop has an opening measuring approximately 14.17 inches (36 cm) in height and 10.08 inches (25.6 cm) in width for the door unit. The door itself has an opening of 11.42"H x 8.86"L.
- Mount the Door Unit: Position the door unit over the prepared opening. Secure it using the provided screws. Do not overtighten the screws to avoid damaging the unit.
- Install the Solar Panel: Mount the solar panel in a location that receives maximum direct sunlight throughout the day. Connect the solar panel cable to the main door unit. The 2.8m cable allows for flexible placement.
- Initial Charge (Optional but Recommended): Before first use, it is recommended to fully charge the internal battery via the USB charging cable, especially if the solar panel cannot provide sufficient initial charge due to weather or placement.
- Set Time and Modes: Once powered, set the current local time and configure your desired operating modes (Timer, Light Sensor, or Combo) using the control panel. Refer to Section 4 for detailed operating instructions.

Figure 3: Step-by-step installation guide for the chicken coop door.
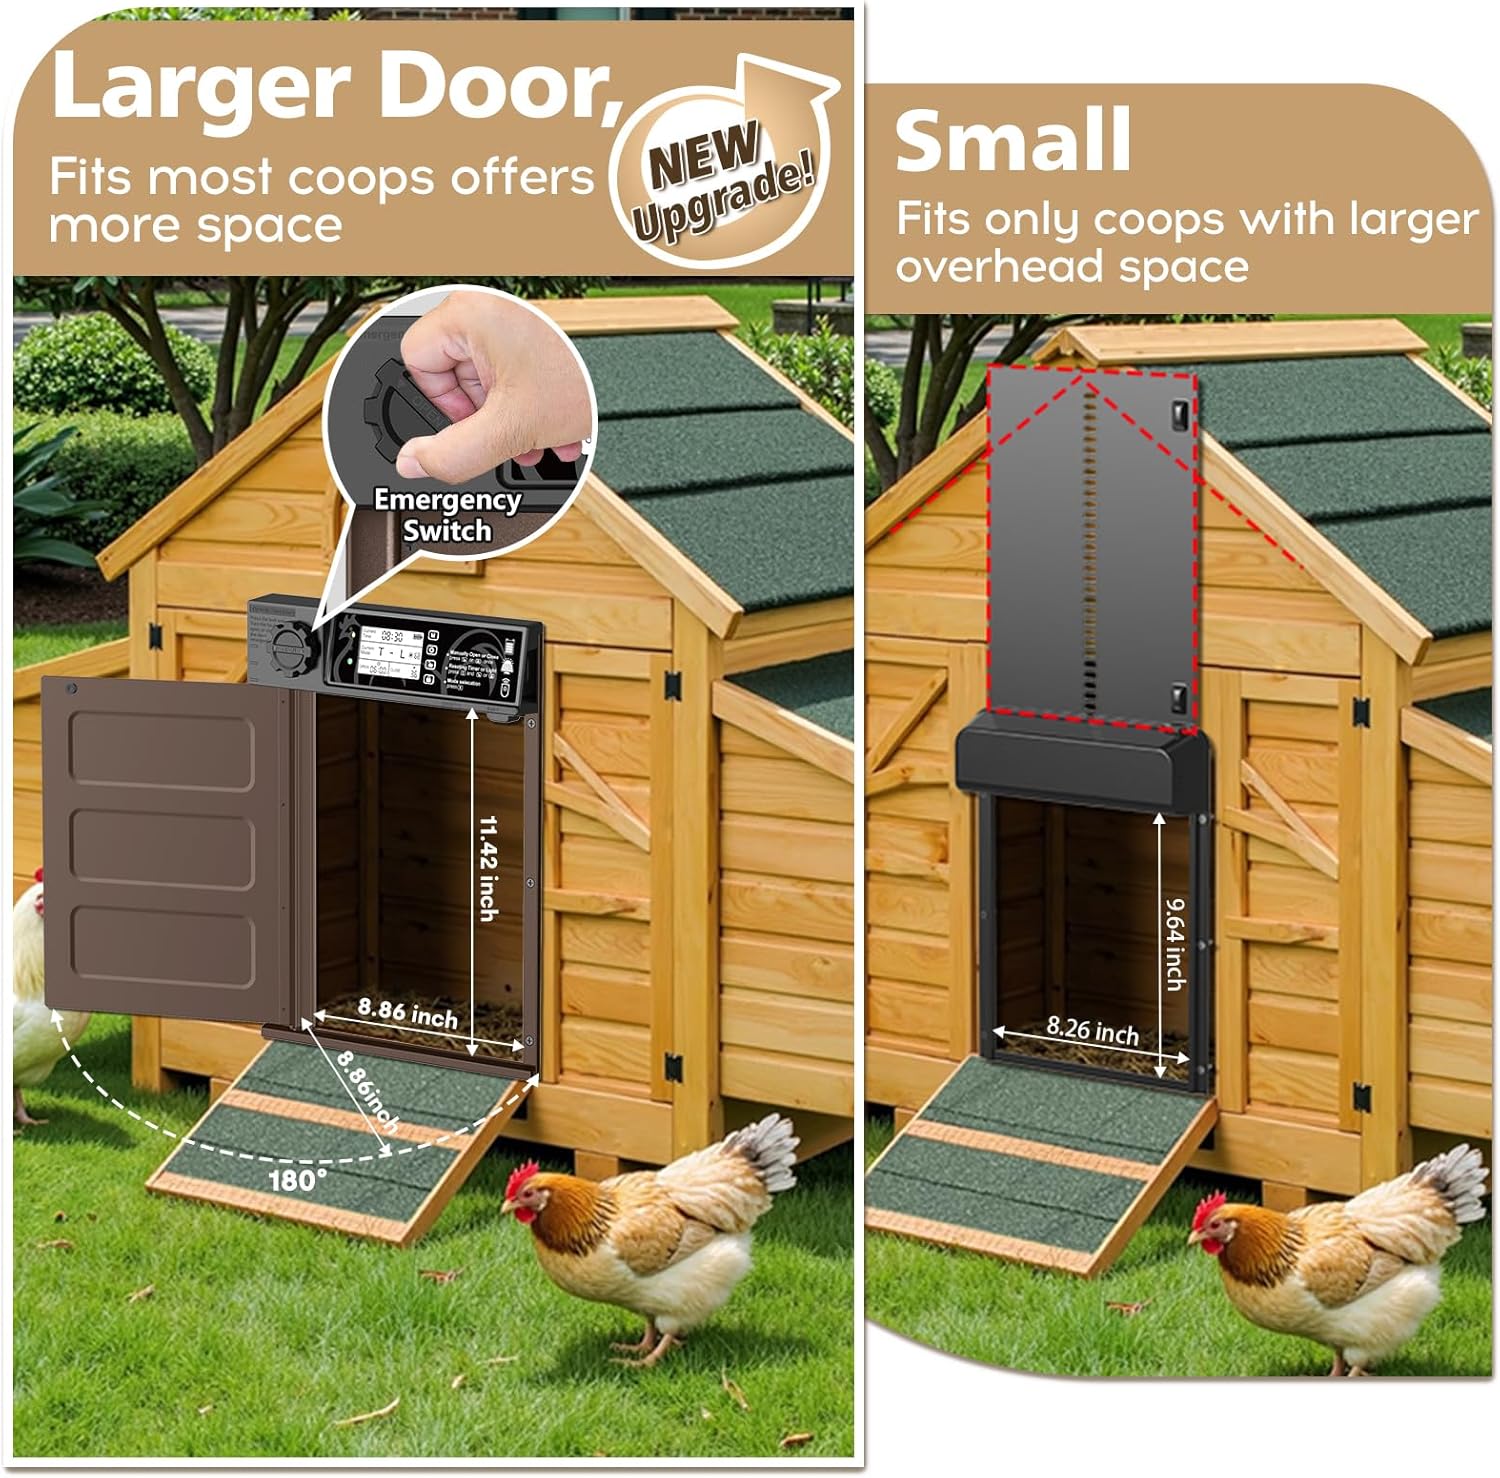
Figure 4: The side-opening design offers a larger passage and avoids overhead space limitations common with vertical doors.
4. Operating Instructions
The MASTERFUN chicken coop door offers five distinct operating modes to suit your needs.

Figure 5: Control panel layout and functions.
Control Panel Overview:
- Current Local Time: Displays the current time.
- Mode Settings: Indicates the active operating mode.
- Time & Light Value Setting: Used to adjust time and light sensitivity.
- Manually Open/Close: Buttons for immediate door operation.
- Mode Selection: Button to cycle through available modes.
- Current Sunlight Value: Displays the detected light level.
- Battery Power Indicator: Shows remaining battery life.
Operating Modes:

Figure 6: Visual representation of the five available operating modes.
- Light Sensor Control (Mode A): The door opens at dawn and closes at dusk based on ambient light levels.

Figure 7: Intelligent Light & Timer Mode operation.
Note: If the door is installed under a roof or in a shaded area, the light sensor may trigger prematurely. Consider switching to Timer Mode or Blending Mode for more precise control, or ensure the sensor is exposed to natural light.
- Time Setting (Mode B): Program specific opening and closing times. The door will operate according to the set schedule.
- Blending Mode (Mode C - Timer + Light): Combines both timer and light sensor functions. For example, you can set a specific opening time and a light-sensor-based closing time, or vice-versa.
- Remote Control (Mode D): Use the provided remote control to open or close the door manually from a distance of up to 15 meters.

Figure 8: Remote control operation and intrusion alarm feature.
- Manual Mode: Directly operate the door using the manual open/close buttons on the control panel.
To switch between modes, press the 'Mode Selection' button on the control panel until the desired mode is displayed.
5. Power and Charging
The chicken coop door features a dual-power system for reliable operation.

Figure 9: Dual charging options: solar power and USB.
- Solar Charging: The included 7W solar panel continuously charges the internal 2000mAh battery during daylight hours. Ensure the solar panel is positioned to receive maximum sunlight.
- USB Charging: For periods of low sunlight or extended cloudy weather, the unit can be charged via the USB charging cable. A fully charged battery can operate the door for approximately 40-50 days.
6. Safety Features
The MASTERFUN chicken coop door incorporates several safety features to protect your poultry and ensure security.
- Anti-Pinch Protection: If an obstacle (such as a chicken) is detected during closing, the door will automatically reopen. It will then pause for 10 seconds before attempting to close again. If the door closes abnormally three times, a red light and beep alarm will activate, but the door will continue to attempt closing.
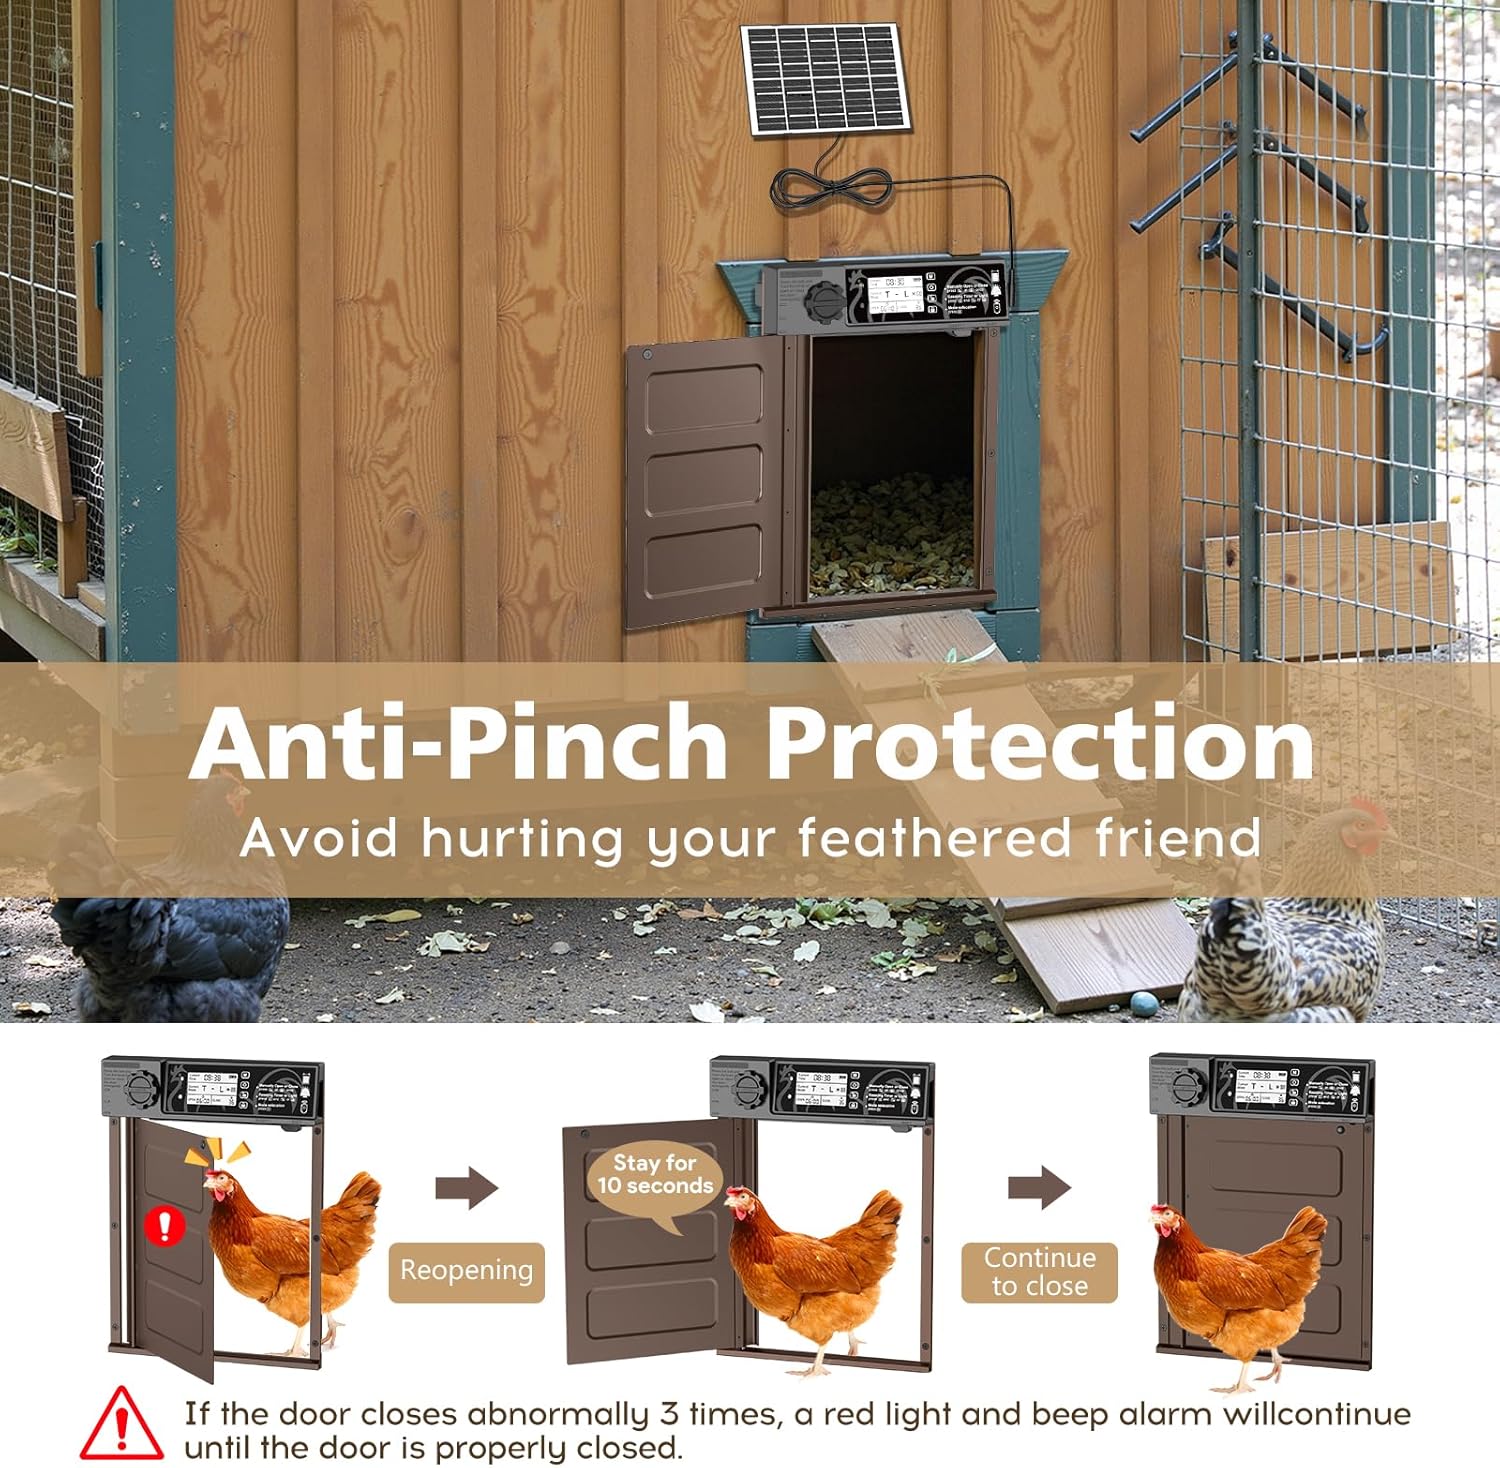
Figure 10: Anti-pinch mechanism in action.
- Intrusion Alarm: If the door is forcibly opened by a predator, an alarm will sound to alert you. This feature enhances the security of your coop.
- Manual Override: In case of power loss or system malfunction, a manual gear knob allows you to open or close the door manually.
7. Maintenance
Regular maintenance ensures the longevity and optimal performance of your chicken coop door.
- Solar Panel Cleaning: Periodically clean the surface of the solar panel to remove dust, dirt, or debris that may reduce charging efficiency.
- Door Track Inspection: Ensure the door tracks are clear of obstructions. Remove any accumulated dirt, feathers, or ice that could impede door movement.
- Battery Monitoring: Monitor the battery indicator on the control panel. If the battery level is consistently low, ensure the solar panel is receiving adequate sunlight or use the USB charging option.
- General Cleaning: Wipe down the door unit and door panel with a damp cloth as needed. Avoid using harsh chemicals.

Figure 11: The door is designed for all-weather resistance, with a working temperature range of -26°C to 60°C.
8. Troubleshooting
This section addresses common issues you might encounter with your automatic chicken coop door.
| Problem | Possible Cause | Solution |
|---|---|---|
| Door does not open/close at expected times in Light Sensor Mode. | Light sensor is obstructed or in a shaded area; ambient light conditions are inconsistent. |
|
| Door reopens repeatedly during closing. | Obstacle (chicken, debris) in the door's path; anti-pinch sensor triggered. |
|
| Battery drains quickly or does not charge. | Solar panel not receiving enough sunlight; faulty solar panel connection; battery degradation. |
|
| Remote control not working. | Remote control battery low; remote out of range; interference. |
|
| Door does not respond to any commands. | Power issue; system malfunction. |
|
9. Specifications
| Attribute | Detail |
|---|---|
| Model Number | JSM13BN |
| Brand | MASTERFUN |
| Material | Aluminum |
| Product Dimensions (L x W x H) | 11.02 x 1.97 x 14.76 inches |
| Door Opening Dimensions (H x L) | 11.42 inches x 8.86 inches |
| Item Weight | 3.89 pounds |
| Solar Panel Power | 7W |
| Battery Capacity | 2000mAh |
| Remote Control Range | Up to 15 meters |
| Working Temperature | -26°C to 60°C (-14.8°F to 140°F) |
| Breed Recommendation | All Breed Sizes |
| Specific Uses for Product | Outdoor |
10. Warranty and Support
For warranty information and customer support, please refer to the documentation included with your product packaging or visit the official MASTERFUN website. Contact details for support are typically provided on the manufacturer's website or in the product's quick start guide.
Please retain your purchase receipt for warranty claims.