Poafamx POA-20
Poafamx Pond Fountain Aerator 5000GPH Floating Pump User Manual
Model: POA-20 | Brand: Poafamx
1. Introduction
This manual provides essential instructions for the safe and efficient operation, installation, and maintenance of your Poafamx 5000GPH Floating Pond Fountain Aerator. Please read this manual thoroughly before use and retain it for future reference.

Figure 1: Poafamx Floating Pond Fountain Aerator and included components.
2. Safety Instructions
Always follow these safety precautions to reduce the risk of injury, electric shock, or damage to the product.
- Ensure the power supply matches the specifications (110V/60Hz).
- Do not operate the pump if the power cord or plug is damaged.
- Always disconnect the power before performing any maintenance or cleaning.
- Keep children and pets away from the fountain while it is operating.
- Do not use the product for purposes other than its intended use (pond aeration and fountain display).
- Avoid touching the impeller when the unit is connected to power.
- Install the unit in a location where it is stable and cannot be easily dislodged.
3. Package Contents
Verify that all components are present and undamaged upon opening the package:

Figure 2: Exploded view and list of included parts.
- Buoy
- Fixing frame
- Fountain pump
- Power cord (33ft)
- Protective net
- Protective net fixing frame
- Screws (x4)
- Nylon rope (33ft x2)
- Insert rod (x2)
- Timer outlet
- Screwdriver
4. Setup and Installation
Follow these steps for proper assembly and installation of your floating pond fountain aerator.
4.1 Assembly
- Attach Protective Net: Secure the protective net to the protective net fixing frame.
- Attach Fixing Frame to Buoy: Place the fountain pump into the buoy. Then, align the fixing frame with the buoy and secure it using the provided screws. Ensure it is tightened to prevent movement.
- Install Filter (Optional): If desired, install the fine filter mesh according to your specific filtration needs. This is typically placed within the fixing frame.
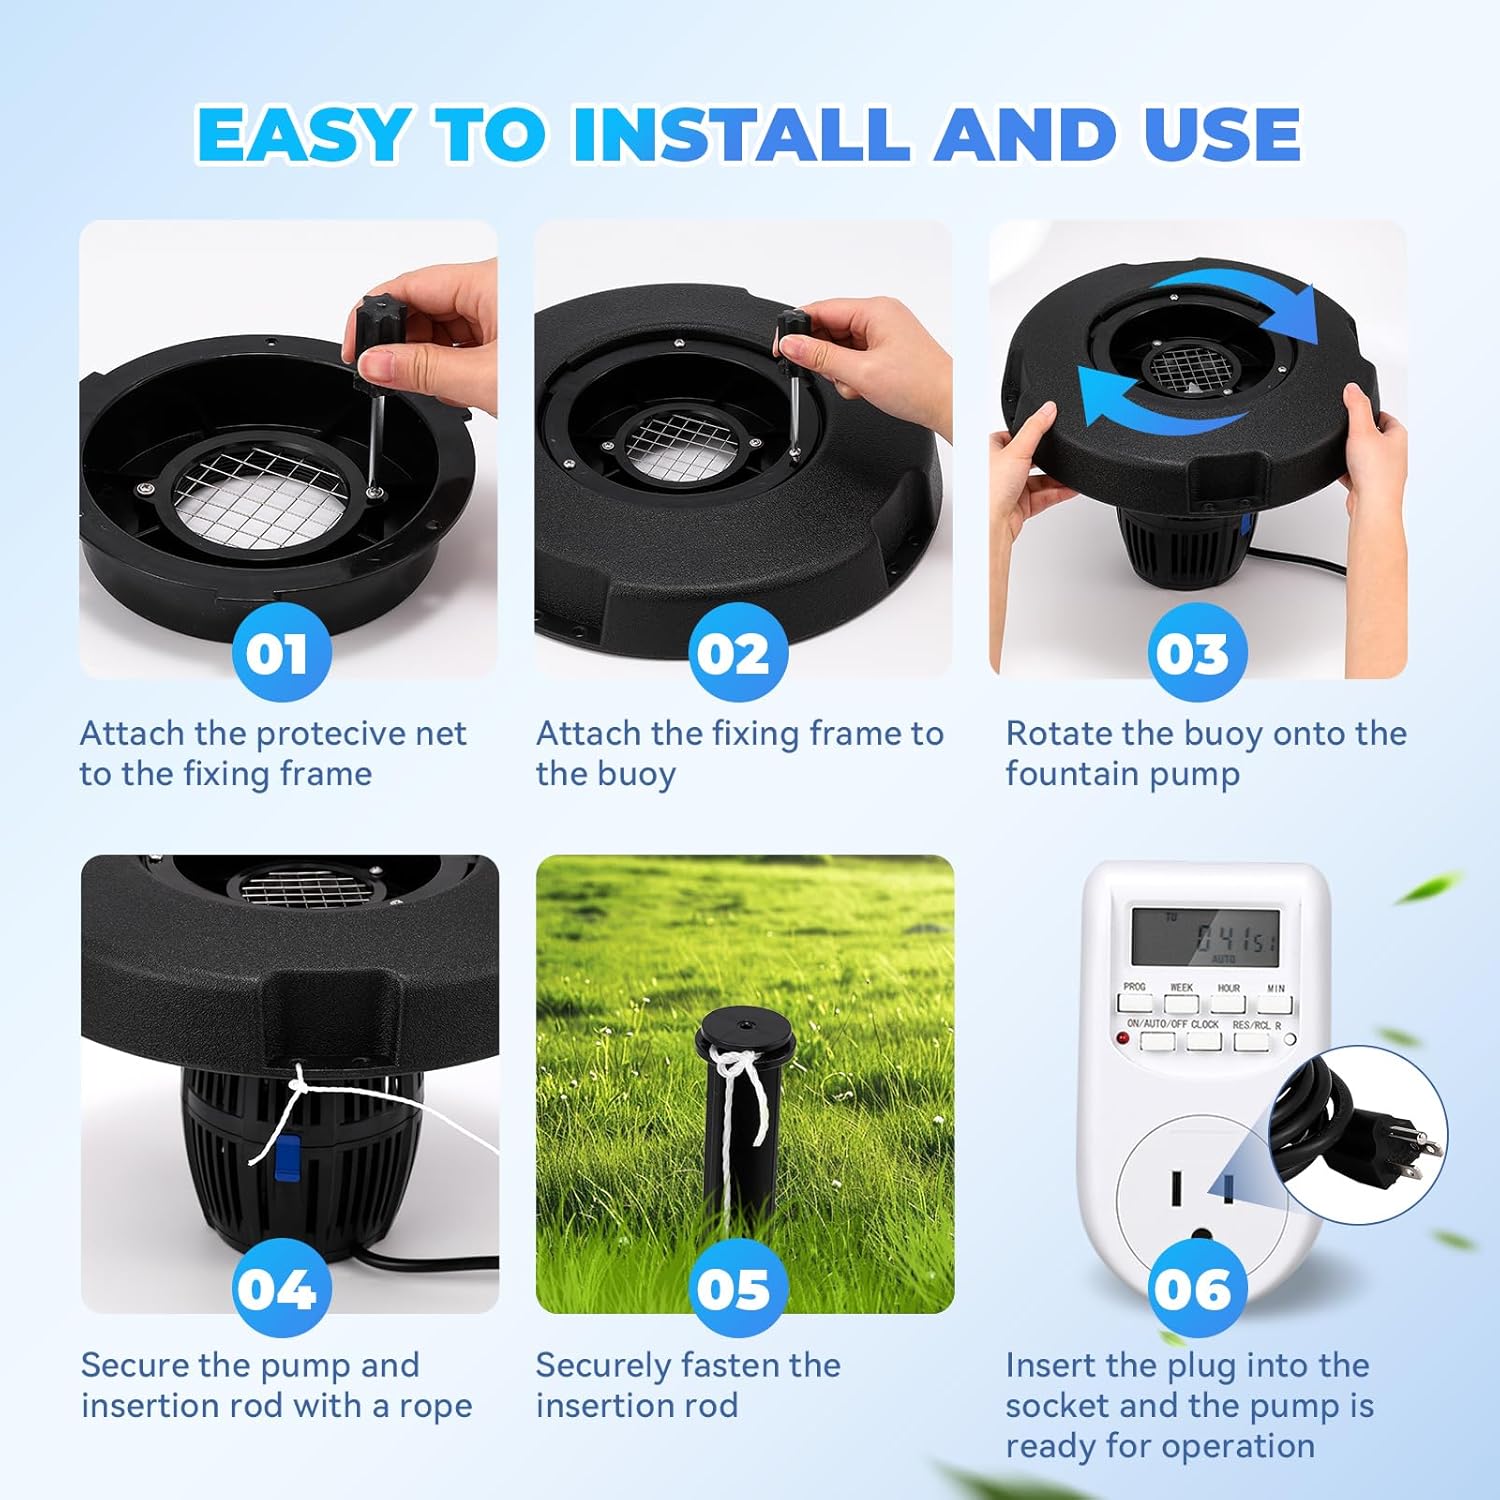
Figure 3: Visual guide for assembling the fountain aerator.
Video 1: A demonstration of the simple installation process for the pond fountain pump.
4.2 Placement and Securing
- Attach Mooring Ropes: Thread the nylon ropes through the designated holes on the buoy.
- Secure Insert Rods: Tie the other end of each rope to an insert rod. Drive the insert rods into the ground at the desired locations around your pond to anchor the fountain.
- Position Fountain: Carefully place the assembled fountain into the water. Adjust the ropes to position the fountain in the desired area of your pond or lake.
- Connect Power: Plug the 33ft power cord into the included timer outlet, then plug the timer outlet into a standard 110V power source.
5. Operating Instructions
The Poafamx Floating Pond Fountain Aerator is designed for continuous operation or timed use via the included outlet timer.
- Initial Start-up: Once connected to power, the pump will begin operating, creating a fountain display and aerating the water.
- Using the Timer: Refer to the separate instructions provided with the timer outlet for detailed programming. The timer allows you to set specific on/off times to conserve energy and customize operation.
- Fountain Display: The pump creates a fountain covering an area of approximately 3.28 x 9.84 feet, enhancing the aesthetic appeal and promoting water circulation and oxygenation.
Video 2: A brief demonstration of the 5000GPH Pond Fountain Aerator in operation.
6. Maintenance
Regular maintenance ensures optimal performance and extends the lifespan of your aerator.
- Disconnect Power: Always unplug the unit from the power source before any cleaning or maintenance.
- Clean Filters: Periodically inspect and clean the protective net and internal filters to prevent debris buildup, which can reduce performance. The filter is designed for easy dismantling.
- Inspect Impeller: Check the ceramic wear-resistant shaft and impeller for any obstructions or damage. Remove any foreign matter carefully.
- Winterization: In freezing climates, remove the aerator from the pond before winter to prevent ice damage. Store it in a dry, frost-free location.

Figure 4: Filter with locking clip for easy cleaning.

Figure 5: Ceramic spindle impeller for long-lasting performance.
7. Troubleshooting
If you encounter issues, consult the table below before contacting customer support.
| Problem | Possible Cause | Solution |
|---|---|---|
| Pump does not start. | No power; clogged impeller; damaged motor. | Check power connection and timer settings. Disconnect power and clean impeller. If motor is damaged, contact support. |
| Weak or no fountain spray. | Clogged intake/filter; low water level; air in pump. | Clean protective net and filters. Ensure adequate water level. Briefly lift and re-submerge the pump to release trapped air. |
| Excessive noise or vibration. | Debris in impeller; pump not stable. | Disconnect power and clean impeller. Ensure the buoy is properly secured and stable in the water. |
8. Specifications
| Feature | Detail |
|---|---|
| Model | POA-20 |
| Brand | Poafamx |
| Power | 90W |
| Voltage | 110V/60Hz |
| Max Flow Rate | 5000 GPH |
| Fountain Height | Up to 3.28 ft |
| Fountain Diameter | Up to 9.84 ft |
| Power Cord Length | 33 ft |
| Product Dimensions (L x W x H) | 10.83" x 9.92" x 16.54" |
| Item Weight | 9.18 pounds |
| Material | Plastic |
| Special Features | Timer Function, Floating Design, Energy Efficient Motor |
9. Warranty and Support
For warranty information, technical support, or replacement parts, please refer to the contact information provided with your purchase or visit the official Poafamx website. Keep your purchase receipt as proof of purchase.
Ask a question about this manual
Ask about setup, troubleshooting, compatibility, parts, safety, or missing instructions. Manuals+ will review the question and use this page’s manual context to help answer it.