Introduction
Thank you for choosing the AMPFORCE Electric Toilet Plunger. This high-pressure air plunger is designed to effectively clear stubborn clogs in toilets, sinks, and other drains. Please read this manual thoroughly before use to ensure safe and optimal performance. Keep this manual for future reference.
Product Overview & Components
The AMPFORCE Electric Toilet Plunger utilizes advanced air-pump technology to provide powerful clog removal. It features an adjustable pressure range and a specialized anti-splash design for clean operation.
Included Components:
- Electric Plunger Unit (main body with pressure gauge)
- Stainless Steel Air Cylinder
- Toilet Head Attachment (120° anti-splash design)
- Basin Sink Head Attachment
- Kitchen Sink Head Attachment
- Floor Drain Head Attachment
- USB Type-C Charging Cable
- Storage Pouch
- Gloves
- Drain Hair Clog Remover Tools (flexible plastic strips)

Figure 1: All components of the AMPFORCE Electric Toilet Plunger, including the main unit, various plunger heads, charging cable, and accessories.
Safety Instructions
- Always wear the provided gloves during operation.
- Ensure a tight seal between the plunger head and the drain opening to prevent splashback.
- Start with the lowest recommended pressure (1 BAR) and gradually increase if necessary. Excessive pressure can damage pipes.
- Do not point the plunger at people or animals.
- Keep out of reach of children.
- Do not use with corrosive chemicals or flammable liquids.
- Ensure the piston is correctly oriented before use.
- Brace the unit firmly with two hands to manage recoil during discharge.
Setup & Assembly
- Charge the Unit: Connect the Type-C charging cable to the plunger unit and a suitable power source. Ensure the unit is fully charged before first use.
- Assemble the Main Unit: Install the sealing ring and white column into the main gun body. Rotate and tighten the stainless steel air cylinder onto the main gun body.
- Attach Plunger Head: Select the appropriate plunger head for the drain type (toilet, sink, floor drain). Securely attach it to the end of the air cylinder. Ensure it is firmly in place to create a vacuum-tight seal.
- Piston Inspection: Verify that the internal piston is not missing and is in the correct orientation within the air cylinder.
Video: Quick Start Guide for AMPFORCE Electric Toilet Plunger. This video demonstrates the initial assembly and basic operation steps.
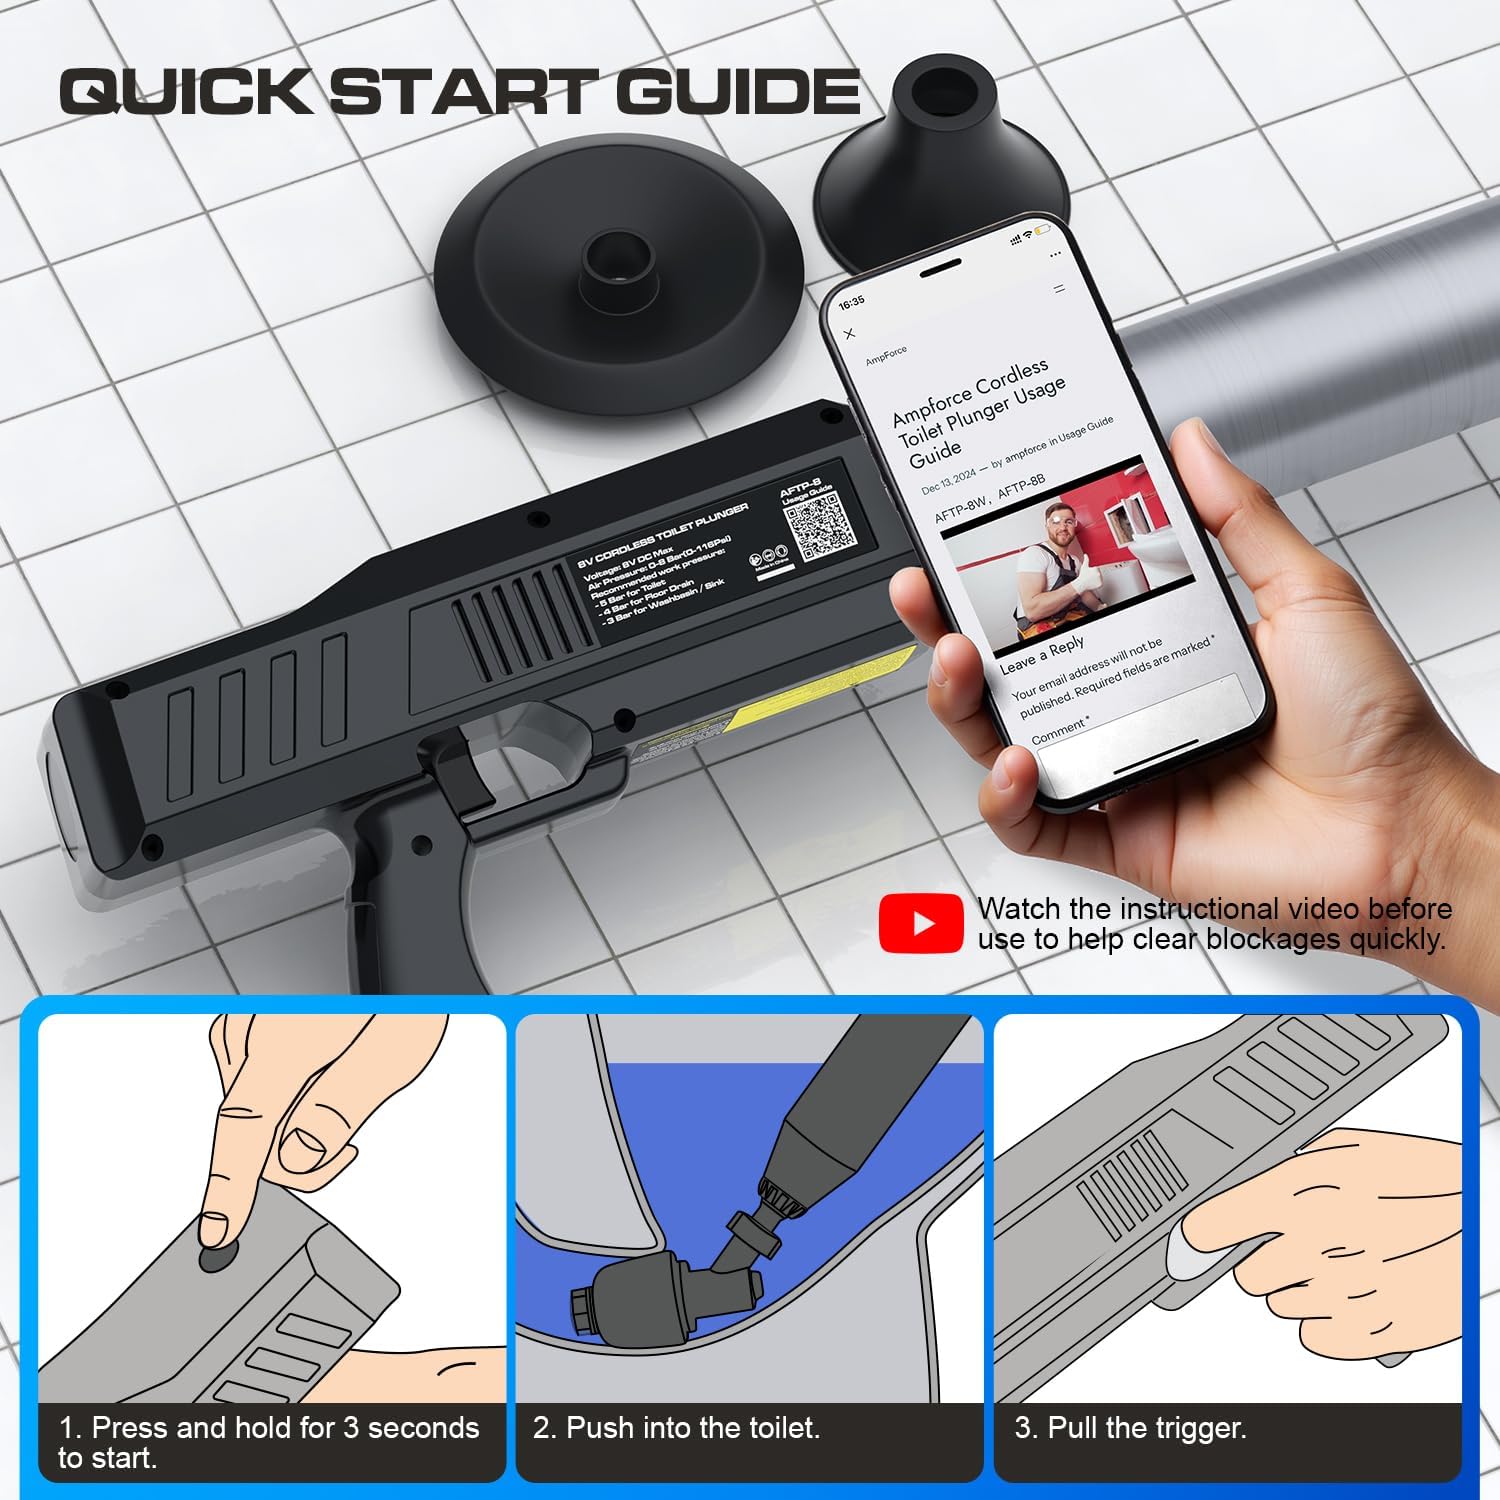
Figure 2: Visual quick start guide for initial operation.
Operating Instructions
Before operating, ensure the unit is fully assembled and charged. Always wear protective gloves.
General Operation Steps:
- Power On & Inflate: Press and hold the power button for 3 seconds to turn on the unit. The pressure gauge will activate. Pump the unit to the recommended pressure for your specific drain type (refer to the table below).
- Position the Plunger: Insert the selected plunger head deep into the drain opening, ensuring a tight seal. For toilets, the 120° anti-splash head should be angled correctly to prevent backflow.
- Brace and Discharge: Hold the unit firmly with both hands to brace against recoil. Pull the trigger to release the high-pressure air in one controlled burst.
- Check and Repeat: Observe if the clog has cleared. If necessary, repeat the process, starting with inflation, positioning, and discharge.
Recommended Pressure Settings:
| Application Scenario | Recommended Pressure (BAR) |
|---|---|
| Toilet | 5 Bar |
| Basin Sink | 3 Bar |
| Kitchen Sink | 3 Bar |
| Floor Drain | 4 Bar |

Figure 3: Guide to selecting the correct plunger head and pressure for various drain types.
Specific Usage Scenarios:
For Toilets:
Use the Toilet Head Attachment. Ensure the 120° anti-splash design forms a vacuum-tight seal against the toilet pipes to prevent messy sprays. Start with 5 BAR pressure.
Video: AMPFORCE Electric Toilet Plunger in action. Demonstrates effective clog removal in a toilet.
Video: Demonstration of the 'No Splashing' feature when using the AMPFORCE plunger in a toilet.
For Sinks (Basin & Kitchen):
Use the appropriate Basin Sink Head or Kitchen Sink Head. Ensure the head covers the drain completely for a tight seal. Recommended pressure is 3 BAR.

Figure 4: Using the AMPFORCE Electric Plunger to clear a bathroom sink drain.

Figure 5: Clearing a kitchen sink drain with the AMPFORCE Electric Plunger.
For Bathtubs & Shower Drains:
Use the appropriate head (often the Basin Sink Head or Floor Drain Head depending on size). Ensure a complete seal over the drain. Recommended pressure is 4 BAR for floor drains.

Figure 6: The AMPFORCE Electric Plunger effectively clearing a bathtub drain.

Figure 7: Clearing a shower drain with the AMPFORCE Electric Plunger.
Maintenance & Cleaning
- Cleaning Plunger Heads: After each use, rinse the plunger head under tap water to remove any residue. The smooth design minimizes trapped grime.
- Storage: Store the clean and dry plunger unit and accessories in the provided storage pouch.
- Battery Care: Recharge the unit as needed using the Type-C charger. Avoid overcharging or completely draining the battery for optimal lifespan.
Troubleshooting
Common Issues & Solutions:
- No Pressure Build-up:
- Check if the sealing ring and white column are correctly installed.
- Ensure the air cylinder is tightly screwed onto the main unit.
- Verify the plunger head forms a tight seal with the drain opening.
- Inspect the piston for proper orientation and ensure it's not missing.
- Ineffective Clog Removal:
- Increase the pressure gradually, staying within recommended limits for the drain type.
- Ensure the plunger head is creating a complete seal.
- Repeat the operation steps 2-3 times if the clog is stubborn.
- For very tough clogs, use the provided drain hair clog remover tools first to clear some debris before using the plunger.
- Unit Not Turning On:
- Ensure the battery is charged.
- Press and hold the power button for 3 seconds.
Specifications
- Brand: AMPFORCE
- Model Number: AFTP-8B
- Color: Phantom Black
- Handle Material: Plastic
- Product Dimensions: 16.85"L x 7.4"W x 3.03"H
- Item Weight: 2.66 pounds (1.21 Kilograms)
- Adjustable Pressure: 1-8 BAR
- Battery: 1 Lithium Ion battery (included)
- Charging: Type-C
- UPC: 673257190253
Warranty & Support
For any product inquiries, technical support, or warranty claims, please contact AMPFORCE customer service through your retailer's support channels. Please have your model number (AFTP-8B) and proof of purchase ready.