
1. Introduction
This manual provides detailed instructions for the assembly, setup, operation, and maintenance of your HOMCOM 58-inch Reversible L-Shaped Gaming Desk. Please read this manual thoroughly before assembly and use to ensure proper function and safety. Keep this manual for future reference.

Figure 1.1: Overview of the HOMCOM 58-inch Reversible L-Shaped Gaming Desk.
2. Safety Information
Always follow the assembly instructions carefully. Keep the desk away from heat sources and liquids. Do not overload the desk or the built-in charging station. Keep electrical components away from water and never attempt to repair or modify them. Always unplug the desk when not in use or when leaving the room.
3. Package Contents
Before beginning assembly, verify that all parts listed in the packaging contents are present and undamaged. If any parts are missing or damaged, do not proceed with assembly and contact customer support.
4. Assembly Instructions
Assembly requires two people and a screwdriver (included). Follow the numbered steps provided in the separate assembly diagram for detailed guidance.
4.1. Pre-Assembly
- Unpack all components and lay them out on a clean, soft surface to prevent scratches.
- Identify all parts against the parts list provided in the packaging.
4.2. Reversible Configuration
The L-shaped desk can be assembled with the longer section on either the left or right side to suit your space. Decide on your preferred orientation before attaching the main desk sections.

Figure 4.1: Illustration of the reversible L-shaped desk configurations.
4.3. Step-by-Step Assembly
- Assemble the main desk frame using the provided screws and the included screwdriver. Ensure all connections are secure.
- Attach the desktop panels to the assembled frame.
- Install the monitor stand onto the main desktop.
- Assemble the two-tier storage shelves and CPU stand, then attach them to the desk frame according to your chosen reversible configuration.
- Mount the fabric storage bag to the side of the desk.
- Install the power outlet unit into the designated slot on the desktop.
- Connect the LED light strip as per the instructions in the LED lights section.
- Adjust the foot pads on the desk legs to ensure stability and level the desk on uneven surfaces.
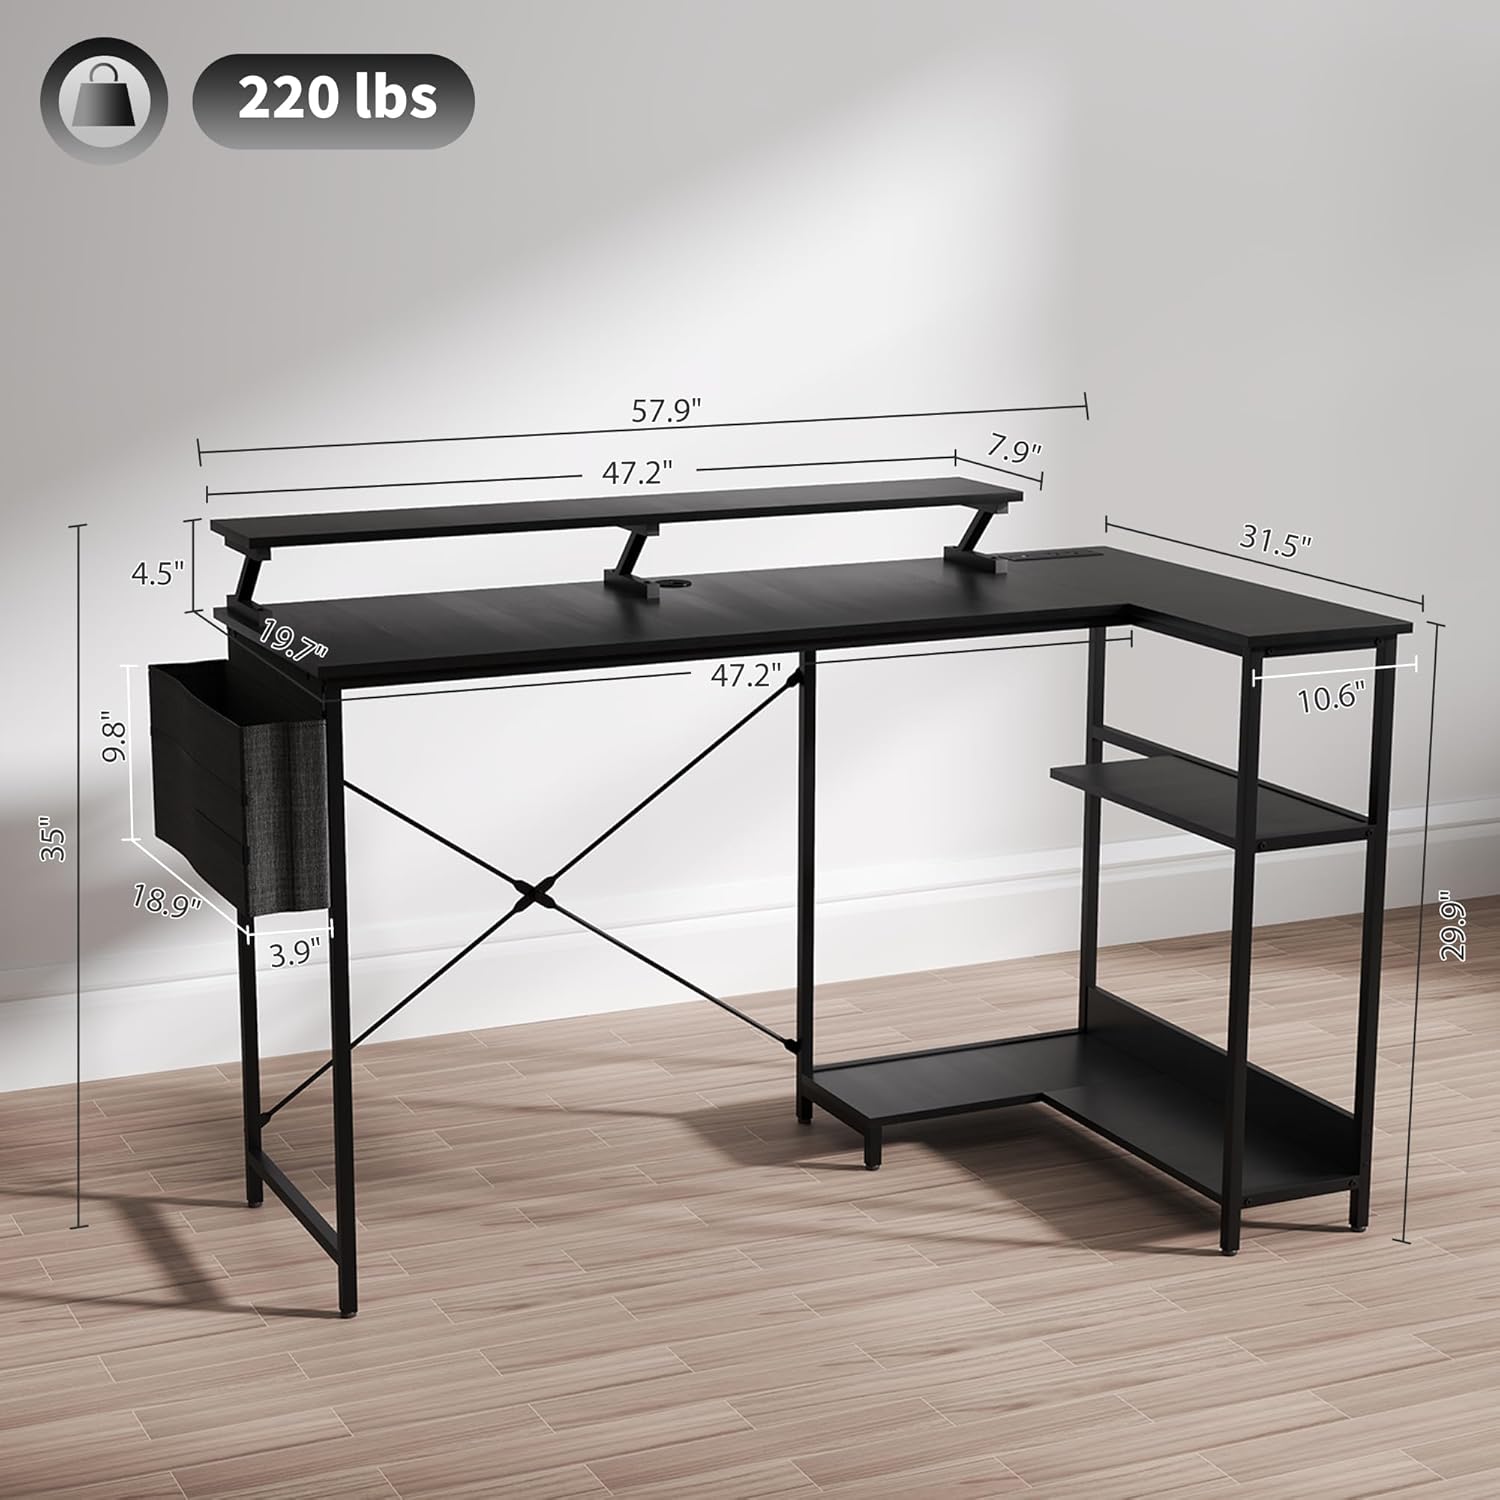
Figure 4.2: Desk dimensions for planning your space.

Figure 4.3: Details of the desk's robust construction, including the powder-coated steel frame, adjustable foot pads, and X-shaped crossbars.
5. Setup
5.1. Ergonomic Monitor Stand
The integrated monitor stand is designed to elevate your screen, promoting an ergonomic viewing height to minimize neck strain during extended use.

Figure 5.1: The ergonomic monitor stand helps maintain proper posture.
5.2. Power Outlets and USB Ports
The desk includes a built-in charging station with two 125V, 12A power outlets, one 5V, 2A USB port, and one 5V, 2A USB-C socket. Connect the desk's power cord to a wall outlet to activate these features.
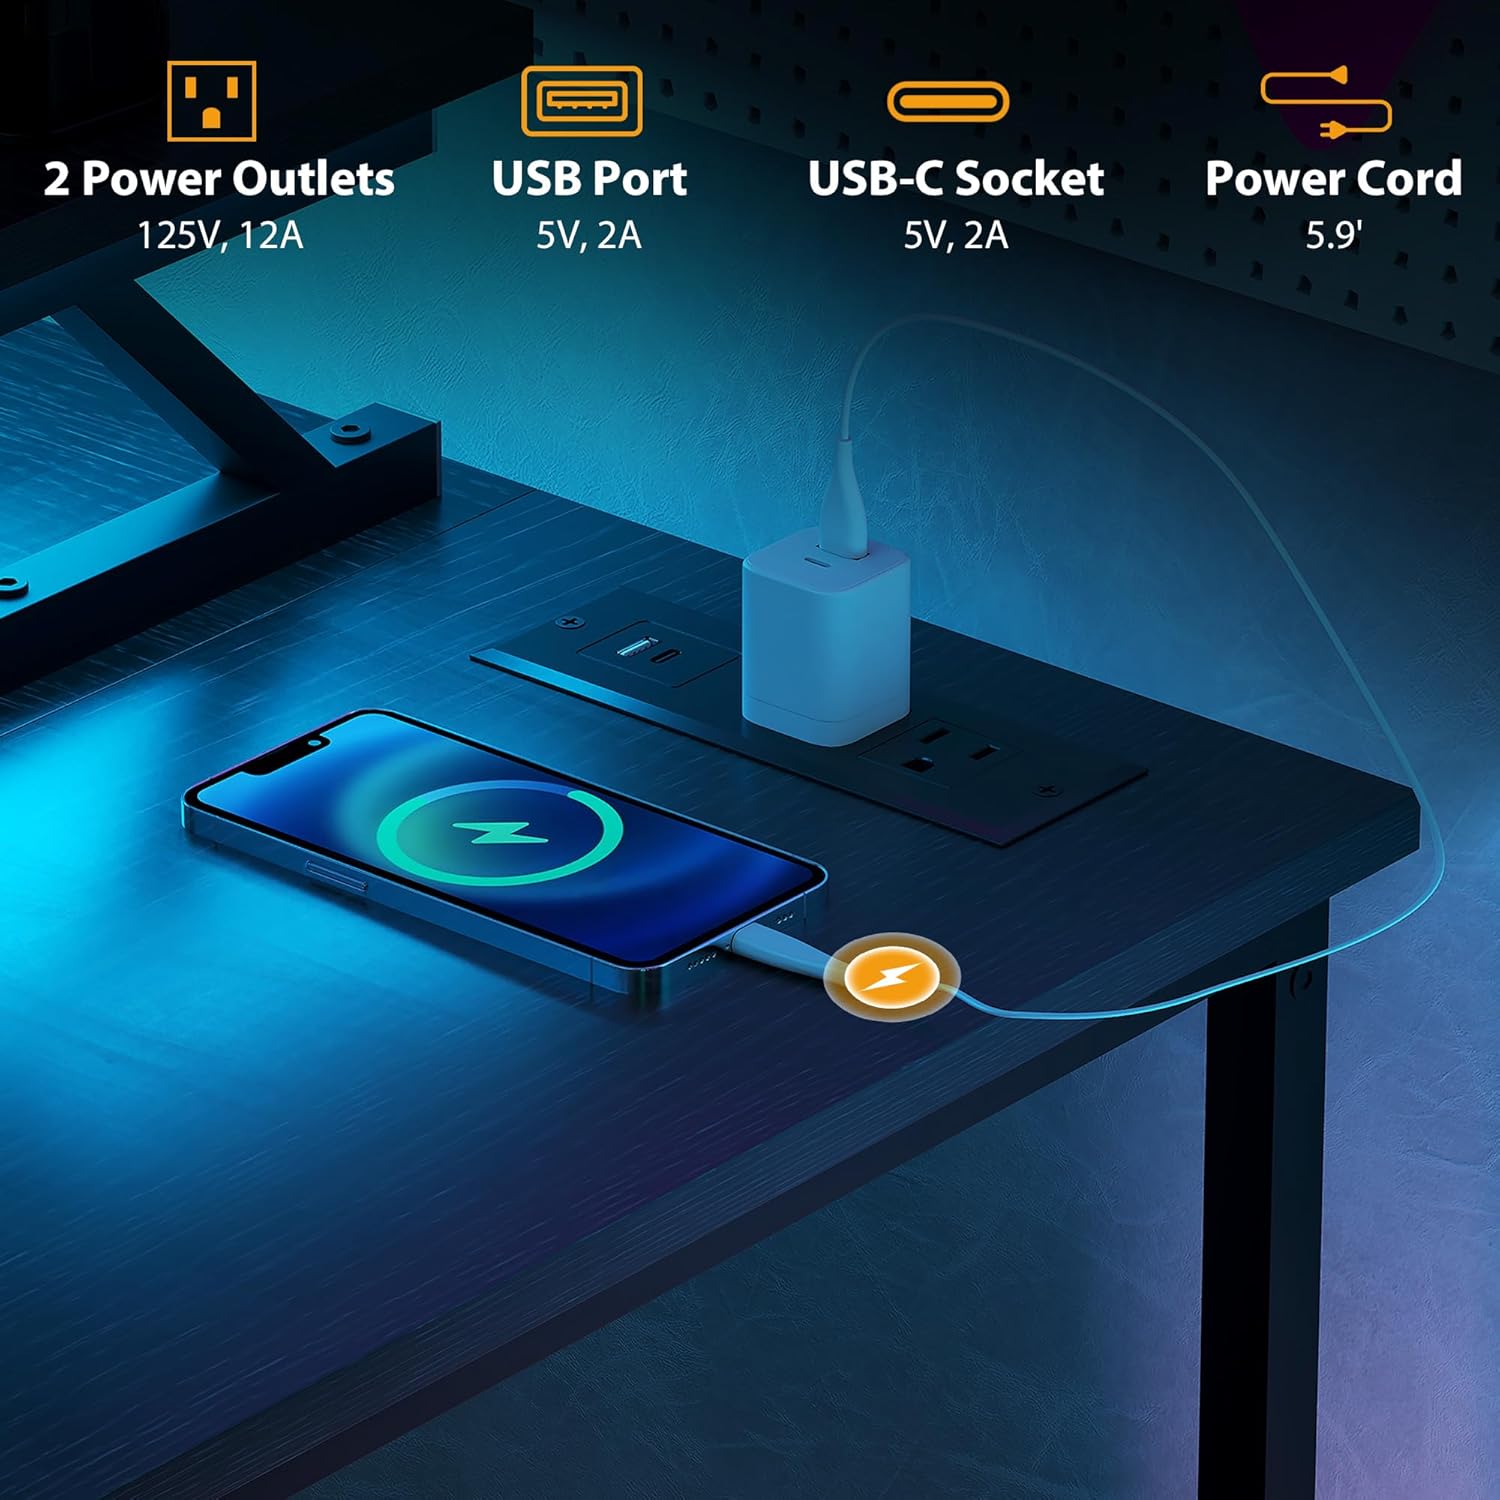
Figure 5.2: Integrated power outlets and USB ports for convenient device charging.
5.3. Storage Solutions
Utilize the two-tier under-desk shelves, CPU stand, and side fabric storage bag to organize your office supplies, computer components, and accessories, maintaining a clutter-free workspace.
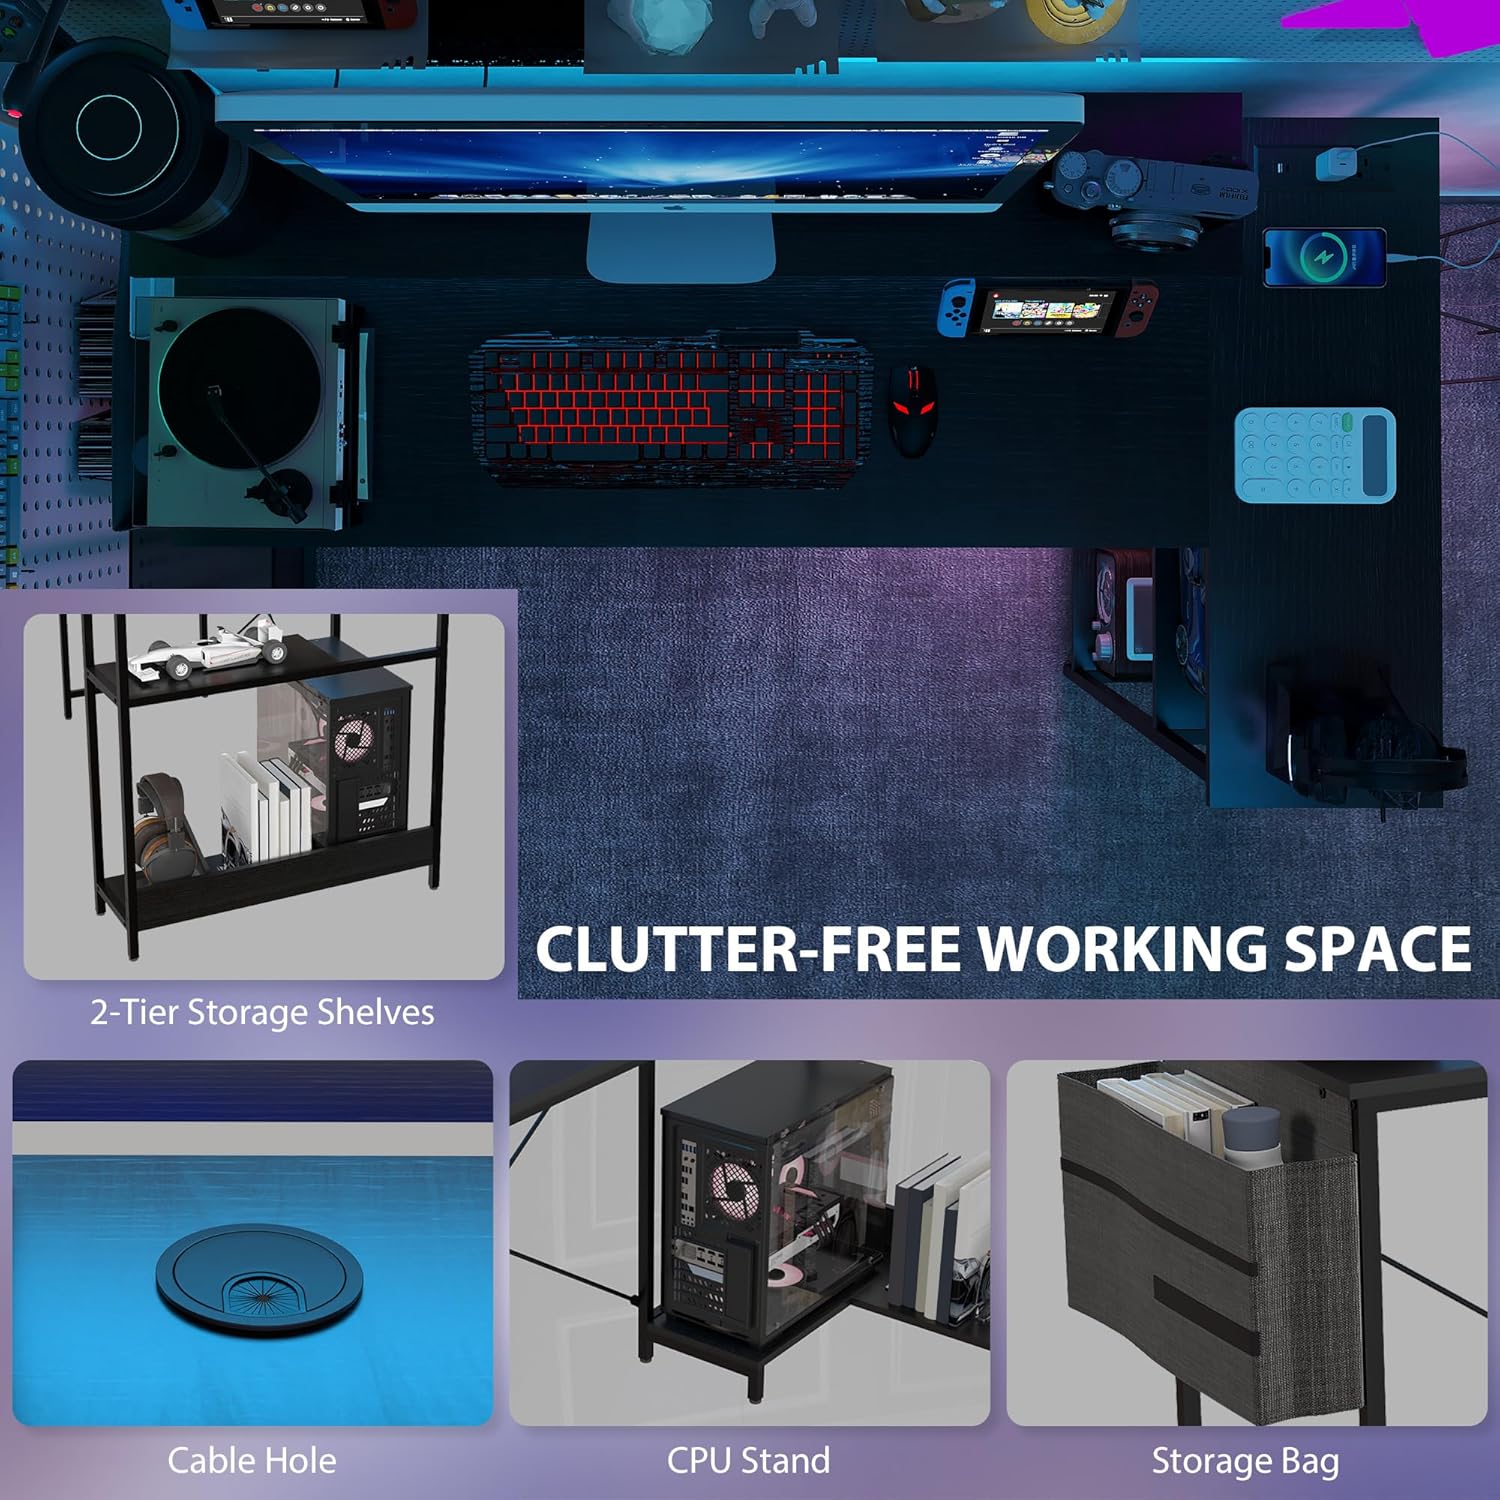
Figure 5.3: Various storage options for an organized workspace.
6. Operating Instructions
6.1. Power Outlets and USB Ports
Once the desk's power cord is plugged into a wall outlet, the integrated power outlets and USB ports are ready for use. Simply plug in your devices to charge or power them.
6.2. LED Lights Operation
The desk features RGB LED lights with changeable modes, colors, and adjustable brightness. Use the included remote control or the line control switch to customize the lighting ambiance.
- Changeable Modes: Cycle through various lighting effects.
- RGB Colors: Select from a spectrum of colors.
- Adjustable Brightness: Increase or decrease the light intensity.
- Line Control Switch: Provides basic control directly on the desk.

Figure 6.1: Control the LED lights using the remote or line switch.
7. Maintenance
7.1. Cleaning
Wipe the desk surfaces with a damp cloth. Avoid using harsh chemicals or abrasive cleaners that could damage the laminated finish. Ensure the power outlets and electrical components are dry before use.
7.2. General Care
- Regularly check all screws and connections to ensure they remain tight.
- Avoid placing excessively hot or cold items directly on the desktop without protective coasters.
- Do not exceed the maximum weight recommendation of 220 pounds.
8. Troubleshooting
8.1. Power Outlets Not Working
- Ensure the desk's main power cord is securely plugged into a functional wall outlet.
- Check if the wall outlet itself is receiving power by testing with another device.
- Verify that no circuit breaker has tripped.
8.2. LED Lights Not Functioning
- Confirm the LED light strip is properly connected to its power source.
- Check the remote control battery and ensure it is pointed towards the receiver.
- Ensure the line control switch is not in an 'off' position.
8.3. Desk Instability
- Adjust the foot pads on each leg to level the desk on uneven floors.
- Tighten all assembly screws.
- Ensure the desk is placed on a flat, stable surface.
9. Specifications
| Brand | HOMCOM |
| Model Number | 920-099V80BK |
| Product Dimensions (D x W x H) | 31.5"D x 57.9"W x 35"H |
| Color | Black |
| Top Material Type | Engineered Wood (Laminated) |
| Base Material | Alloy Steel (Powder Coated) |
| Item Weight | 49 Pounds |
| Maximum Weight Recommendation | 220 Pounds |
| Power Outlets | 2 x 125V, 12A AC Outlets |
| USB Ports | 1 x 5V, 2A USB-A, 1 x 5V, 2A USB-C |
| LED Lights | RGB, Changeable Modes, Adjustable Brightness |
| Required Assembly | Yes (2 people recommended) |
| Tools Recommended For Assembly | Screwdriver (Included) |
| Special Features | Built-In USB Outlet, Electric, Monitor Stand, Scratch Resistant |
10. Warranty and Support
10.1. Warranty Information
This HOMCOM product comes with a Limited Warranty. Please refer to the warranty card included in your packaging for specific terms, conditions, and duration of coverage.
10.2. Customer Support
For any questions, missing parts, or assistance with assembly or operation, please contact HOMCOM customer support. Contact information can typically be found on the product packaging or the official HOMCOM website.