1. Product Overview
The HUANANZHI X99-AD4 V2.0 is an ATX motherboard designed for high-performance computing, supporting LGA2011-3 processors and DDR4 memory. This manual provides essential information for the installation, operation, and maintenance of your motherboard, ensuring optimal performance and longevity.

Image 1.1: The HUANANZHI X99-AD4 V2.0 motherboard shown with its retail packaging. This image provides a general view of the product and its box.
2. Key Features
The X99-AD4 V2.0 motherboard incorporates several features designed for enhanced performance and connectivity:
- Unparalleled Performance: Designed for LGA2011-3 processors with DDR4 memory slots accommodating up to 128GB (2400/2133/1866 MHz) for robust processing power.
- Advanced Connectivity Options: Features 4 USB 3.0 and 6 USB 2.0 ports on the back panel, 6 SATA 3.0 (6Gbps) and 2 SSATA 3.0 interfaces, and 2 PCI-E x16 slots.
- Highly Flexible Memory Support: Includes 4 DDR4 slots supporting both ECC and non-ECC memory in a four-channel architecture for maximum data bandwidth.
- Enhanced Expansion Features: Equipped with dual M.2 slots (one NVME PCIe x4 32Gbps and one NGFF SATA 3.0 6Gbps) for swift data storage. Features a 10-layer PCB and 6-phase power supply.
- Integrated Cooling and Audio: Onboard silent cooling fans and power/reset buttons. 5.1 channel audio with ALC662 chip and gigabit LAN for stable network connections.

Image 2.1: A top-down view of the HUANANZHI X99-AD4 V2.0 motherboard, highlighting the CPU socket, DDR4 memory slots, PCI-E slots, and M.2 interfaces.
3. Setup Guide
Before beginning installation, ensure your system is powered off and disconnected from the power source. Handle the motherboard by its edges to avoid static discharge.
3.1. CPU Installation
- Locate the LGA2011-3 socket on the motherboard.
- Open the CPU retention mechanism by pushing down and out on the lever(s).
- Carefully align the CPU with the socket, ensuring the gold triangle on the CPU matches the indicator on the socket. Do not force the CPU into place.
- Gently lower the CPU into the socket.
- Close the retention mechanism by pushing the lever(s) back into their locked position.
- Apply a thin, even layer of thermal paste to the CPU's integrated heat spreader (IHS).
- Install the CPU cooler according to its manufacturer's instructions.
3.2. RAM Installation
- Locate the four DDR4 memory slots.
- Open the clips at both ends of the memory slot.
- Align the memory module with the slot, ensuring the notch on the module matches the key in the slot.
- Press down firmly on both ends of the memory module until the clips snap into place.
3.3. M.2 SSD Installation
- Identify the M.2 slots (one NVME PCIe x4, one NGFF SATA 3.0).
- Remove the M.2 standoff screw from the motherboard.
- Insert the M.2 SSD into the slot at a 30-degree angle.
- Gently push down the SSD and secure it with the standoff screw.
3.4. SATA Device Connection
- Connect one end of a SATA data cable to a SATA 3.0 port on the motherboard.
- Connect the other end of the SATA data cable to your storage device (HDD/SSD).
- Connect a SATA power cable from your power supply to the storage device.
3.5. PCI-E Card Installation
- Locate the desired PCI-E x16 or PCI-E x1 slot.
- Remove the corresponding expansion slot cover from your PC case.
- Align the PCI-E card with the slot and press down firmly until it is seated correctly.
- Secure the card to the case with a screw or retention clip.
3.6. Power Supply Connection
- Connect the 24-pin ATX power connector from your power supply to the main power socket on the motherboard.
- Connect the 8-pin (or 4+4-pin) CPU power connector to the CPU power socket near the CPU.
3.7. Front Panel Connectors
Connect the front panel cables (Power LED, HDD LED, Power Switch, Reset Switch, USB, Audio) from your PC case to the corresponding headers on the motherboard. Refer to the motherboard diagram for exact pin assignments.
3.8. I/O Panel Connections
Connect your peripherals (keyboard, mouse, monitor, network cable, audio devices) to the appropriate ports on the motherboard's rear I/O panel.
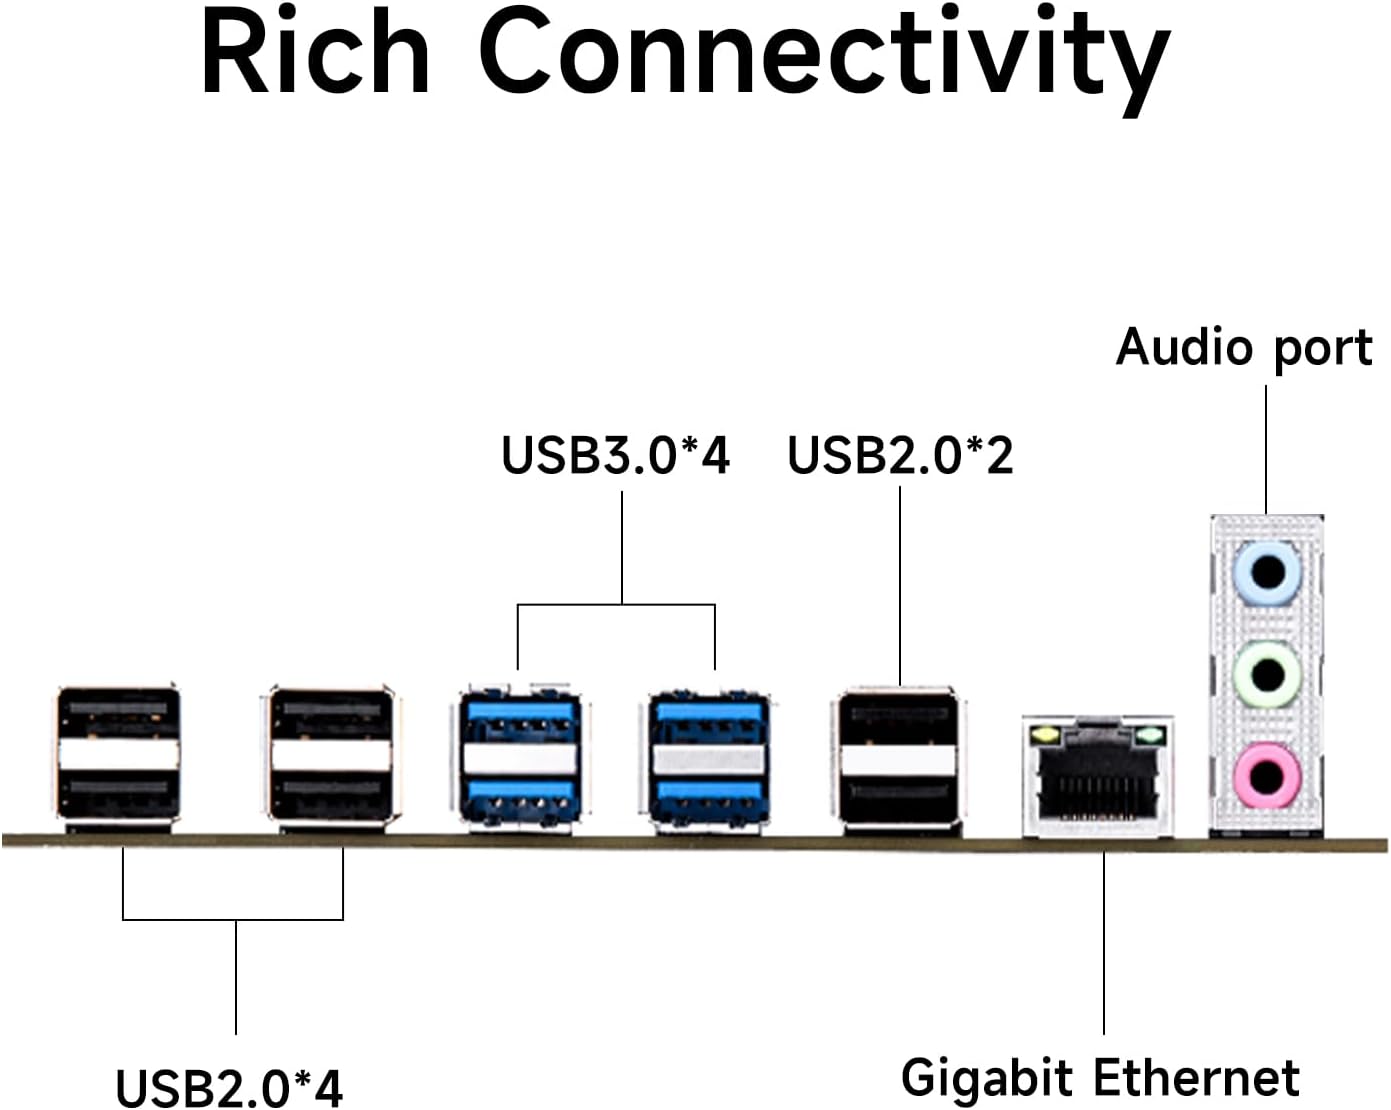
Image 3.1: A detailed view of the rear I/O panel, illustrating the various connectivity options including USB 3.0, USB 2.0, Gigabit Ethernet, and 5.1 channel audio ports.
4. Operating Instructions
4.1. First Boot
After completing all hardware installations, connect your monitor, keyboard, and mouse. Power on your system. The system should display the BIOS/UEFI splash screen. If not, refer to the Troubleshooting section.
4.2. BIOS/UEFI Configuration
To enter the BIOS/UEFI setup, press the DEL or F2 key during the boot process. Within the BIOS/UEFI, you can configure various system settings, including:
- Boot order for storage devices.
- Date and time settings.
- CPU and memory settings (e.g., XMP profiles for RAM).
- Peripheral configurations.
Save changes before exiting the BIOS/UEFI.
4.3. Driver Installation
After installing your operating system, it is crucial to install the necessary drivers for the motherboard's components. These typically include:
- Chipset drivers.
- LAN (Ethernet) drivers.
- Audio drivers.
- USB drivers (if not automatically detected by OS).
Drivers can usually be found on the manufacturer's website or an included driver CD/USB drive.
4.4. Operating System Installation
Insert your operating system installation media (USB drive or DVD) and set it as the primary boot device in the BIOS/UEFI. Follow the on-screen instructions to install your preferred operating system.
5. Maintenance
Regular maintenance helps ensure the stability and longevity of your motherboard and system.
5.1. Cleaning
- Periodically clean dust from the motherboard and components using compressed air.
- Ensure all fans (CPU cooler, case fans) are free of dust to maintain optimal cooling.
- Always power off and unplug the system before cleaning.
5.2. BIOS/UEFI Updates
Check the HUANANZHI website for the latest BIOS/UEFI updates. Updating the BIOS/UEFI can improve system stability, add support for new hardware, or fix bugs. Follow the manufacturer's instructions carefully when performing a BIOS/UEFI update to avoid system damage.
5.3. Connection Checks
Occasionally, verify that all cables (power, data, front panel) are securely connected to the motherboard and peripherals.
6. Troubleshooting
This section addresses common issues you might encounter.
6.1. No Power
- Ensure the power supply is connected to the motherboard (24-pin ATX and 8-pin CPU power).
- Verify the power supply switch is in the 'ON' position.
- Check that the front panel power switch cable is correctly connected to the motherboard header.
- Test the power supply with another system or a power supply tester.
6.2. No Display
- Ensure the monitor is connected to the graphics card (not the motherboard, as this board does not have integrated graphics).
- Verify the graphics card is properly seated in its PCI-E slot and has adequate power connected.
- Reseat RAM modules. Incorrectly seated RAM is a common cause of no display.
- Clear the CMOS (Complementary Metal-Oxide-Semiconductor) by removing the CMOS battery for 5-10 seconds or using the clear CMOS jumper.
- Test with a single RAM stick in different slots.
6.3. System Instability / Crashes
- Check CPU and GPU temperatures. Overheating can cause instability.
- Ensure all drivers are up to date.
- Run memory diagnostic tools to check for faulty RAM.
- Verify power supply wattage is sufficient for all components.
6.4. Boot Issues
- Check the boot order in BIOS/UEFI to ensure the correct drive is selected.
- Verify that the operating system is installed correctly on the boot drive.
- Ensure SATA or M.2 cables are securely connected.
7. Specifications
The following table details the technical specifications of the HUANANZHI X99-AD4 V2.0 Motherboard:

Image 7.1: The HUANANZHI X99-AD4 V2.0 motherboard displayed alongside a table summarizing its key specifications.
| Feature | Detail |
|---|---|
| Model Name | X99-AD4 V2.0 |
| Brand | HUANANZHI |
| CPU Socket | LGA 2011-3 |
| Compatible Processors | LGA2011-3 CPUs |
| RAM Memory Technology | DDR4 |
| Memory Slots | 4 x DDR4 (Quad Channel) |
| Max Memory Capacity | 128 GB |
| Memory Clock Speed | 2400 MHz (supports 2400/2133/1866 MHz) |
| Chipset Type | C612 |
| Storage Interface | 6 x SATA 3.0 (6Gbps), 2 x SSATA 3.0 |
| M.2 Slots | 1 x NVME PCIe x4 32Gbps, 1 x NGFF SATA 3.0 6Gbps |
| Expansion Slots | 2 x PCI-E x16, 1 x PCI-E x1 |
| USB Ports (Rear) | 4 x USB 3.0, 6 x USB 2.0 |
| Audio | 5.1 Channel (ALC662) |
| LAN | Gigabit Ethernet |
| Form Factor | ATX |
| Product Dimensions | 14.57 x 11.42 x 4.33 inches |
| Item Weight | 3.75 pounds |
8. Warranty & Support
For warranty information and technical support, please refer to the documentation provided with your purchase or visit the official HUANANZHI website. Warranty terms and conditions may vary based on region and retailer.
For further assistance, you may contact your point of purchase or the manufacturer's customer service channels.


