1. Introduction
Thank you for choosing the TinyGlow 4-in-1 Baby Bassinet. This versatile product is designed to adapt to your baby's needs, functioning as a bassinet, playard, bedside crib, and diaper changing station. Please read this manual thoroughly before assembly and use to ensure safe and proper operation.
2. Safety Information
WARNING: Failure to follow these warnings and instructions could result in serious injury or death.
- Always keep the product away from open flames, heaters, and other sources of strong heat.
- Never leave your child unattended in the bassinet or playard.
- Discontinue use of the bassinet function when the infant begins to push up on hands and knees, or has reached 20 lbs (9 kg), or is 25 inches (63.5 cm) tall, whichever comes first.
- Discontinue use of the playard when the child is able to climb out, or reaches the height of 35 inches (89 cm), or weighs more than 30 lbs (13.6 kg), whichever comes first.
- Always ensure all locking mechanisms are securely engaged before placing your child in the product.
- Only use the mattress/pad provided by the manufacturer. Do not add extra padding.
- Keep small parts away from children during assembly.
3. Parts List
Please ensure all components are present before beginning assembly:
- Main Bassinet/Playard Frame
- Mattress/Base Pad
- Diaper Changing Station
- Mobile with Hanging Toys
- Mosquito Net Canopy
- Side Storage Organizer
- Carry Bag
- Instruction Manual
4. Assembly Instructions
4.1. Unfolding the Main Frame
- Remove the main frame from its carry bag.
- Stand the folded frame upright.
- Pull the top rails upwards until they lock into place. Ensure all four sides are fully extended and locked.
- Push down on the center of the base until it lies flat.

Figure 4.1: The bassinet unfolds quickly for easy setup.
4.2. Installing the Mattress/Base Pad
- Place the mattress/base pad inside the main frame.
- For the bassinet (upper) level, secure the mattress using the provided clips or straps to the elevated support.
- For the playard (lower) level, place the mattress directly on the bottom of the frame.

Figure 4.2: The comfortable mattress provides a soft and breathable surface.
4.3. Attaching the Diaper Changing Station
- Locate the diaper changing station and its support rods.
- Assemble the short tubes into the circular grooves of the changing station buckles, ensuring the buckles face upward.
- Clip the changing station onto the top rails of the bassinet/playard. Ensure it is securely attached.
Video 4.3: Detailed assembly of the diaper changing table support rods.
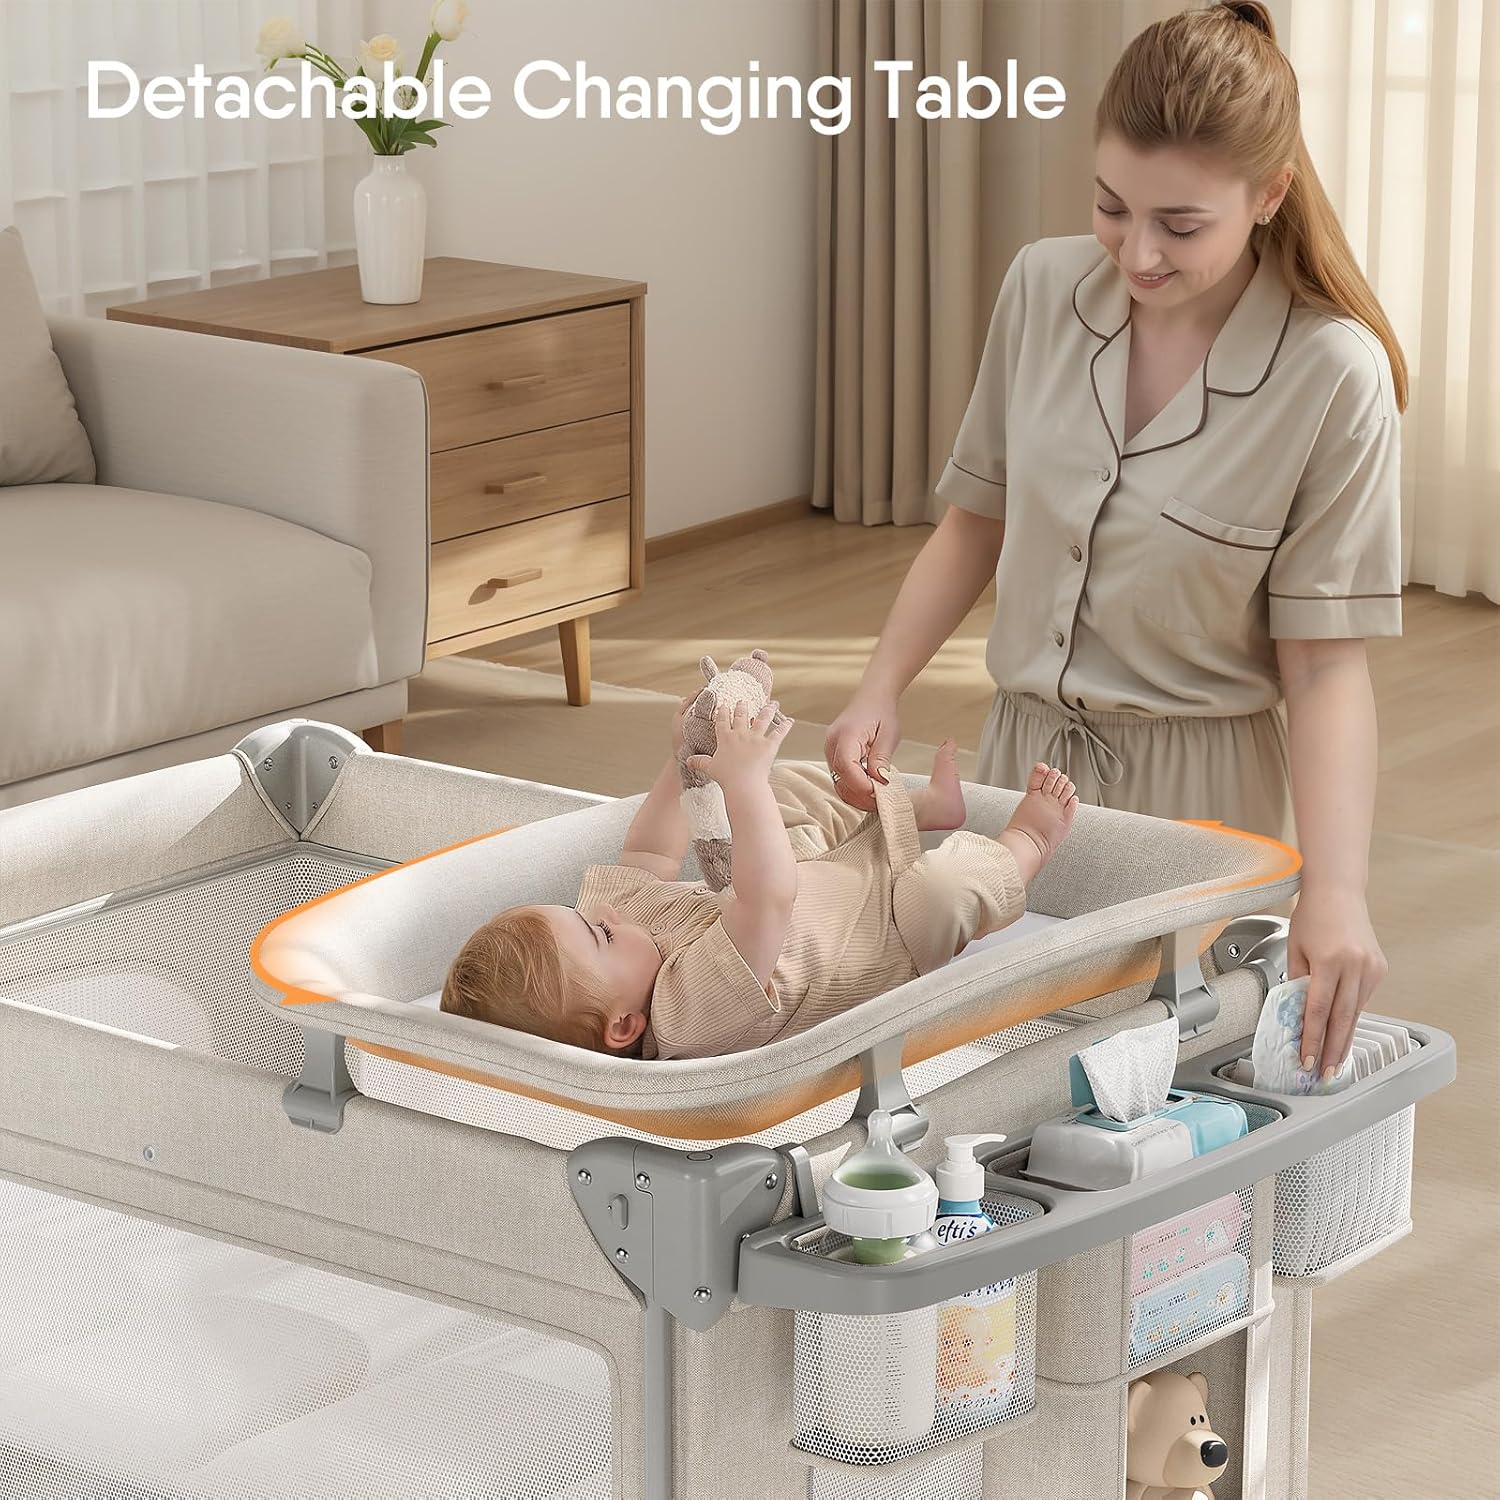
Figure 4.3: The detachable changing table provides a convenient space for diaper changes.
4.4. Attaching the Mobile and Mosquito Net
- Attach the mobile arm to one of the top corners of the bassinet/playard. Ensure the hanging toys are securely fastened.
- Drape the mosquito net canopy over the bassinet/playard, securing it with the clips provided around the top rails.

Figure 4.4: The detachable mobile with engaging toys.

Figure 4.5: The mosquito net canopy provides protection for your child.
Video 4.5: Comprehensive overview of assembly and features.
5. Operating Modes
5.1. Bassinet Mode
For infants, the bassinet mode provides an elevated sleeping surface, making it easier to access your baby. Ensure the mattress is secured at the higher level.

Figure 5.1: Bassinet mode for easy access to your infant.
5.2. Playard Mode
As your child grows and becomes more active, the playard mode offers a secure and spacious area for play. Lower the mattress to the bottom of the frame. The mesh sides provide visibility and ventilation.
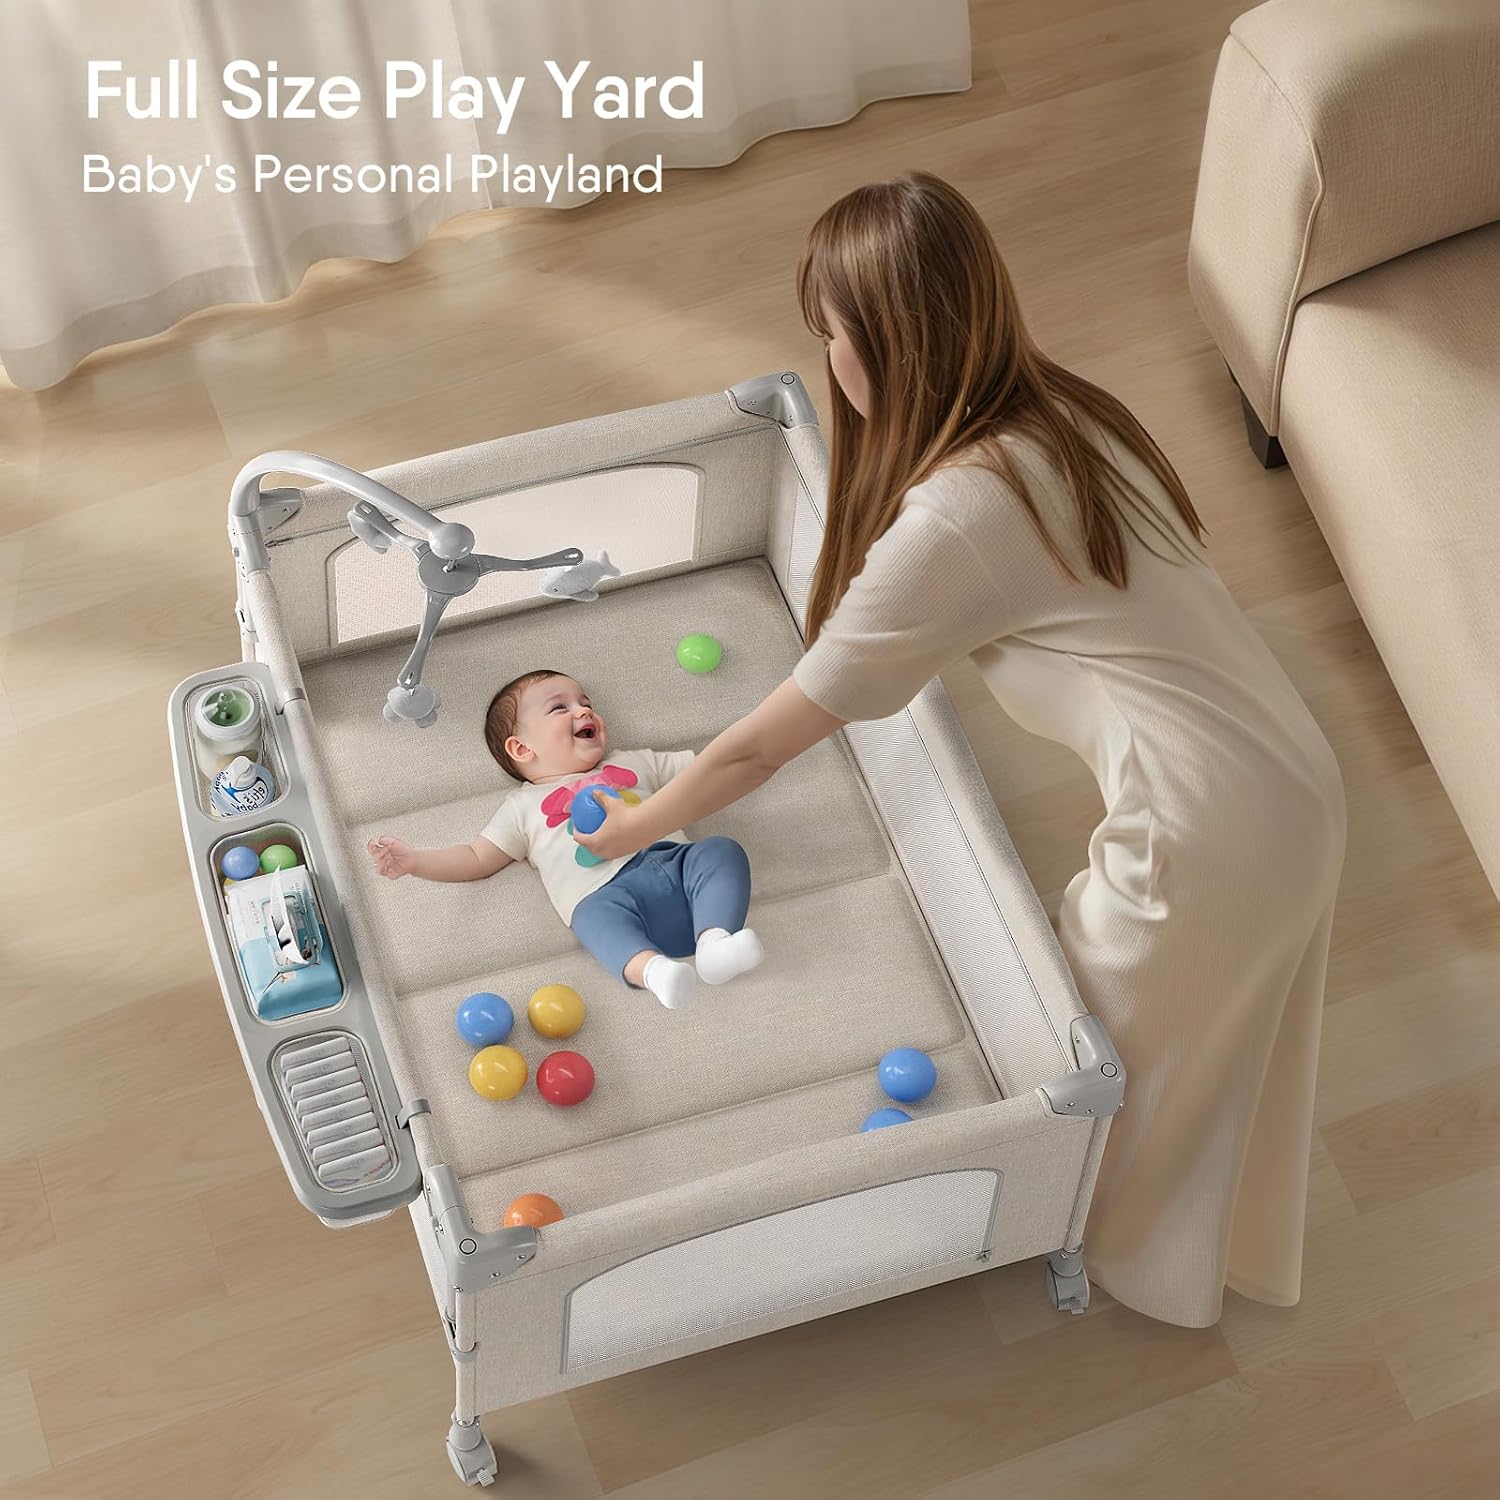
Figure 5.2: Playard mode offers a safe play area.
5.3. Bedside Crib Sleeper Mode
To use as a bedside sleeper, lower one of the side panels. This allows you to keep your baby close during the night for easier feeding and comforting. Ensure the bassinet is securely positioned next to your bed and the lowered side is flush with your mattress.
Video 5.3: Bedside crib sleeper functionality.
5.4. Diaper Changer Mode
The detachable diaper changing station can be clipped onto the top rails, providing a convenient and safe surface for diaper changes. The wrap-around design enhances safety, and the side storage keeps essentials organized.
Video 5.4: Using the diaper changing station.
6. Features
- Quick Assembly & Fold: Designed for rapid setup and folding within seconds, requiring no tools.
- Mosquito Net: A breathable, blackout mosquito net protects your baby from insects.
- Rotating Mobile with Toys: Keeps your baby entertained and engaged.
- Side Storage Organizer: Conveniently holds diapers, wipes, bottles, and other baby essentials.
- Wheels with Locks: Allows for easy movement between rooms and secure positioning.
- Breathable Mesh Sides: Ensures optimal airflow and visibility of your child.
- Comfortable Mattress: Soft and breathable, designed to support your baby's spine.

Figure 6.1: Wheels for easy mobility and secure locking.

Figure 6.2: Breathable mesh sides for ventilation and visibility.
7. Maintenance
- Cleaning Fabric: Use a damp cloth and mild soap to clean fabric surfaces. Do not use harsh detergents or bleach.
- Cleaning Frame: Wipe the metal and plastic parts of the frame with a soft, damp cloth.
- Mattress Care: The mattress pad can be spot cleaned. Refer to the care label for specific instructions.
- Storage: When not in use, fold the bassinet and store it in its carry bag in a cool, dry place.
8. Folding and Portability
The TinyGlow 4-in-1 Bassinet is designed for quick folding and portability:
- Remove the mattress, changing station, mobile, and mosquito net.
- Pull the center strap on the base upwards to begin folding the frame.
- Press the release buttons on the top rails (if applicable) and push the rails downwards to collapse the sides.
- Continue to compress the frame until it is fully folded.
- Secure the folded unit with the provided straps and place it in the carry bag for easy transport.
Video 8.1: Demonstration of folding the bassinet for portability.
9. Specifications
| Feature | Detail |
|---|---|
| Brand | TinyGlow |
| Model Number | B0DQ72XT66 |
| Material | Nylon |
| Item Weight | 33.6 pounds (15.26 Kilograms) |
| Package Dimensions | 28.25 x 11.25 x 10.5 inches |
| Batteries Required | No |
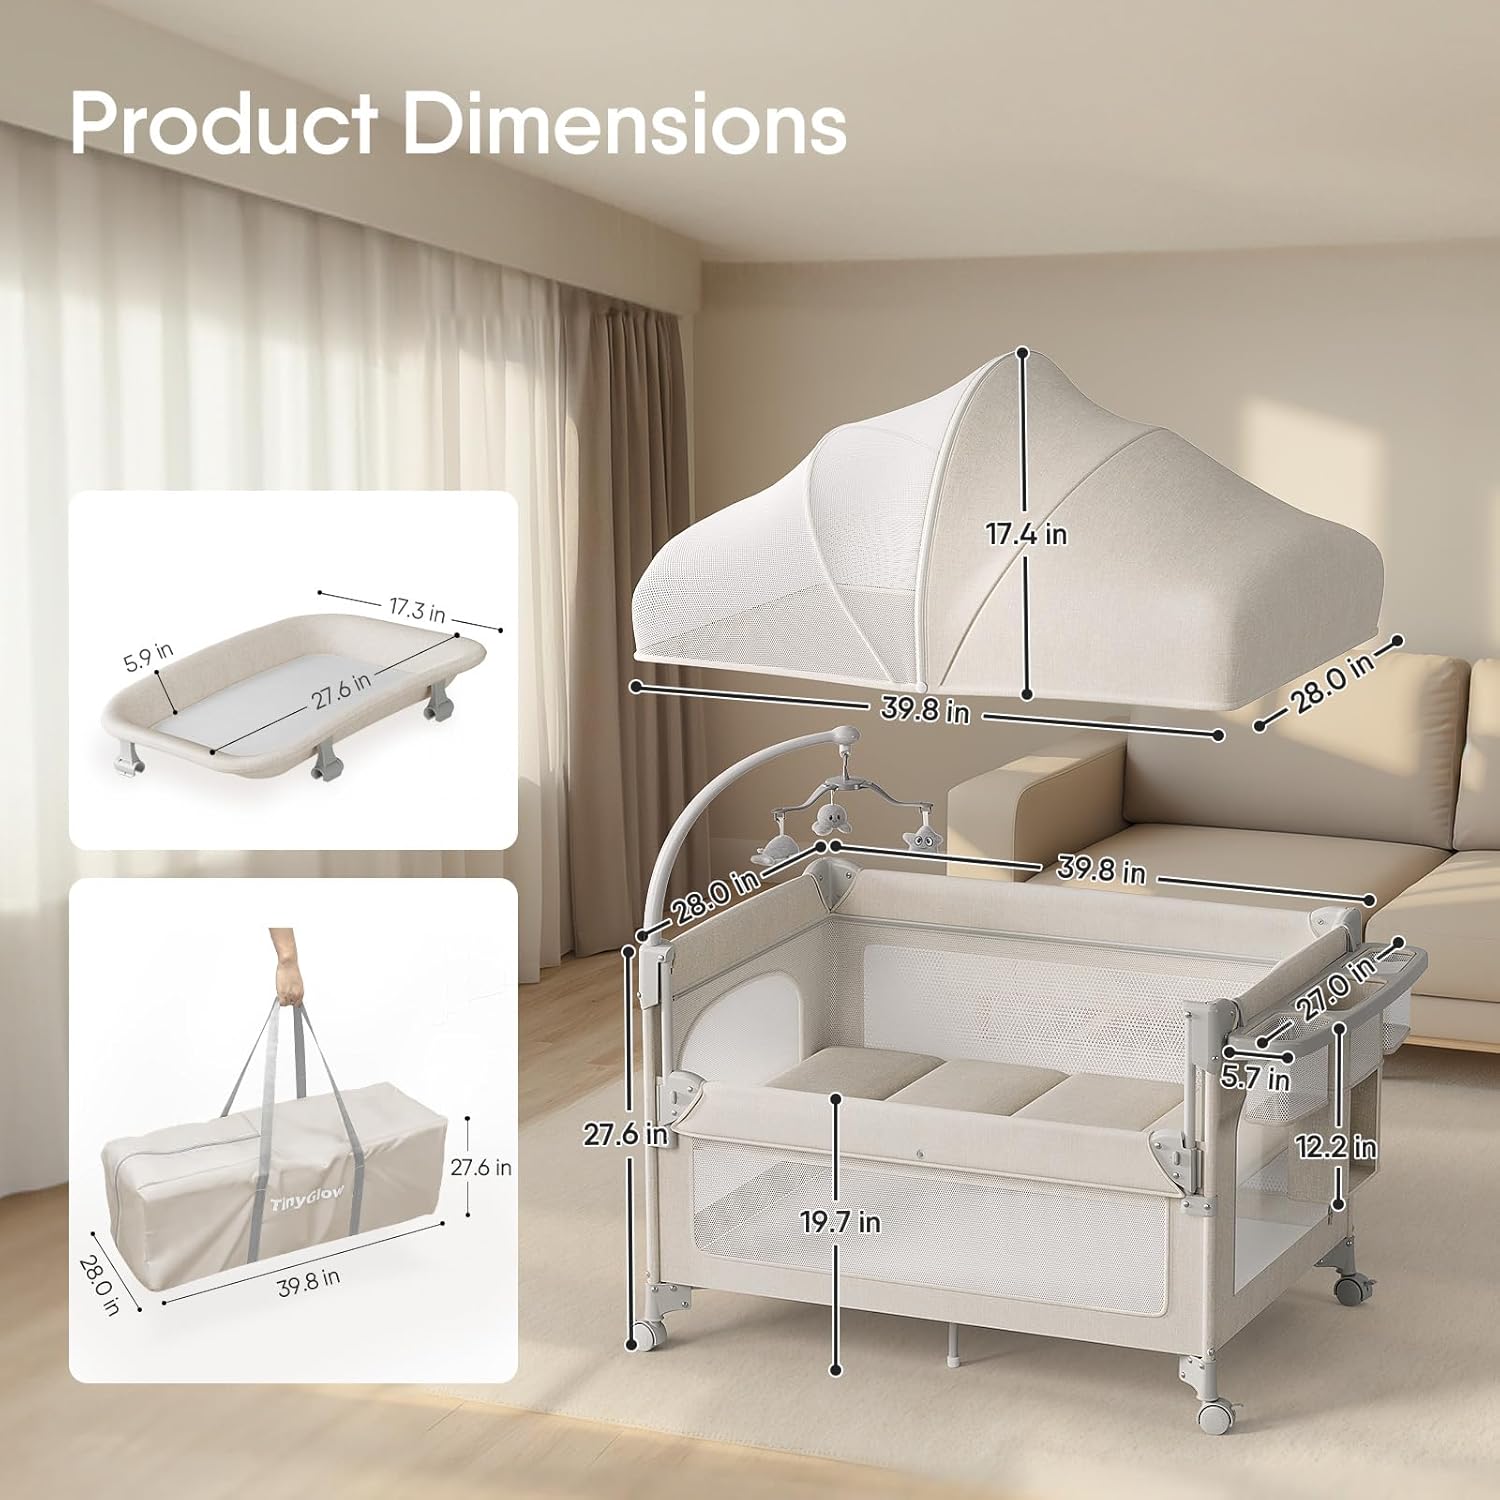
Figure 9.1: Product dimensions for planning and space considerations.
10. Troubleshooting
- Frame not locking: Ensure all top rails are pulled up firmly until they click into place. The center base must be pushed down completely.
- Difficulty folding: Make sure the mattress and all accessories are removed. Pull the center strap upwards and ensure all side rails are unlocked before attempting to collapse the frame.
- Accessories not attaching: Verify that accessories like the changing station or mobile are aligned correctly with their designated attachment points on the frame.
11. Warranty and Support
For warranty information, product registration, or customer support, please visit the official TinyGlow website or contact our customer service team. Keep your purchase receipt for warranty claims.