HUANANZHI X99-TF
HUANANZHI X99-TF Gaming Motherboard User Manual
Model: X99-TF
1. Introduction
This manual provides detailed instructions for the installation, operation, and maintenance of your HUANANZHI X99-TF Gaming Motherboard. The X99-TF is designed to support LGA2011-3 V3/V4 series processors and offers versatile memory configurations with support for both DDR3 and DDR4 RAM up to 128GB. It features high-speed storage options including dual M.2 NVME slots and multiple SATA interfaces, built on a robust 10-layer PCB for enhanced stability and performance.

Figure 1.1: HUANANZHI X99-TF Motherboard and Box
This image displays the HUANANZHI X99-TF motherboard alongside its product packaging, highlighting its design and branding.
2. Product Overview
2.1 Motherboard Layout
Familiarize yourself with the key components and connectors on the motherboard before installation.
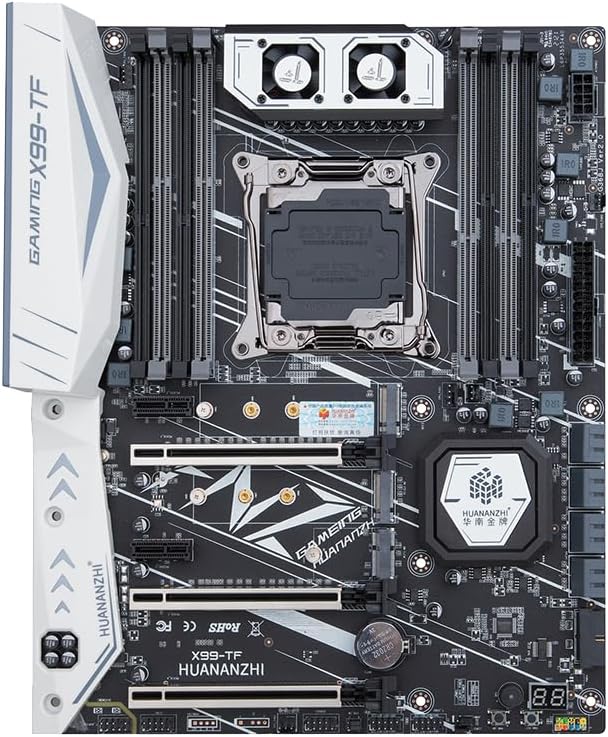
Figure 2.1: Top-down view of the X99-TF Motherboard
This image provides a clear top-down view of the HUANANZHI X99-TF motherboard, showcasing the LGA2011-3 CPU socket, eight DDR3/DDR4 memory slots, M.2 slots, PCIe slots, and various headers.
2.2 Rear I/O Panel
The rear I/O panel provides various ports for connecting external devices.

Figure 2.2: Rear I/O Panel Connectivity
This image details the rear input/output panel of the X99-TF motherboard, labeling ports such as PS/2, USB 2.0, USB 3.0, Gigabit Ethernet, and audio jacks.
- PS/2 Interface: For legacy keyboard and mouse connections.
- USB 2.0 Ports: For connecting peripherals.
- USB 3.0 Ports: For high-speed data transfer with compatible devices.
- Gigabit Ethernet Port: For wired network connectivity.
- Audio Ports: For connecting speakers, headphones, and microphones.
3. Setup and Installation
3.1 Safety Precautions
- Always disconnect the power supply from the wall outlet before installing or removing any components.
- Wear an anti-static wrist strap or frequently touch a grounded metal object to discharge static electricity.
- Handle components by their edges to avoid touching sensitive circuits.
3.2 Component Installation
3.2.1 CPU Installation
- Locate the LGA2011-3 CPU socket on the motherboard.
- Open the CPU socket retention levers.
- Carefully align the CPU with the socket, ensuring the gold triangle on the CPU matches the triangle on the socket.
- Gently place the CPU into the socket without forcing it.
- Close the retention levers to secure the CPU.
- Install the CPU cooler according to its manufacturer's instructions.
3.2.2 Memory (RAM) Installation
The X99-TF supports both DDR3 and DDR4 memory modules. Note: DDR3 and DDR4 memory cannot be mixed simultaneously.
- Open the clips at both ends of the memory slot.
- Align the notch on the memory module with the key in the memory slot.
- Press down firmly on both ends of the memory module until the clips snap into place.
- For optimal performance, install memory modules in matched pairs for dual-channel operation. Refer to the motherboard diagram for recommended slot configurations.
3.2.3 Storage Device Installation
- M.2 NVME SSD: Insert the M.2 SSD into the designated M.2 slot at a 30-degree angle, then gently push it down and secure it with the provided screw.
- SATA Drives: Connect SATA data cables from your storage drives (HDDs/SSDs) to the SATA ports on the motherboard. Connect SATA power cables from your power supply to the drives.
3.2.4 Graphics Card Installation
- Locate the PCIe x16 slot.
- Remove the corresponding expansion slot cover from your PC case.
- Align the graphics card with the PCIe slot and press down firmly until it is fully seated and the retention clip locks.
- Secure the graphics card to the case with a screw.
- Connect any necessary PCIe power cables from your power supply to the graphics card.
3.2.5 Power Supply Connection
- Connect the 24-pin ATX power connector from your power supply to the main power header on the motherboard.
- Connect the 8-pin (or 4+4 pin) CPU power connector from your power supply to the CPU power header near the CPU socket.
3.3 Case Installation
Install the motherboard into your PC case, ensuring it aligns with the standoffs and is secured with screws. Connect all front panel headers (power button, reset button, USB ports, audio jacks, etc.) according to the motherboard manual's pinout diagram.
4. Operation Guide
4.1 First Boot and BIOS Setup
- After assembling all components, connect your monitor, keyboard, and mouse.
- Power on your system. During the boot process, repeatedly press the DEL or F2 key (or as indicated on screen) to enter the BIOS/UEFI setup utility.
- In the BIOS, you can configure boot order, system time, enable/disable integrated peripherals, and adjust performance settings. Save changes before exiting.
4.2 Driver Installation
After installing your operating system, install the necessary drivers for optimal performance. Drivers typically include:
- Chipset Drivers
- LAN (Ethernet) Drivers
- Audio Drivers
- USB Drivers
- Graphics Card Drivers (from GPU manufacturer)
Drivers can usually be found on the manufacturer's website or included on a driver CD/USB drive with the motherboard.
4.3 Operating System Installation
Follow the instructions provided by your operating system (e.g., Windows, Linux) for installation. Ensure your bootable installation media is correctly configured in the BIOS.
5. Maintenance
5.1 Cleaning
Regularly clean your PC to prevent dust buildup, which can lead to overheating and component failure.
- Use compressed air to remove dust from fans, heatsinks, and other components.
- Ensure the system is powered off and unplugged before cleaning.
- Avoid using liquid cleaners directly on components.
5.2 BIOS/UEFI Updates
BIOS/UEFI updates can provide performance improvements, bug fixes, and support for new hardware. Only update the BIOS if necessary and follow the manufacturer's specific instructions carefully, as an incorrect update can render the motherboard inoperable.
6. Troubleshooting
This section addresses common issues you might encounter.
| Problem | Possible Cause | Solution |
|---|---|---|
| No display on monitor | Incorrect monitor connection, faulty graphics card, RAM not seated correctly, CPU not seated. | Check monitor cables. Reseat graphics card and RAM. Verify CPU installation. Test with a known good graphics card if possible. |
| System won't boot / Power on but no POST | Power supply issue, loose power cables, faulty component, BIOS settings. | Ensure all power cables are securely connected. Test power supply. Try booting with minimal components (CPU, one RAM stick). Reset CMOS. |
| Memory not detected or incorrect capacity | RAM not seated correctly, incompatible RAM, faulty RAM slot. | Reseat RAM modules. Ensure you are using either DDR3 or DDR4, not mixed. Test RAM sticks individually in different slots. |
| Storage drive not detected | Loose data/power cables, incorrect BIOS settings, faulty drive. | Check SATA/M.2 data and power connections. Verify SATA mode (AHCI) in BIOS. Test drive on another system if possible. |
If you encounter persistent issues, refer to the manufacturer's support resources or consult a qualified technician.
7. Technical Specifications
Below are the detailed specifications for the HUANANZHI X99-TF Motherboard.

Figure 7.1: X99-TF Motherboard with Key Specifications
This image presents the HUANANZHI X99-TF motherboard alongside a table summarizing its main technical specifications, including model, CPU socket, memory support, and storage interfaces.
| Feature | Specification |
|---|---|
| Model | X99-TF |
| CPU Socket | LGA 2011-3 (Supports V3/V4 CPUs) |
| Chipset Type | C612 |
| Memory Slots | 8 (4x DDR4, 4x DDR3) |
| Memory Technology | DDR3 / DDR4 (Not mixable) |
| Max Memory Capacity | 128 GB |
| Memory Clock Speed | Up to 2400/2133/1866 MHz |
| Storage Interfaces | 2x M.2 NVME, 1x M.2 WIFI, 4x SATA 3.0, 4x SSATA 3.0 |
| Expansion Slots | 2x PCIe 3.0 x16, 1x PCIe 3.0 x4, 2x PCIe 2.0 x1 |
| Network Card | Gigabit Ethernet |
| Power Supply | 6-phase power supply |
| Form Factor | Mini ATX (300*244mm) |
| Product Dimensions | 15.2 x 13.27 x 4.45 inches |
| Item Weight | 3.97 pounds |
8. Warranty and Support
HUANANZHI products are designed for reliability and performance. For warranty information and technical support, please refer to the documentation included with your purchase or visit the official HUANANZHI website. Keep your proof of purchase for warranty claims.
For further assistance, you may contact HUANANZHI customer support through their official channels.