Introduction
Thank you for choosing the FEIFANKE FKC-550H 55A Plasma Cutter. This manual provides essential information for the safe and efficient operation, setup, and maintenance of your plasma cutting machine. Please read this manual thoroughly before using the equipment to ensure proper function and to prevent injury or damage.

Figure 1: FEIFANKE FKC-550H Plasma Cutter in operation.
Safety Information
Plasma cutting can be dangerous if proper safety precautions are not followed. Always adhere to the following guidelines:
- Electric Shock: Can kill. Ensure the machine is properly grounded. Do not touch live electrical parts. Wear dry gloves and protective clothing.
- Fumes and Gases: Can be hazardous. Work in a well-ventilated area. Use an exhaust fan or fume extractor if necessary.
- Arc Rays: Can burn eyes and skin. Wear a welding helmet with appropriate shade filter, safety glasses, and protective clothing.
- Fire and Explosion: Hot metal and sparks can cause fires. Keep flammable materials away from the work area. Have a fire extinguisher readily available.
- Noise: Excessive noise can damage hearing. Wear ear protection.
- Compressed Air: Use appropriate air pressure and ensure connections are secure.
- Read the Manual: Understand all instructions before operating the equipment.
Product Overview and Features
The FEIFANKE FKC-550H is a 55A dual-voltage (110V/220V) plasma cutter designed for precise cutting of various metals. Key features include:
Non-Touch Pilot Arc Function
This plasma cutter utilizes non-touch pilot arc technology. This feature prevents direct contact between the torch tip and the workpiece, reducing consumable wear, avoiding metal contamination, and extending the lifespan of consumables. It provides smooth and precise cuts, particularly beneficial for thin metals and aluminum, and improves cut quality on corroded or irregular surfaces by reducing sparks and enhancing safety.
LED Digital Display for Real-time Monitoring

Figure 2: LED Digital Display and Control Panel.
The integrated LED digital display provides real-time monitoring of critical parameters such as voltage, current, and air pressure. This allows operators to quickly assess the machine's status and make necessary adjustments for optimal cutting efficiency. An error code system is included to simplify troubleshooting.
- 1. Airflow / Pressure Display: Shows the current air pressure (PSI).
- 2. Gas Test / Cutting Function: Indicates gas flow or cutting mode.
- 3. Current Display: Shows the output current (Amperes).
- 4. Rotate to Adjust Current / Press to Set Post Flow Time: Multi-function knob for current adjustment and post-flow time setting.
- 5. 2T/4T Mode: Selects between 2-touch and 4-touch trigger modes.
Cutting Thickness Capabilities

Figure 3: Cutting Thickness Guide.
Utilizing IGBT and MCU inverter technology, this plasma cutter offers high precision cutting for various metals. The cutting capabilities vary based on the input voltage:
- Output Current: 20-45A at 110V, 20-55A at 220V.
- Maximum Cut Thickness: Up to 12mm (approx. 1/2 inch) at 110V, and 15mm (approx. 5/8 inch) at 220V.
- Ideal Clean Cut Thickness: 8mm (approx. 3/8 inch) at 110V, and 10mm (approx. 3/8 inch) at 220V.
It is suitable for cutting thin steel plates, aluminum alloys, stainless steel, and other conductive metals.
2T/4T and Post-Flow Function

Figure 4: 2T and 4T Trigger Modes.
- 2T Mode (Two-Touch): Press and hold the trigger to cut; release to stop. This mode is suitable for short, precise cuts and tasks requiring frequent starts and stops.
- 4T Mode (Four-Touch): Press and release the trigger to start cutting; press and release again to stop. This mode is designed for extended cutting operations, reducing operator fatigue during long or continuous work.

Figure 5: Post-Flow Function in action.
The adjustable post-flow time (ranging from 2 to 15 seconds) allows gas to continue flowing after the arc stops. This cools the torch head, ensuring a cleaner cut surface and extending the torch's lifespan.
Air Filter System

Figure 6: External Air Filter.
An external air filter is included to remove water, oil, and debris from the compressed air supply. This is crucial for maintaining arc stability, improving cut quality, and prolonging the life of consumables and the machine itself.
Packing List
Upon unpacking, verify that all items listed below are present and undamaged. If any components are missing or damaged, please contact customer support.
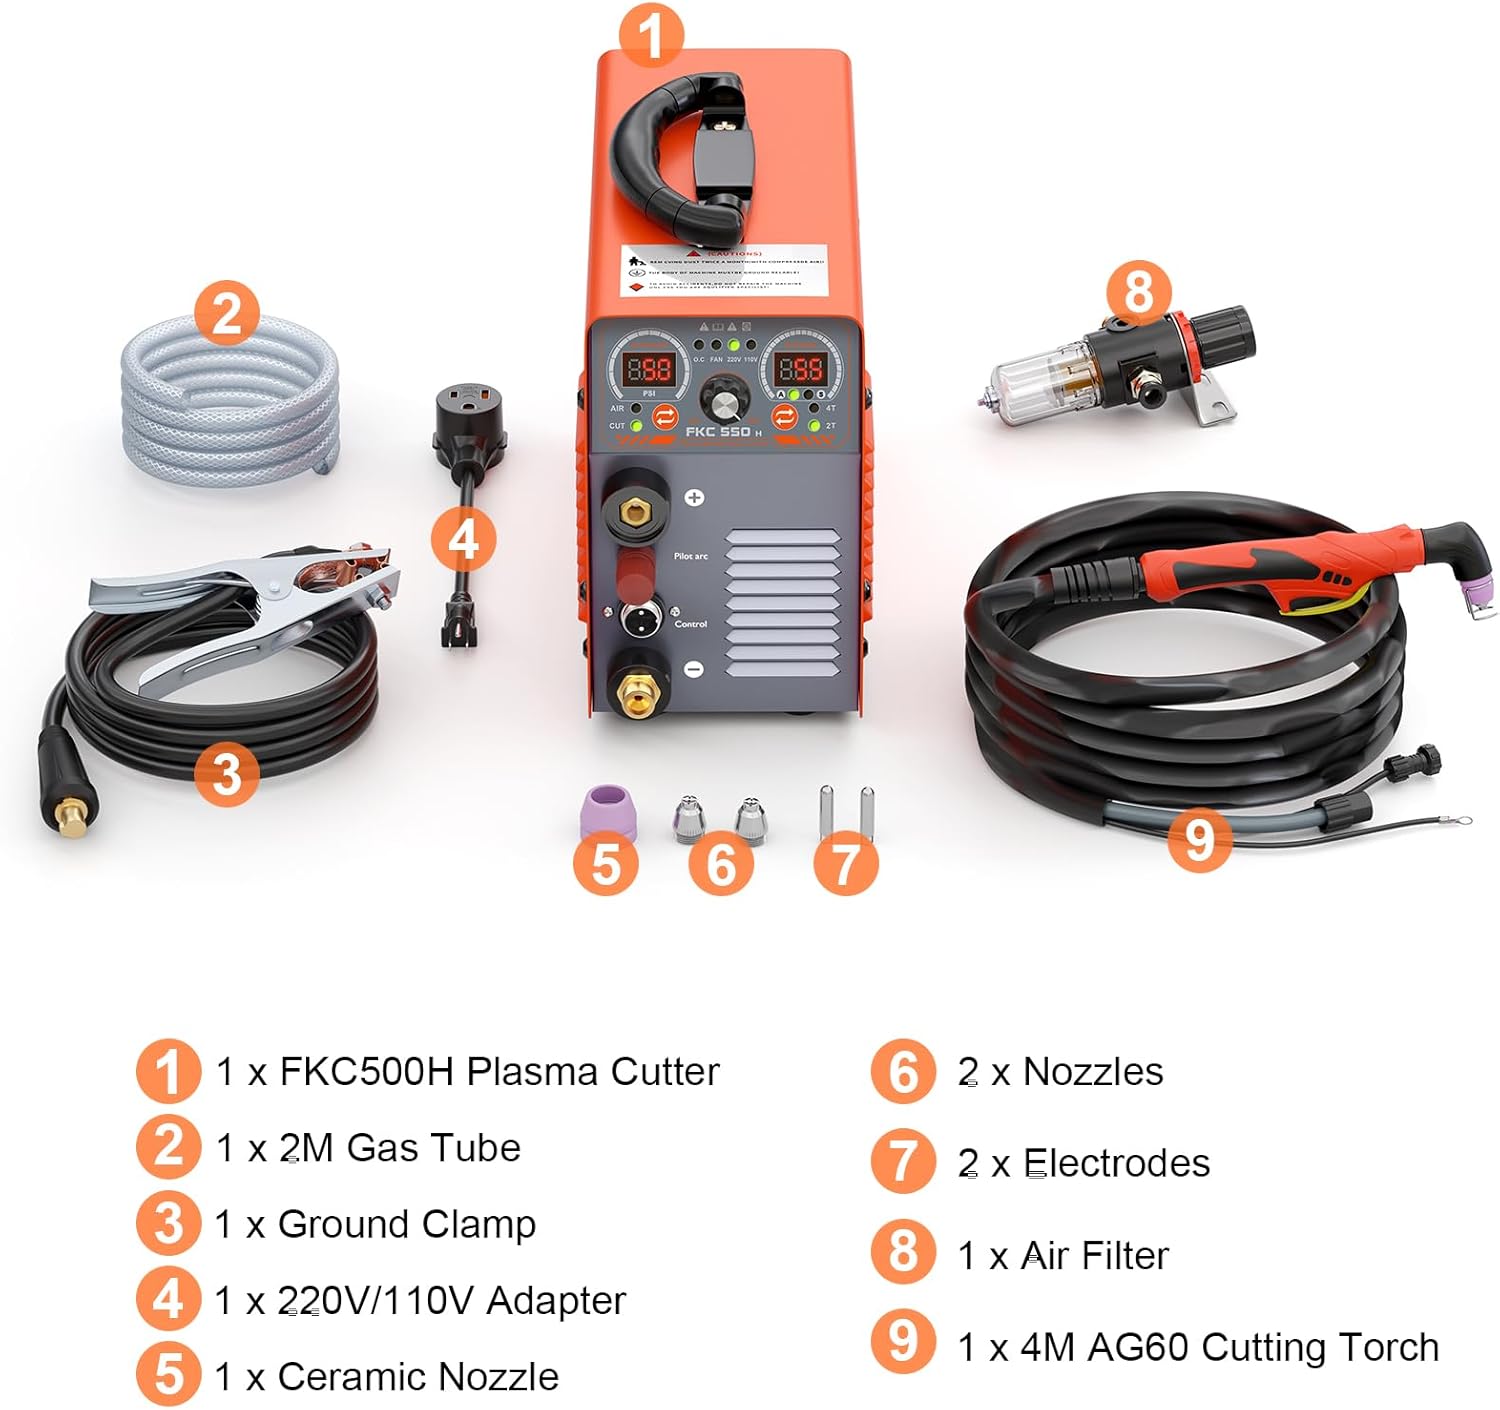
Figure 7: Included Components.
- 1 x FKC-550H Plasma Cutter Unit
- 1 x Ground Clamp
- 1 x 5M AG60 Cutting Torch
- 1 x Air Filter
- 1 x 2M Gas Tube
- 1 x 220V/110V Adapter
- 1 x Ceramic Nozzle
- 2 x Nozzles (additional)
- 2 x Electrodes (additional)
Setup Instructions
Follow these steps to set up your plasma cutter:
- Placement: Place the plasma cutter on a stable, level surface in a well-ventilated area, away from flammable materials.
- Air Compressor Connection:
- Connect the 2M gas tube to the air inlet on the plasma cutter and to your air compressor.
- Install the air filter unit between the compressor and the plasma cutter, ensuring the airflow direction is correct. The air filter removes moisture and contaminants, which is crucial for optimal performance.
- Ensure your air compressor can provide sufficient airflow (CFM) and pressure for plasma cutting. Refer to the specifications section for requirements.
- Torch Connection: Connect the AG60 cutting torch to the designated port on the front panel of the plasma cutter. Ensure it is securely fastened.
- Ground Clamp Connection: Attach the ground clamp cable to the positive (+) terminal on the front panel. Secure the ground clamp to the workpiece or a sturdy metal workbench that is electrically connected to the workpiece. Ensure a clean, bare metal connection for effective grounding.
- Power Connection:
- Verify the input voltage of your power supply (110V or 220V).
- Use the provided 220V/110V adapter if switching between voltages. Ensure the correct adapter is used and the machine is set to the appropriate voltage if there is a manual switch (refer to the machine's label).
- Plug the power cord into a suitable, grounded electrical outlet.
- Initial Check: Before turning on, double-check all connections for security and proper installation.
Operation Guide
This section outlines the basic steps for operating your FEIFANKE FKC-550H plasma cutter.
Starting the Machine
- Turn on the air compressor and set the output pressure to the recommended level (refer to specifications or material cutting guide).
- Turn on the plasma cutter using the power switch. The LED display will illuminate.
- Adjust the cutting current using the rotary knob on the control panel. The optimal current depends on the material type and thickness.
- Select either 2T or 4T mode based on your cutting task.
- Set the post-flow time by pressing and rotating the multi-function knob.
Cutting Procedure
- Ensure proper personal protective equipment (PPE) is worn, including a welding helmet, gloves, and protective clothing.
- Secure the workpiece and ensure the ground clamp has a good connection.
- Position the torch nozzle approximately 1/8 inch (3mm) above the workpiece for non-touch pilot arc initiation.
- For 2T Mode: Press and hold the torch trigger. The pilot arc will initiate, followed by the cutting arc. Move the torch steadily along the cutting line. Release the trigger to stop cutting.
- For 4T Mode: Press and release the torch trigger to initiate the pilot arc and then the cutting arc. Move the torch steadily. Press and release the trigger again to stop cutting.
- Maintain a consistent travel speed and torch height for a clean cut. Adjust current and speed as needed.
- After cutting, the post-flow function will cool the torch.
Tips for Optimal Cutting
- Air Pressure: Too low pressure can cause poor cuts and short consumable life. Too high pressure can cause arc instability.
- Travel Speed: Too slow can cause excessive dross and wide kerf. Too fast can result in incomplete cuts.
- Torch Height: Maintain a consistent standoff distance for best results.
- Consumables: Regularly inspect and replace worn nozzles and electrodes for optimal performance.
Maintenance
Regular maintenance ensures the longevity and optimal performance of your plasma cutter.
- Daily/Before Use:
- Inspect the power cord, torch cable, and ground clamp cable for damage.
- Check the torch consumables (nozzle, electrode, shield cup) for wear and replace if necessary.
- Drain any accumulated water from the air filter/regulator.
- Weekly/After Extended Use:
- Clean the exterior of the machine with a dry cloth. Do not use solvents.
- Inspect air lines for leaks or damage.
- Ensure all connections are tight.
- Periodically:
- Clean the internal components (fans, circuit boards) using compressed air, ensuring the machine is unplugged and completely de-energized. This should only be done by qualified personnel.
- Replace the air filter element if it appears dirty or clogged.
Always disconnect the power supply before performing any maintenance or inspection.
Troubleshooting
This section provides solutions to common issues you might encounter. The FKC-550H features an error code system on its LED display to assist with diagnostics.
| Problem | Possible Cause | Solution |
|---|---|---|
| Machine does not power on. | No power supply; faulty power cord; internal fault. | Check power outlet and connections. Ensure power switch is ON. Inspect power cord for damage. If problem persists, contact support. |
| No pilot arc or cutting arc. | No air supply; insufficient air pressure; worn consumables; poor ground connection; torch trigger issue. | Check air compressor and pressure. Inspect and replace torch consumables. Ensure ground clamp has good contact. Check torch cable and trigger. |
| Poor cut quality (excessive dross, wide kerf, incomplete cut). | Incorrect current/speed settings; worn consumables; incorrect air pressure; torch height too high/low. | Adjust current and travel speed. Replace worn nozzle/electrode. Verify air pressure. Maintain consistent torch height. |
| Arc stops prematurely. | Low air pressure; loose connections; overheating (thermal overload). | Check air supply. Tighten all connections. Allow machine to cool down if thermal overload indicator is active. |
| Error Code on LED Display. | Indicates specific internal fault or operational issue. | Refer to the machine's internal error code list (if provided separately) or contact customer support with the specific error code for assistance. |
If you encounter issues not covered here or if solutions do not resolve the problem, please contact FEIFANKE customer support.
Technical Specifications
| Parameter | Value |
|---|---|
| Model Number | FKC-550H |
| Brand | FEIFANKE |
| Input Voltage | 110V/220V Dual Voltage |
| Output Current (110V) | 20-45A |
| Output Current (220V) | 20-55A |
| Max Cut Thickness (110V) | 12mm (approx. 1/2 inch) |
| Max Cut Thickness (220V) | 15mm (approx. 5/8 inch) |
| Clean Cut Thickness (110V) | 8mm (approx. 3/8 inch) |
| Clean Cut Thickness (220V) | 10mm (approx. 3/8 inch) |
| Pilot Arc Type | Non-Touch Pilot Arc |
| Cutting Modes | 2T/4T |
| Post-Flow Time | Adjustable (2-15 seconds) |
| Power Source | AC/DC |
| Material | Metal |
| Item Weight | 8.25 kg (approx. 18.19 lbs) |
| Parcel Dimensions | 39.19 x 30.91 x 21.11 cm |
Warranty and Support
FEIFANKE products are manufactured to high-quality standards. For warranty information, please refer to the documentation included with your purchase or contact FEIFANKE customer support directly. Keep your purchase receipt as proof of purchase.
For technical assistance, troubleshooting, or parts inquiries, please contact FEIFANKE customer service. Contact details can typically be found on the product packaging or the official FEIFANKE website.