YITAHOME MAYIHj9cnb
YITAHOME Polycarbonate Greenhouse 6x8FT Instruction Manual
Model: MAYIHj9cnb
1. Product Overview
This manual provides essential information for the assembly, operation, and maintenance of your YITAHOME 6x8FT Polycarbonate Greenhouse. Designed for year-round plant cultivation and protection, this greenhouse features a robust aluminum frame and UV-protected polycarbonate panels.

Image 1.1: The YITAHOME 6x8FT Polycarbonate Greenhouse.
Key Features:
- Reinforced Aluminum Alloy Frame: Provides enhanced sturdiness and load-bearing capacity.
- Double-Wall Polycarbonate Panels: 4mm thick with UV protection, blocking 99% of UV radiation.
- Adjustable Skylights: Allows for optimal air circulation and ventilation with various opening angles.
- Sliding Door: Innovative design for seamless opening, closing, and space saving.
- Drainage Tank Design: Facilitates effective water management.

Image 1.2: Double-wall polycarbonate panel features, highlighting long lifespan, waterproof, and UV-blocking properties.
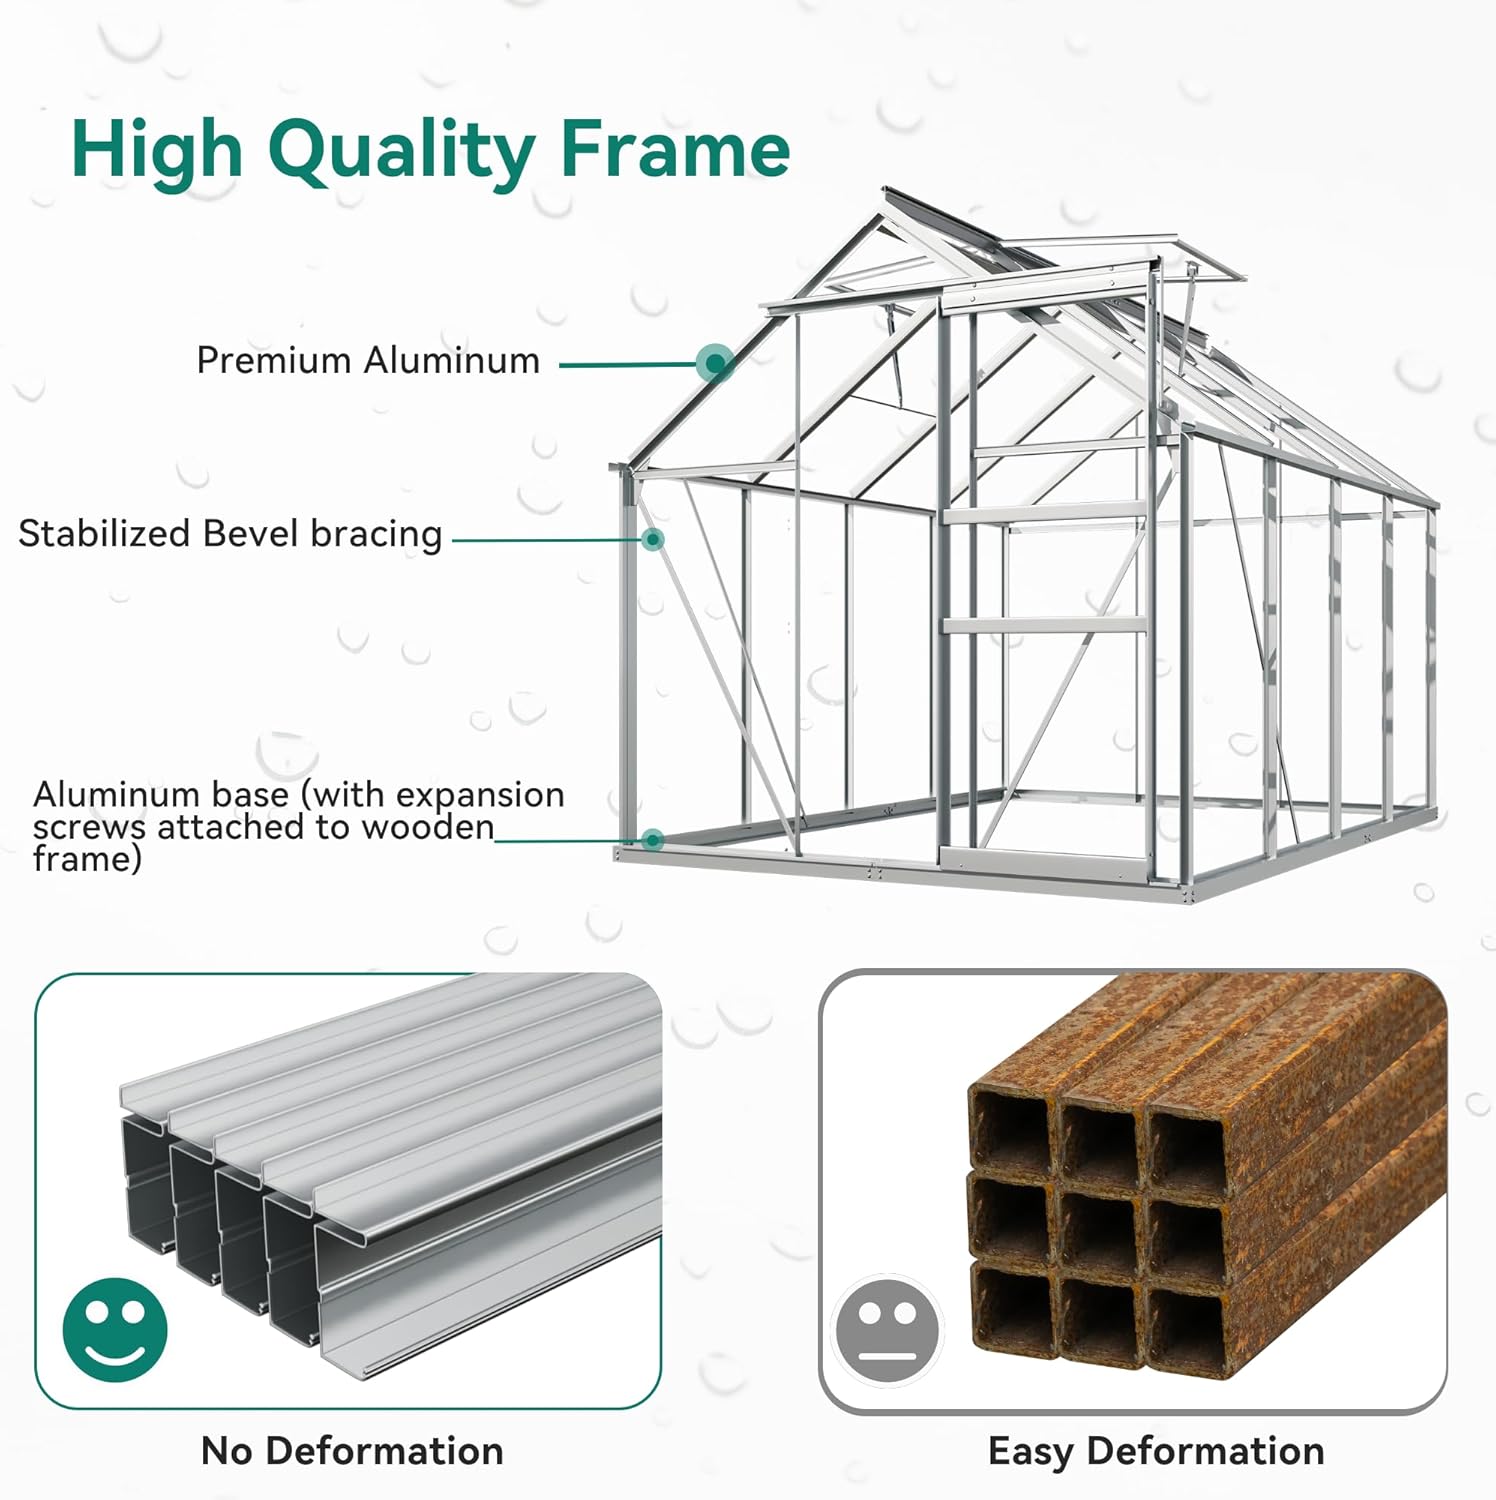
Image 1.3: High-quality aluminum frame construction with stabilized bevel bracing.
2. Safety Information
Please read and understand all safety instructions before assembly and use to prevent injury or damage.
- Weather Precautions: During severe weather conditions (e.g., strong winds, heavy snow), remove any valuable items from inside the greenhouse to prevent property loss. Avoid using the greenhouse during such times.
- Foundation Stability: Ensure the greenhouse base is securely fixed to the ground using expansion screws in a pre-dug trench for maximum stability and wind resistance.
- Waterproofing: For optimal waterproofing, apply glass adhesive to the connections between the polycarbonate panels and the frame.
- Assembly: While designed for easy installation, ensure all components are correctly aligned and fastened according to the instructions to maintain structural integrity.
3. Installation Guide
This section outlines the general steps for installing your YITAHOME greenhouse. Refer to the detailed assembly instructions included in your product packaging for specific part identification and step-by-step procedures.
3.1 Site Preparation
- Choose a level, well-drained area for your greenhouse.
- Clear the area of any debris, rocks, or vegetation.
- Consider sunlight exposure and wind patterns when selecting the location.
3.2 Base Fixation and Stability
To ensure the greenhouse's stability and wind resistance, proper base fixation is crucial.
- Dig a shallow trench for the bottom frame to sit in.
- Secure the bottom frame to the ground using the provided expansion screws. These screws should be inserted into pre-drilled holes in the base and anchored into the foundation.
- For additional stability, consider staking out the four interior corners and stabilizing with extra ground spikes, especially in areas prone to strong winds.

Image 3.1: Recommendations for improving greenhouse wind rating, including fixing the base with expansion screws, staking interior corners, and sealing panels.
3.3 Assembly Steps (General)
- Assemble the base frame components.
- Attach the vertical frame supports.
- Install the roof frame and crossbeams.
- Insert the polycarbonate panels into the frame channels.
- Install the sliding door and vent window mechanisms.
- Ensure all screws and fasteners are tightened securely.
Note: The product is shipped in multiple packages and may arrive separately. Please wait patiently for all packages before beginning assembly.
4. Operation
4.1 Ventilation and Temperature Control
The greenhouse is equipped with adjustable skylights to manage internal temperature and air circulation.
- Adjust the skylights to various opening angles to create an optimal air circulation system.
- This helps sustain indoor ventilation and cooling, preventing overheating and promoting healthy plant growth.

Image 4.1: The 5-level adjustment mechanism for skylight ventilation.
4.2 Sliding Door
The innovative sliding door design allows for convenient access and maximizes space.
- Gently slide the door open or closed along its track.
- Consider adding a lock (not included) for enhanced security if desired.
5. Maintenance
Regular maintenance will extend the lifespan and performance of your greenhouse.
- Panel Sealing: Periodically inspect the connections between the polycarbonate panels and the frame. Reapply glass glue or sealant as needed to maintain waterproofing.
- Cleaning: Clean the polycarbonate panels with mild soap and water. Avoid abrasive cleaners or tools that could scratch the surface.
- Frame Inspection: Regularly check the aluminum frame for any signs of damage, loose fasteners, or corrosion. Tighten any loose screws.
- Drainage System: Ensure the drainage tank and channels are clear of debris to allow for proper water runoff.

Image 5.1: Applying glass adhesive to seal panel connections for waterproofing.
6. Troubleshooting
This section addresses common issues you might encounter with your greenhouse.
- Issue: Water leakage.
Solution: Inspect all panel seams and frame connections. Reapply glass adhesive or sealant where gaps are found. Ensure the drainage system is clear. - Issue: Greenhouse feels unstable in wind.
Solution: Verify that the base is securely anchored with expansion screws in a trench. Consider adding additional ground stakes or securing the frame to a more robust foundation. - Issue: High internal temperature.
Solution: Ensure skylights are fully open for maximum ventilation. Consider adding shade cloth during peak sunlight hours. - Issue: Difficulty sliding the door.
Solution: Check the door track for any obstructions or debris. Clean the track and apply a silicone-based lubricant if necessary. Ensure the frame is level and square.
7. Product Specifications

Image 7.1: Key dimensions of the YITAHOME 6x8FT Polycarbonate Greenhouse.
| Specification | Detail |
|---|---|
| Brand | YITAHOME |
| Model Number | MAYIHj9cnb |
| Size | 6x8ft |
| Product Dimensions | 96 x 72 x 76.7 inches (L x W x H) |
| Frame Material | Aluminum |
| Cover Material | Polycarbonate (PC) |
| Item Weight | 73.5 pounds |
| Number of Doors | 1 |
| Number of Vents | 1 (Adjustable Skylight) |
| UPC | 197839699151 |
8. Warranty and Support
For any questions, concerns, or assistance with your YITAHOME Polycarbonate Greenhouse, please contact YITAHOME customer support.
- Customer Support: Refer to your purchase documentation or the YITAHOME official website for contact details.
- Returns: This product typically includes a 30-day easy return policy. Please check your purchase details for specific terms.
Ask a question about this manual
Ask about setup, troubleshooting, compatibility, parts, safety, or missing instructions. Manuals+ will review the question and use this page’s manual context to help answer it.