Outsunny 84H-220V00WT
Outsunny 13' x 10' x 6.5' Hoop House Greenhouse Model 84H-220V00WT User Manual
Introduction
This manual provides essential instructions for the assembly, operation, maintenance, and troubleshooting of your Outsunny 13' x 10' x 6.5' Hoop House Greenhouse, Model 84H-220V00WT. Please read this manual thoroughly before beginning assembly or use to ensure safe and efficient operation.
Safety Information
Important Safety Guidelines:
- Assembly requires 3-4 people for safety and ease of construction.
- Always follow the manual for safe installation procedures.
- Anchor the greenhouse securely to the ground to prevent damage from wind or severe weather.
- Avoid prolonged direct UV exposure to the polyethylene cover when not in use, as this can accelerate material degradation.
- Do not allow heavy snow accumulation on the greenhouse roof, as it is not designed for significant weight bearing. Clear snow promptly.
Package Contents
Before assembly, verify that all components listed in your product's packing list are present and undamaged. Typical contents include:
- Galvanized Steel Frame Tubes (various lengths and shapes)
- Connectors and Fasteners
- Polyethylene (PE) Cover
- Guy Ropes
- Ground Stakes
- Assembly Hardware
Setup and Assembly
Assembly of this greenhouse requires careful attention to detail and the assistance of 3-4 people. Choose a level, well-drained site for installation, away from overhead obstructions and strong wind paths if possible.
1. Frame Construction
Assemble the galvanized steel frame according to the detailed diagrams in your included assembly guide. Ensure all connections are secure. The frame features 25mm galvanized steel tubes and slant bracing bars for enhanced stability.

Image Description: A close-up view of the galvanized steel frame components, highlighting the 24mm diameter and 0.5mm thickness of the tubes, along with the slant bracing tubes designed for structural stability.
2. Cover Installation
Carefully drape the 140 gsm polyethylene (PE) cover over the assembled frame. Ensure the cover is centered and evenly distributed. The cover is designed to prevent scorching and delay aging while allowing approximately 85% sunlight penetration. It also features a reinforcement grid to resist tearing.

Image Description: A detailed view of the greenhouse's UV-resistant PE cover, illustrating its grid pattern and highlighting its properties: bird-proof, UV protection, tear-proof, and heat preservation.
3. Anchoring the Greenhouse
Proper anchoring is crucial for the stability and longevity of your greenhouse, especially in windy conditions. The cover includes extended edges (approximately 15cm or 0.5 feet) that should be buried in the soil to improve stability and airtightness. Additionally, use the provided guy ropes and ground stakes to secure the structure firmly to the ground. Pull guy ropes tightly.

Image Description: An illustration demonstrating how to secure the greenhouse, showing the 15cm extended cover edges meant for burying in soil and a hand tightening a guy rope attached to ground stakes.
Assembly Overview Video
Video Description: An official product video from Aosom Direct providing an overview of the Outsunny 84H-220V00WT Polytunnel Greenhouse, demonstrating its features and potential assembly steps.
Operating Instructions
Access and Ventilation
The greenhouse features a large roll-up zippered door for easy access to plants and equipment. Multiple roll-up mesh windows are provided on the sidewalls to allow for cross-ventilation. These windows help regulate temperature and humidity inside the greenhouse and keep out unwanted pests.
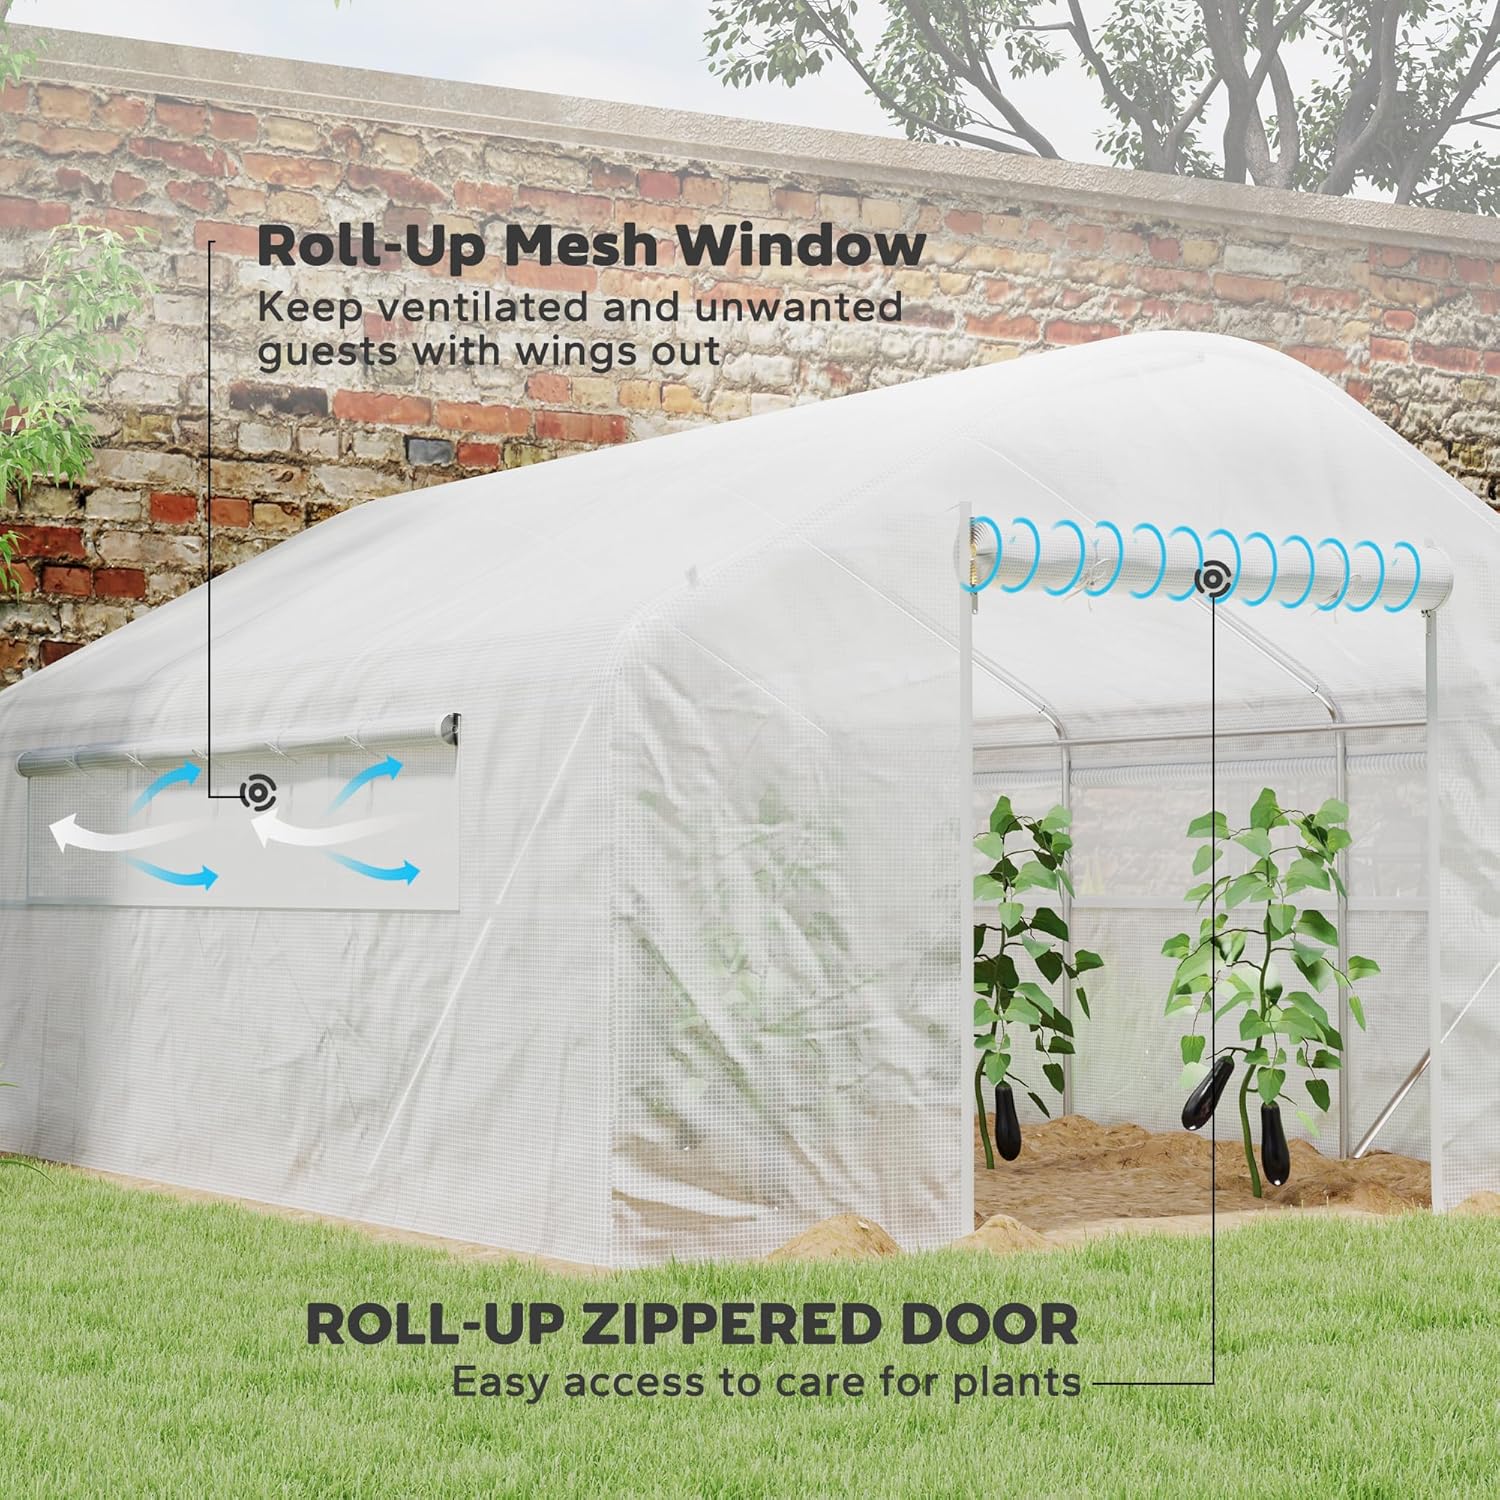
Image Description: A visual representation of the greenhouse's roll-up mesh window and zippered door, illustrating how they facilitate ventilation and provide easy access for plant care.
Environmental Control
Monitor the internal temperature and humidity. On warm days, open the door and windows to prevent overheating. On cooler days or nights, ensure all openings are closed to retain heat. The PE cover is designed to maintain an optimal growing environment.

Image Description: An interior shot of the greenhouse, showcasing its spacious design with various plants arranged in raised beds and on shelving units, demonstrating its utility for gardening.
Maintenance
Regular maintenance will extend the lifespan of your greenhouse.
- Frame Inspection: Periodically check all frame connections and tubes for signs of rust, bending, or damage. Tighten any loose fasteners.
- Cover Care: Inspect the PE cover for tears, punctures, or excessive wear. Small tears can be repaired with appropriate greenhouse repair tape. Clean the cover gently with mild soap and water to maximize light transmission.
- Anchoring System: Regularly verify that the guy ropes are taut and the ground stakes are firmly in place. Re-bury extended cover edges if they become exposed. Strong winds can loosen anchoring points over time.
- Snow Removal: In areas with snowfall, promptly remove any accumulation from the greenhouse roof to prevent structural collapse. The greenhouse is not designed to bear heavy snow loads.
Troubleshooting
- Greenhouse unstable or damaged by wind:
Ensure all guy ropes are tightly secured and ground stakes are deeply embedded. Consider using additional or heavier-duty ground anchors if your area experiences frequent strong winds. Verify that the extended cover edges are buried in the soil. Inspect the frame for any bent or broken components and replace as necessary.
- Cover tearing or showing excessive wear:
Small tears can be patched with greenhouse repair tape. For significant damage, the cover may need replacement. Prolonged exposure to harsh UV rays and extreme weather can degrade the material over time. Ensure the cover is not rubbing against sharp edges of the frame.
- Insufficient heat retention:
Check that the zippered door is fully closed and all roll-up windows are sealed. Ensure the extended cover edges are properly buried to minimize drafts. Consider adding internal insulation for colder climates.
- Excessive heat inside the greenhouse:
Utilize the roll-up zippered door and mesh windows to increase airflow and ventilation. Openings should be adjusted based on external temperature and desired internal conditions.
Specifications
| Model Number | 84H-220V00WT |
| Product Dimensions (L x W x H) | 155.5" x 118.1" x 77.6" (approximately 13' x 10' x 6.5') |
| Item Weight | 45 Pounds |
| Frame Material | Galvanized Alloy Steel (25mm tubes) |
| Cover Material | 140 gsm Polyethylene (PE) |
| Door Style | Roll-Up Zippered Door |
| Number of Vents/Windows | 2 (Roll-up mesh windows) |
| Color | White |
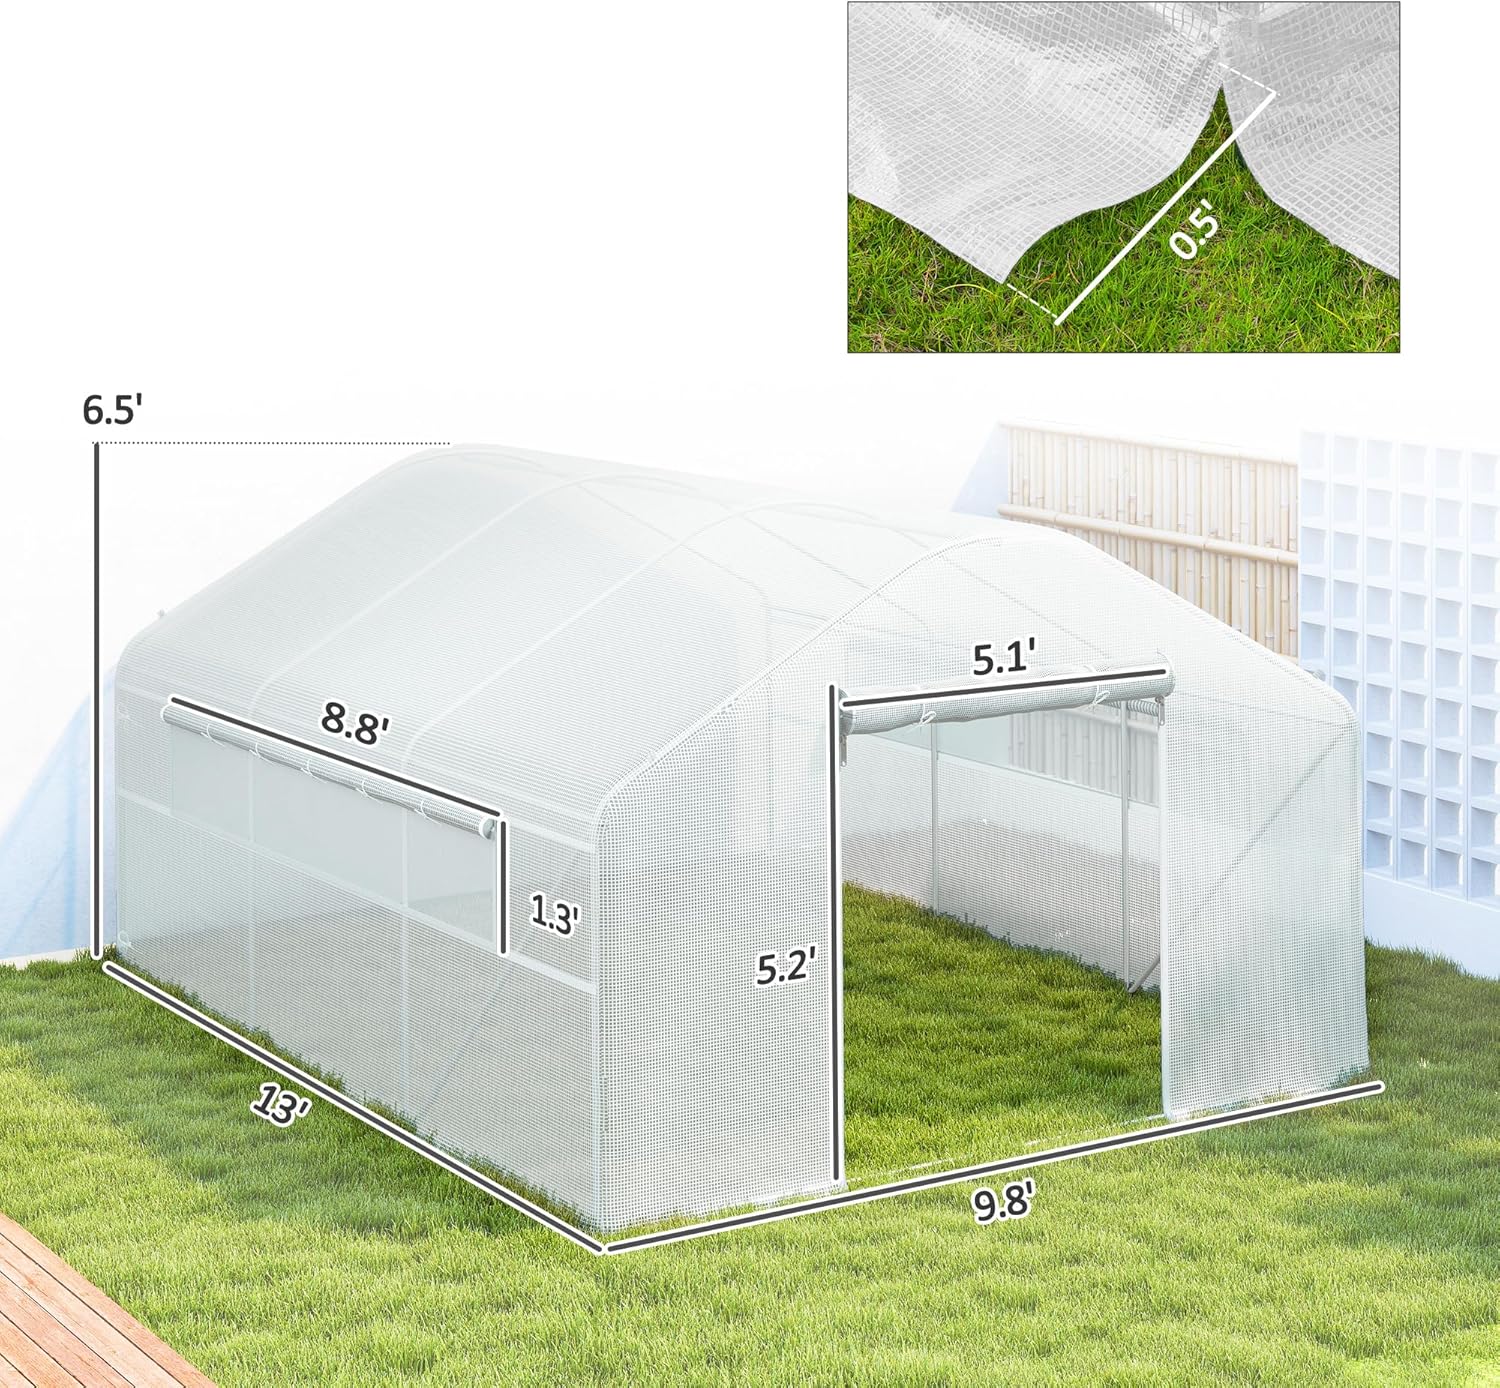
Image Description: A diagram illustrating the key dimensions of the greenhouse, including its length (13'), width (9.8'), and height (6.5'), along with specific measurements for windows and door.
Warranty and Support
For warranty information or technical support, please refer to the documentation included with your purchase or contact Outsunny customer service directly. Keep your purchase receipt and model number (84H-220V00WT) handy for any inquiries.
Ask a question about this manual
Ask about setup, troubleshooting, compatibility, parts, safety, or missing instructions. Manuals+ will review the question and use this page’s manual context to help answer it.