
1. Introduction
Thank you for choosing the Jerqry 4Core Car Radio. This manual provides detailed instructions for the installation, operation, and maintenance of your new car stereo system. Designed specifically for Honda CRV models from 2012 to 2016, this unit features a 9-inch 1280x800 HD touchscreen, Wireless Carplay, Android Auto, GPS Navigation, Bluetooth 5.0, 5G WiFi, FM Radio, DSP Sound, and an AHD Backup Camera. Please read this manual thoroughly before installation and use to ensure optimal performance and safety.
2. Safety Information
- Always ensure the vehicle is turned off and the battery is disconnected before performing any installation or wiring.
- Consult a professional for installation if you are unsure about any steps. Improper installation can lead to damage to the unit or vehicle.
- Do not operate the unit in a way that distracts you from driving. Always prioritize road safety.
- Keep the unit away from water and excessive moisture.
- Use only specified power cables and accessories to prevent damage or fire.
3. Setup and Installation
3.1 Package Contents
Verify that all components are present in your package:
- Jerqry 4Core Car Radio Unit
- Power Cable
- USB Cable (x2)
- External Microphone
- AHD Backup Camera
- Reversing Cable
- GPS Antenna
- CAN BUS Decoder
- RCA Cable
- Crowbar (Plastic Pry Tool)
- Original USB Adapter
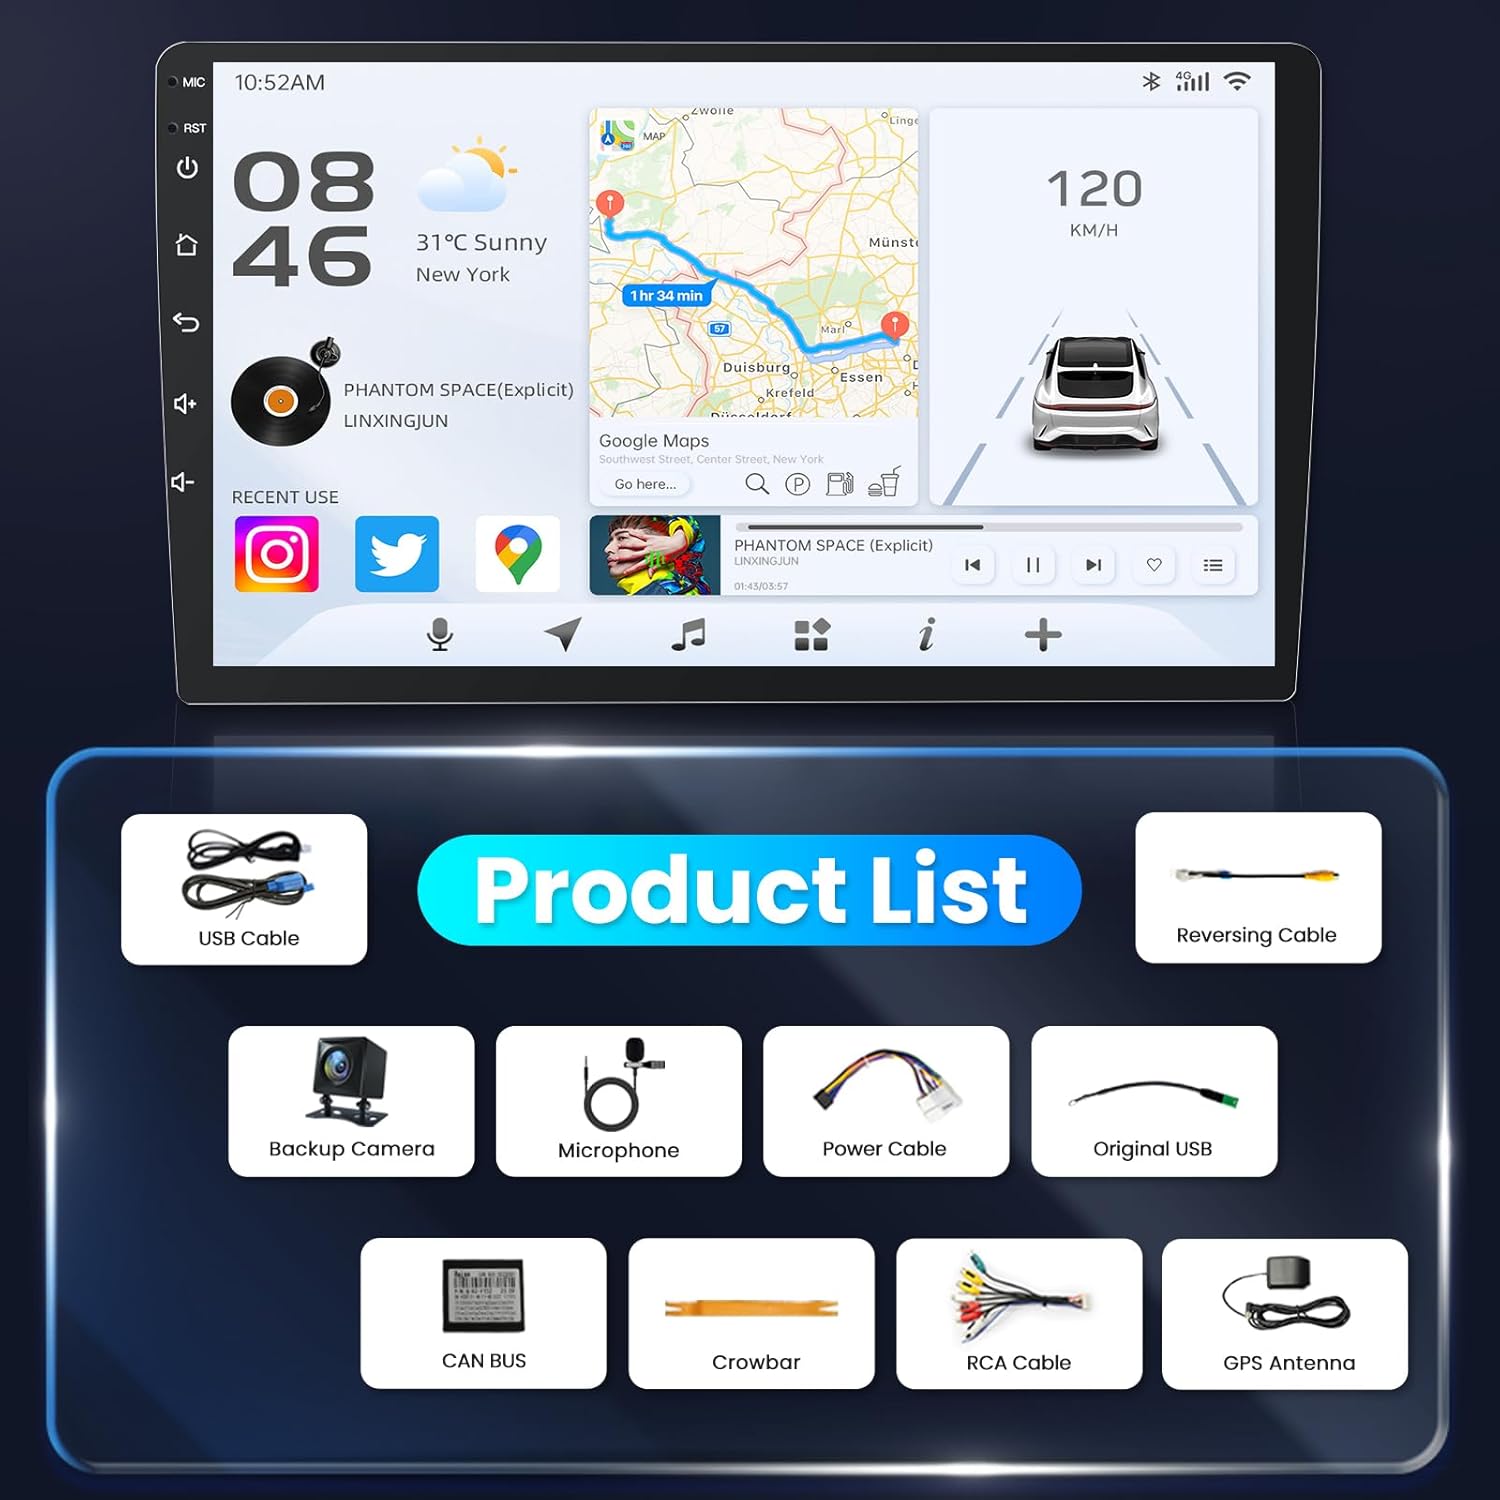
Figure 3.1: Included accessories for the Jerqry 4Core Car Radio.
3.2 Installation Steps
The Jerqry 4Core Car Radio features a plug-and-play design for Honda CRV 2012-2016 models. The included CANBUS decoder ensures compatibility with your vehicle's existing systems, including steering wheel controls.
- Prepare the Vehicle: Turn off the vehicle and disconnect the negative terminal of the car battery to prevent electrical shorts.
- Remove the Old Unit: Carefully use the provided plastic crowbar to pry off the trim panels around your existing car radio. Unscrew and remove the old head unit. You may need an 8mm nut driver and a #2 Phillips head screwdriver.
- Connect Wiring Harness: Connect the new power cable and RCA cables to the corresponding ports on the Jerqry car radio. Utilize the CANBUS decoder for seamless integration with your vehicle's electrical system.
- Install GPS Antenna: Mount the GPS antenna in a location with a clear view of the sky, typically on the dashboard or under the windshield.
- Install External Microphone: Connect the external microphone and route it to a suitable location for clear voice pickup, such as near the rearview mirror or on the steering column.
- Install Backup Camera (Optional): If installing the AHD backup camera, route the video cable from the rear of the vehicle to the car radio unit. Connect the power wire of the camera to the vehicle's reverse light circuit.
- Mount the New Unit: Secure the Jerqry car radio into the dashboard opening. Reattach the trim panels.
- Reconnect Battery: Reconnect the negative terminal of the car battery.

Figure 3.2: Installation comparison showing the Jerqry car radio's fit in a Honda CRV dashboard.
4. Operating Instructions
4.1 Initial Power On and Basic Settings
After installation, turn on your vehicle's ignition. The car radio will boot up. You may need to set the language, time, and date during the initial setup.
4.2 Touchscreen Interface
The unit features a responsive 9-inch 1280x800 HD IPS touchscreen. Navigate through menus and applications by tapping, swiping, and pinching. The IPS display provides clear images and text with accurate color rendering from various viewing angles.

Figure 4.1: High-definition IPS touchscreen display.
4.3 Wireless CarPlay & Android Auto
Connect your iOS or Android smartphone wirelessly via Bluetooth or USB to access CarPlay or Android Auto. This allows for seamless integration of your phone's features, including navigation, music, calls, and messages, directly on the car radio screen. Use voice commands (Siri or Google Assistant) or the touchscreen for control.

Figure 4.2: Wireless CarPlay and Android Auto interface.
4.4 Bluetooth 5.0 Connectivity
The unit features Bluetooth 5.0 for fast and stable connections. Pair your smartphone to enable hands-free calling, phonebook synchronization, and wireless music streaming. The built-in and external microphones ensure clear audio quality during calls.

Figure 4.3: Bluetooth 5.0 for hands-free communication and audio streaming.
4.5 GPS Navigation & 5G WiFi
Utilize the built-in GPS for reliable navigation with pre-loaded North and South America maps. The unit supports both online and offline maps. Connect to a 5G WiFi network or use your phone's hotspot to access live map updates, download additional applications, and browse the internet.

Figure 4.4: GPS Navigation in action.

Figure 4.5: 5G WiFi and Hotspot functionality.
4.6 FM Radio & DSP Sound
Tune into your favorite FM radio stations. The unit supports RDS (Radio Data System) to display station and program information. Experience enhanced audio quality with DSP technology and customizable EQ settings, allowing you to tailor the sound to your preferences.

Figure 4.6: FM Radio and EQ Adjustment interface.
4.7 AHD Backup Camera
The included 1080p AHD rearview camera provides a clear image on the car radio screen when reversing. With night vision assist, parking is safer and easier, even in low-light conditions.

Figure 4.7: 1080P AHD Rear View Camera functionality.
4.8 Steering Wheel Controls (SWC)
The unit supports your vehicle's existing steering wheel controls, allowing you to adjust volume, switch songs/channels, and answer calls without taking your hands off the wheel. This enhances driving safety and convenience.

Figure 4.8: Steering Wheel Controls integration.
4.9 Split Screen Function
The split-screen function allows you to run two applications simultaneously on the display. For example, you can view GPS navigation on one side while controlling music or browsing the web on the other.

Figure 4.9: Split Screen Functionality.
4.10 UI Replacement
The car radio offers various user interface (UI) themes that can be customized to your preference. Navigate to the settings menu to explore and select different UI options.
4.11 Product Features Overview Video
Video 4.1: This video provides a visual overview of the Jerqry car radio's key features, including Bluetooth connection, CarPlay & Android Auto, DSP sound settings, 1280x800P display resolution, 5G WiFi function, sound quality demonstration, FM radio operation, split-screen function, and UI replacement options.
5. Maintenance
- Screen Cleaning: Use a soft, lint-free cloth to clean the touchscreen. For stubborn smudges, lightly dampen the cloth with water or a screen-safe cleaner. Avoid harsh chemicals.
- Software Updates: Periodically check for software updates through the unit's settings menu or the manufacturer's website to ensure optimal performance and access to new features.
- General Care: Avoid exposing the unit to extreme temperatures or direct sunlight for prolonged periods. Ensure all connections are secure.
6. Troubleshooting
If you encounter issues with your Jerqry car radio, refer to the following common problems and solutions:
| Problem | Possible Cause | Solution |
|---|---|---|
| Unit does not power on | Loose power connection, blown fuse, vehicle battery issue. | Check all power connections. Inspect vehicle fuses. Ensure car battery is charged. |
| No sound or distorted audio | Incorrect wiring, speaker issues, volume too low, EQ settings. | Verify speaker wiring. Adjust volume and EQ settings. Check audio output mode. |
| Bluetooth/CarPlay/Android Auto not connecting | Bluetooth not enabled, incorrect pairing, phone compatibility, USB cable issue. | Ensure Bluetooth is on for both devices. Re-pair the device. Try a different USB cable. Check phone compatibility. |
| GPS signal lost or inaccurate | GPS antenna obstruction, poor satellite reception. | Ensure GPS antenna has a clear view of the sky. Move vehicle to an open area. |
| System reboots or glitches | Software issue, power fluctuation, excessive background apps. | Perform a system reset (refer to settings). Close unnecessary applications. Ensure stable power supply. Check for software updates. |
| Backup camera not displaying | Incorrect wiring, camera malfunction, reverse signal issue. | Check camera video and power connections. Ensure reverse signal wire is correctly connected. |
If the problem persists after attempting these solutions, please contact customer support.
7. Specifications
| Feature | Specification |
|---|---|
| Brand | Jerqry |
| Model | 2G RAM + 32GB ROM-B |
| Compatible Vehicle Type | Honda CRV (2012-2016) |
| Screen Size | 9 Inches |
| Display Type | IPS |
| Resolution | 1280*800 HD |
| Operating System | Android 12, iOS (via CarPlay) |
| CPU | 4 Core |
| RAM | 2GB |
| ROM (Storage) | 32GB |
| Connectivity Technology | Bluetooth 5.0, USB, Wireless (WiFi) |
| Supported Satellite Navigation System | GPS |
| Map Type | North America, South America |
| Audio Output Mode | Stereo (with DSP & EQ) |
| Backup Camera | 1080P AHD (Waterproof, Night Vision) |
| Human-Interface Input | Touchscreen, Voice |
| Mounting Type | Dashboard Mount |
| Item Weight | 1.69 Kilograms |
| UPC | 750872692819 |
8. Warranty and Support
For warranty information and technical support, please refer to the documentation included with your purchase or visit the official Jerqry website. Keep your purchase receipt as proof of purchase for any warranty claims.