1. Introduction
Welcome to the user manual for your new EPOMAKER X Aula F75 MAX Wireless Mechanical Keyboard. This guide provides detailed instructions on setting up, operating, maintaining, and troubleshooting your keyboard to ensure optimal performance and a personalized user experience.
Package Contents
- EPOMAKER X Aula F75 MAX Keyboard
- Multilingual Manual
- Extra Switches
- Keycap & Switch Puller
- Detachable USB-A to USB-C cable

2. Setup and Connectivity
The F75 MAX keyboard offers versatile connectivity options: Bluetooth, 2.4GHz wireless, and wired USB-C. Ensure the keyboard is charged before initial use. It comes with a 4000mAh battery.
Initial Connection
Locate the mode switch on the back of the keyboard to select your preferred connection method.

- Wired Mode (USB-C): Connect the provided USB-A to USB-C cable from your keyboard to your computer. The keyboard will automatically be recognized.
- 2.4GHz Wireless Mode: Switch the mode to 2.4G. Insert the 2.4GHz USB receiver into an available USB port on your device. The keyboard should connect automatically.
- Bluetooth Mode: Switch the mode to BT. On your device, search for Bluetooth devices and select "EPOMAKER F75 MAX". Follow any on-screen prompts to complete pairing.

3. Key Functions and Layout
The F75 MAX features a compact 75% layout with 80 programmable keys, designed for both gaming and productivity. It includes a versatile knob and a TFT screen for enhanced control and customization.

Volume Knob
The multi-function knob located on the top right corner allows for quick adjustments:
- Rotate: Adjusts system volume.
- Press: Mutes/unmutes audio.
Adjustable Kick-Stand
The keyboard features a 2-stage adjustable kick-stand, allowing you to set the typing angle for optimal comfort and ergonomics.
4. TFT Screen and Customization
The integrated TFT smart display provides real-time information and allows for on-the-fly customization of various keyboard settings.
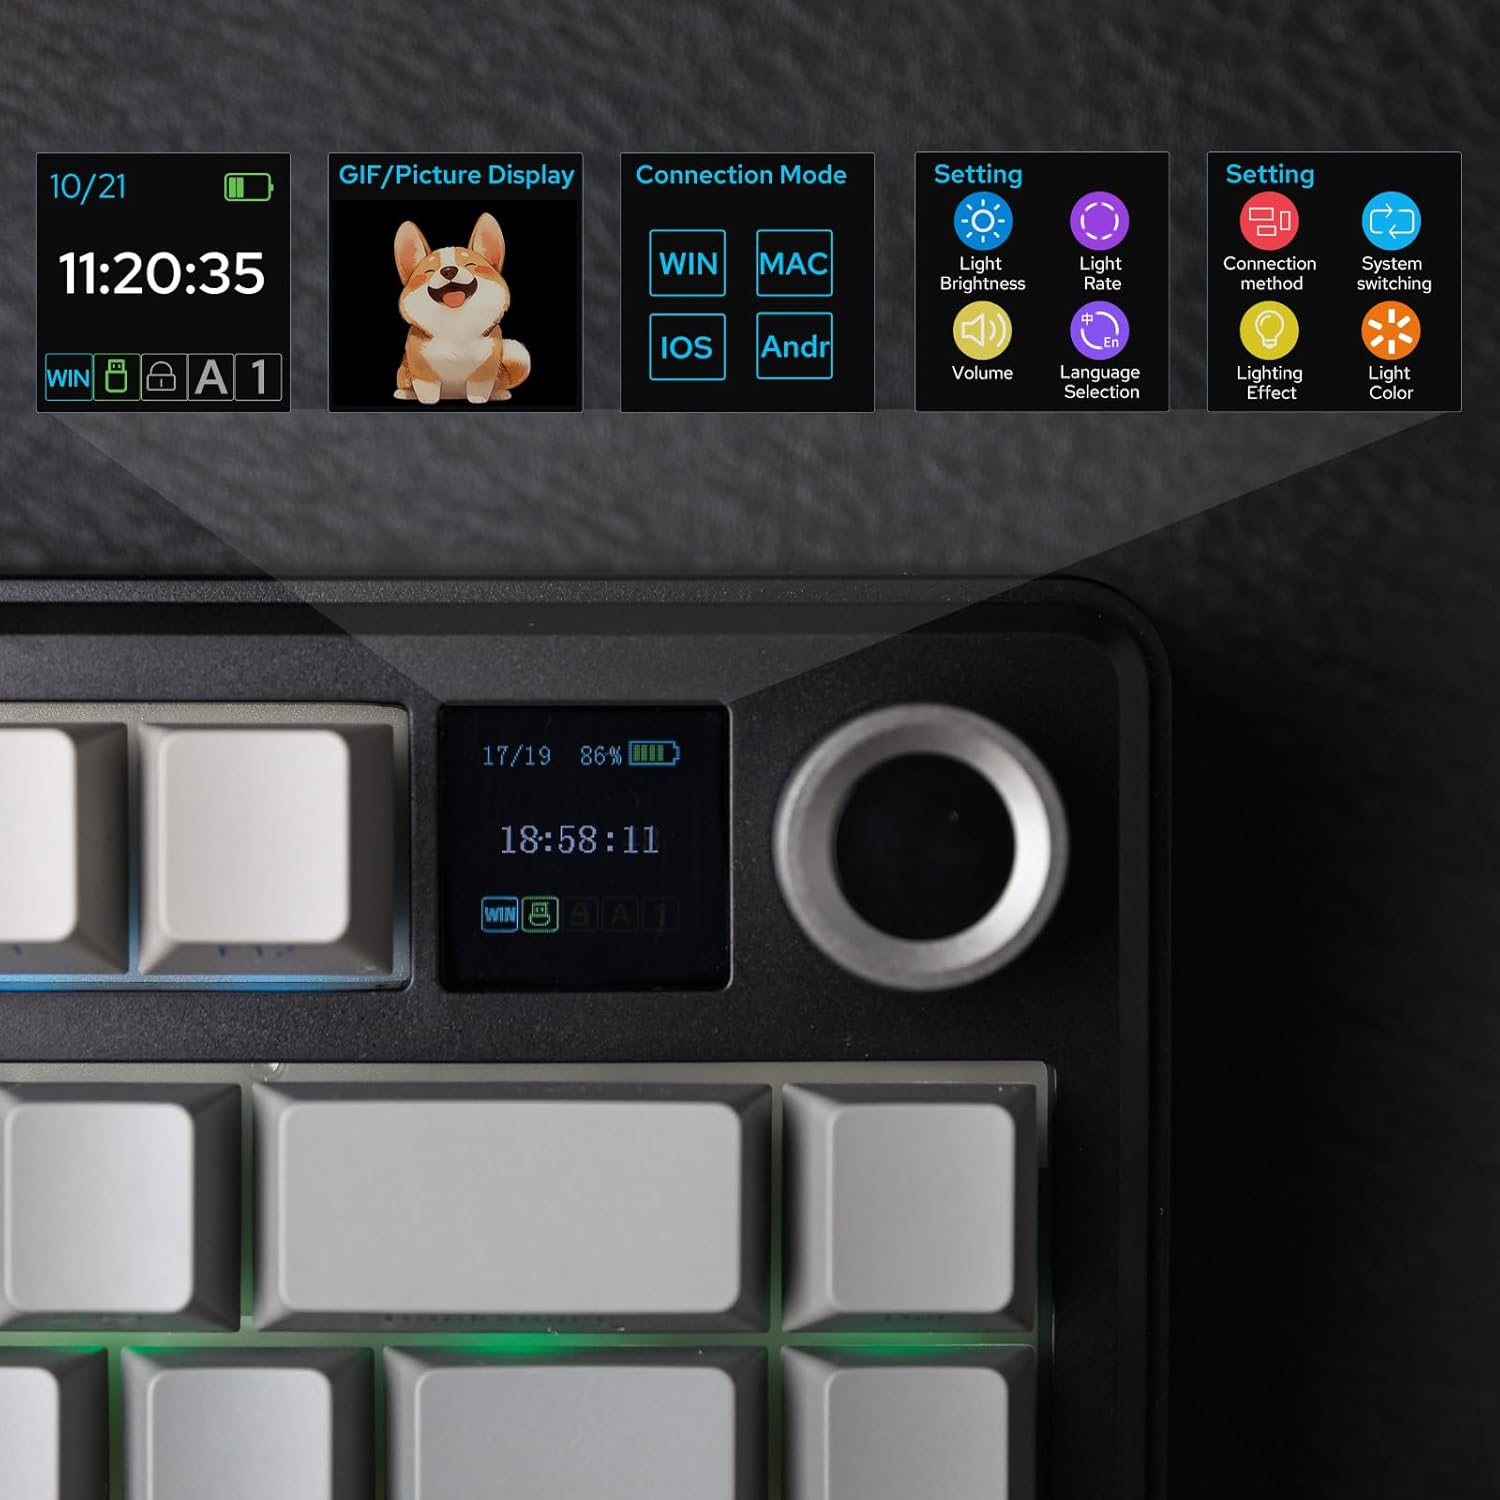
Screen Functions:
- Time & Date: Displays current time and date.
- Battery Monitor: Shows current battery level.
- Connection Mode: Indicates the active connection mode (Wired, 2.4G, BT).
- GIF/Picture Display: Supports custom GIF or picture uploads for personalization.
- Settings: Access various settings including light brightness, light rate, volume, language selection, lighting effect, and lighting color.
Watch this video to see the TFT screen in action:
5. RGB Backlight Customization
The F75 MAX features vibrant RGB backlighting with south-facing per-key LEDs, offering a wide range of customization options to match your setup and mood.
- Pre-set Dynamic Effects: Cycle through various pre-programmed lighting effects directly from the keyboard or via the software.
- Adjustable Color & Style: Customize individual key colors and lighting styles using the dedicated software or through the TFT screen's settings.
- Brightness & Speed Control: Adjust the brightness and speed of lighting effects to your preference.
6. Hot-Swappable Switches
The F75 MAX is hot-swappable, allowing you to easily change mechanical switches without soldering. This provides flexibility to experiment with different typing feels and sounds.
- Compatibility: Compatible with most 3-pin and 5-pin mechanical switches.
- Included Tools: Use the provided keycap and switch puller for safe and easy removal/installation.
- Pre-lubed Switches: The factory-lubed linear switches offer a smooth and satisfying typing experience right out of the box.

7. Gasket Mount Design
The F75 MAX utilizes a gasket-mount structure, which isolates the PCB from the keyboard's shell. This design eliminates harsh bottom-out sounds and provides a softer, more flexible typing feel.
- Sound Dampening: Internal foams and silicone layers reduce echo and enhance the mellow sound profile of the switches.
- Typing Comfort: The flex-cut PC plate contributes to a soft and soothing typing experience, reducing finger fatigue during extended use.

Experience the typing sound of the F75 MAX:
8. System Compatibility
The EPOMAKER X Aula F75 MAX keyboard is designed for broad compatibility across various operating systems, making it suitable for a wide range of users and devices.
- Supported Operating Systems: Android, Windows, Mac, Linux.
- Compatible Devices: Laptop, Gaming Console, PC, Tablet, Smartphone.

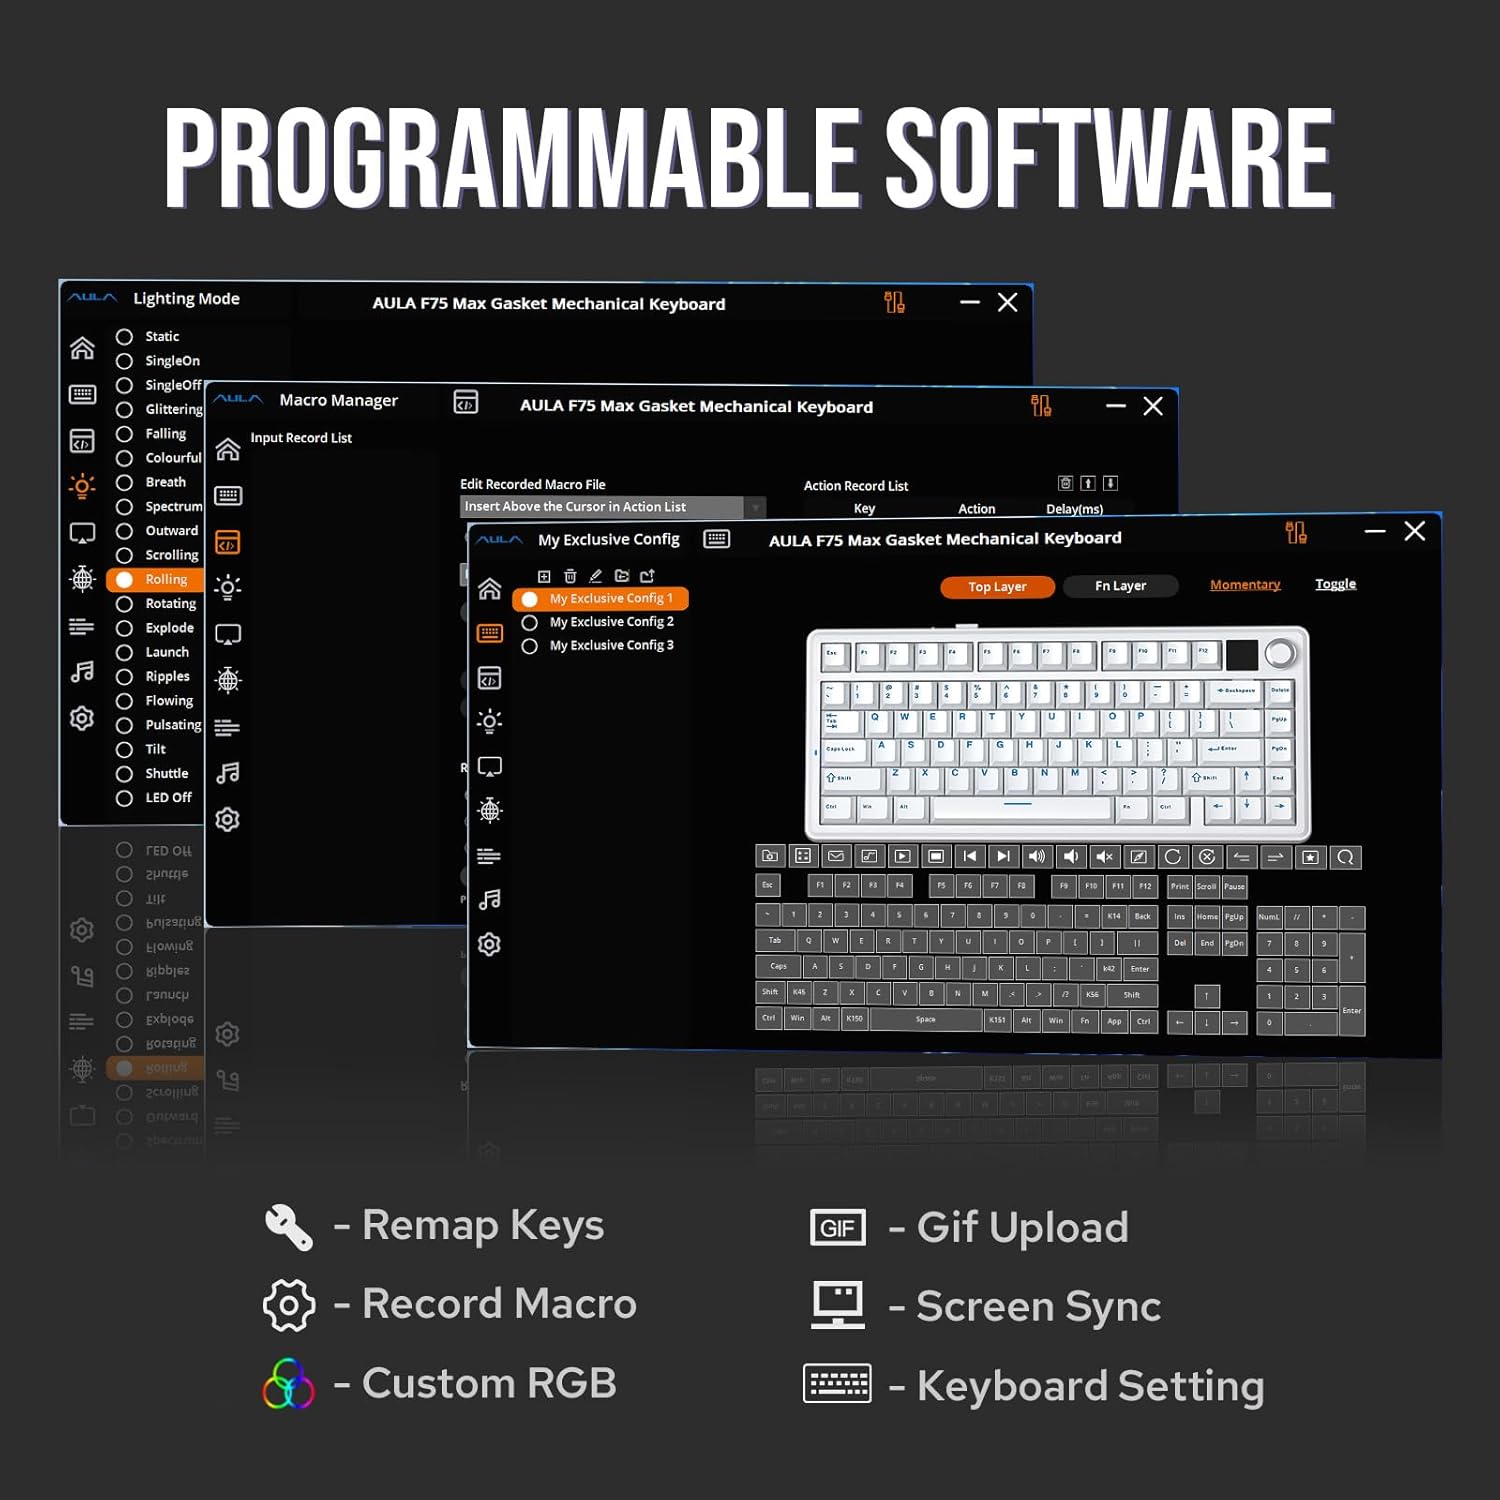
9. Programmable Software
Unlock the full potential of your F75 MAX keyboard with its dedicated programmable software. This software allows for advanced customization beyond the on-board controls.
- Key Remapping: Assign new functions to any key for personalized layouts.
- Macro Editing: Create and edit complex macros to automate repetitive tasks or execute intricate command sequences in games.
- Custom RGB: Fine-tune RGB lighting effects, colors, and patterns to create unique visual experiences.
- GIF Upload & Screen Sync: Upload custom GIFs to the TFT screen and synchronize screen content with keyboard settings.
10. Maintenance
Proper maintenance ensures the longevity and optimal performance of your EPOMAKER X Aula F75 MAX keyboard.
- Cleaning Keycaps: Use a soft, damp cloth to wipe down keycaps. For deeper cleaning, remove keycaps using the provided puller and wash with mild soap and water. Ensure they are completely dry before reattaching.
- Cleaning the Case: Wipe the keyboard case with a soft, lint-free cloth. Avoid abrasive cleaners or solvents.
- Dust Removal: Use compressed air to remove dust and debris from between keycaps and around switches.
- TFT Screen Care: Gently wipe the TFT screen with a microfiber cloth. Avoid pressing hard or using harsh chemicals.
11. Troubleshooting
If you encounter any issues with your keyboard, refer to the following common troubleshooting steps:
| Problem | Possible Solution |
|---|---|
| Keyboard not responding (Wired) |
|
| 2.4GHz/Bluetooth connection issues |
|
| RGB backlight not working/flickering |
|
| Keys not registering or double-typing |
|
12. Technical Specifications
| Feature | Detail |
|---|---|
| Model | F75 MAX |
| Layout | 75% (80 Keys) |
| Connectivity | Bluetooth, 2.4GHz Wireless, USB-C Wired |
| Switches | Hot-Swappable (3/5-pin compatible) |
| Backlight | RGB (16.8 Million Colors) |
| Special Features | Colorful Smart Display Screen, Volume Knob, Gasket Mount, Pre-lubed Cream Switches |
| Battery | 4000mAh Lithium Ion (included) |
| Dimensions (L x W x H) | 12.87 x 5.62 x 1.69 inches (32.8 x 14.3 x 4.3 cm) |
| Item Weight | 2.84 pounds (1.29 kg) |
| Manufacturer | EPOMAKER |
| Country of Origin | China |
13. Warranty and Support
For detailed warranty information and customer support, please refer to the official EPOMAKER resources.
- Official User Guide (PDF): For a comprehensive guide, you can download the official PDF user manual here.
- EPOMAKER Brand Store: Explore more products and support resources by visiting the EPOMAKER Brand Store on Amazon.


