Karbeen KM-75-1
Karbeen 6.5 Cu ft Home Safe Box with Digital Keypad Instruction Manual
Model: KM-75-1
1. Introduction
Welcome to the Karbeen Safe Box instruction manual. This guide provides essential information for the safe and efficient operation of your new 6.5 Cu ft Home Safe Box with Digital Keypad. Please read this manual thoroughly before installation and use, and retain it for future reference.
This safe is designed to protect your valuables from unauthorized access. It features a robust construction, a digital keypad for secure entry, a dual alarm system, a convenient deposit slot, and internal LED lighting.
2. Important Safety Information
Always follow basic safety precautions when using this product to reduce the risk of injury or damage to the safe or its contents.
- Do not store flammable liquids or materials inside the safe.
- Keep emergency keys in a secure location away from the safe and out of reach of children. Do not store emergency keys inside the safe.
- Ensure the safe is securely mounted to a floor or wall to prevent tipping or unauthorized removal.
- Do not attempt to force the safe open if the digital keypad fails. Use emergency keys or the emergency power supply.
- Keep children away from the safe and its contents.
- This safe is not water resistant. Avoid placing it in areas prone to water exposure.
3. Package Contents
Verify that all items are present in the package:
- 1 x Karbeen 6.5 Cub Safe Box
- 4 x Emergency Keys
- 6 x Expansion Screws
- 1 x USB Type-C Cable (for emergency power)
- 4 x Non-slip Pads
- 1 x User Manual
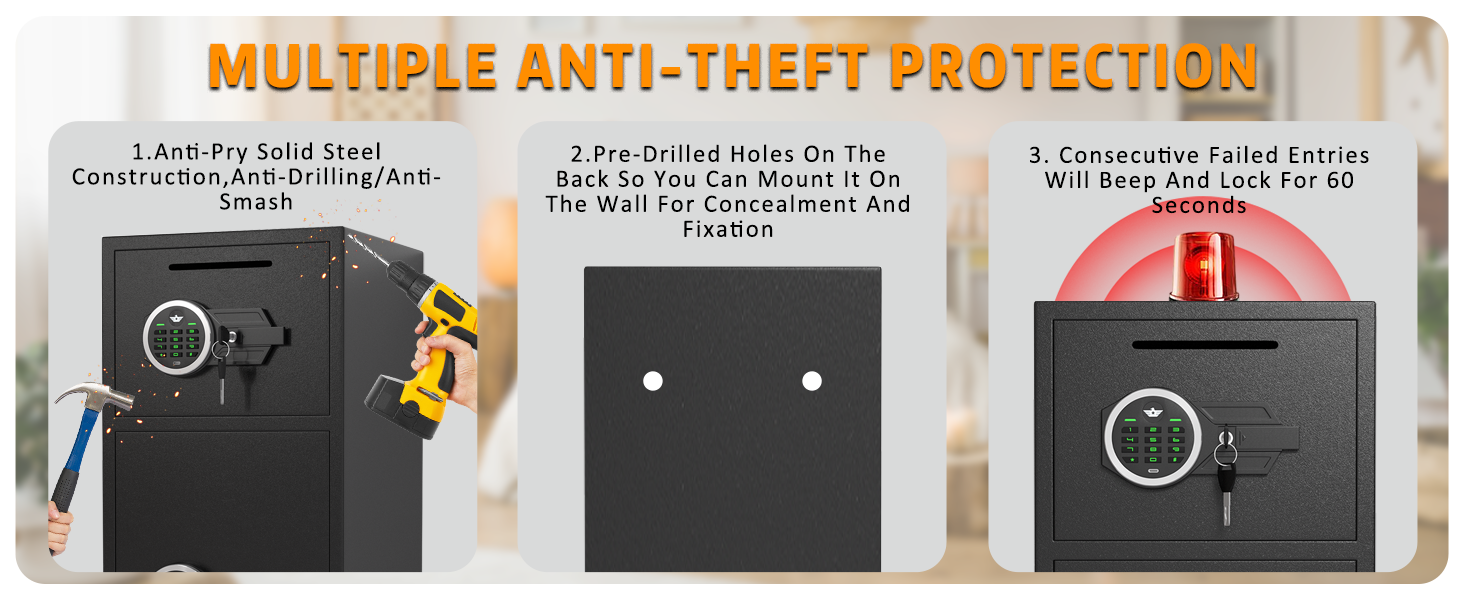
Figure 1: Package Contents. This image displays the Karbeen safe box along with its accessories: emergency keys, expansion screws, USB Type-C cable, non-slip pads, and the user manual.
4. Setup and Installation
4.1 Initial Opening
Upon receiving your safe, use one of the emergency keys to open the door for the first time. The battery compartment is located inside the door.
- Insert the emergency key into the keyhole and turn it clockwise.
- Rotate the knob to open the safe door.
- Install 4 AA batteries (not included) into the battery compartment located on the inside of the door. Ensure correct polarity.
4.2 Setting the Digital Passcode
Your safe comes with a default passcode. It is highly recommended to change this immediately for security purposes.
- With the safe door open, press the red reset button located on the inside of the door. You will hear a beep.
- Enter your desired 3-8 digit passcode on the keypad.
- Press the "#" button to confirm. You will hear a confirmation beep.
- Test the new passcode with the door open before closing it to ensure it works correctly.

Figure 2: Digital Keypad and Emergency Keyhole. This image highlights the electronic keypad for passcode entry and the hidden keyhole for emergency access.
4.3 Mounting the Safe
For enhanced security, it is recommended to mount the safe to a floor or wall using the provided expansion screws.
- Choose a suitable, discreet location for the safe.
- Mark the drilling points through the pre-drilled holes on the back or bottom of the safe.
- Drill holes in the wall or floor using an appropriate drill bit for the expansion screws.
- Align the safe with the drilled holes and secure it using the expansion screws.

Figure 3: Wall Mounting. This image demonstrates how to secure the safe to a wall using pre-drilled holes and expansion screws for added security.
5. Operating Instructions
5.1 Opening the Safe with Passcode
- Enter your 3-8 digit passcode on the digital keypad.
- Press the "#" button.
- Within 5 seconds, rotate the knob clockwise to open the door.
5.2 Opening the Safe with Emergency Key
This method is used if you forget your passcode or if the batteries are depleted.
- Locate the emergency keyhole cover (usually hidden behind the keypad or a removable panel).
- Insert the emergency key and turn it clockwise.
- Rotate the knob to open the door.
5.3 Emergency Power Supply
If the batteries are dead and you do not have the emergency key, you can use the USB Type-C cable for temporary power.
- Connect the USB Type-C cable to the emergency power jack on the keypad.
- Connect the other end to a power source (e.g., power bank, USB adapter).
- Enter your passcode and open the safe as usual.
- Replace the internal batteries immediately after opening.
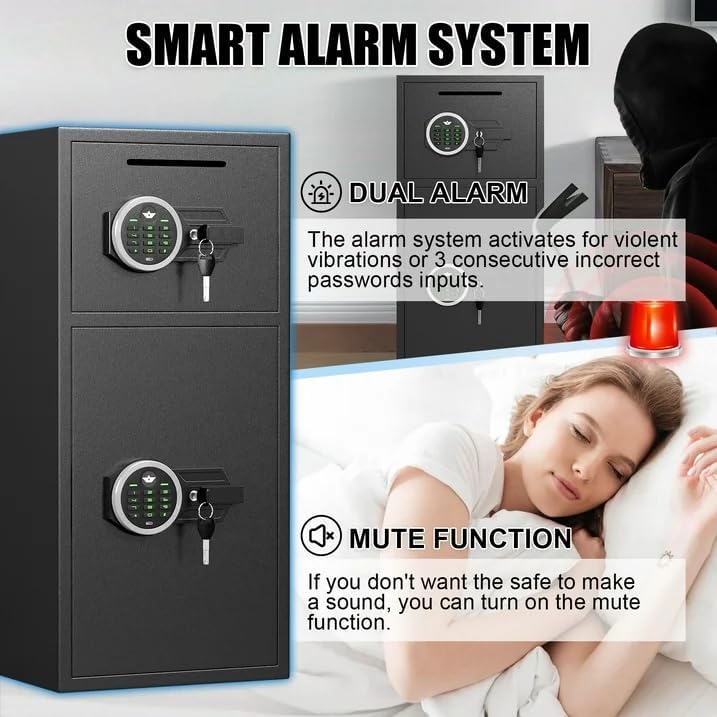
Figure 4: Multiple Opening Methods. This image illustrates the three primary ways to access the safe: using the digital passcode, the emergency key, or temporary USB power combined with the passcode.
5.4 Using the Deposit Slot
The safe features a front deposit slot for conveniently adding money or small documents without opening the main door.
- Insert items into the slot located on the top front of the safe.
- Ensure items are fully deposited and do not obstruct the slot.
5.5 Mute Function
To operate the safe silently, activate the mute function. This is useful for discreet access.
- Refer to the detailed user manual for specific instructions on activating and deactivating the mute function.

Figure 5: Smart Alarm System. This image highlights the dual alarm feature, which activates after incorrect passcode attempts or violent vibrations, and the mute function for silent operation.
6. Maintenance
- Battery Replacement: Replace batteries when the low battery indicator appears or if the keypad becomes unresponsive. Always use 4 new AA alkaline batteries.
- Cleaning: Wipe the safe's exterior with a soft, damp cloth. Avoid abrasive cleaners or solvents that could damage the finish or electronic components.
- Key Storage: Store emergency keys in a secure, easily accessible location outside the safe. Do not store them inside the safe.
7. Troubleshooting
| Problem | Possible Cause | Solution |
|---|---|---|
| Safe does not open with passcode. | Incorrect passcode entered; dead batteries. | Re-enter correct passcode. Replace batteries or use emergency key/USB power. |
| Keypad is unresponsive. | Dead batteries. | Replace batteries or use emergency USB power. |
| Alarm sounds unexpectedly. | Multiple incorrect passcode entries; violent vibration. | Enter correct passcode to disarm. Avoid disturbing the safe. |
| Door does not close properly. | Obstruction; locking bolts not fully retracted. | Check for obstructions. Ensure knob is fully turned to retract bolts. |
8. Specifications
| Feature | Detail |
|---|---|
| Model Number | KM-75-1 |
| External Dimensions (DxWxH) | 13.8" x 13.8" x 29.5" |
| Capacity | 6.5 Cubic Feet |
| Lock Type | Electronic Combination Lock |
| Material | Low Carbon Alloy Steel |
| Item Weight | 46.1 Pounds |
| Mounting Type | Floor & Wall Mount |
| Alarm | Audible (70 dB) |
| Water Resistance Level | Not Water Resistant |
| Special Features | Double door design, Deposit slot, Internal LED lights, Mute function |
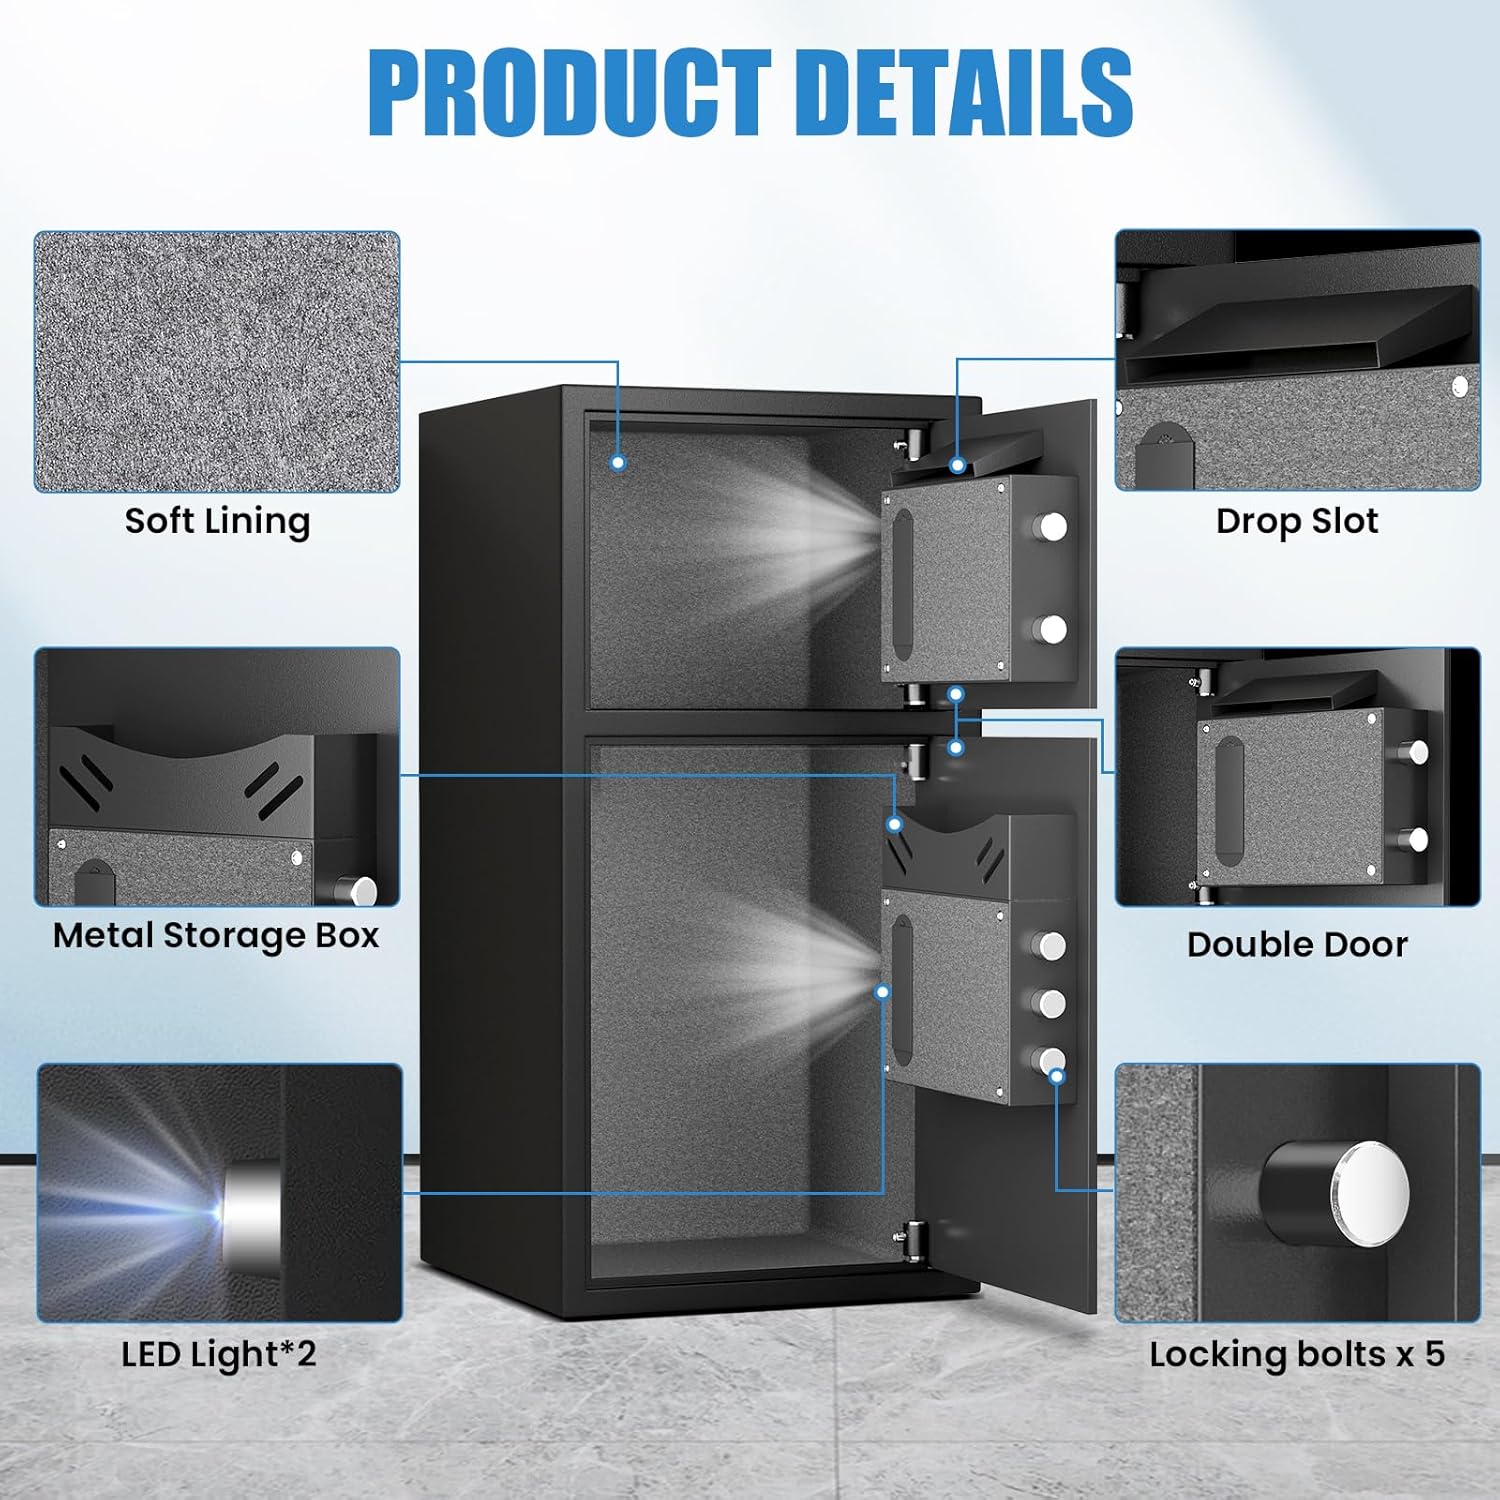
Figure 6: Product Dimensions. This image provides a detailed diagram of the safe's external and internal measurements, including compartment sizes.
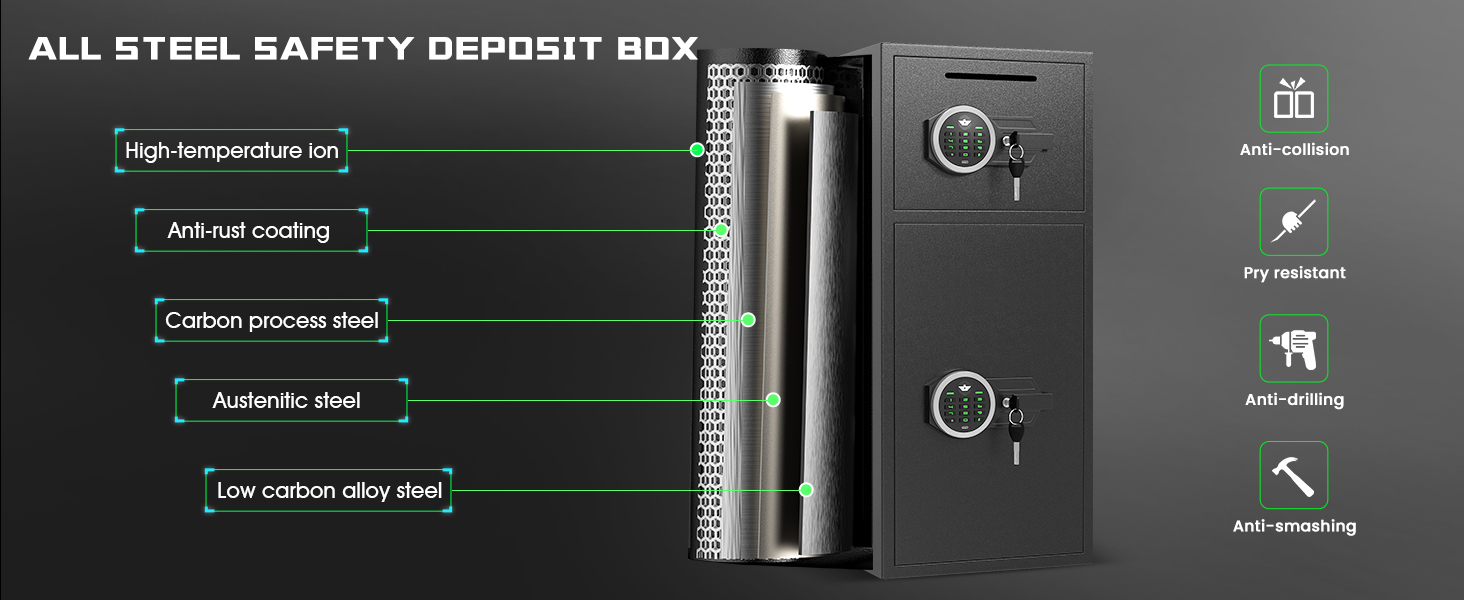
Figure 7: All Steel Safety Deposit Box Construction. This image illustrates the robust construction of the safe, highlighting features like high-temperature ion treatment, anti-rust coating, carbon process steel, austenitic steel, and low carbon alloy steel for enhanced security.
9. Warranty and Customer Support
Karbeen offers comprehensive customer support for your safe box.
- Lifetime Warranty: The product is covered by a lifetime warranty.
- 24/7 Online Customer Service: Assistance is available around the clock.
- 90-Day Unconditional Returns: For returns within 90 days of purchase.
- Lifetime Key Matching Service: For replacement keys.
For any issues or inquiries, please contact Karbeen customer service. Refer to the contact information provided with your purchase or visit the official Karbeen website.

Figure 8: Customer Support. This image represents the availability of customer service for assistance with your Karbeen safe.
Ask a question about this manual
Ask about setup, troubleshooting, compatibility, parts, safety, or missing instructions. Manuals+ will review the question and use this page’s manual context to help answer it.