1. Introduction
This manual provides detailed instructions for the installation, operation, and maintenance of your YuqiaoTime 0360-025T WiFi 7-in-1 Professional Weather Station. This device is designed to monitor various environmental parameters including indoor/outdoor temperature and humidity, barometric pressure, dew point, wind chill, wind speed, wind direction, weather forecast, moon phase, solar power, rainfall data, UV index, light meter, and solar radiation. It features a wireless color console and supports data upload to online weather services like Weather Underground and WeatherCloud.
2. Setup
2.1 Unpacking and Component Check
Carefully unpack all components and verify that all items are present. Refer to the table below for a complete list of included parts.
| QTY | Item | Image |
|---|---|---|
| 1 | Display Console Frame Dimensions: 6.5"x5.32"x0.71" (165x135x18mm) LCD Dimensions: 5.12"x3.16" (130x80mm) | 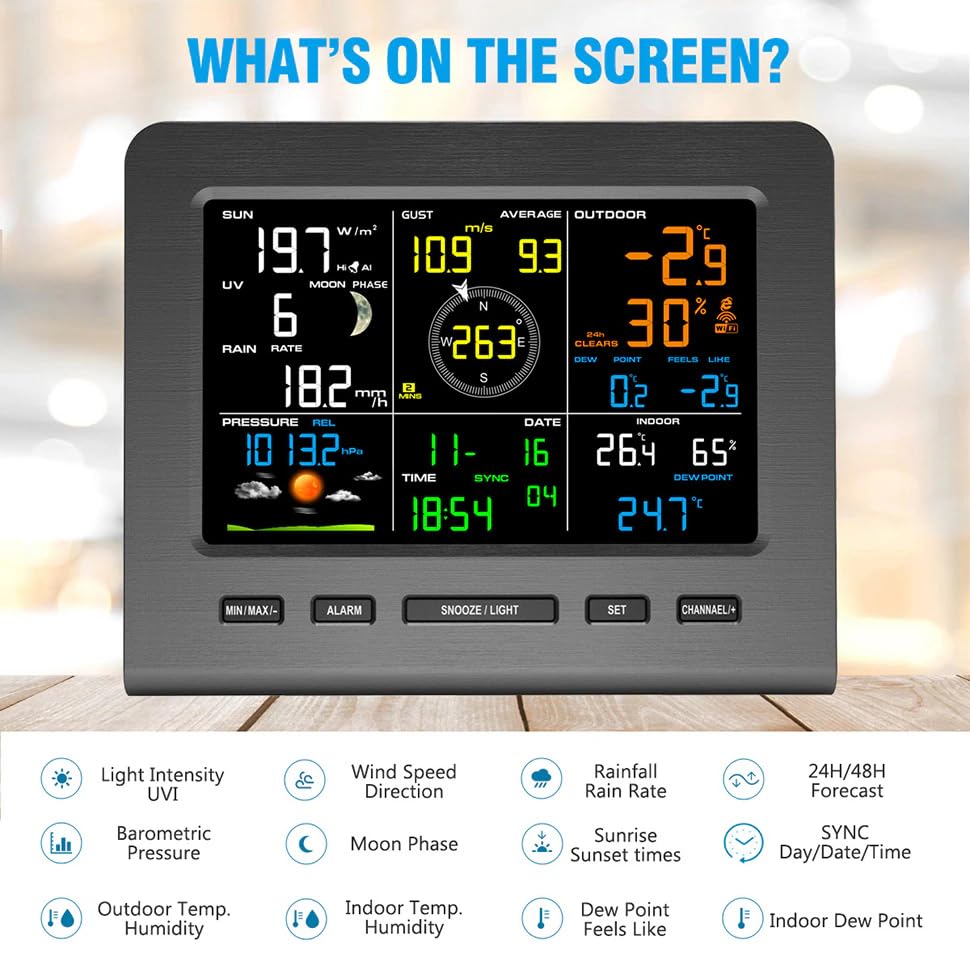 |
| 1 | Integrated Outdoor Transmitter Dimensions: 15x7.1x11 inches (380x180x280mm) | 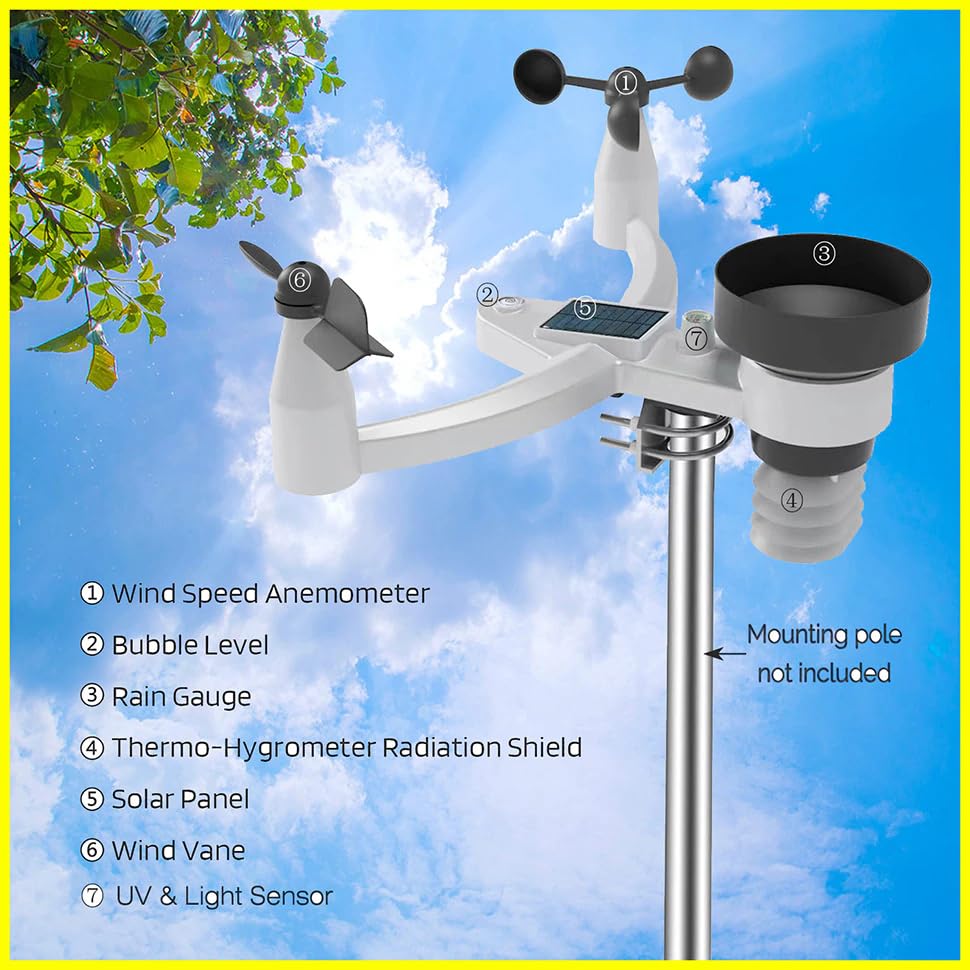 |
| 1 | Wind Vane Dimensions: 6.7x1.6x2 inches (170x40x50mm) | 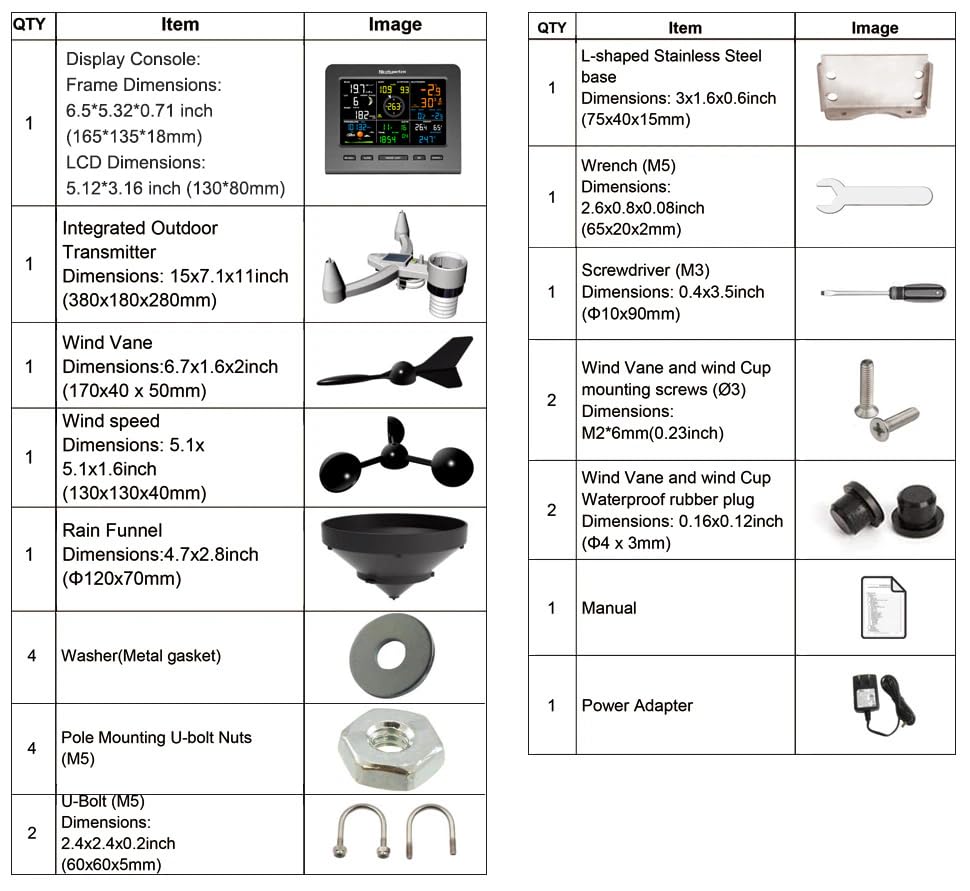 |
| 1 | Wind Speed Anemometer Dimensions: 5.1x5.1x6 inches (130x130x40mm) | |
| 1 | Rain Funnel Dimensions: 4.7x2.8 inches (Ø120x70mm) | |
| 4 | Washer (Metal gasket) | |
| 4 | Pole Mounting U-bolt Nuts (M5) | |
| 2 | U-Bolt (M5) Dimensions: 2.4x2.4x2 inches (60x60x5mm) | |
| 1 | L-shaped Stainless Steel base Dimensions: 3.1x1.6x0.6 inches (75x40x15mm) | |
| 1 | Wrench (M5) Dimensions: 2.6x0.8x0.08 inches (65x20x2mm) | |
| 1 | Screwdriver (M3) Dimensions: 0.4x3.5 inches (Ø10x90mm) | |
| 2 | Wind Vane and Wind Cup mounting screws (Ø3) | |
| 2 | Wind Vane and Wind Cup Waterproof rubber plug Dimensions: 0.16x0.12 inches (Ø4x3mm) | |
| 1 | Manual | |
| 1 | Power Adapter | |
2.2 Outdoor Sensor Assembly
Assemble the wind vane and wind cups onto the integrated outdoor transmitter. Ensure all components are securely fastened. Refer to the diagram and video for visual guidance.
Figure 1: Integrated Outdoor Sensor Components.
The outdoor sensor includes a wind speed anemometer, bubble level, rain gauge, thermo-hygrometer radiation shield, solar panel, wind vane, and UV & Light sensor. A mounting pole is not included.
Video 1: Assembly and Battery Installation for the Outdoor Sensor. This video demonstrates how to install batteries and assemble the wind vane and wind cups onto the outdoor sensor unit.
2.3 Battery Installation
Outdoor Sensor: Install 3x AA 1.5V Alkaline batteries (not included) into the outdoor sensor's battery compartment. Ensure correct polarity. The outdoor sensor also features a built-in solar panel for power, extending battery life up to 1 year. Refer to Video 1 for visual instructions on battery installation.
Display Console: The display console requires a 5V DC adapter (included) for continuous power. It also requires 3x AA 1.5V Alkaline batteries (not included) for backup power. Install these batteries into the compartment on the back of the console. One LR41 battery is included for internal clock/memory backup.
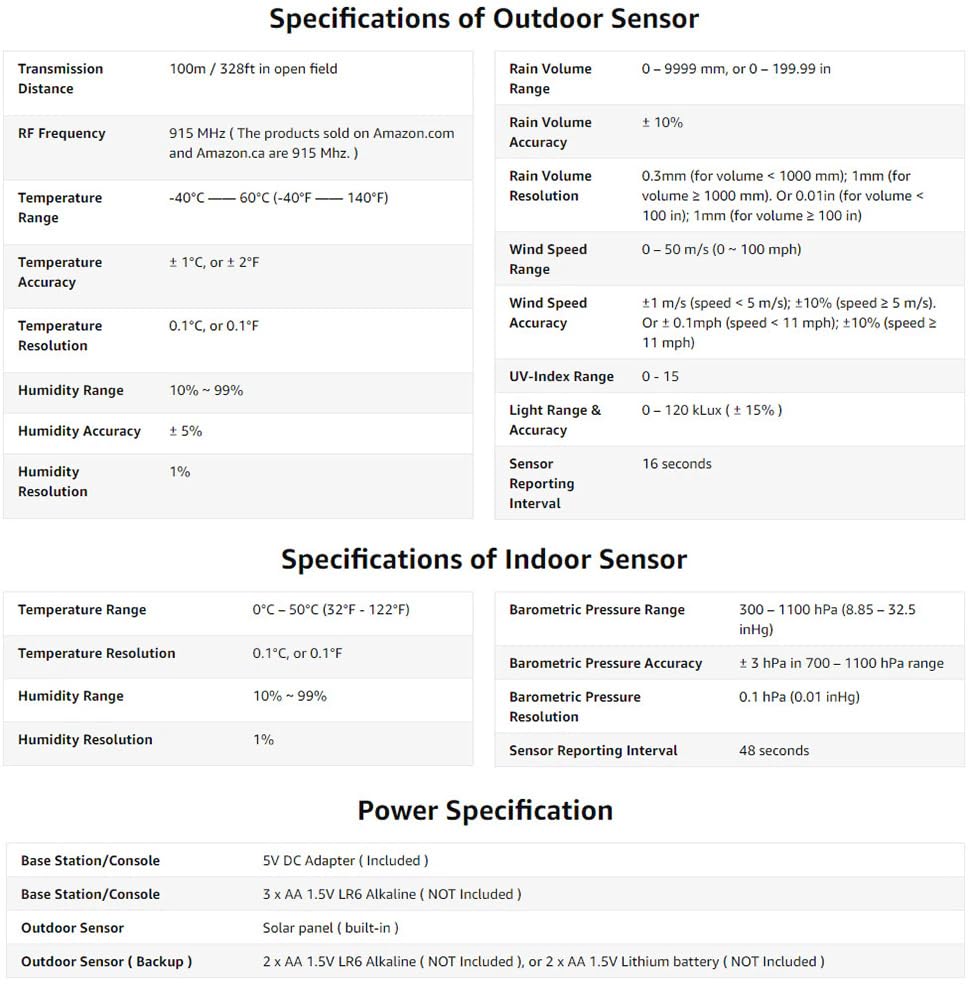
Figure 2: Display Console Rear View with Battery Compartment.
The display console's rear panel shows the battery compartment for backup power and the power adapter input. It also has a keyhole for wall mounting.
2.4 Mounting the Outdoor Sensor
Mount the integrated outdoor sensor in an open area, free from obstructions, to ensure accurate readings for wind, rain, and sunlight. The sensor wirelessly connects to the display console from up to 330 feet (100 meters). Use the provided U-bolts, nuts, and L-shaped base to secure it to a pole (not included).
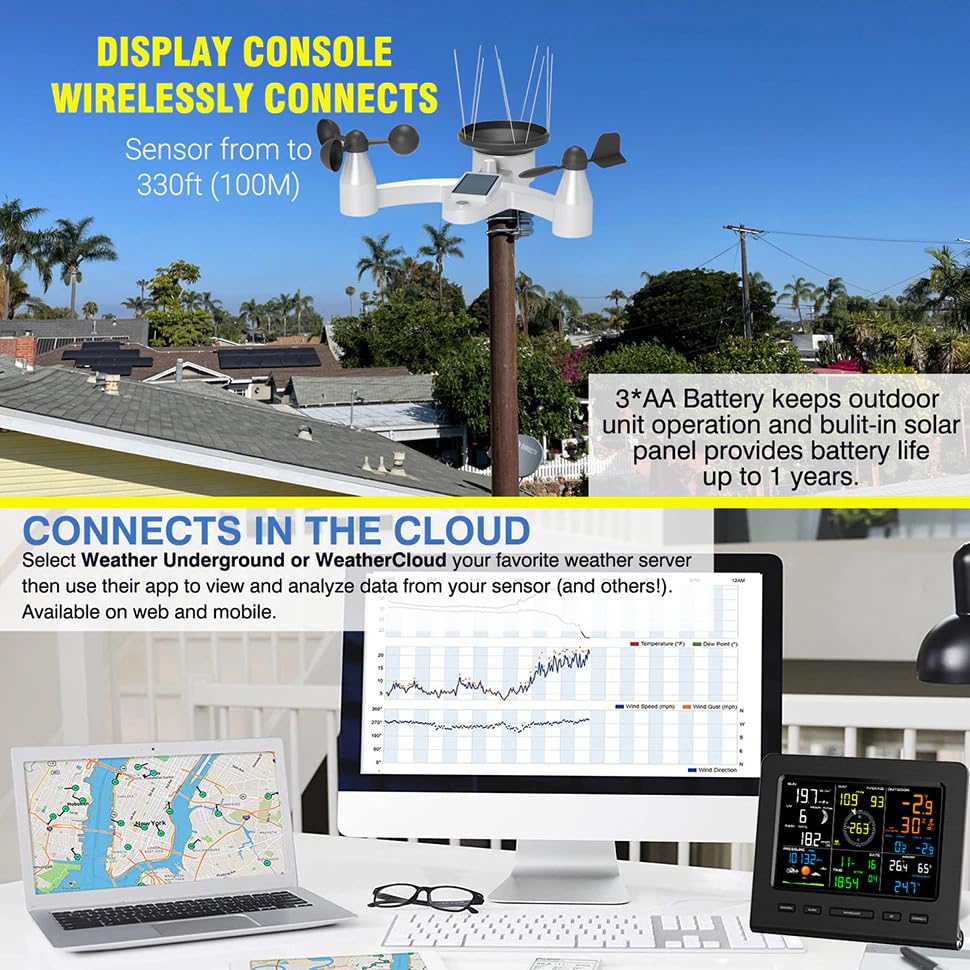
Figure 3: Outdoor Sensor Mounting Example.
This image illustrates the outdoor sensor mounted on a pole, demonstrating its wireless connectivity range and solar power capabilities.
3. Operation
3.1 Display Console Overview
The full-color LCD display console provides a comprehensive overview of current and historical weather data. It features touch buttons for easy navigation and settings adjustment.
Figure 4: Display Console Screen Details.
The display shows current weather conditions, including sun intensity, UV index, moon phase, wind speed and direction, outdoor and indoor temperature and humidity, barometric pressure, rain rate, date, and time.

Figure 5: Display Console Features and Forecast.
This image highlights the 24-48 hour weather forecast based on barometric readings and the ability to select display units for various sensors (e.g., °C/°F for temperature, mph/km/h for wind speed).
3.2 Initial Power-Up and Sensor Synchronization
- Connect the display console to power using the DC adapter.
- Ensure batteries are installed in the outdoor sensor.
- The console will automatically search for and synchronize with the outdoor sensor. This process may take a few minutes.
- Once synchronized, outdoor data will appear on the display.
3.3 Wi-Fi Connection and Data Upload
The weather station supports Wi-Fi connectivity to upload real-time weather data to online platforms such as www.wunderground.com or www.weathercloud.net. Follow the instructions in the full manual (not provided here) to configure your Wi-Fi settings and link your station to these services. This allows for remote monitoring via web or mobile applications.
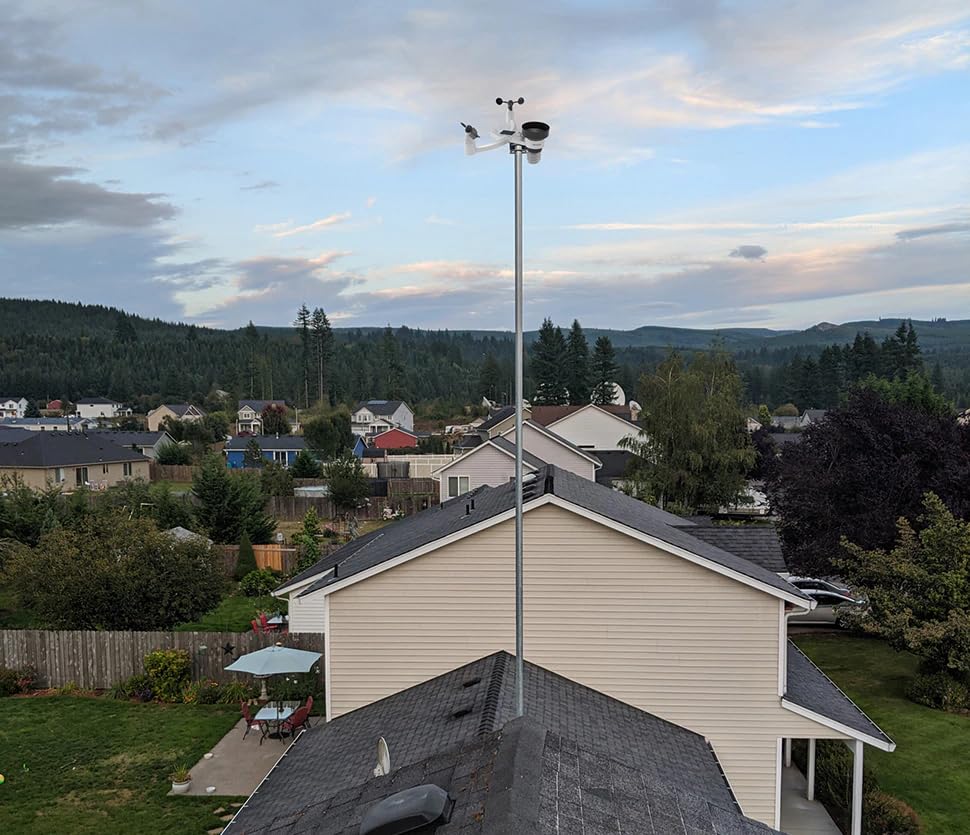
Figure 6: Cloud Connectivity for Remote Monitoring.
The weather station can upload data to online platforms like Weather Underground and WeatherCloud, allowing users to view and analyze data from their sensor via web or mobile applications.
3.4 Setting Time, Date, and Units
Use the buttons on the display console (e.g., SET, MAX/MIN, ALARM, SNOOZE/LIGHT, CHANNEL/+) to adjust settings such as time, date, and measurement units (e.g., Celsius/Fahrenheit, mph/km/h, inHg/hPa/mmHg for pressure, inch/mm for rainfall, lux/fc for light). Refer to the full product manual for specific button functions and navigation.
4. Maintenance
4.1 Cleaning
- Outdoor Sensor: Periodically clean the rain gauge funnel and wind cups to ensure accurate readings. Remove any debris, leaves, or insects. Use a soft, damp cloth.
- Display Console: Wipe the display and casing with a soft, dry cloth. Avoid abrasive cleaners or solvents.
4.2 Battery Replacement
- Outdoor Sensor: Replace the 3x AA Alkaline batteries annually or when the low power indicator appears on the console.
- Display Console: Replace the 3x AA Alkaline backup batteries when the low power indicator appears. The LR41 battery for memory backup typically lasts several years.
5. Troubleshooting
- No Outdoor Data Displayed:
- Ensure the outdoor sensor has fresh batteries and is powered on.
- Verify the outdoor sensor is within the 330ft (100m) wireless range of the console.
- Check for obstructions between the sensor and console that might interfere with the signal.
- Try re-synchronizing the sensor with the console (refer to the full manual for specific steps).
- Incorrect Readings (Wind, Rain, Temperature):
- Ensure the outdoor sensor is mounted correctly and free from obstructions.
- Clean the rain gauge and wind cups for any debris.
- Verify the sensor is not exposed to direct heat sources or reflective surfaces that could affect temperature readings.
- Wi-Fi Connection Issues:
- Ensure your Wi-Fi network is active and the console is within range.
- Double-check Wi-Fi password and network settings.
- Restart both your Wi-Fi router and the weather station console.
- Refer to the full manual for detailed Wi-Fi setup and troubleshooting steps.
6. Specifications
Detailed technical specifications for the YuqiaoTime 0360-025T Weather Station are provided below:
| Outdoor Sensor Specifications | |
|---|---|
| Transmission Distance | 100m / 328ft (open field) |
| RF Frequency | 915 MHz |
| Temperature Range | -40°C ~ 60°C (-40°F ~ 140°F) |
| Temperature Accuracy | ±1°C, or ±2°F |
| Temperature Resolution | 0.1°C, or 0.1°F |
| Humidity Range | 10% ~ 99% |
| Humidity Accuracy | ±5% |
| Humidity Resolution | 1% |
| Rain Volume Range | 0 - 9999 mm, or 0 - 199.99 in |
| Rain Volume Accuracy | ±10% |
| Rain Volume Resolution | 0.3mm (for volume < 1000 mm); 1mm (for volume ≥ 1000 mm). Or 0.01in (for volume < 100 in); 1mm (for volume ≥ 100 in) |
| Wind Speed Range | 0 - 50 m/s (0 - 100 mph) |
| Wind Speed Accuracy | ±1 m/s (speed < 5 m/s); ±10% (speed ≥ 5 m/s). Or ± 0.1mph (speed < 11 mph); ±10% (speed ≥ 11 mph) |
| UV-Index Range | 0 - 15 |
| Light Range & Accuracy | 0 - 120 kLux (± 15%) |
| Sensor Reporting Interval | 16 seconds |
| Indoor Sensor Specifications | |
|---|---|
| Temperature Range | 0°C ~ 50°C (32°F ~ 122°F) |
| Temperature Resolution | 0.1°C, or 0.1°F |
| Humidity Range | 10% ~ 99% |
| Humidity Resolution | 1% |
| Barometric Pressure Range | 300 - 1100 hPa (8.85 - 32.5 inHg) |
| Barometric Pressure Accuracy | ±3 hPa in 700 - 1100 hPa range |
| Barometric Pressure Resolution | 0.1 hPa (0.01 inHg) |
| Sensor Reporting Interval | 48 seconds |
| Power Specifications | |
|---|---|
| Base Station/Console | 5V DC Adapter (Included) |
| Base Station/Console (Backup) | 3 x AA 1.5V LR6 Alkaline (NOT included) |
| Outdoor Sensor | Solar panel (built-in) |
| Outdoor Sensor (Backup) | 2 x AA 1.5V LR6 Alkaline (NOT included), or 2 x AA 1.5V Lithium battery (NOT included) |
Figure 7: Detailed Product Specifications.
This image provides a comprehensive table of technical specifications for both the outdoor and indoor sensors, as well as power requirements for the entire system.
7. Warranty and Support
7.1 Warranty Information
The YuqiaoTime 0360-025T WiFi 7-in-1 Professional Weather Station typically comes with a manufacturer's warranty covering defects in materials and workmanship. Please refer to the warranty card included in your product packaging or contact the retailer for specific warranty terms and duration. Keep your purchase receipt as proof of purchase for warranty claims.
7.2 Customer Support
For technical assistance, troubleshooting, or inquiries regarding your weather station, please contact YuqiaoTime customer support. Contact information can usually be found on the product packaging, the official YuqiaoTime website, or through your retailer. When contacting support, please have your product model number (0360-025T) and purchase details ready.