Important Safety Information
Please read and understand all safety warnings before using this product. Failure to follow these instructions may result in injury or product damage.
- Do not exceed the maximum weight limit of 500 pounds.
- Inflate and deflate the mattress according to the instructions to avoid damage or injury.
- Keep away from heat sources and sharp objects to prevent punctures.
- Do not leave the mattress inflated for extended periods to prevent material expansion and potential suffocation risks.
- Always inspect the mattress for any damage before use.
Package Contents
Verify that all items are present in the package:
- 1 x EKEPE Queen Air Mattress with Headboard
- 1 x Removable Wireless Air Pump
- 1 x Carry Bag
- 1 x USB Charge Cable
Setup Instructions
1. Unpacking and Preparation
- Remove the air mattress from its carry bag and unroll it on a clean, flat surface.
- Ensure the area is free of sharp objects that could puncture the mattress.

Figure 1: EKEPE Queen Air Mattress with Headboard, unrolled and ready for inflation.
2. Charging the Wireless Air Pump
- Locate the removable wireless air pump.
- Connect the included USB charge cable to the pump and a suitable USB power source. The indicator light will show red during charging and turn green when fully charged.
- Ensure the pump is fully charged before first use for optimal performance.

Figure 2: The removable air pump being charged via USB cable. A red light indicates charging, green indicates full charge.
3. Inflating the Air Mattress
- Open the cap covering the inflation port on the mattress.
- Insert the nozzle of the charged wireless air pump into the inflation port.
- Turn on the pump. The mattress will begin to inflate.
- Monitor the inflation process. Once the mattress reaches desired firmness, turn off the pump and securely close the inflation port cap.
Video 1: Demonstration of inflating the EKEPE Air Mattress using the built-in wireless pump. The video shows the pump being inserted into the valve and activated, with the mattress inflating over time.

Figure 3: Close-up view of the removable air pump port on the side of the mattress, showing the pump being inserted for inflation.
4. Attaching and Inflating the Headboard
- The headboard is designed to be attached to the main mattress. Align the headboard's attachment points with the corresponding areas on the mattress.
- Inflate the headboard using the same wireless air pump. Locate the headboard's inflation valve, insert the pump nozzle, and activate the pump until the headboard is firm.
- Securely close the headboard's inflation valve.
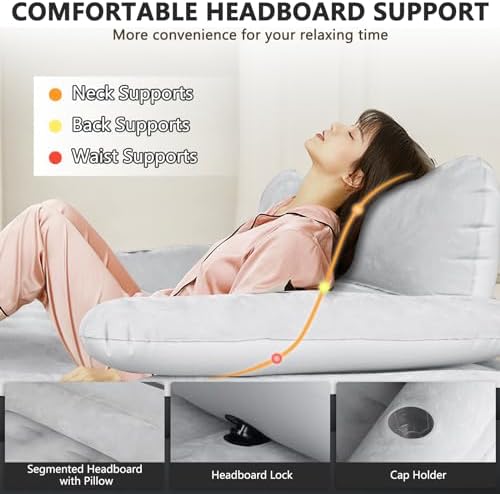
Figure 4: An individual comfortably lounging on the fully inflated EKEPE Air Mattress, demonstrating the ergonomic support provided by the headboard for the neck, back, and waist.
Operating Instructions
Using the Mattress
- The EKEPE Air Mattress is suitable for both indoor and outdoor use, providing a comfortable sleeping or lounging surface.
- The integrated headboard offers ergonomic support for your neck, back, and lumbar region, enhancing comfort for reading or relaxing.
- Utilize the built-in cup holders on the headboard for beverages or small personal items.
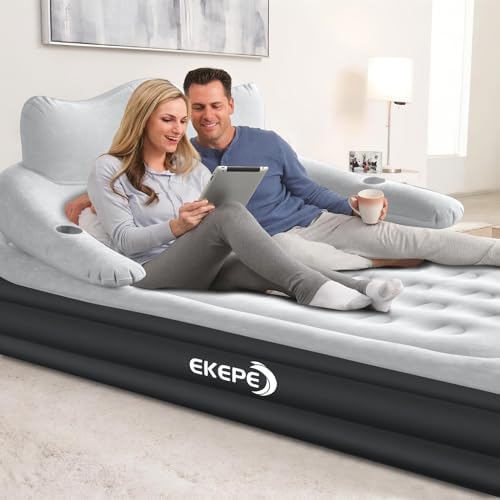
Figure 5: A couple enjoying the EKEPE Air Mattress with Headboard, highlighting its use for relaxation and the convenience of the cup holders.
Deflating and Storing the Mattress
- To deflate the mattress, open the main inflation port. For faster deflation, use the wireless air pump in reverse (deflate mode) by attaching the nozzle to the exhaust port.
- Once the mattress is mostly deflated, roll it tightly to expel any remaining air.
- Remove the headboard if desired, and deflate it separately.
- Fold or roll the mattress and headboard neatly and place them into the provided carry bag for compact storage.

Figure 6: A person demonstrating the deflation process of the air mattress using the removable pump. The pump can be used to quickly remove air for packing.
Maintenance
Cleaning
- Spot clean the mattress surface with a mild soap and damp cloth.
- Do not use harsh chemicals or abrasive cleaners, as these can damage the PVC and flocking material.
- Ensure the mattress is completely dry before storing to prevent mold or mildew.
Storage
- Store the mattress in a cool, dry place, away from direct sunlight and extreme temperatures.
- Keep the mattress away from pets and sharp objects during storage to prevent accidental damage.
Material Characteristics
The PVC/Vinyl material of the air mattress will naturally stretch and expand during use. After being inflated and/or slept on for several days, the mattress may lose some of its initial firmness due to this expansion. This is normal and not a result of air leakage. Simply re-inflate to your desired firmness.
Troubleshooting
- Mattress loses firmness: This is often due to the natural stretching of the PVC material. Re-inflate the mattress to your preferred firmness. If significant air loss occurs rapidly, check all valves for secure closure and inspect the mattress for punctures.
- Air pump not working: Ensure the wireless air pump is fully charged. Check the power switch on the pump. If the pump is charged but not operating, contact customer support.
- Headboard detaches easily: Ensure the headboard is properly aligned and securely attached to the main mattress before inflation. Inflating the headboard after it's attached can help secure it.
Specifications
| Feature | Detail |
|---|---|
| Brand | EKEPE |
| Model Name | Air Mattress Queen (AM-QG) |
| Size | Queen |
| Product Dimensions | 80"L x 60"W x 18"Th |
| Item Thickness | 18 Inches |
| Weight Capacity | 500 Pounds |
| Special Features | Inflatable, Wireless, Portable, Removable Headboard, Built-in Pump |
| Top Material Type | Flock |
| Included Components | Wireless Air Pump, Carry Bag, USB Charge Cable |
| Batteries | 1 Lithium Ion battery required (included) |

Figure 7: Visual representation of the EKEPE Queen Air Mattress dimensions: 80"L x 60"W x 18"Th.
Warranty and Support
For warranty information or technical support, please refer to the product packaging or contact EKEPE customer service directly. Keep your purchase receipt for warranty claims.


