
1. Introduction
This manual provides essential information for the safe and efficient operation of your new TWINBIRD WM-EA90W 9kg Automatic Washing Machine. Please read this manual thoroughly before using the appliance and keep it for future reference.

Image: The TWINBIRD WM-EA90W washing machine, designed for easy and efficient laundry with its generous 9kg capacity, automatic detergent and softener dispensing, and quick wash course.
2. Safety Information
To prevent injury to yourself and others, and to avoid property damage, please observe the following safety precautions:
- Always connect the washing machine to a grounded electrical outlet.
- Do not operate the machine if the power cord or plug is damaged.
- Keep children and pets away from the appliance during operation.
- Ensure water supply hoses are securely connected to prevent leaks.
- Do not wash items contaminated with flammable substances.
- Unplug the machine before cleaning or performing any maintenance.
3. Setup and Installation
3.1 Unpacking
Carefully remove all packaging materials. Inspect the machine for any damage incurred during transit. Retain packaging for potential future transport.
3.2 Placement
Place the washing machine on a firm, level surface. Ensure adequate clearance around the machine for proper ventilation and operation.
- Maintain at least 10 cm clearance from the wall on the drain hose side.
- Maintain at least 5 cm clearance from the wall on the opposite side.
- Maintain at least 2 cm clearance from the wall at the back.

Image: Installation diagram illustrating the minimum required distances from walls for optimal placement and operation of the washing machine.
3.3 Leveling
Adjust the leveling feet at the bottom of the machine to ensure it is perfectly level. This prevents excessive vibration and noise during operation.
3.4 Water and Drain Connections
Connect the water supply hose to a cold water tap and the machine's inlet. Securely attach the drain hose to a suitable drain pipe or sink, ensuring it is properly positioned to prevent backflow.
3.5 Product Dimensions
Refer to the diagram below for detailed product dimensions to ensure proper fit in your installation space.

Image: Detailed product dimension diagram, indicating the width, depth, and height of the washing machine in millimeters for installation planning.
4. Operating Instructions
4.1 Loading Laundry
Open the lid and load laundry into the drum. Do not overload the machine; ensure there is enough space for clothes to move freely. The maximum capacity is 9kg.
4.2 Automatic Detergent and Softener Dispensing
This washing machine features an automatic dispensing function for liquid detergent and fabric softener, eliminating the need for manual measurement for each wash.
- Fill the liquid detergent case (approx. 420ml capacity) and the fabric softener case (approx. 520ml capacity) before starting a wash cycle.
- The machine will automatically dispense the appropriate amount based on the laundry load.
- Using concentrated liquid detergents can reduce refill frequency.
- A separate manual input case is available for special detergents like delicate wash or bleach.

Image: The automatic dispenser for liquid detergent and fabric softener, illustrating how to fill the compartments for hands-free dispensing.
4.3 Washing Programs
Select the desired washing program using the control panel:
- Normal Course: Standard wash for everyday laundry.
- Quick Course: Washes approximately 1.5kg (one person's daily laundry) in about 13 minutes (including water supply and drainage time). Maximum load for this course is 2kg. Ideal for lightly soiled items or when you need clothes quickly.

Image: A user preparing to use the Quick Course, which can wash one person's laundry in approximately 13 minutes, saving time.
- Susugi 0-Rinse Dedicated Course: This course uses a gentle water flow and a special detergent designed for zero-rinse cycles. It effectively removes dirt and odors with minimal detergent residue, making it gentle on clothes and economical by saving water, time, and power. Maximum load for this course is 2kg.
- Tub Cleaning Course: Use this course periodically to clean the washing machine tub.
4.4 Dual Shower Wash
The Dual Shower Wash feature ensures thorough cleaning by penetrating deep into fabric fibers, effectively removing dirt and stains.

Image: The Dual Shower Wash in action, demonstrating how powerful water streams ensure deep cleaning of laundry, reaching every fiber.
4.5 Tangling Prevention Function
This function helps to untangle clothes after the wash cycle, making it easier to remove them from the drum and reducing wrinkles.

Image: A visual comparison of laundry before and after the tangling prevention function, highlighting how it loosens clothes for easier removal.
5. Maintenance
5.1 Lint Filter Cleaning
Regularly clean the lint filter to maintain washing performance and prevent lint buildup on clothes.
- Open the lid and locate the lint filter inside the drum.
- Gently remove the filter by pulling it upwards.
- Open the filter and remove any accumulated lint.
- Rinse the filter under running water to clean it thoroughly.
- Reinsert the clean filter back into its position until it clicks.
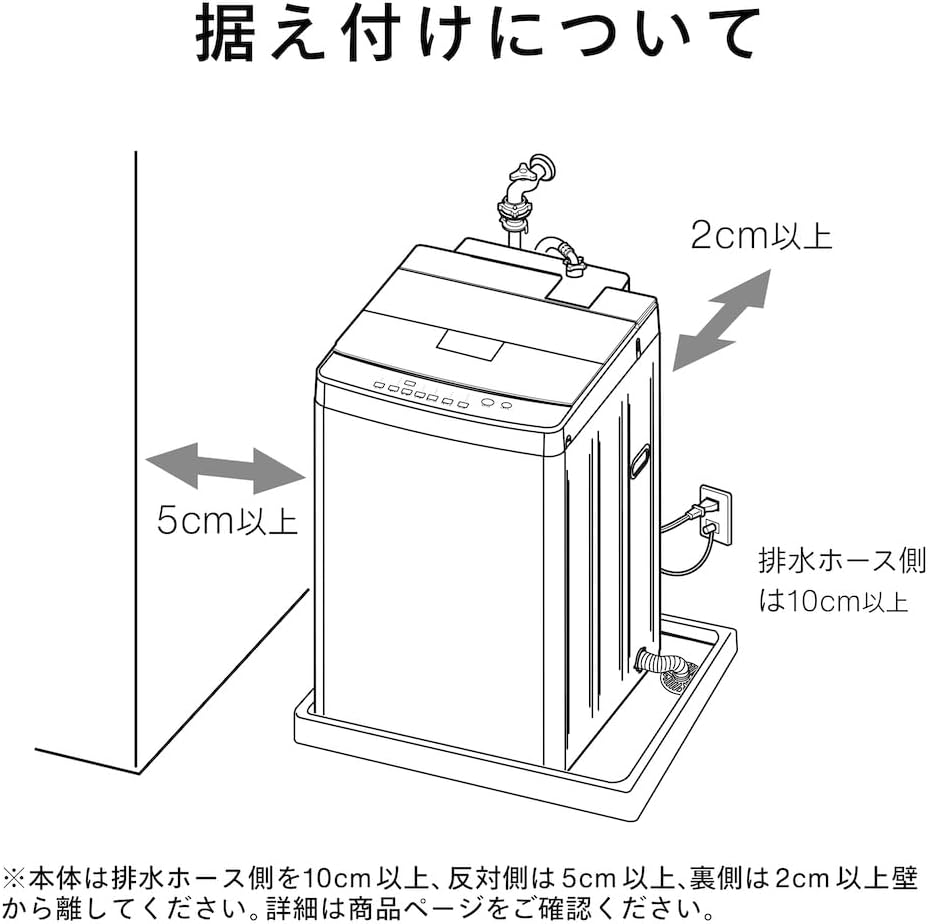
Image: Demonstrating the easy removal of the lint filter for routine cleaning, ensuring optimal machine performance.
5.2 Detergent and Softener Cases Cleaning
The detergent and softener cases are washable. After rinsing with water, wipe them dry before reinserting to maintain hygiene.
5.3 Exterior Cleaning
Wipe the exterior of the machine with a soft, damp cloth. Do not use abrasive cleaners or solvents.
6. Troubleshooting
If you encounter any issues with your washing machine, please refer to the following common problems and solutions before contacting customer service.
| Problem | Possible Cause | Solution |
|---|---|---|
| Machine does not start | Power cord unplugged, lid not closed, power outage | Check power connection, ensure lid is fully closed, check circuit breaker |
| Water not filling | Water tap closed, water supply hose kinked, water pressure low | Open water tap, straighten hose, check water supply |
| Water not draining | Drain hose kinked or blocked, filter clogged | Check and clear drain hose, clean lint filter |
| Excessive vibration/noise | Machine not level, unbalanced load, shipping bolts not removed | Level the machine, redistribute laundry, ensure shipping bolts are removed |
7. Specifications
| Feature | Specification |
|---|---|
| Brand | TWINBIRD |
| Model Number | WM-EA90W |
| Product Dimensions (D x W x H) | 62.7 x 59 x 103.6 cm |
| Capacity | 9 kg |
| Color | White |
| Special Features | Automatic Detergent Dispenser, Quick Wash, Dual Shower Wash, Tangling Prevention, Washable Detergent Case |
| Control Type | Touch |
| Operation Mode | Fully Automatic |
| Wash Dispenser Options | Detergent & Fabric Softener |
| Cycle Options | Normal, Quick Wash, Tub Clean |
| Drum Material | Stainless Steel |
| Included Components | Cover, Screws (for protective cover attachment), Water inlet hose joint, Water inlet hose |
8. Warranty and Support
8.1 Warranty Information
This TWINBIRD WM-EA90W washing machine comes with a 1-year warranty from the date of purchase. Please retain your proof of purchase for warranty claims. The warranty covers manufacturing defects under normal use conditions.
8.2 Customer Support
For technical assistance, troubleshooting beyond this manual, or warranty service, please contact TWINBIRD customer support. Refer to the contact information provided with your product packaging or visit the official TWINBIRD website.