1. Introduction
This manual provides detailed instructions for the safe and efficient operation of your SUNAPEX 12V MPPT Solar Charge Controller. This device is designed to maximize energy efficiency from solar panels and safely charge 12V GEL, AGM, and LiFePO₄ batteries. Please read this manual thoroughly before use.

Image: Front view of the SUNAPEX 12V MPPT Solar Charge Controller with SAE connectors.
2. Product Features
- Maximized Energy Efficiency: Upgraded MPPT technology for up to 34% more power from solar panels compared to traditional PWM controllers.
- Zero Battery Drain: Equipped with diodes to prevent reverse current flow, ensuring no battery drainage when the sun isn't shining.
- Comprehensive Safety Measures: Built-in safeguards including overcharge, overvoltage, reverse current, reverse polarity, short circuit, and over-temperature protection.
- SAE Connector Convenience: Easy and direct attachment to SUNAPEX 15W, 25W, 50W solar panels, and adaptable to other brands within 50W (ensure correct polarity).
- Universal Compatibility: Compatible with GEL, AGM, and LiFePO₄ batteries.
- IP67 Waterproof: Fully sealed design, specifically tailored for outdoor use.

Image: The SUNAPEX MPPT Charge Controller being splashed with water, demonstrating its IP67 waterproof rating.

Image: Visual comparison showing the SUNAPEX MPPT controller is 34% more efficient than traditional PWM controllers.
3. Safety Information
The SUNAPEX MPPT Charge Controller is designed with multiple safety features to ensure reliable operation. Always adhere to the following guidelines:
- Ensure the solar panel is within the specified power range (50W or less for 12V systems).
- Verify correct positive and negative pole connections for all SAE connectors. Incorrect polarity can damage the device or battery.
- Do not attempt to open or modify the controller. Refer all servicing to qualified personnel.
- Keep the controller away from flammable materials and excessive heat sources.
- The controller includes: Overcharge Protection, Over-temperature Protection, Over-voltage Protection, Reverse Current Protection, Reverse Polarity Protection, and Short Circuit Protection.

Image: Diagram illustrating the six safety protections integrated into the SUNAPEX MPPT Charge Controller: Overcharge, Over Temperature, Over-voltage, Reverse Current, Reverse Polarity, and Short Circuit Protection.
4. Setup and Installation
Follow these steps to set up your SUNAPEX MPPT Solar Charge Controller:
- Step 1: Position the Solar Panel in Sunlight
Place your solar panel in a location that receives maximum direct sunlight throughout the day for optimal charging. - Step 2: Connect the Solar Panel to the Controller
Connect the SAE connector from your solar panel to the input SAE connector on the SUNAPEX MPPT Charge Controller. Ensure the connection is secure and polarity is correct (red for positive, black for negative). - Step 3: Connect the Controller, Battery Clips, and Battery
Connect the output SAE connector from the controller to your battery clips, and then connect the battery clips to your 12V rechargeable battery (GEL, AGM, or LiFePO₄). Ensure correct polarity: red clip to positive (+) terminal, black clip to negative (-) terminal. - Step 4: Select the Appropriate Battery Type on the Controller
Once all connections are made, select the correct battery type on the controller. Refer to the "Operating Instructions" section for details on how to do this.

Image: A four-panel diagram illustrating the setup process: positioning the solar panel, connecting the solar panel to the controller, connecting the controller to the battery, and selecting the battery type.

Image: Diagram showing the SAE connectors and emphasizing correct positive (red) and negative (black) polarity for connection to both the battery and solar panel.
5. Operating Instructions
Selecting Battery Type
The SUNAPEX MPPT Controller is compatible with GEL, AGM, and LiFePO₄ batteries. It is crucial to select the correct battery type for optimal charging and battery longevity.
- Initial Selection (AGM): Press and hold the MODE button for 5 seconds. The AGM indicator light will start to flash, indicating it's ready for selection.
- Switching to GEL: Press the MODE button once to switch to GEL. The GEL indicator light will flash.
- Switching to LiFePO₄: Press the MODE button again to switch to LiFePO₄. The LiFePO₄ indicator light will flash.
Tip:
After switching to the desired battery type, let the indicator light blink for 5 seconds. The selection will then be successful and the light will become solid.
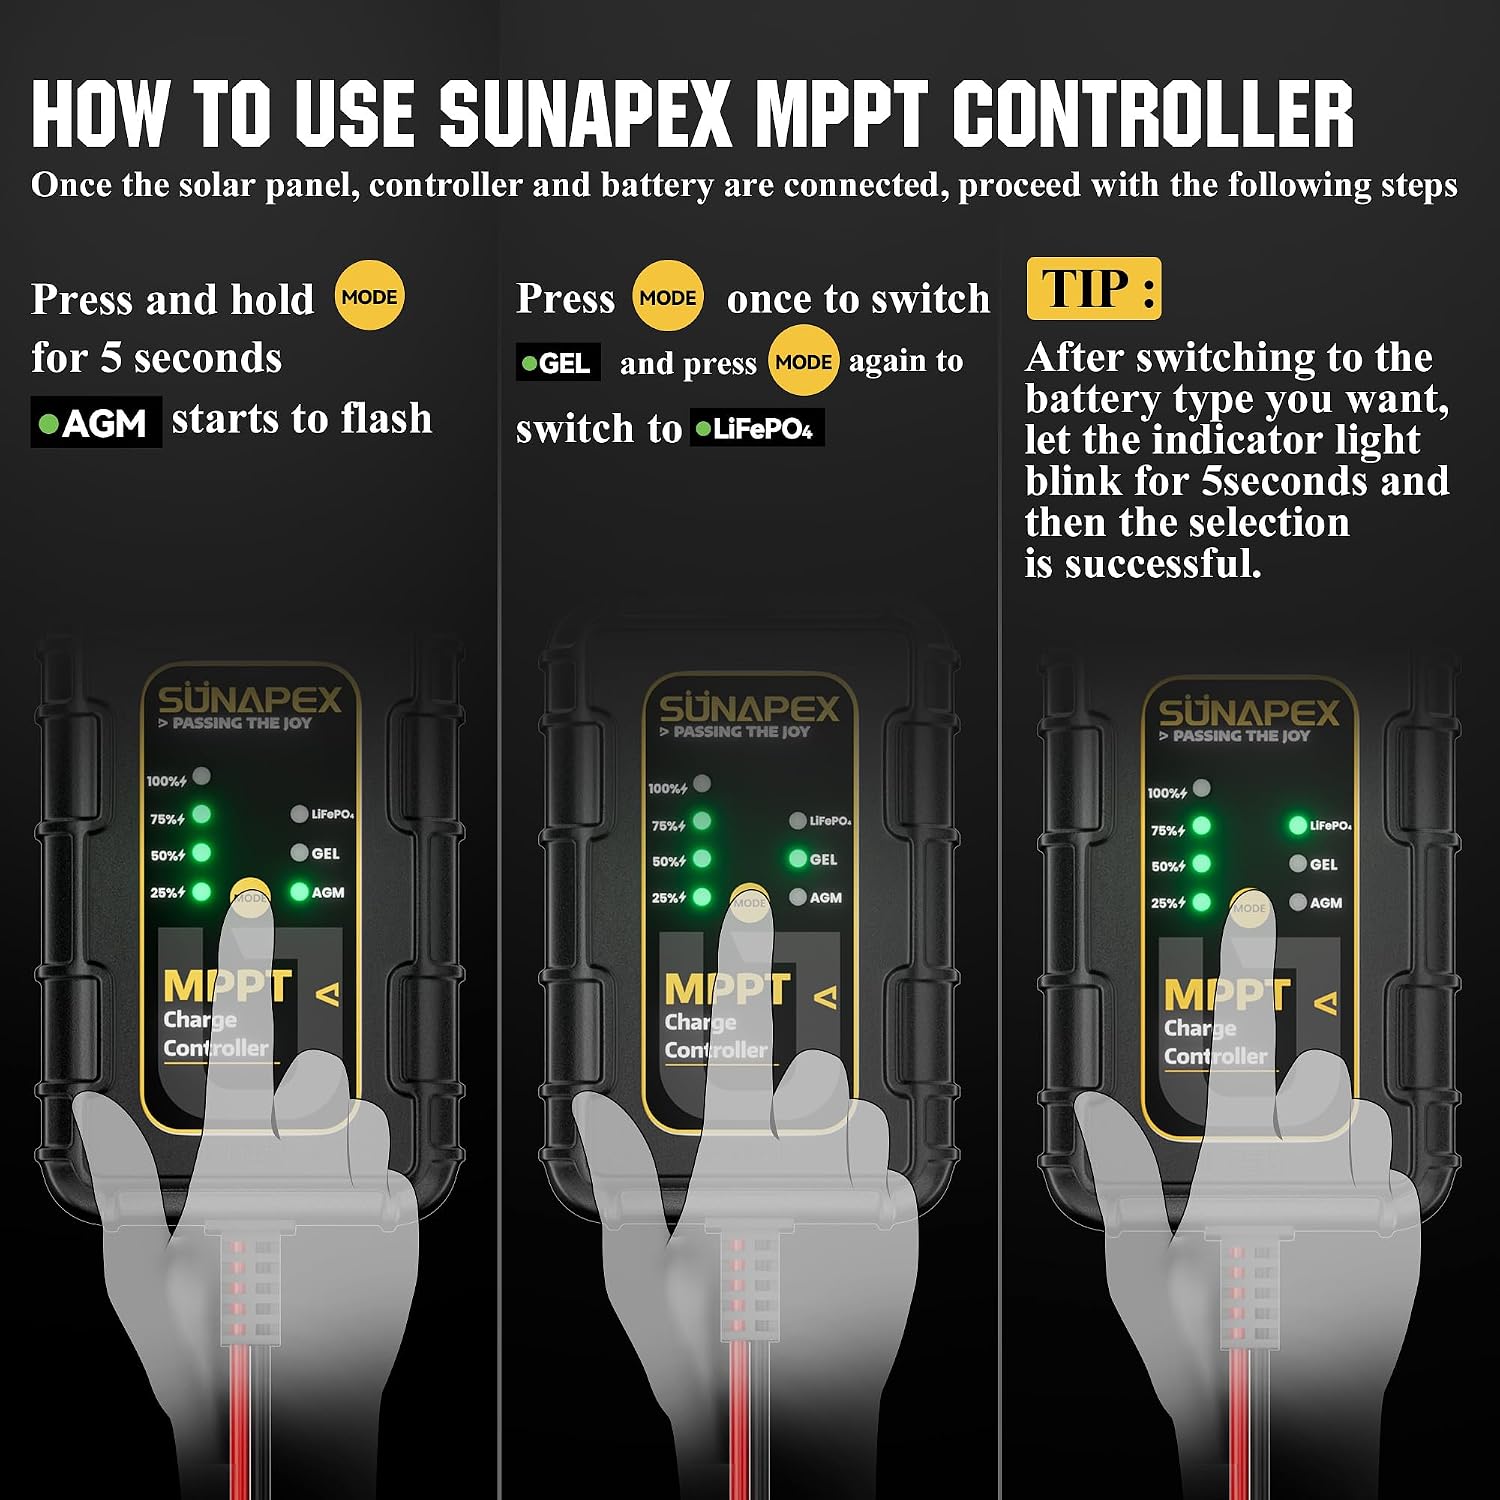
Image: Three-panel diagram showing the process of selecting battery types (AGM, GEL, LiFePO₄) using the MODE button on the controller.
6. Maintenance
The SUNAPEX MPPT Charge Controller is designed for low maintenance. However, regular checks can ensure optimal performance and longevity:
- Periodically inspect all cable connections (SAE connectors, battery clips) to ensure they are clean, secure, and free from corrosion.
- Keep the controller clean and free from dust or debris. While it is IP67 waterproof, avoid submerging it for extended periods.
- Check for any visible damage to the controller casing or cables. If damage is found, discontinue use and contact customer support.
7. Troubleshooting
This section addresses common issues you might encounter. For problems not listed here, please contact SUNAPEX customer support.
| Problem | Possible Cause | Solution |
|---|---|---|
| Controller not charging battery. |
|
|
| Battery indicator lights not illuminating. |
|
|
| Controller feels excessively hot. |
|
|
8. Specifications
| Feature | Detail |
|---|---|
| Model Number | MPPT Charge Controller |
| Input Voltage | 12 Volts (DC) |
| Max Solar Panel Power | 50W (for 12V panels) |
| Compatible Battery Types | GEL, AGM, LiFePO₄ |
| Connectors | SAE |
| Waterproof Rating | IP67 |
| Dimensions | 7.01 x 3.19 x 1.34 inches |
| Item Weight | 4.6 ounces |
| Material | Plastic |
| Included Components | MPPT Charge Controller (solar panel not included) |
9. Warranty and Support
SUNAPEX stands behind its products with a comprehensive warranty and dedicated customer support:
- Warranty: One-year warranty from the date of purchase.
- Technical Support: Lifetime technical support is available.
- After-Sales Service: 7x24 hours after-sales service to ensure your questions are answered promptly.
If you have any questions, require technical assistance, or are not satisfied with your product, please contact SUNAPEX customer service.


