1. Introduction
Thank you for choosing the msecore MQ12 Mini PC. This compact yet powerful desktop computer is designed for a wide range of applications, from daily office tasks to demanding creative work and entertainment. This manual provides essential information for setting up, operating, maintaining, and troubleshooting your device. Please read it carefully to ensure optimal performance and longevity of your Mini PC.
2. Package Contents
Verify that all items listed below are included in your package. If any items are missing or damaged, please contact customer support.
- 1x msecore MQ12 Mini PC
- 1x Power Adapter
- 1x Power Cord
- 1x DP to HDMI Adapter
- 1x SATA Cable (for 2.5-inch HDD/SSD)
- Screws for SATA HD and VESA Mount
- 2x Dual WiFi Antennas
- 1x VESA Mount Bracket
- 1x User Manual
- 1x Warranty Card

Figure 2.1: Included Package Contents
3. Product Overview
The msecore MQ12 Mini PC is equipped with advanced components for high performance.
3.1 Key Features
- Processor: 13th Gen Intel Core i9-13900H (14 Cores, 20 Threads, up to 5.4GHz)
- Graphics: Integrated Intel Iris Xe Graphics
- Memory: 64GB DDR4L RAM (expandable via 2x SODIMM slots)
- Storage: 2TB PCIe 4.0 SSD (with additional slot for 2.5-inch SATA HDD/SSD)
- Operating System: Windows 11 Pro (pre-installed)
- Display Output: 1x HDMI, 1x DisplayPort, 1x USB-C (supports video output) for triple display support up to 8K resolution.
- Network: Dual LAN (1x 1G Realtek, 1x 2.5G Intel225), Wi-Fi 6E, Bluetooth 5.3
- Ports: Multiple USB 2.0, USB 3.0, USB-C, 3.5mm Headset Jack

Figure 3.1: msecore MQ12 Mini PC Front and Rear Ports
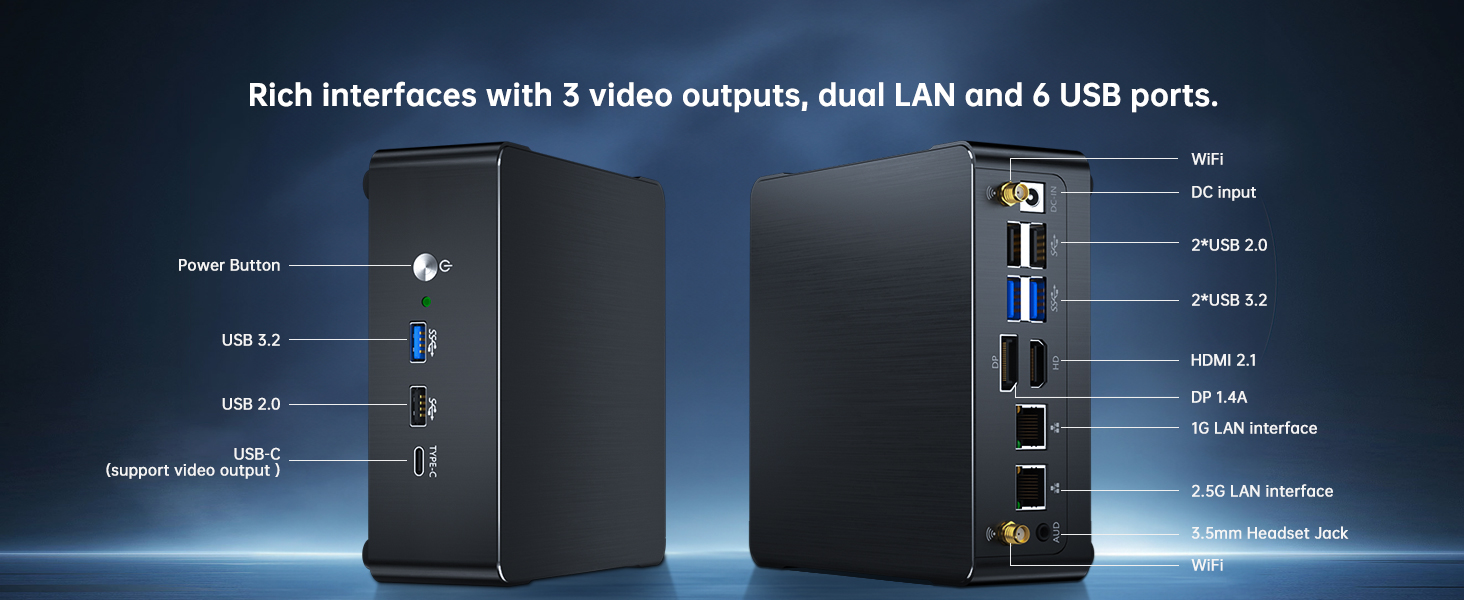
Figure 3.2: Detailed Port Layout
4. Setup Instructions
Follow these steps to set up your msecore MQ12 Mini PC.
- Connect Antennas: Screw the two WiFi antennas onto the corresponding connectors at the rear of the Mini PC.
- Connect Display: Connect your monitor(s) to the Mini PC using the HDMI, DisplayPort, or USB-C ports. Use the provided DP to HDMI adapter if needed.
- Connect Peripherals: Plug in your keyboard, mouse, and any other USB devices into the available USB ports.
- Connect Power: Connect the power adapter to the DC-IN port on the Mini PC, then plug the power cord into an electrical outlet.
- Power On: Press the power button located on the front of the Mini PC. The power indicator light will illuminate.
- Initial Setup: Follow the on-screen instructions to complete the Windows 11 Pro initial setup.
4.1 VESA Mount Installation (Optional)
The Mini PC can be mounted behind a monitor using the included VESA mount bracket to save desk space.
- Attach the VESA mount bracket to the back of your monitor using the provided screws. Ensure it is securely fastened.
- Slide the Mini PC onto the VESA mount bracket until it clicks into place.

Figure 4.1: VESA Mount Installation
5. Operating Instructions
5.1 Power On/Off
- Power On: Press the power button on the front panel.
- Power Off: Click the Start menu in Windows, then select Power > Shut down. Alternatively, press and hold the power button for 4-5 seconds to force a shutdown (not recommended for regular use).
5.2 Display Configuration
The Mini PC supports up to three displays simultaneously.
- Connect monitors to the HDMI, DisplayPort, and USB-C video output ports.
- In Windows, right-click on the desktop and select "Display settings" to configure display arrangement, resolution, and orientation.
- DisplayPort supports resolutions up to 8K (7680 x 4320) at 60Hz.

Figure 5.1: Triple Display Setup
5.3 Network Connectivity
- Wired Connection: Connect an Ethernet cable to either the 1G or 2.5G LAN port on the rear of the Mini PC.
- Wireless Connection: Ensure WiFi antennas are connected. In Windows, click the network icon in the taskbar, select your desired Wi-Fi network, and enter the password. The Mini PC supports Wi-Fi 6E for enhanced speed and reduced latency.
5.4 Storage Expansion
The Mini PC supports an additional 2.5-inch SATA HDD or SSD.
- Power off the Mini PC and disconnect all cables.
- Carefully open the bottom cover of the Mini PC.
- Connect the 2.5-inch SATA drive to the provided SATA power and data cable.
- Secure the drive in the designated slot on the back cover using the provided screws.
- Close the bottom cover and reconnect all cables.
- Upon booting, the new drive may need to be initialized and formatted in Windows Disk Management before use.

Figure 5.2: Internal Storage Expansion Options
6. Maintenance
- Cleaning: Use a soft, dry cloth to clean the exterior of the Mini PC. Avoid liquid cleaners. Use compressed air to clear dust from vents periodically.
- Ventilation: Ensure the Mini PC's ventilation openings are not blocked to prevent overheating.
- Software Updates: Regularly update Windows and drivers to ensure optimal performance and security.
- Data Backup: Periodically back up important data to an external storage device.
7. Troubleshooting
| Problem | Possible Cause | Solution |
|---|---|---|
| No power | Power cable loose, power adapter faulty, power outlet issue. | Check power cable connections. Try a different power outlet. Ensure power adapter is functioning. |
| No display | Monitor not connected, incorrect input source, faulty cable. | Ensure display cables are securely connected. Select correct input source on monitor. Try a different cable or monitor. |
| No Wi-Fi connection | Antennas not connected, Wi-Fi disabled, incorrect password. | Ensure WiFi antennas are securely attached. Check Wi-Fi settings in Windows. Verify Wi-Fi password. |
| System slow or unresponsive | Too many applications running, insufficient RAM, malware. | Close unnecessary applications. Check Task Manager for resource usage. Run antivirus scan. Consider upgrading RAM if frequently an issue. |
If you encounter issues not covered here, please refer to the Warranty and Support section for assistance.
8. Specifications
| Feature | Detail |
|---|---|
| Brand | msecore |
| Model Number | MQ12 |
| Processor | Intel Core i9-13900H (14 Cores, 20 Threads, up to 5.4 GHz) |
| Graphics | Intel Iris Xe Graphics (Integrated) |
| RAM | 64GB DDR4L SDRAM (2x SODIMM slots, Max 64GB) |
| Storage | 2TB PCIe 4.0 SSD (1x M.2 NVMe slot, 1x 2.5-inch SATA slot) |
| Operating System | Windows 11 Pro (pre-installed) |
| Video Outputs | 1x HDMI 2.1, 1x DisplayPort 1.4A, 1x USB-C (supports video output) |
| Max Resolution | 8K (7680 x 4320) @ 60Hz via DisplayPort |
| LAN | 1x 1G Ethernet (Realtek), 1x 2.5G Ethernet (Intel225) |
| Wireless | Wi-Fi 6E (2.4GHz/5GHz/6GHz), Bluetooth 5.3 |
| USB Ports | 3x USB 3.0, 3x USB 2.0, 1x USB-C |
| Audio | 1x 3.5mm Headset Jack |
| Dimensions (LxWxH) | 145 x 145 x 46mm (approx. 5.7 x 5.7 x 1.8 inches) |
| Item Weight | Approx. 4.4 pounds |
9. Warranty and Support
9.1 Warranty Information
The msecore MQ12 Mini PC comes with a 2-year hardware warranty from the date of purchase. This warranty covers manufacturing defects and hardware malfunctions under normal use. It does not cover damage caused by misuse, accidents, unauthorized modifications, or natural disasters. Please retain your proof of purchase for warranty claims.
9.2 Technical Support
For technical assistance or warranty claims, please contact msecore customer support.
- Email: Please send your order number and a detailed description of the problem (including pictures or videos if applicable) to our support email address. We aim to respond within 24 hours.
- Online Resources: Visit the official msecore website for FAQs, driver downloads, and additional support resources.
If you require a specific operating system like Windows 10 Pro, or have other inquiries, feel free to reach out to our support team.
