1. Introduction
The Jumplushion A3006 is a compact and versatile pen-type digital multimeter designed for various electrical measurements. It integrates a multimeter and a test pen into a single device, offering convenience and efficiency for both professional and home use. This manual provides detailed instructions on the proper use, maintenance, and troubleshooting of your A3006 multimeter.
2. Safety Information
Always observe basic safety precautions when using electrical testing equipment to reduce the risk of fire, electric shock, and personal injury.
- Do not exceed the maximum voltage ratings specified for the device.
- Ensure the test leads are in good condition and free from damage before each use.
- Do not use the device if it appears damaged or is not operating correctly.
- Avoid touching exposed wires or circuit components while testing.
- Always turn off power to the circuit before connecting or disconnecting test leads, if possible.
- Keep the device dry and clean.
3. Product Overview
The A3006 pen multimeter is designed for ease of use and portability. It features a clear LCD screen, intuitive buttons, and a durable construction.

Figure 3.1: Jumplushion A3006 Pen Type Digital Multimeter and accessories.
3.1 Components
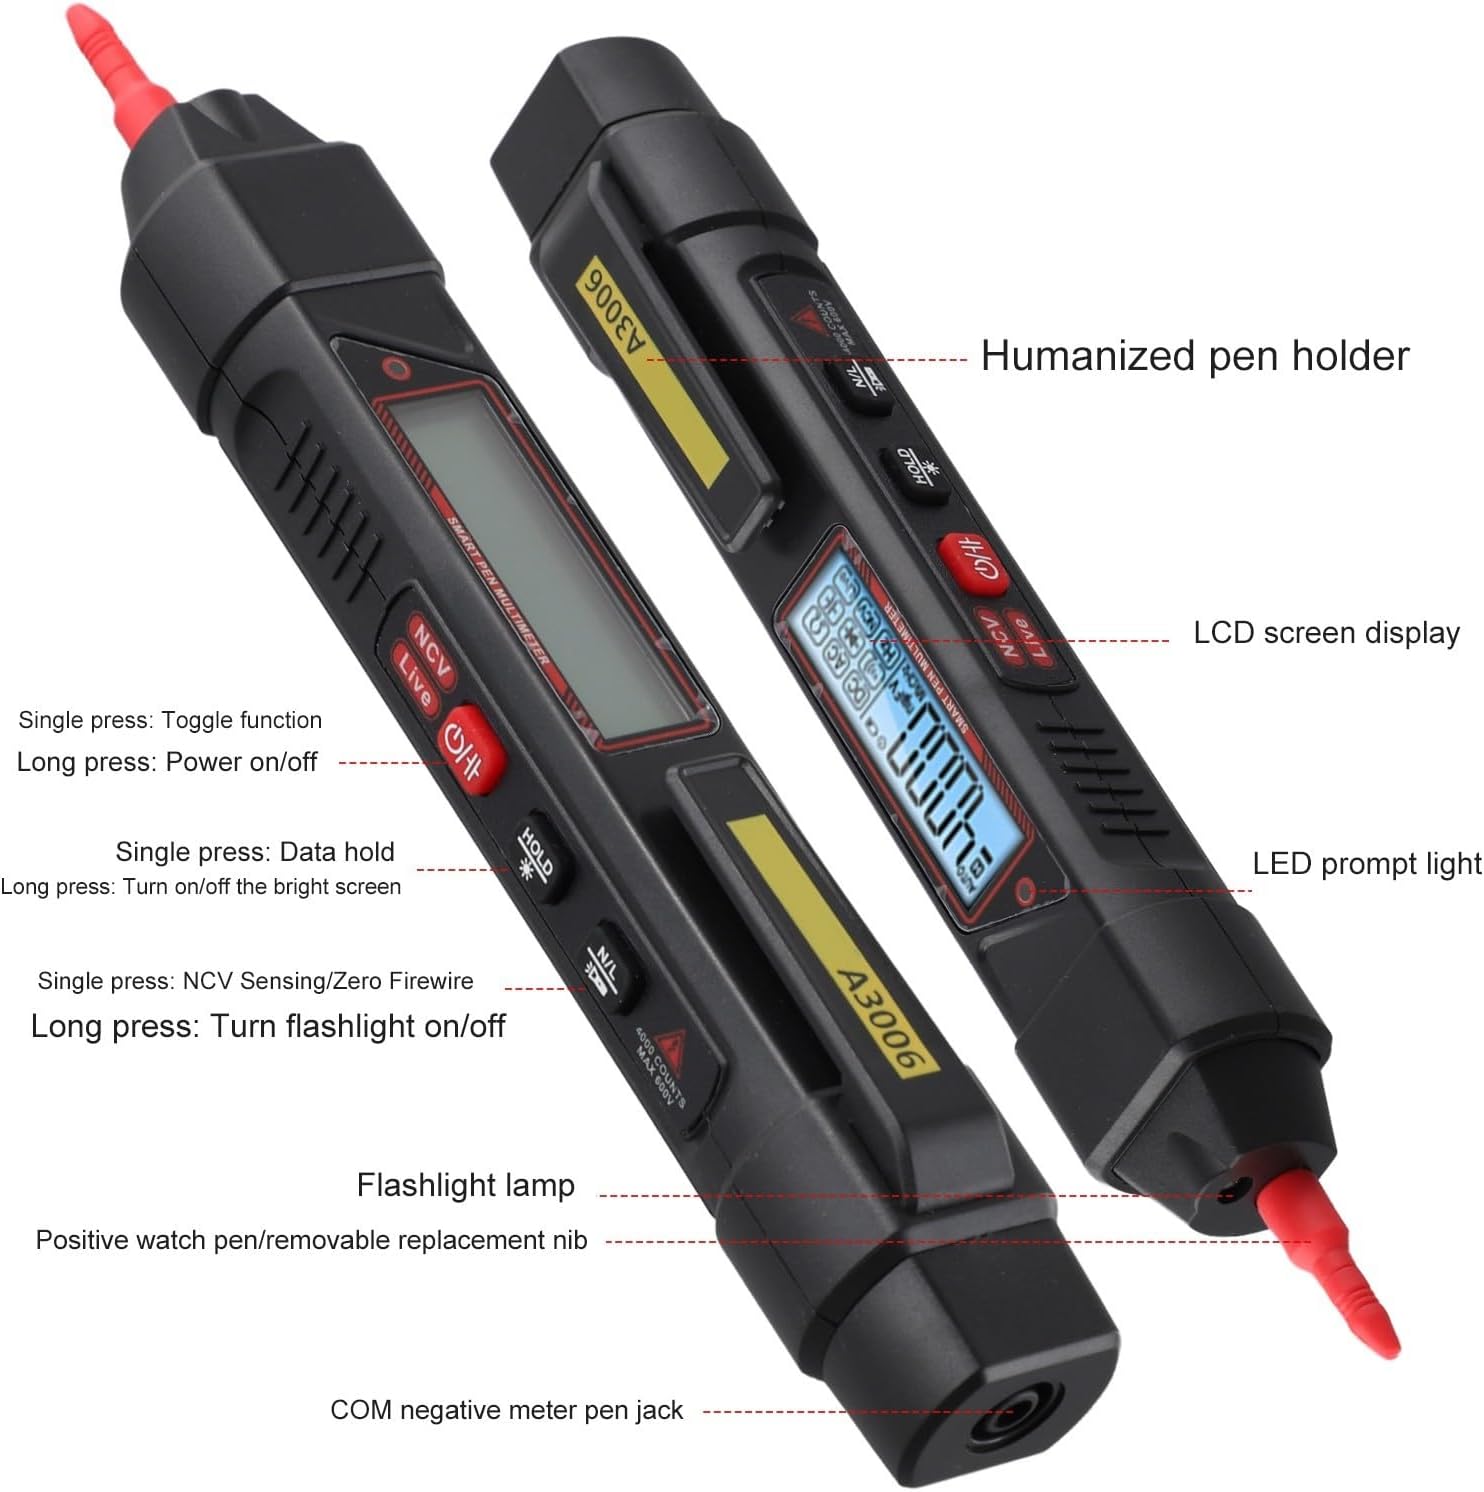
Figure 3.2: Key components and features of the A3006 multimeter.
- LCD Screen Display: Shows measurement readings and indicators.
- Humanized Pen Holder: For convenient storage and carrying.
- LED Prompt Light: Indicates live wire detection and NCV alerts.
- Flashlight Lamp: Provides illumination in dark environments.
- Positive Watch Pen/Removable Replacement Nib: The main test probe with a removable tip.
- COM Negative Meter Pen Jack: Connection point for the black test lead.
- Function Button (Toggle): Single press to toggle functions.
- Power On/Off Button: Long press to power on/off.
- Data Hold Button: Single press to hold data on screen.
- NCV Sensing/Zero Firewire Button: Single press for NCV, long press for flashlight.
4. Setup
4.1 Battery Installation
The A3006 multimeter requires 2 AAA batteries for operation. Ensure the device is powered off before installing or replacing batteries.

Figure 4.1: The removable tip and battery compartment location.
- Locate the battery compartment cover, usually at the rear or bottom of the device.
- Open the battery compartment cover.
- Insert 2 AAA batteries, observing the correct polarity (+ and -) as indicated inside the compartment.
- Close the battery compartment cover securely.
4.2 Attaching Test Leads
Connect the black test lead to the COM (common) jack and the red test lead to the positive input jack (usually indicated by a red color or specific function symbol).
5. Operating Instructions
The A3006 features an AUTO automatic range function, simplifying measurements. Long press the power button to turn the device on or off.

Figure 5.1: NCV and Live function buttons.
5.1 AC/DC Voltage Measurement
- Power on the multimeter. The device will automatically enter the AUTO measurement mode.
- Connect the red test lead to the positive side of the circuit and the black test lead to the negative side (or ground).
- The LCD screen will display the AC or DC voltage reading.
5.2 Resistance Measurement
- Ensure the circuit is de-energized before measuring resistance.
- Connect the test leads across the component to be measured.
- The multimeter will automatically detect and display the resistance value in Ohms (Ω).
5.3 Capacitance Measurement
- Ensure the capacitor is fully discharged before measurement.
- Connect the test leads across the capacitor terminals.
- The multimeter will display the capacitance value in Farads (F).
5.4 Neutral and Live Wire Identification
This function helps identify live wires without direct contact.
- Press the 'Live' button.
- Insert the test pen tip into the socket hole or near the wire.
- If a live wire is detected, the red indicator light will flash, and a buzzer alarm will sound.
5.5 NCV (Non-Contact Voltage) Induction
Used for detecting AC voltage without physical contact, useful for finding breakpoints in live lines.
- Press the 'NCV' button.
- Move the tip of the multimeter near the wire or electrical outlet.
- The device will indicate the presence of AC voltage with a flashing red light and an audible buzzer.
- To find a breakpoint, move the device along the live line. The connected position will show a bright red light and buzzer alarm, while the non-light position indicates the disconnection point.
5.6 Flashlight Function
Long press the NCV/Flashlight button to turn the built-in flashlight on or off for illumination in dark work areas.
5.7 Data Hold
Single press the 'HOLD' button to freeze the current reading on the display. Press again to release.
6. Maintenance
- Cleaning: Wipe the device with a dry, clean cloth. Do not use abrasive cleaners or solvents.
- Storage: Store the multimeter in a cool, dry place away from direct sunlight and extreme temperatures.
- Battery Replacement: Replace batteries when the low battery symbol appears on the display to ensure accurate readings. Remove batteries if the device will not be used for an extended period.
- Removable Pen Tip: The silver-plated stainless steel pen tip is removable for cleaning or replacement. It can be carefully rotated out using pliers if needed.
7. Troubleshooting
| Problem | Possible Cause | Solution |
|---|---|---|
| Device does not power on. | Low or dead batteries; incorrect battery polarity. | Replace batteries; ensure correct polarity. |
| Inaccurate readings. | Low battery; damaged test leads; improper connection. | Replace batteries; check test leads for damage; ensure secure connection. |
| NCV/Live function not working. | Not in correct mode; interference. | Ensure 'NCV' or 'Live' button is pressed; test in an area with less electrical noise. |
| Screen is dim or flickering. | Low battery. | Replace batteries. |
8. Specifications
| Parameter | Value |
|---|---|
| Model | A3006 |
| Maximum Count | 4000 counts |
| AC Voltage Range | 0.8V - 600V |
| DC Voltage Range | 0.8V - 600V |
| Resistance Range | 0.1Ω - 40MΩ |
| Capacitance Range | 0.01nF - 4mF |
| Frequency (Hz) | 10Hz - 10MHz |
| Diode Test | Yes |
| On-off Buzzer | Yes |
| Neutral Live Wire Identification | Yes |
| NCV Induction Electricity | Yes |
| Data Retention | Yes |
| Backlight Screen | Yes |
| Flashlight Lighting | Yes |
| Low Battery Symbol | Yes |
| Auto Shutdown | Yes (after 15 minutes of no use) |
| Probe Material | PVC/Brass |
| Probe Length | 93cm / 36.6inch |
| Battery Type | 2 x AAA batteries |
| Product Dimensions | 190 x 28.7 x 27.7mm (7.48 x 1.12 x 1.09 inches) |
| Item Weight | 4.2 ounces / 119 grams |
| Item Model Number (Manufacturer) | 32BXDNENHMV1K2LCUM3MBNR01BN |
9. Warranty and Support
For warranty information and technical support, please refer to the contact details provided with your purchase or visit the official Jumplushion website. Keep your purchase receipt as proof of purchase for any warranty claims.