OBEST 10 in 1
OBEST Digital Water Quality Tester User Manual
Model: 10 in 1
Brand: OBEST
Introduction
The OBEST 10-in-1 Digital Water Quality Tester is a versatile and accurate device designed for comprehensive water analysis. It can measure various parameters including pH, TDS, EC, Salinity, Temperature, H2, ORP, S.G, Fertility, and Resistivity (MΩ). This manual provides detailed instructions for the proper use, calibration, and maintenance of your water quality tester to ensure accurate and reliable results for a wide range of applications, from drinking water and aquariums to pools and hydroponics.

Figure 1: OBEST 10-in-1 Digital Water Quality Tester in use.
Product Features
- 10-in-1 Functionality: Measures TDS, Temperature (°C/°F), H2, pH, ORP, S.G, EC, Salinity, Fertility, and Resistivity (MΩ).
- Easy to Read Display: Compact and lightweight design with a large, backlit display screen for clear readings in various environments.
- High Accuracy: Equipped with a stainless steel temperature sensor and Automatic Temperature Compensation (ATC) for precise and rapid results.
- Data Hold Function: The HOLD/TEMP button allows locking the reading on the screen for convenient recording.
- Automatic Shutdown: Powers off automatically after 5 minutes of inactivity to conserve battery life.
- Wide Application: Suitable for testing water in pools, spas, aquariums, hydroponics, drinking water, and more.
- IP67 Waterproof Rating: Designed to withstand immersion, ensuring durability and reliability.

Figure 2: Overview of the 10 measurement parameters.
Package Contents
- OBEST 10-in-1 Digital Water Quality Tester
- User Manual
- Storage Case (assumed)
- Calibration Powders (pH 4.00, pH 6.86, pH 9.18 - assumed for calibration)
Product Overview
Familiarize yourself with the components of your OBEST water quality tester:
- LCD Display: Shows measurement readings, temperature, and battery status.
- Power Button: Turns the device on/off.
- HOLD/TEMP Button: Short press to hold data; long press to switch temperature units (°C/°F).
- MODE/CAL Button: Short press to cycle through measurement modes; long press to enter calibration mode.
- Electrode Probe: The sensing part that is immersed in the liquid.
- Battery Compartment: Located at the top, under the cap (assumed).


Figure 3: LCD Display and Electrode Head details.
Setup
1. Battery Installation
The device typically uses button cell batteries (e.g., LR44 or AG13, check device for specifics). To install or replace batteries:
- Unscrew the battery compartment cap at the top of the tester.
- Insert the batteries according to the polarity markings (+/-).
- Securely screw the cap back on.
2. Initial Preparation
Before first use, or after prolonged storage, ensure the electrode is clean and hydrated. Rinse the electrode with distilled water and gently wipe dry. For pH measurements, it is recommended to perform a calibration.
Operating Instructions
1. Power On/Off
- Press the Power Button (
 ) to turn the tester on.
 - Press and hold the Power Button again to turn the tester off.
2. Mode Selection
Short press the MODE/CAL Button to cycle through the different measurement modes (e.g., pH, TDS, EC, Salinity, H2, ORP, S.G, Fertility, MΩ). The current mode will be displayed on the screen.
Figure 4: One-click switching of multiple functions.
3. Measurement Procedure
- Turn on the tester and select the desired measurement mode.
- Immerse the electrode probe into the liquid to be tested. Do not immerse beyond the maximum immersion line.
- Gently stir the solution and wait for 6-10 seconds for the reading to stabilize.
- Press the HOLD/TEMP Button to lock the reading on the screen for easy recording. Press again to release.
- After measurement, rinse the electrode with pure water and wipe it dry before storing.
4. Temperature Unit Conversion
Long press the HOLD/TEMP Button to switch between Celsius (°C) and Fahrenheit (°F) temperature units.

Figure 5: Temperature unit conversion.
5. Specific Measurement Details
TDS (Total Dissolved Solids) Measurement
TDS indicates the total concentration of dissolved substances in water. Lower TDS generally means purer water.

Figure 6: TDS value reference table.
pH Measurement
pH measures the acidity or alkalinity of a solution. A pH of 7 is neutral, below 7 is acidic, and above 7 is alkaline.

Figure 7: pH value measuring range.
EC (Electrical Conductivity) Measurement
EC measures the electrical conductivity of water, which is directly related to the concentration of dissolved ionized solids in the water.
Figure 8: EC Value Measurement.
Salinity Measurement
Measures the salt content in water. Important for marine aquariums, aquaculture, and food processing.

Figure 9: Salinity Value Measurement and Nutrient Solution Concentration.
Nutrient Solution Fertility Measurement
This function helps assess the concentration of nutrients in solutions, particularly useful for plant growth in hydroponics.
Refer to Figure 9 for concentration guidelines:
- 0-1: Low concentration, not suitable for plant growth.
- 1-3: Moderate concentration, suitable for plant growth.
- 3+: High concentration, may need dilution.
ORP (Oxidation-Reduction Potential) Measurement
ORP measures the ability of water to cleanse itself or break down contaminants. Higher ORP values indicate greater oxidizing potential.
H2 (Hydrogen) Measurement
Measures the concentration of dissolved hydrogen in water, often associated with antioxidant properties.
Resistivity (MΩ) Measurement
Resistivity is the inverse of conductivity and indicates the purity of water. Higher resistivity means purer water.
Calibration
Regular calibration ensures the accuracy of your tester. pH calibration is crucial for precise pH readings.
pH Calibration (Three-Point Calibration Recommended)
You will need pH buffer solutions (e.g., pH 6.86, pH 4.00, pH 9.18).
- Prepare three clean beakers with pH 6.86, pH 4.00, and pH 9.18 buffer solutions, respectively.
- Turn on the tester and switch to pH mode.
- Rinse the electrode with distilled water and blot dry.
- Immerse the electrode into the pH 6.86 buffer solution.
- Long press the MODE/CAL Button until "CAL" appears and the reading starts flashing. The tester will automatically recognize the buffer solution.
- Wait for the reading to stabilize and the display to show "END" or a stable value, indicating successful calibration for that point.
- Rinse the electrode with distilled water and blot dry.
- Repeat steps 4-6 for pH 4.00 buffer solution, then for pH 9.18 buffer solution.
- After completing all three points, the tester is calibrated.
Note: If the calibration fails or readings are unstable, ensure the buffer solutions are fresh and the electrode is clean. Recalibrate if readings seem inaccurate.
Maintenance
1. Cleaning the Electrode
Always rinse the electrode with pure water (distilled or deionized water) after each use to prevent contamination and ensure accurate future readings. Gently wipe the electrode with a clean, soft cloth or tissue. Do not scrub or use abrasive materials.
2. Storage
Store the tester in a cool, dry place. For pH electrodes, it is crucial to keep the electrode moist. If your tester comes with a protective cap, ensure it contains a small amount of electrode storage solution or pH 4.00 buffer solution to prevent the electrode from drying out. Never store the electrode dry or in distilled water.
3. Battery Replacement
When the battery indicator on the display shows low power, replace the batteries as described in the "Setup" section. Dispose of old batteries responsibly.
4. Waterproof Rating (IP67)
The OBEST tester is rated IP67 waterproof, meaning it is protected from dust and can withstand immersion in water up to 1 meter for 30 minutes. While durable, avoid prolonged immersion or exposure to high-pressure water jets.

Figure 10: IP67 Waterproof feature.
Troubleshooting
| Problem | Possible Cause | Solution |
|---|---|---|
| Inaccurate readings | Electrode is dirty or dry; Tester needs calibration; Expired buffer solutions. | Clean the electrode; Perform calibration; Use fresh buffer solutions. |
| Display shows "Err" or "---" | Measurement range exceeded; Sensor malfunction; Low battery. | Ensure sample is within measurement range; Contact customer service if persistent; Replace batteries. |
| Tester does not turn on | Dead batteries; Incorrect battery installation. | Replace batteries; Check battery polarity. |
| Slow response time | Electrode is dirty or aged; Temperature difference between sample and electrode. | Clean the electrode; Allow electrode to equilibrate with sample temperature; Consider electrode replacement if very old. |
Specifications
| Parameter | Range | Accuracy |
|---|---|---|
| pH | 0.01 - 14.00 pH | ±0.05 pH (typical) |
| TDS | 0 - 200000 ppm, 0.1 - 200.0 ppt | ±2% F.S. |
| EC | 0 - 200000 us/cm | ±2% F.S. |
| Salinity | 0 - 20% | ±0.5% (0-10%), ±1% (10-20%) |
| Temperature | 0.1 - 60.0°C (32.0 - 140.0°F) | ±0.5°C |
| H2 | 0 - 2400 ppb | ±10 ppb |
| ORP | 0 - ±1999 mV | ±5 mV |
| S.G | 1.000 - 1.222 | N/A |
| Fertility | 0 - 3 | N/A |
| Resistivity (MΩ) | 50Ω - 20MΩ | N/A |
| Automatic Temperature Compensation (ATC) | 0 - 60°C (32 - 140°F) | |
| Waterproof Rating | IP67 | |
| Power Supply | Button Cell Batteries (e.g., LR44/AG13, not included) | |
| Dimensions | 18.5 cm (Height) x 3.7 cm (Width) x 2.4 cm (Depth) | |
| Weight | Approx. 175 g | |
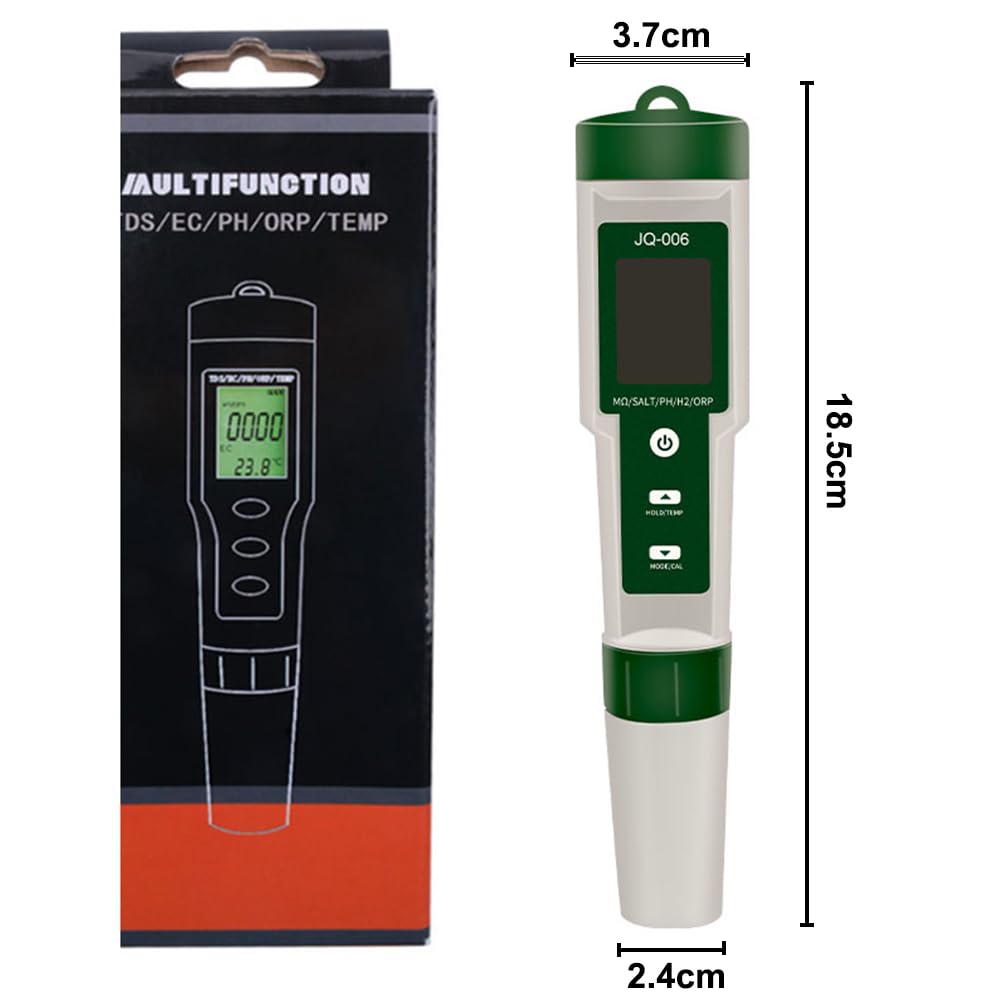
Figure 11: Product Dimensions.
Warranty and Customer Support
OBEST provides a one-year warranty for this product from the date of purchase, as stated in the product features. This warranty covers manufacturing defects and malfunctions under normal use.
For any questions, technical support, or warranty claims, please contact OBEST customer service. You can typically reach them via the contact information provided on the product packaging or through the seller's platform where the product was purchased. Please provide your purchase details and product model number when contacting support.
Ask a question about this manual
Ask about setup, troubleshooting, compatibility, parts, safety, or missing instructions. Manuals+ will review the question and use this page’s manual context to help answer it.