VLOXO Docreate-757
VLOXO Battery Spot Welder Model Docreate-757 Instruction Manual
Comprehensive guide for safe and effective operation.
1. Introduction
Thank you for choosing the VLOXO Battery Spot Welder Model Docreate-757. This portable, handheld spot welder is designed for efficient welding of nickel strips to various battery types, including cylindrical and button batteries. It features an integrated design for one-handed operation, an LCD screen for clear settings display, 99 adjustable gears, and dual operating modes (automatic and manual). Please read this manual thoroughly before use to ensure proper operation and safety.

Image 1.1: VLOXO Battery Spot Welder with included accessories.
2. Safety Information
Always prioritize safety when operating electrical tools. Failure to follow these instructions may result in injury or damage to the device.
- Eye Protection: Always wear appropriate eye protection (safety glasses or goggles) to shield against sparks and debris during welding.
- Ventilation: Use the device in a well-ventilated area to avoid inhaling fumes.
- Material Compatibility: This spot welder is designed for welding nickel-plated sheets, stainless iron sheets, or stainless steel sheets. Do not attempt to weld copper or aluminum, as this can damage the device and pose a safety risk.
- Temperature Protection: The device features an intelligent temperature detection system. If the internal temperature exceeds 65°C (149°F), the device will automatically power off to prevent overheating. Allow the device to cool down before resuming operation.
- Battery Safety: Ensure batteries being welded are in good condition and handled according to their specific safety guidelines.
- Children and Pets: Keep the device out of reach of children and pets.
- Power Source: Use only the provided Type-C charging cable for charging.
- Storage: Store the device in a dry, cool place when not in use.
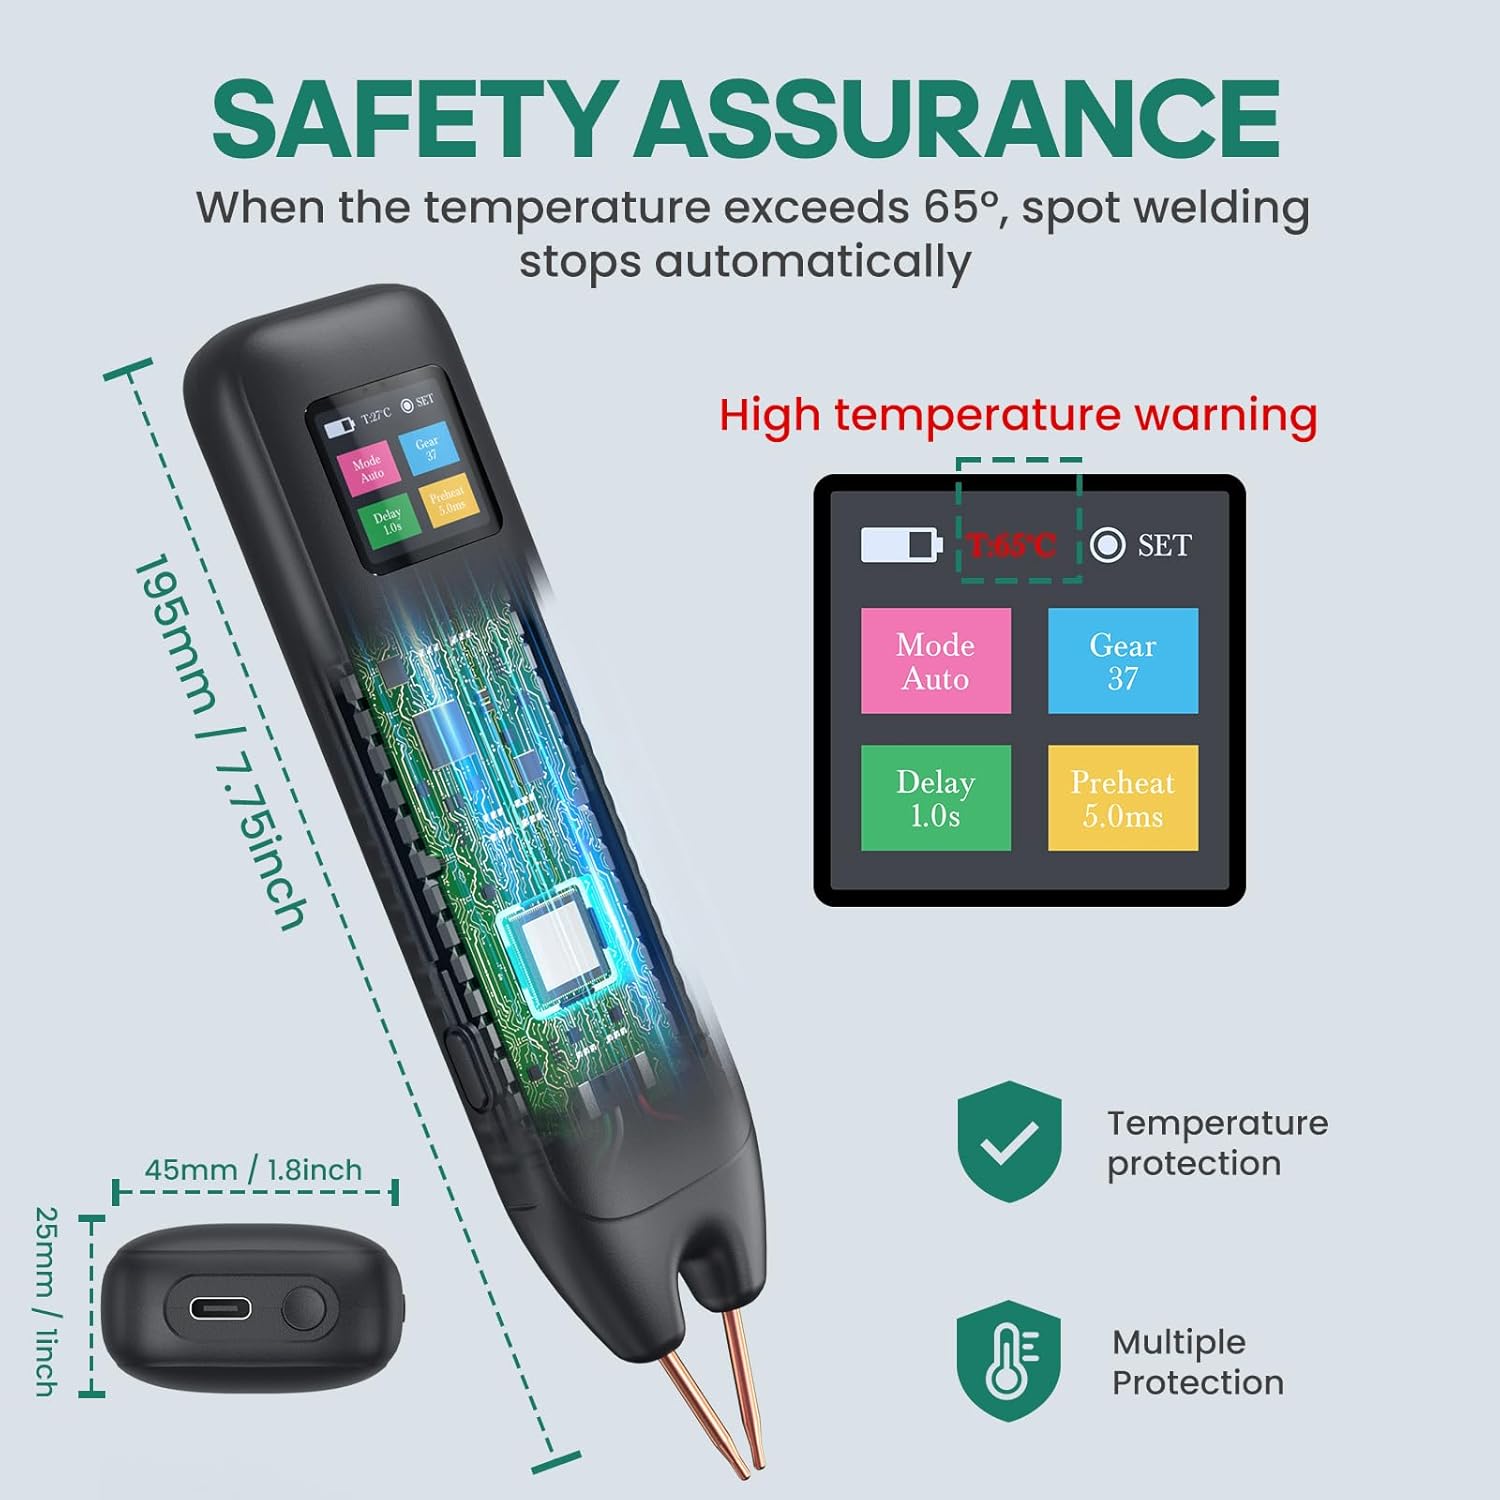
Image 2.1: Safety features including temperature protection and multiple safeguards.
3. Package Contents
Please check the package contents upon receipt to ensure all items are present:
- 1 x VLOXO Spot Welder Host
- 1 x Welding Pen Cover
- 2 x Copper Needles (spare)
- 1 x 2m Nickel Roll
- 1 x Frosted Paper (Sandpaper)
- 1 x Type-C Charging Cable
- 1 x User Manual

Image 3.1: Contents of the VLOXO Battery Spot Welder package.
4. Product Overview and Features
The VLOXO Battery Spot Welder is designed for portability and ease of use, offering precise welding capabilities for various battery applications.
- Integrated Design: Power supply and welding pen are combined for convenient one-handed operation.
- LCD Digital Display: Provides real-time information on mode, gear setting, preheating time, and delay. Allows access to settings for language, sleep time, and screen brightness.
- Dual Modes: Choose between Automatic and Manual welding modes for increased flexibility.
- 99 Adjustable Gears: Fine-tune the output power (0-99 gears) to match the thickness of the nickel strip and achieve optimal weld quality. Features dual pulse output for precise welding.
- Multi-Protection Design: Includes intelligent temperature detection and automatic power-off at 65°C to ensure safe operation.
- Wide Application: Suitable for welding nickel-plated, stainless iron, or stainless steel sheets for cylindrical batteries, button batteries, and other electronic devices.

Image 4.1: Detailed view of the LCD digital display and its functions.
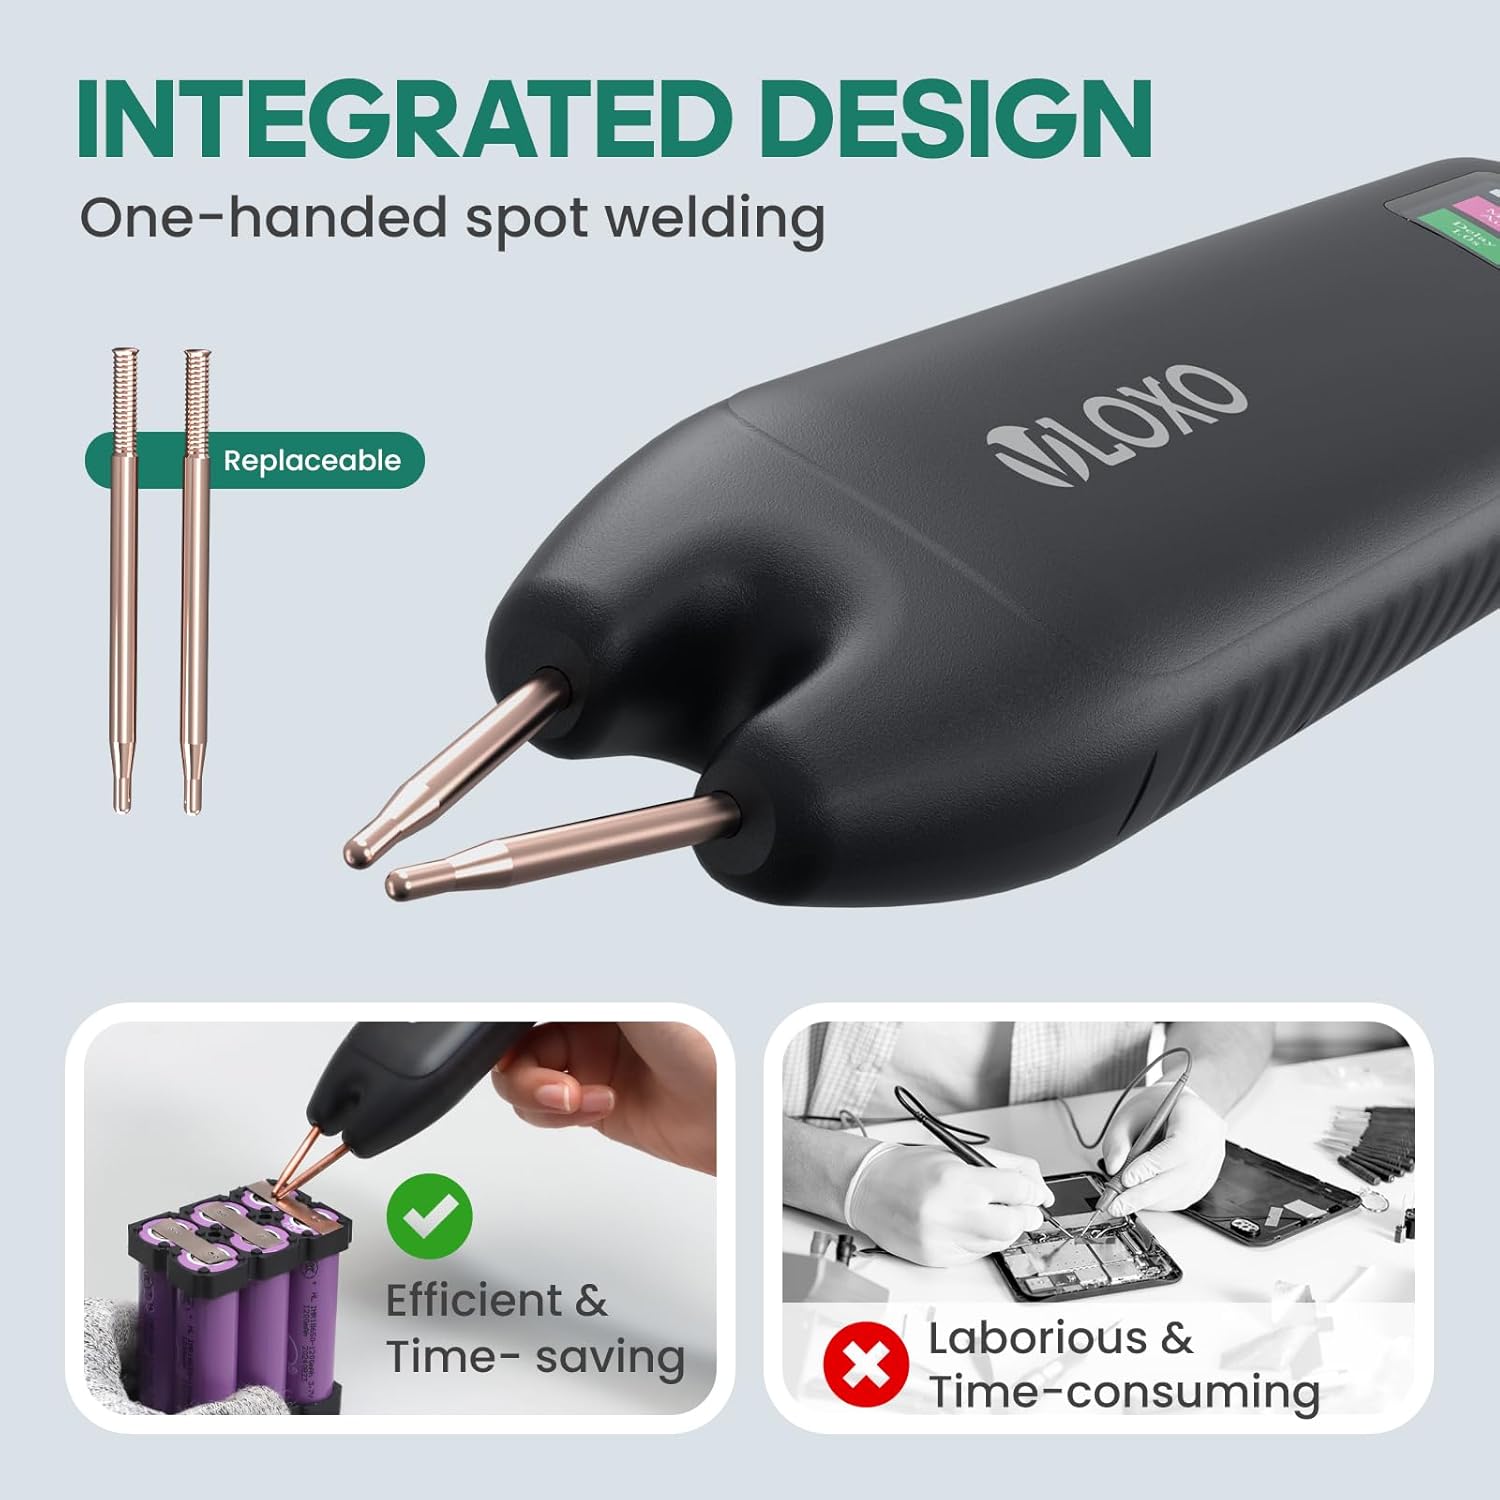
Image 4.2: The integrated design of the spot welder, highlighting replaceable tips and one-handed use.
5. Setup
- Initial Charging: Before first use, fully charge the spot welder using the provided Type-C charging cable. Connect the cable to the charging port on the device and a suitable USB power adapter (not included). The LCD screen will indicate charging status. Ensure the battery is fully charged for optimal performance.
- Power On: Press and hold the power switch for 2-3 seconds to turn on the device. The LCD screen will illuminate.
- Prepare Materials:
- Ensure the nickel strips and battery terminals are clean. Use the included frosted paper (sandpaper) to lightly abrade surfaces if necessary to remove oxidation or debris.
- Position the nickel strip securely on the battery terminal where the weld is to be made.

Image 5.1: Information on charging the VLOXO Spot Welder via Type-C and battery life indicators.
6. Operating Instructions
6.1. Understanding the LCD Display
The LCD screen provides critical information and allows for setting adjustments:
- Mode: Displays "Mode Auto" or "Mode Manual".
- Gear: Shows the current power level (0-99).
- Delay: Indicates the welding delay time.
- Preheat: Shows the preheating time.
- Battery Indicator: Displays current battery level.
- Temperature: Real-time temperature display.
- SET Button: Click to enter the settings menu for language, sleep time, screen brightness, etc.
6.2. Mode Selection and Gear Adjustment
The device offers two welding modes and 99 adjustable power gears.
- Select Mode: Use the appropriate button (refer to device interface) to switch between "Mode Auto" and "Mode Manual".
- Adjust Gear: Use the adjustment button (refer to device interface) to set the desired power level from 0 to 99.
- A higher gear setting provides more output power, suitable for thicker nickel strips (0.1-0.25mm).
- If the weld point is black, lower the gear. If the molten pool is too small, increase the gear.
- Smoking during welding is a normal phenomenon.
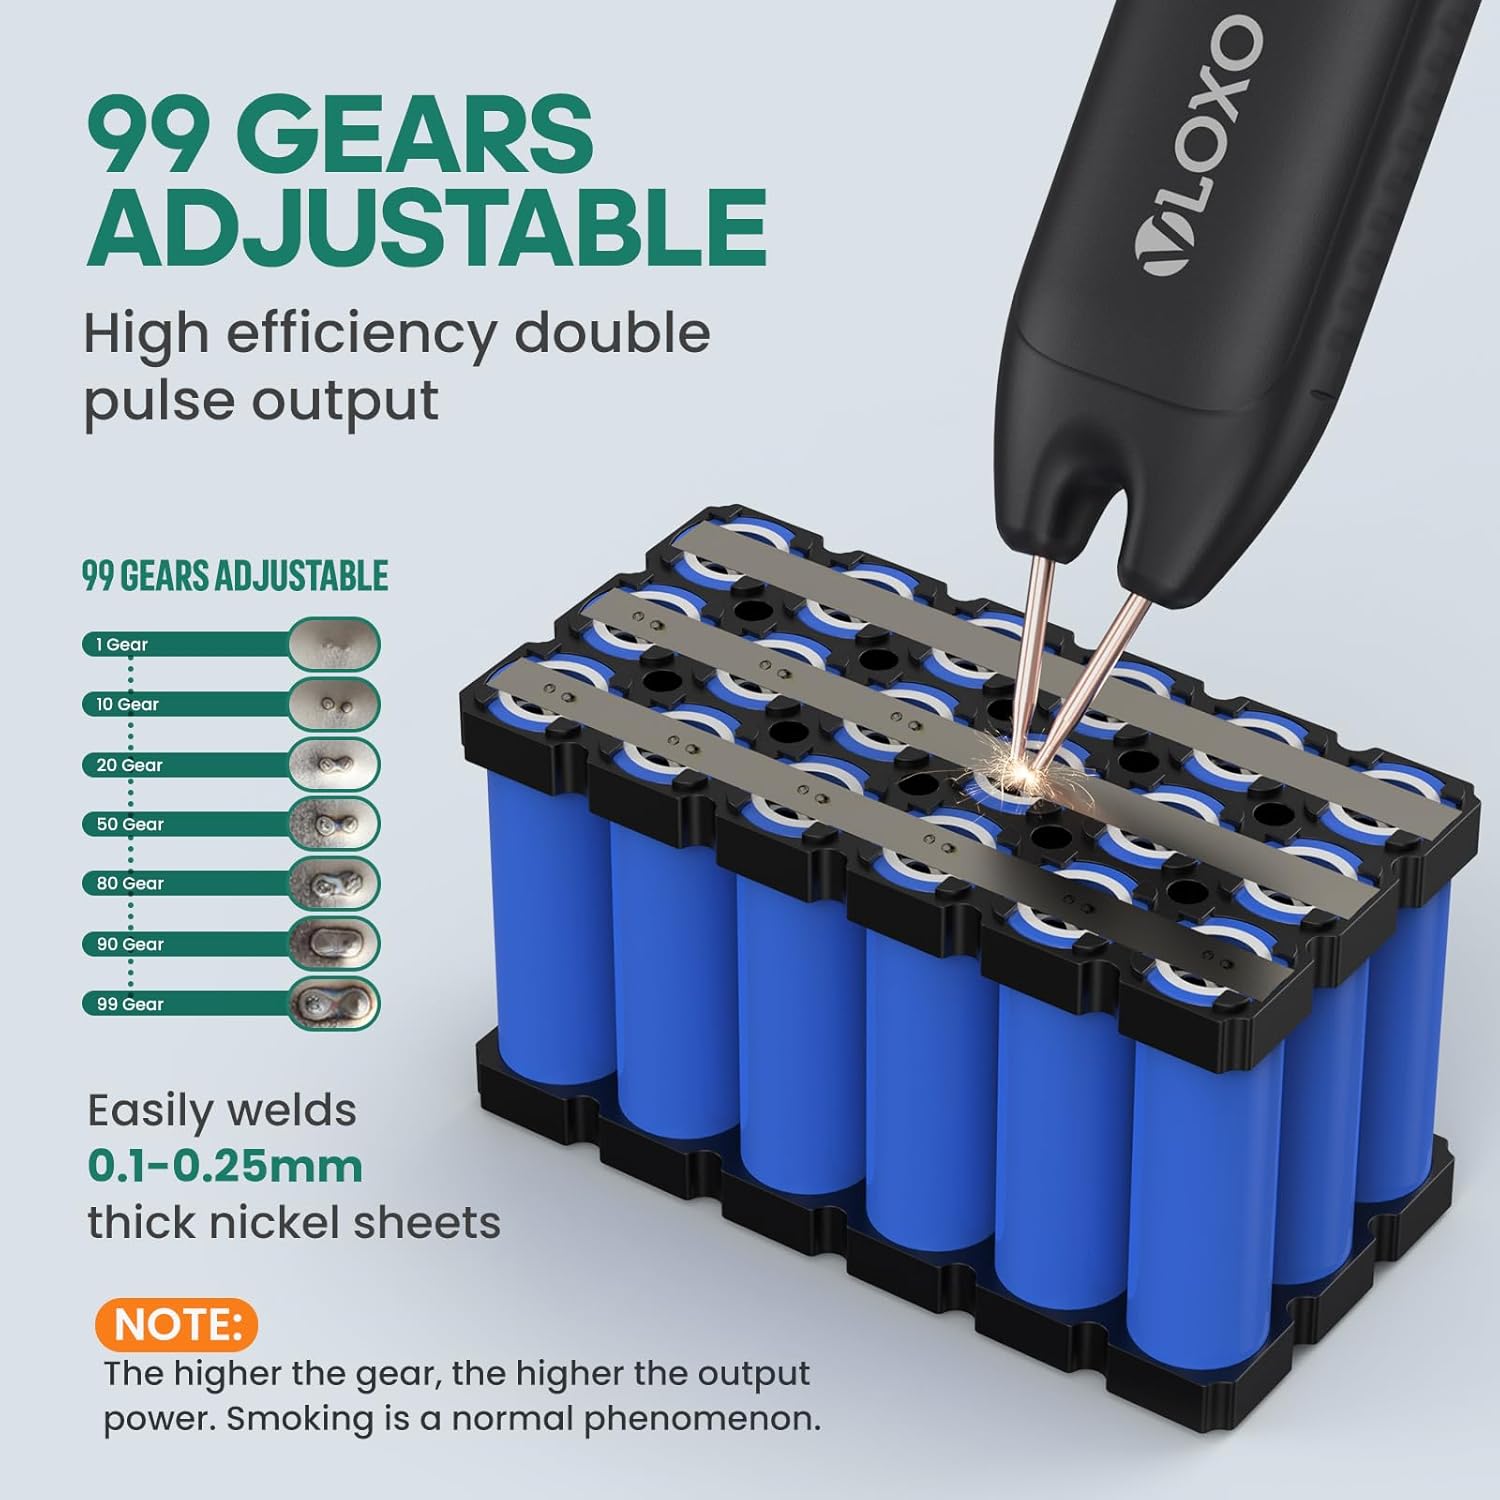
Image 6.1: Illustration of 99 adjustable gears and their effect on weld quality.

Image 6.2: Comparison of Automatic and Manual welding modes.
6.3. Welding Process
- Positioning: Hold the spot welder at a 45° to 60° angle relative to the welding surface. This angle facilitates easier and more effective welding.
- Contact:
- Automatic Mode: After setting the mode, simply make both welding pens fully contact the material. The spot welding will be automatically triggered after the set delay time.
- Manual Mode: After setting the mode, first make both welding pens fully contact the material, and then press the power button to initiate the weld.
- Ensure Proper Contact: It is crucial that both welding pens touch the material simultaneously to ensure a consistent and strong weld. Uneven contact can lead to poor weld quality.
- Inspect Weld: After each weld, visually inspect the joint for firmness and appearance. Adjust gear settings as needed.

Image 6.3: Step-by-step guide on how to use the VLOXO Spot Welder, including power on, material selection, mode/gear selection, and welding angle.

Image 6.4: Recommended welding angles and compatible materials (nickel sheet) versus incompatible materials (copper or aluminum).
7. Charging and Battery Life
The VLOXO Battery Spot Welder is equipped with a rechargeable Lithium Metal battery.
- Charging Method: Use the included Type-C charging cable.
- Charging Indicator: The LCD screen displays the battery level and charging status.
- Battery Life: A fully charged welder can perform approximately 1000 spot welds on 0.1mm material. Actual performance may vary based on gear setting and material thickness.
- Charging While Operating: The device can be used while charging, providing continuous operation if needed.
Image 7.1: Visual representation of the rechargeable battery and Type-C charging.
8. Maintenance
- Cleaning Welding Tips: Regularly inspect the copper needles for wear or oxidation. Use the included frosted paper (sandpaper) to clean the tips if they become dirty or oxidized, ensuring good electrical contact.
- Replacing Copper Needles: If the copper needles become excessively worn, replace them with the spare needles provided in the package.
- General Cleaning: Wipe the device with a dry, soft cloth to remove dust and debris. Do not use harsh chemicals or immerse the device in water.
- Storage: Store the spot welder in a clean, dry environment away from direct sunlight and extreme temperatures.
9. Troubleshooting
| Problem | Possible Cause | Solution |
|---|---|---|
| Device does not power on. | Low battery; Power button not pressed long enough; Device malfunction. | Charge the device fully. Press and hold the power button for 2-3 seconds. If problem persists, contact customer support. |
| Poor weld quality (e.g., weak welds, black spots, small molten pool). | Incorrect gear setting; Dirty welding tips; Uneven contact; Incompatible material. | Adjust the gear setting (increase for small molten pool, decrease for black spots). Clean welding tips with sandpaper. Ensure both tips make simultaneous, firm contact. Confirm material is nickel-plated, stainless iron, or stainless steel. |
| Device automatically shuts off during operation. | Overheating (temperature exceeded 65°C). | Allow the device to cool down completely before resuming use. Operate in a well-ventilated area. |
| LCD screen is dim or unresponsive. | Low battery; Screen brightness setting. | Charge the device. Access the settings menu via the SET button to adjust screen brightness. |
10. Specifications
| Feature | Detail |
|---|---|
| Model Number | Docreate-757 |
| Brand | VLOXO |
| Dimensions | 7.72 x 1.61 x 0.98 inches (195mm x 45mm x 25mm) |
| Item Weight | 5.1 ounces |
| Material | ABS |
| Power Source | Battery Powered (1 Lithium Metal battery included) |
| Charging Port | Type-C |
| Adjustable Gears | 0-99 |
| Welding Thickness | 0.1-0.25mm nickel sheets |
| Automatic Shut-off Temperature | 65°C (149°F) |
11. Warranty and Support
For warranty information or technical support, please contact VLOXO customer service through the retailer where the product was purchased or visit the official VLOXO website. Please retain your proof of purchase for warranty claims.