1. Introduction
This manual provides essential information for the safe and effective operation, maintenance, and troubleshooting of your INGCO Cordless Angle Grinder, Model CAGLI271532. Please read and understand all instructions before using the tool. Keep this manual for future reference.
2. Safety Instructions
Always observe basic safety precautions to reduce the risk of fire, electric shock, and personal injury. This tool is designed for grinding, sanding, wire brushing, and cutting operations. Do not use this tool for purposes other than those specified.
General Power Tool Safety Warnings
- Work Area Safety: Keep the work area clean and well-lit. Cluttered or dark areas invite accidents. Do not operate power tools in explosive atmospheres, such as in the presence of flammable liquids, gases, or dust.
- Electrical Safety: Avoid body contact with earthed or grounded surfaces. Do not expose power tools to rain or wet conditions.
- Personal Safety: Always wear eye protection, hearing protection, and a dust mask when operating the angle grinder. Use appropriate personal protective equipment (PPE) such as gloves and sturdy footwear. Dress properly; avoid loose clothing or jewelry.
- Tool Use and Care: Do not force the power tool. Use the correct power tool for your application. Disconnect the battery pack from the power tool before making any adjustments, changing accessories, or storing power tools.
- Battery Tool Use and Care: Recharge only with the charger specified by the manufacturer. Use power tools only with specifically designated battery packs.
- Service: Have your power tool serviced by a qualified repair person using only identical replacement parts.
Specific Safety Warnings for Grinding Operations
- Always use the auxiliary handle.
- Ensure the guard is correctly positioned and secure before use.
- Do not use damaged discs. Inspect discs before each use for chips, cracks, or excessive wear.
- Maintain a firm grip on the tool.
- Keep hands clear of the rotating disc.
- Be aware of sparks and flying debris. Ensure no flammable materials are nearby.

Image: A worker demonstrating the safe use of the angle grinder, wearing appropriate personal protective equipment.
3. Package Contents
Verify that all items listed below are included in your package. If any parts are missing or damaged, contact your retailer.
- 1x INGCO Cordless Angle Grinder (CAGLI271532)
- 2x 20V 4.0 Ah Lithium-ion Batteries
- 1x Battery Charger (220-240V~50/60Hz)
- 10x Abrasive Cutting Discs (115mm)
- 1x Auxiliary Handle
- 1x Combination Wrench
- 1x Carrying Case
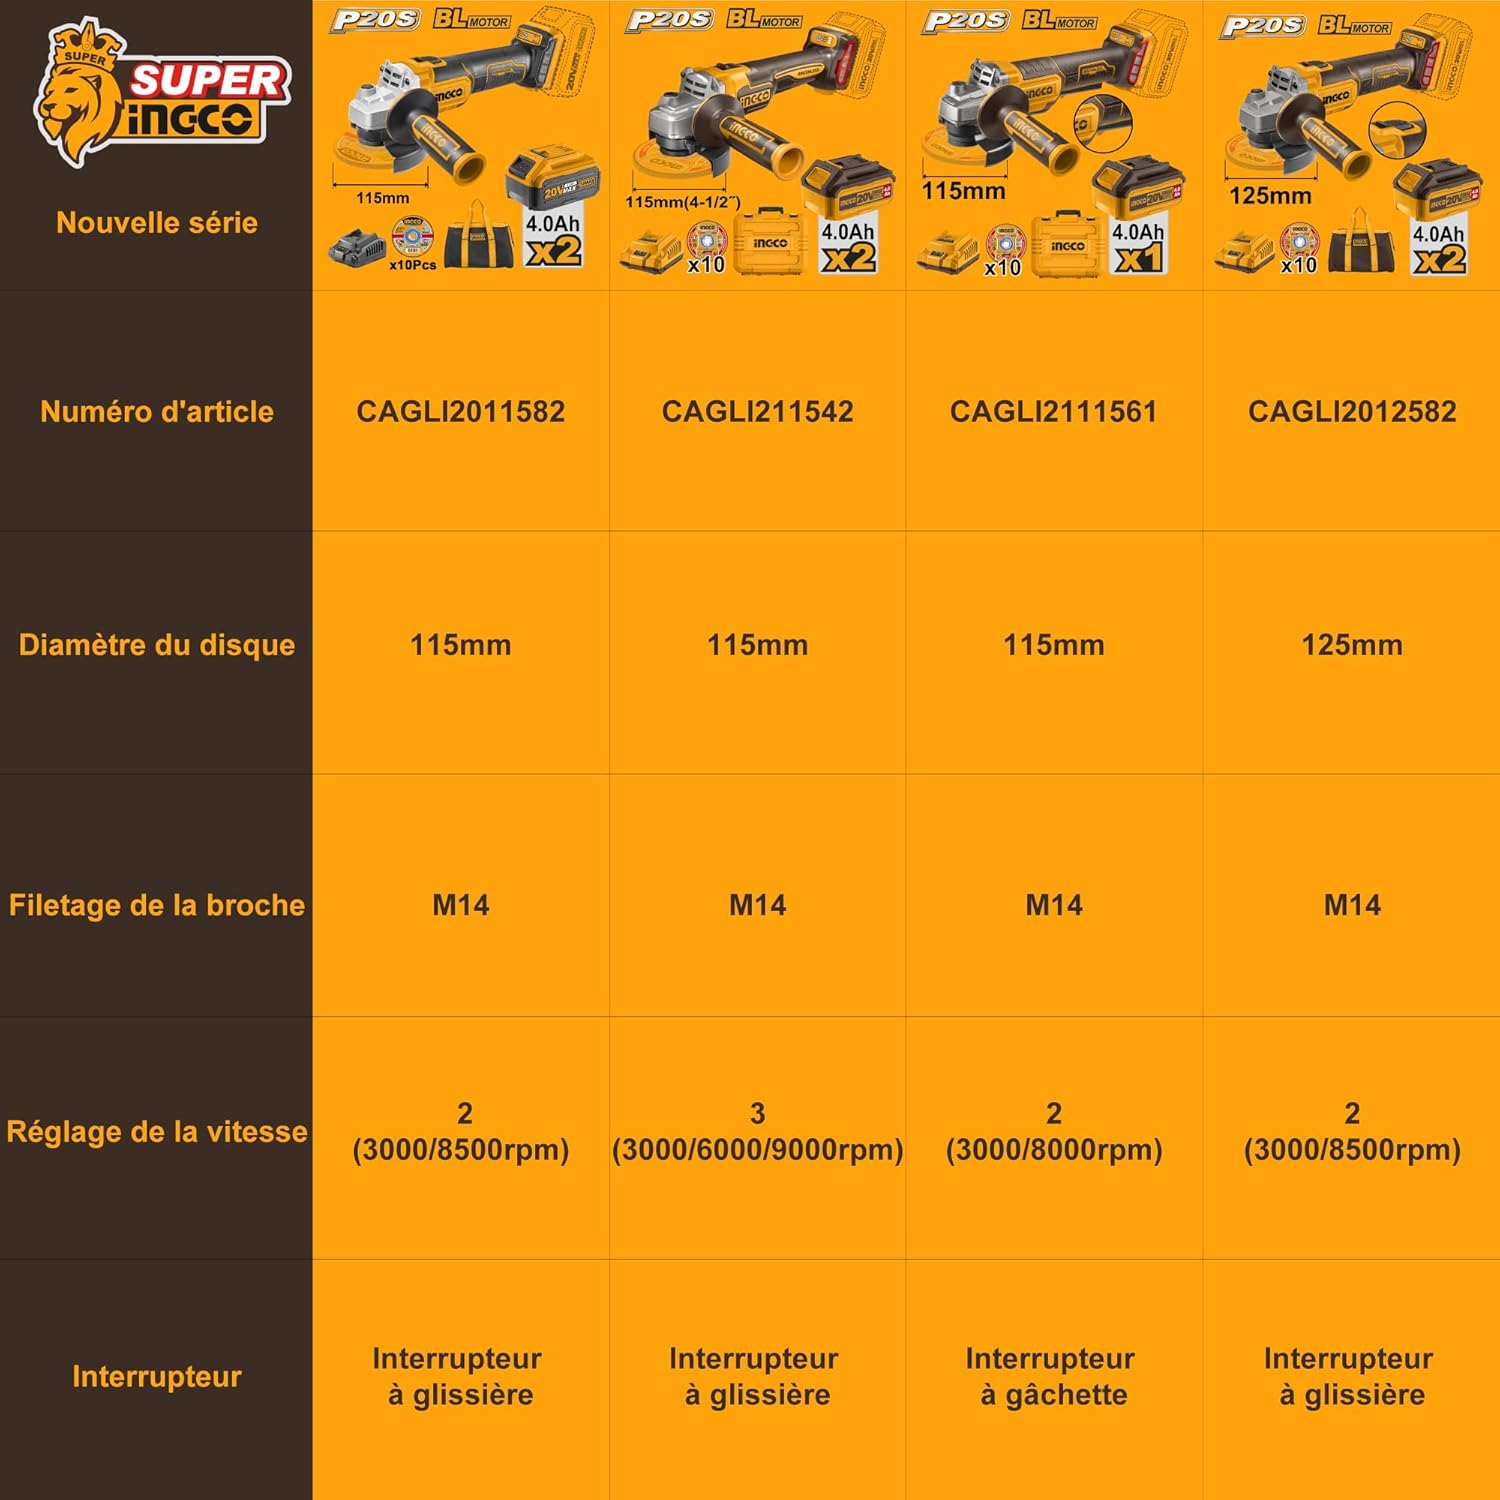
Image: The complete kit of the INGCO Cordless Angle Grinder, showing all included accessories.
4. Product Overview (Components)
Familiarize yourself with the different parts of your angle grinder before operation.

Image: Labeled diagram of the INGCO Cordless Angle Grinder components.
- Ergonomic Body Design: For comfortable and secure handling.
- Lock Switch: For continuous operation.
- Aluminum Gear Housing: Durable housing for the gear mechanism.
- Metal Wheel Guard: Protects the user from sparks and debris.
- Auxiliary Handle: Provides additional grip and control.
- Dust Screen: Helps prevent dust ingress into the motor.
- Brushless Motor: Provides efficient power and extended tool life.
- Three-Speed Regulation: Allows adjustment of rotation speed.
5. Specifications
Technical data for the INGCO Cordless Angle Grinder CAGLI271532.

Image: Detailed parameter information for the angle grinder.
| Feature | Specification |
|---|---|
| Model Number | CAGLI271532 |
| Voltage | 20 Volts |
| Wattage | 1000 Watts |
| Motor Type | Brushless |
| Disc Diameter | 115 mm |
| Spindle Thread | M14 |
| No-load Speed | 3000 / 6000 / 9000 rpm (3-speed variable) |
| Battery Type | Lithium-ion |
| Battery Capacity | 2x 4.0 Ah |
| Charger Input | 220-240V~50/60Hz |
| Weight | 5.3 kg (with battery) |
6. Setup
6.1 Battery Installation
- Ensure the angle grinder is switched off.
- Align the battery pack with the battery port on the tool.
- Slide the battery pack into the port until it clicks securely into place.
- To remove, press the battery release button and slide the battery out.
6.2 Auxiliary Handle Attachment
- Screw the auxiliary handle into one of the threaded holes on the gear housing.
- Tighten the handle firmly by hand. Ensure it is secure before operation.
- The handle can be attached to either side for left or right-handed use.
6.3 Disc Installation
- Disconnect the battery pack before changing discs.
- Press and hold the spindle lock button.
- Use the provided combination wrench to loosen and remove the outer flange nut by turning it counter-clockwise.
- Place the desired 115mm grinding or cutting disc onto the inner flange, ensuring it sits flat.
- Replace the outer flange nut and tighten it clockwise with the wrench while holding the spindle lock button. Do not overtighten.
- Ensure the disc guard is properly adjusted to protect against sparks and debris, covering as much of the disc as possible.
7. Operation
7.1 Power On/Off
- To start the tool, slide the lock switch forward.
- For continuous operation, push the switch further forward until it locks into place.
- To stop the tool, release the switch or, if locked, press the rear part of the switch to disengage the lock.
7.2 Speed Adjustment
This angle grinder features a 3-speed variable control for different applications.

Image: Illustration of the 3-speed regulation feature.
- The speed selection button is located on the tool body.
- Press the button to cycle through the available speeds: 3000 rpm, 6000 rpm, and 9000 rpm.
- Select a lower speed for polishing or delicate materials, and a higher speed for aggressive grinding or cutting of hard materials.
7.3 Grinding and Cutting Techniques
- Allow the disc to reach full speed before contacting the workpiece.
- Apply light, even pressure. Do not force the tool, as this can cause kickback or damage the disc.
- For grinding, hold the tool at a 15-30 degree angle to the workpiece.
- For cutting, hold the tool perpendicular to the workpiece and make straight cuts. Avoid twisting or bending the disc.
- Always work away from your body.
8. Maintenance
8.1 Cleaning
- Disconnect the battery pack before cleaning.
- Regularly clean the ventilation slots to prevent overheating. Use a soft brush or compressed air.
- Wipe the tool housing with a damp cloth. Do not use harsh chemicals or abrasive cleaners.
8.2 Battery Care
- Store batteries in a cool, dry place away from direct sunlight and extreme temperatures.
- Do not store batteries in a discharged state for extended periods. Recharge them periodically.
- Only use the INGCO charger provided with the tool.
8.3 Disc Replacement
Replace discs when they are worn down, chipped, or cracked. Refer to section 6.3 for disc installation instructions.
9. Troubleshooting
This section addresses common issues you might encounter. For problems not listed here, contact customer support.
| Problem | Possible Cause | Solution |
|---|---|---|
| Tool does not start | Battery not charged or improperly installed | Charge battery fully; ensure battery is securely clicked into place. |
| Tool stops during operation | Battery is depleted or tool is overloaded | Recharge battery; reduce pressure on the tool. |
| Excessive vibration | Disc is damaged or improperly installed | Inspect disc for damage and replace if necessary; ensure disc is correctly seated and flange nut is tightened. |
| Reduced performance | Ventilation slots blocked or disc is worn | Clean ventilation slots; replace worn disc. |
10. Warranty and Support
INGCO products are manufactured to high-quality standards and are warranted against defects in materials and workmanship. For specific warranty terms and conditions, please refer to the warranty card included with your product or visit the official INGCO website.
For technical support, spare parts, or service inquiries, please contact your local INGCO dealer or authorized service center. Keep your purchase receipt as proof of purchase for warranty claims.